一、前言
AIDL是Android中IPC(Inter-Process Communication)方式中的一种,AIDL是Android Interface definition language的缩写,AIDL的作用是绑定一个其他APP的service,用于进程间的通讯。
在Android系统中,每个进程都运行在一块独立的内存中,在其中完成自己的各项活动,与其他进程都分隔开来。可是有时候我们又有应用间进行互动的需求,比较传递数据或者任务委托等,AIDL就是为了满足这种需求而诞生的。通过AIDL,可以在一个进程中获取另一个进程的数据和调用其暴露出来的方法,从而满足进程间通信的需求。
二、使用
1、创建服务项目

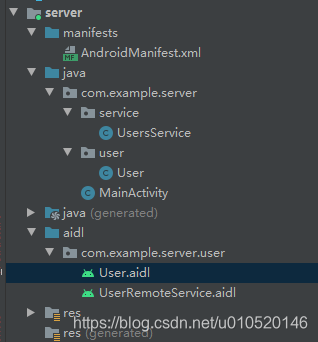
(1)定义aidl接口UserRemoteService和实体类User.aidl
UserRemoteService.aidl
package com.example.server.user;

import com.example.server.user.User;
interface UserRemoteService {
    User getUserByid(int id);
    int addUser(in  User user);//in 为客户端传输数据到服务端,out 为服务端传输数据到客户端
    void showToast(String msg);
}
User.aidl
package com.example.server.user;
parcelable User;
(2)编写java代码
User.java
public class User implements Parcelable, Serializable {

    private int id;
    private String username;
    private String password;

    public User() {
    }

    public User(int id, String username, String password) {
        this.id = id;
        this.username = username;
        this.password = password;
    }

    public User(Parcel in) {
        id = in.readInt();
        username = in.readString();
        password = in.readString();
    }

    public static final Creator<User> CREATOR = new Creator<User>() {
        @Override
        public User createFromParcel(Parcel in) {
            return new User(in);
        }

        @Override
        public User[] newArray(int size) {
            return new User[size];
        }
    };

    public int getId() {
        return id;
    }

    public void setId(int id) {
        this.id = id;
    }

    public String getUsername() {
        return username;
    }

    public void setUsername(String username) {
        this.username = username;
    }

    public String getPassword() {
        return password;
    }

    public void setPassword(String password) {
        this.password = password;
    }

    @Override
    public int describeContents() {
        return 0;
    }

    @Override
    public void writeToParcel(Parcel parcel, int flags) {
        parcel.writeInt(id);
        parcel.writeString(username);
        parcel.writeString(password);
    }

    @Override
    public String toString() {
        return "User{" +
                "id=" + id +
                ", username='" + username + '\'' +
                ", password='" + password + '\'' +
                '}';
    }
}
注意:在构造函数中读取数据,读取的顺序要和写入的顺序一样,必须按照成员变量声明的顺序来,不然对象传输会丢失数据!已踩坑!
(3)编写服务service
UsersService.java
public class UsersService extends Service {

    @Override
    public void onCreate() {
        super.onCreate();
    }

    @Override
    public int onStartCommand(Intent intent, int flags, int startId) {
        return super.onStartCommand(intent, flags, startId);
    }

    @Nullable
    @Override
    public IBinder onBind(Intent intent) {
        return new UserRemoteService.Stub(){

            @Override
            public User getUserByid(int id) throws RemoteException {
                User user = new User(id,"123456","lss0555");
                return user;
            }

            @Override
            public int addUser(User user) throws RemoteException {
                Log.e("添加用户:",""+user.toString());
                return 1;
            }

            @Override
            public void showToast(String msg) throws RemoteException {
                Handler handler=new Handler(Looper.getMainLooper());
                handler.post(new Runnable(){
                    public void run(){
                        Toast.makeText(getApplicationContext(), "服务提示:"+msg, Toast.LENGTH_LONG).show();
                    }
                });
            }
        };
    }
}
(4)配置启动服务
在 AndroidManifest.xml 声明服务
<service android:name=".service.UsersService"
            android:enabled="true"
            android:exported="true">
            <intent-filter>
                <action android:name="com.example.server.service.UsersService"/>
            </intent-filter>
</service>
在界面种进行启动服务
Intent service = new Intent(getApplicationContext(),UsersService.class);
startService(service);
2、创建客户端项目

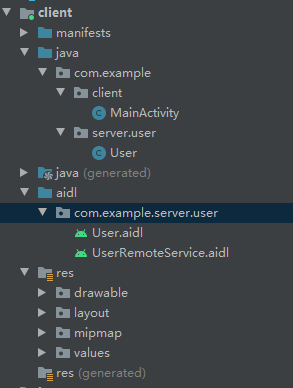
定义aidl
将服务的User.aidl、User.java、UserRemoteService.aidl复制到项目下,文件的路径必须一致!
测试类,连接远程服务,调用
MainActivity.java
public class MainActivity extends AppCompatActivity {
    private UserRemoteService userRemoteService;
    private ServiceConnection conn = new ServiceConnection() {
        @Override
        public void onServiceDisconnected(ComponentName name) {
            Toast.makeText(getApplicationContext(),"服务已断开",Toast.LENGTH_SHORT).show();
            userRemoteService = null;
        }

        @Override
        public void onServiceConnected(ComponentName name, IBinder service) {
            Toast.makeText(getApplicationContext(),"服务连接成功",Toast.LENGTH_SHORT).show();
            userRemoteService = UserRemoteService.Stub.asInterface(service);
        }
    };

    @Override
    protected void onCreate(Bundle savedInstanceState) {
        super.onCreate(savedInstanceState);
        setContentView(R.layout.activity_main);

        Intent intent = new Intent();
        intent.setPackage("com.example.server");
        intent.setAction("com.example.server.service.UsersService");
        bindService(intent, conn, Service.BIND_AUTO_CREATE);
    }

    //获取用户信息
    public void getUserInfo(View view) {
        try {
            User user = userRemoteService.getUserByid(888);
            Log.e("用户信息:",""+user.toString());
        } catch (RemoteException e) {
            e.printStackTrace();
        }
    }

    //添加用户
    public void addUser(View view) {
        try {
            User user = new User(33, "lss0555", "123");
            int addUser = userRemoteService.addUser(user);
            Toast.makeText(getApplicationContext(),"结果:"+addUser,Toast.LENGTH_SHORT).show();
        } catch (RemoteException e) {
            e.printStackTrace();
        }
    }

    //提示功能
    public void maketip(View view) {
        try {
            userRemoteService.showToast("hello world");
        } catch (RemoteException e) {
            e.printStackTrace();
        }
    }

    @Override
    protected void onDestroy() {
        super.onDestroy();
        if(conn!=null){
            unbindService(conn);
        }
    }
}
测试:
com.example.server E/添加用户:: User{id=33, username='lss0555', password='123'}

com.example.client E/用户信息:: User{id=888, username='123456', password='lss0555'}