flutter学习之基础组件(六)
本次主要学习一些Flutter中的常见的按钮组件以及自定义按钮组件
一、Flutter中的按钮组件介绍
Flutter里有很多的Button 组件很多,参考下表

1.0和2.0的区别就是,1.0的好的属性需要在外部配置,2.0都是放在style里面去配置了
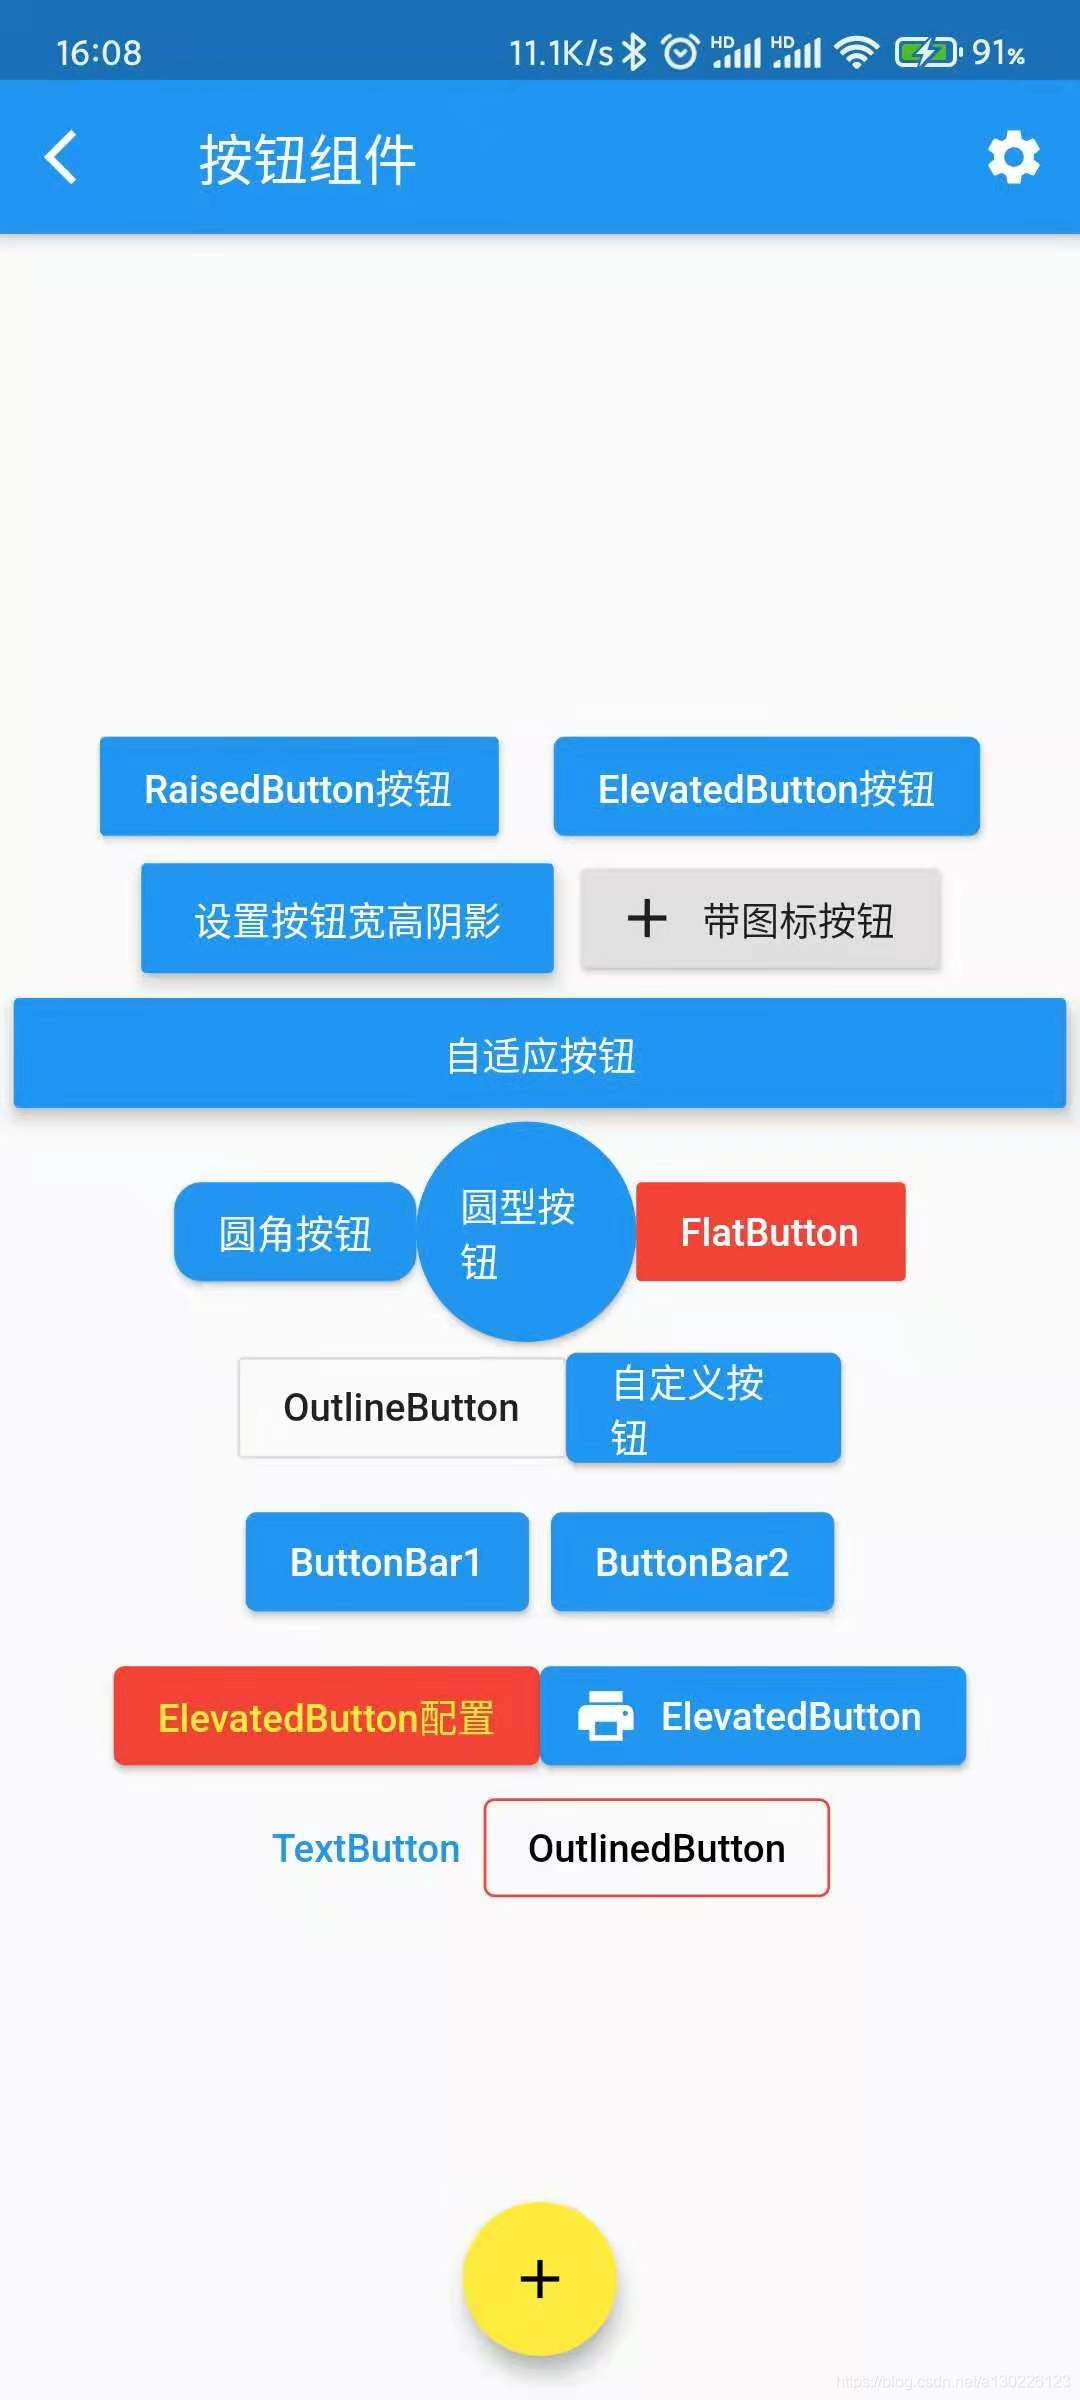
二、各种按钮使用
效果:
相关代码:
import 'package:flutter/cupertino.dart';
import 'package:flutter/material.dart';
import 'package:flutter_view_demo/myProject/main/CurrentTab.dart';

class TestFifteen extends StatefulWidget {
  const TestFifteen({Key? key}) : super(key: key);

  @override
  _TestFifteenState createState() => _TestFifteenState();
}

class _TestFifteenState extends State<TestFifteen> {
  @override
  Widget build(BuildContext context) {
    return Scaffold(
      appBar: AppBar(
        title: Text("按钮组件"),
        leading: Icon(Icons.arrow_back_ios),
        actions: [IconButton(onPressed: () {}, icon: Icon(Icons.settings))],
      ),
      floatingActionButton: FloatingActionButton(
        onPressed: () {
          Navigator.of(context).pushAndRemoveUntil(
              new MaterialPageRoute(builder: (context) => new CurrentTab(currentIndex:0)),
                  (route) => route == null);  //所有路由都置为空,在跳转到指定页面
        },
        child: Icon(Icons.add,color: Colors.black,),
        backgroundColor: Colors.yellow,
      ),
      floatingActionButtonLocation: FloatingActionButtonLocation.centerFloat, //设置floatingActionButton位置
      body: Column(
        mainAxisAlignment: MainAxisAlignment.center,
        children: [
          Row(
            mainAxisAlignment: MainAxisAlignment.center,
            children: [
              RaisedButton(
                onPressed: () {},
                color: Colors.blue,
                textColor: Colors.white,
                child: Text("RaisedButton按钮"),
              ),
              SizedBox(width: 20),
              ElevatedButton(
                onPressed: () {},
                child: Text("ElevatedButton按钮"),
              )
            ],
          ),
          Row(
            mainAxisAlignment: MainAxisAlignment.center,
            children: [
              Container(
                width: 150,
                height: 40,
                child: RaisedButton(
                  onPressed: () {},
                  color: Colors.blue,
                  textColor: Colors.white,
                  elevation: 5,
                  child: Text("设置按钮宽高阴影"),
                ),
              ),
              SizedBox(
                width: 10,
              ),
              RaisedButton.icon(
                  onPressed: () {},
                  icon: Icon(Icons.add),
                  label: Text("带图标按钮")),
            ],
          ),
          Row(
            mainAxisAlignment: MainAxisAlignment.center,
            children: [
              Expanded(
                  child: Container(
                margin: EdgeInsets.all(5),
                height: 40,
                child: RaisedButton(
                  onPressed: () {},
                  color: Colors.blue,
                  textColor: Colors.white,
                  elevation: 5,
                  child: Text("自适应按钮"),
                ),
              )),
            ],
          ),
          Row(
            mainAxisAlignment: MainAxisAlignment.center,
            children: [
              RaisedButton(
                onPressed: () {},
                color: Colors.blue,
                textColor: Colors.white,
                shape: RoundedRectangleBorder(
                    borderRadius: BorderRadius.circular(10)),
                child: Text("圆角按钮"),
              ),
              Container(
                width: 80,
                height: 80,
                child: RaisedButton(
                  onPressed: () {},
                  color: Colors.blue,
                  textColor: Colors.white,
                  splashColor: Colors.red,
                  //长按水波纹颜色
                  shape: CircleBorder(side: BorderSide(color: Colors.blue)),
                  child: Text("圆型按钮"),
                ),
              ),
              FlatButton(
                onPressed: () {},
                child: Text("FlatButton"),
                color: Colors.red,
                textColor: Colors.white,
              )
            ],
          ),
          Row(
            mainAxisAlignment: MainAxisAlignment.center,
            children: [
              OutlineButton(onPressed: () {}, child: Text("OutlineButton")),
              MyBotton(
                width: 100.0,
                height: 40.0,
                pressed: () {},
                text: "自定义按钮",
              )
            ],
          ),
          Row(
            mainAxisAlignment: MainAxisAlignment.center,
            children: [
              ButtonBar(
                children: [
                  ElevatedButton(
                    onPressed: () {},
                    child: Text("ButtonBar1"),
                  ),
                  ElevatedButton(
                    onPressed: () {},
                    child: Text("ButtonBar2"),
                  )
                ],
              )
            ],
          ),
          Row(
            mainAxisAlignment: MainAxisAlignment.center,
            children: [
              ElevatedButton(
                onPressed: () {},
                child: Text("ElevatedButton配置"),
                style: ButtonStyle(
                  backgroundColor: MaterialStateProperty.all(Colors.red),
                  foregroundColor: MaterialStateProperty.all(Colors.yellow),
                ),
              ),
              ElevatedButton.icon(
                  onPressed: () {},
                  icon: Icon(Icons.print),
                  label: Text("ElevatedButton"))
            ],
          ),
          Row(
            mainAxisAlignment: MainAxisAlignment.center,
            children: [
              TextButton(onPressed: () {}, child: Text("TextButton")),
              OutlinedButton(
                onPressed: () {},
                child: Text("OutlinedButton"),
                style: ButtonStyle(
                    foregroundColor: MaterialStateProperty.all(Colors.black),
                    side: MaterialStateProperty.all(
                        BorderSide(color: Colors.red, width: 1))),
              ),
            ],
          ),

        ],
      ),
    );
  }
}

//自定义按钮组件
class MyBotton extends StatelessWidget {
  final width;
  final height;
  final pressed;
  final text;

  const MyBotton(
      {this.width = 80.0,
      this.height = 30.0,
      this.pressed = null,
      this.text = ""})
      : super();

  @override
  Widget build(BuildContext context) {
    return Container(
      width: this.width,
      height: this.height,
      child: ElevatedButton(
        onPressed: this.pressed,
        child: Text(this.text),
      ),
    );
  }
}
三、FloatingActionButton实现底部中间bottomNavigationBar
效果图:

在Scaffold中创建floatingActionButton,并且设置floatingActionButton的位置,调整盖到中间bottomNavigationBar的item的图标,在设置点击floatingActionButton的时候,调用刷新页面属性
class _CurrentTabState extends State<CurrentTab> {
  int _currentIndex = 0;
  _CurrentTabState(currentIndex){
    this._currentIndex = currentIndex;
  }

  List<Widget> _pageList = [
    HomePage(),
    AddPage(),
    MyPage()
  ];

  @override
  Widget build(BuildContext context) {
    return Scaffold(
      // appBar: AppBar(
      //   title: Text("flutter学习"),
      // ),
      floatingActionButton: Container(
   //     margin: EdgeInsets.only(top: 10),   //修改上边距
        height: 70,
        width: 70,
        padding: EdgeInsets.all(8),
        decoration: BoxDecoration(
          borderRadius: BorderRadius.circular(40),
          color: Colors.white
        ),
        child: FloatingActionButton(
          onPressed: () {
            setState(() {
              this._currentIndex = 1;
            });
          },
          child: Icon(Icons.add,color: this._currentIndex == 1 ? Colors.white:Colors.black,size: 28,),
          backgroundColor: this._currentIndex == 1 ? Colors.red:Colors.yellow,
        ),
      ),
      floatingActionButtonLocation: FloatingActionButtonLocation.centerDocked,
      body: _pageList[_currentIndex],
      bottomNavigationBar: BottomNavigationBar(
        currentIndex: _currentIndex,
        onTap: (int index){
          setState(() {
            _currentIndex = index;
          });
        },
        fixedColor: Colors.pinkAccent[100],
        type: BottomNavigationBarType.fixed,
        items: [
          BottomNavigationBarItem(icon: Icon(Icons.home), title: Text("首页")),
          BottomNavigationBarItem(icon: Icon(Icons.home), title: Text("添加")),
          BottomNavigationBarItem(icon: Icon(Icons.home), title: Text("我的")),
        ],
      ),
    );
  }
}