一、使用步骤
1、导入相关库支持库,最新版本请查看安卓官网:https://developer.android.com/jetpack/androidx/versions?hl=zh-cn
官方使用指导请查看:https://developer.android.com/guide/navigation?hl=zh-cn,官方使用讲解的很清楚,大部分第三方资料都是基于官方文档编写,包括本文档。
dependencies {
  def nav_version = "2.3.5"

  // Java language implementation
  implementation "androidx.navigation:navigation-fragment:$nav_version"
  implementation "androidx.navigation:navigation-ui:$nav_version"

  // Kotlin
  implementation "androidx.navigation:navigation-fragment-ktx:$nav_version"
  implementation "androidx.navigation:navigation-ui-ktx:$nav_version"

  // Feature module Support
  implementation "androidx.navigation:navigation-dynamic-features-fragment:$nav_version"

  // Testing Navigation
  androidTestImplementation "androidx.navigation:navigation-testing:$nav_version"

  // Jetpack Compose Integration
  implementation "androidx.navigation:navigation-compose:2.4.0-alpha03"
}
2. 新建navigation xml文件,我们称这个文件问导航图,navigation graph,
1.? 在“Project”窗口中,右键点击?res?目录,然后依次选择?New > Android Resource File。此时系统会显示?New Resource File?对话框。
2.? 在?File name?字段中输入名称,例如“nav_graph”。
3.? 从?Resource type?下拉列表中选择?Navigation,然后点击?OK。
新建导航图后,会有一个直观的画面可以看到fragment的跳转关系,方便用户直观查看。
导航图文件结构如下:
<navigation xmlns:android="http://schemas.android.com/apk/res/android"
    xmlns:app="http://schemas.android.com/apk/res-auto"
    xmlns:tools="http://schemas.android.com/tools"
    android:id="@+id/nav_graph"
    app:startDestination="@id/firstFragment">

    <fragment
        android:id="@+id/firstFragment"
        android:name="com.xmcc.androidbasesample.fragment.navigation.FirstFragment"
        android:label="fragment_first"
        tools:layout="@layout/fragment_first" >
        <action
            android:id="@+id/action_firstFragment_to_secondFragment"
            app:destination="@id/secondFragment" />
        <action
            android:id="@+id/action_firstFragment_to_settingsFragment"
            app:destination="@id/settingsFragment" />
    </fragment>
    <fragment
        android:id="@+id/secondFragment"
        android:name="com.xmcc.androidbasesample.fragment.navigation.SecondFragment"
        android:label="fragment_second"
        tools:layout="@layout/fragment_second" >
        <action
            android:id="@+id/action_secondFragment_to_firstFragment"
            app:destination="@id/firstFragment" />
    </fragment>
    <fragment
        android:id="@+id/settingsFragment"
        android:name="com.xmcc.androidbasesample.SettingsFragment"
        android:label="SettingsFragment" />
</navigation>
其中action元素为跳转标记,使用代码跳转时,将会使用到该action元素中的id,如下
Navigation.findNavController(it).navigate(R.id.action_firstFragment_to_secondFragment)导航图中在根元素navigation中有app:startDestination="@id/firstFragment",表示第一个进入的fragment
3. 完成导航图创建后,我们需要将导航图添加到导航宿主activity中,新建一个空的activity,在xml中添加如下内容,
<?xml version="1.0" encoding="utf-8"?>
<androidx.constraintlayout.widget.ConstraintLayout
    ...>

    <androidx.fragment.app.FragmentContainerView
        ...

        android:name="androidx.navigation.fragment.NavHostFragment"
        app:defaultNavHost = "true"
        app:navGraph = "@navigation/nav_graph"

        ...
        />

</androidx.constraintlayout.widget.ConstraintLayout>
其中有3个属性比较关键,
- android:name?属性包含?NavHost?实现的类名称。
- app:navGraph?属性将?NavHostFragment?与导航图相关联。导航图会在此?NavHostFragment?中指定用户可以导航到的所有目的地。
- app:defaultNavHost="true"?属性确保您的?NavHostFragment?会拦截系统返回按钮。请注意,只能有一个默认?NavHost。如果同一布局(例如,双窗格布局)中有多个宿主,请务必仅指定一个默认?NavHost。
注意:FragmentContainerView必须要有一个id,否则会包如下错误,
Caused by: java.lang.IllegalStateException: FragmentContainerView must have an android:id to add Fragment androidx.navigation.fragment.NavHostFragment
至此,您已经完成了navigation最基本得创建和使用,当然navigation功能还有很多。
二、navigation跳转
navigation跳转方向如下,
1. fragment -> fragment
2. fragment -> activity, activity是导航图的一个端点,相当于调用了,startActivity(xxx)函数,当导航到另一个activity时,当前的导航图将不在处于作用域内,使用如下activity标签,
<activity
    android:id="@+id/testNavigationActivity"
    android:name="com.xmcc.androidbasesample.fragment.navigation.TestNavigationActivity"
    android:label="TestNavigationActivity" />
3. fragment -> dialogFragment,需要在导航图中新建一个dialog标签的destination,否则将不会出现dialog效果,只会和普通的fragment一样,diaolog标签如下,
<dialog
    android:id="@+id/my_dialog_fragment"
    android:name="com.xmcc.androidbasesample.fragment.navigation.NavigationDialogFragment">
    <action
        android:id="@+id/myDialogAction"
        app:destination="@+id/destinationNameXXX"/>
</dialog>
这里备注下fragment 生命周期:
onAttach -> onCreate -> onCreateView -> onViewCreated -> onActivityCreated -> onStart -> onResume
fragment跳转时:onPause -> onStop -> onDestroyView
fragment结束时:onPause -> onStop -> onDestroyView -> onDestroy -> onDetach
4. 通过导航图跳转到带scheme的activity
androidmanifest.xml中定义如下activity
<activity android:name=".fragment.navigation.TestSchemeActivity">
    <intent-filter tools:ignore="AppLinkUrlError">
    <action android:name="android.intent.action.VIEW" />
        <data android:host="example.com"
              android:scheme="https"/>
                <category android:name="android.intent.category.DEFAULT"/>
    </intent-filter>
</activity>
在导航图中定义如下destination,
<activity
    android:id="@+id/testSchemeActivity"
    android:label="activity_test_scheme"
    app:action="android.intent.action.VIEW"
    app:data="https://example.com"
    app:targetPackage="${applicationId}"
    tools:layout="@layout/activity_test_scheme" />
其中targetPackage用来限定当前应用,不加时,会出现多个应用选择。
5. scheme动态参数
与上一条类似,参数略有不同,导航图中配置如下
<activity
    android:id="@+id/testDynamicSchemeActivity"
    android:label="activity_test_dynamic_scheme"
    app:action="android.intent.action.VIEW"
    app:dataPattern="https://example.com?userId={userId}"
    app:targetPackage="${applicationId}"
    tools:layout="@layout/activity_test_dynamic_scheme" >
    <argument android:name="userId"
        app:argType="string"/>
</activity>
使用时传参如下
findNavController().navigate(
    R.id.action_firstFragment_to_testDynamicSchemeActivity,
    bundleOf("userId" to "abcd1234")
 )
接收数据的activity中,解析如下
intent.dataString
三、嵌套导航图 nested graph
使用嵌套导航图时,外部不能直接访问嵌套图的内部,嵌套图xml如下,嵌套图可以使用include标签,
<?xml version="1.0" encoding="utf-8"?>
<navigation xmlns:android="http://schemas.android.com/apk/res/android"
    xmlns:app="http://schemas.android.com/apk/res-auto"
    xmlns:tools="http://schemas.android.com/tools"
    android:id="@+id/nested_graph"
    app:startDestination="@id/nestedGraphRootFragment">

    <fragment
        android:id="@+id/nestedGraphRootFragment"
        android:name="com.xmcc.androidbasesample.fragment.navigation.nestedgraph.NestedGraphRootFragment"
        android:label="fragment_nested_graph_root_list"
        tools:layout="@layout/fragment_nested_graph_root_list" >
        <action
            android:id="@+id/action_nestedGraphRootFragment_to_orderListFragment"
            app:destination="@id/nav_order" />
        <action
            android:id="@+id/action_nestedGraphRootFragment_to_userHomeFragment"
            app:destination="@id/nav_user" />
    </fragment>
    <include app:graph = "@navigation/nested_order"/>

    <navigation android:id="@+id/nav_user"
        app:startDestination="@id/userHomeFragment">
        <fragment
            android:id="@+id/settingsFragment2"
            android:name="com.xmcc.androidbasesample.fragment.navigation.nestedgraph.usernode.SettingsFragment"
            android:label="fragment_settings"
            tools:layout="@layout/fragment_settings">
        </fragment>
        <fragment
            android:id="@+id/userHomeFragment"
            android:name="com.xmcc.androidbasesample.fragment.navigation.nestedgraph.usernode.UserHomeFragment"
            android:label="fragment_user_home"
            tools:layout="@layout/fragment_user_home">
            <action
                android:id="@+id/action_userHomeFragment_to_settingsFragment2"
                app:destination="@id/settingsFragment2" />
        </fragment>
    </navigation>
    <action android:id="@+id/action_global_nestedGraphRootFragment"
        app:destination="@id/nestedGraphRootFragment"/>
</navigation>
四、导航图返回
可以使用方式返回,如下,
1. 使用popBackStack返回,
findNavController().popBackStack()2. 使用navigateUp返回,
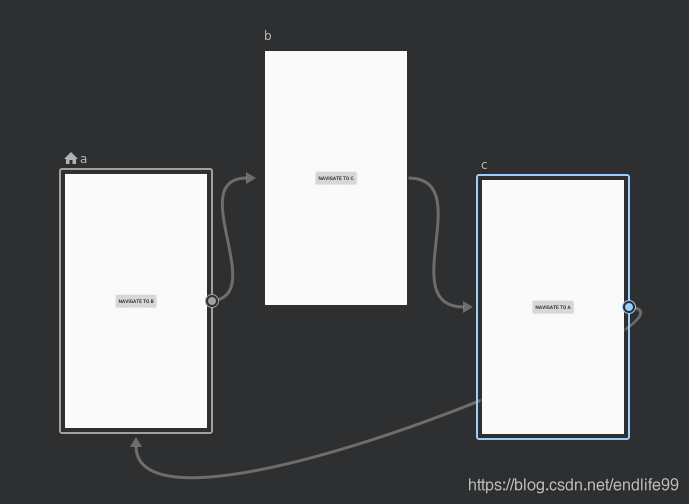
findNavController().navigateUp()3. 使用navigate + actionId返回,注意需要在导航图中使用popUpTo,popUpToInclusive标签,其中popUpToInclusive标签为true时,会把destination也清除掉(例子中的destination为orderListFragment)。如有3个destination,A、B、C如下图,从C如果直接navigate到A,没有使用popUpTo的情况下,B、C不会清除,即
没有使用popUpTo,堆栈内会是,ABCABC...
使用popUpTo,堆栈内会是,A
使用popUpTo且popUpToInclusive=true,堆栈内ABC都没有

回退方法
findNavController().navigate(R.id.orderRatingFragmentPop)nav graph中内容
<fragment
    android:id="@+id/orderRatingFragment"
    android:name="com.xmcc.androidbasesample.fragment.navigation.nestedgraph.ordernode.OrderRatingFragment"
    android:label="fragment_order_rating"
    tools:layout="@layout/fragment_order_rating"
    >
    <action
         android:id="@+id/orderRatingFragmentPop"
         app:popUpTo="@id/orderListFragment"
        app:popUpToInclusive="true"
        />
</fragment>
这里再说明下popBackStack和navigateUp两个方法的区别,
popBackStack,根据官方描述,与系统back键类似,
Attempts to pop the controller's back stack. Analogous to when the user presses the system?Back?button when the associated navigation host has focus.
navigateUp,查看源码可以发现,getDestinationCountOnBackStack() 不为1时,就是调用的popBackStack
public boolean navigateUp() {
    if (getDestinationCountOnBackStack() == 1) {
        // If there's only one entry, then we've deep linked into a specific destination
        // on another task so we need to find the parent and start our task from there
        NavDestination currentDestination = getCurrentDestination();
        int destId = currentDestination.getId();
        NavGraph parent = currentDestination.getParent();
        while (parent != null) {
            if (parent.getStartDestination() != destId) {
               ......
                return true;
            }
            destId = parent.getId();
            parent = parent.getParent();
        }
        // We're already at the startDestination of the graph so there's no 'Up' to go to
        return false;
    } else {
        return popBackStack();
    }
}
五、在目的地(destination)间数据传递
1. 定义目的地参数
<fragment android:id="@+id/myFragment" >
     <argument
         android:name="myArg"
         app:argType="integer"
         android:defaultValue="0" />
 </fragment>
支持的参数类型如下
| 类型 | app:argType 语法 | 是否支持默认值? | 是否支持 null 值? |
| 整数 | app:argType="integer" | 是 | 否 |
| 浮点数 | app:argType="float" | 是 | 否 |
| 长整数 | app:argType="long" | 是 - 默认值必须始终以“L”后缀结尾(例如“123L”)。 | 否 |
| 布尔值 | app:argType="boolean" | 是 -“true”或“false” | 否 |
| 字符串 | app:argType="string" | 是 | 是 |
| 资源引用 | app:argType="reference" | 是 - 默认值必须为“@resourceType/resourceName”格式(例如,“@style/myCustomStyle”)或“0” | 否 |
| 自定义 Parcelable | app:argType="<type>",其中 <type> 是?Parcelable?的完全限定类名称 | 支持默认值“@null”。不支持其他默认值。 | 是 |
| 自定义 Serializable | app:argType="<type>",其中 <type> 是?Serializable?的完全限定类名称 | 支持默认值“@null”。不支持其他默认值。 | 是 |
| 自定义 Enum | app:argType="<type>",其中 <type> 是 Enum 的完全限定名称 | 是 - 默认值必须与非限定名称匹配(例如,“SUCCESS”匹配 MyEnum.SUCCESS)。 | 否 |
接收的fragment直接使用如下代码,即可获取到传递进来的参数
override fun onCreate(savedInstanceState: Bundle?) {
    super.onCreate(savedInstanceState)
    arguments?.let {
        val param1 = it.getInt("orderId")
    }
}
同时以上内容,也表明最终还是通过bundle来传递参数,包括后续要说到的Safe Args插件也是一样,通过bundle来传递参数的,只是外型不一样。
2. Safe Args插件使用
导入包
buildscript {
    repositories {
        google()
    }
    dependencies {
        def nav_version = "2.3.5"
        classpath "androidx.navigation:navigation-safe-args-gradle-plugin:$nav_version"
    }
}
在对应模块中加入插件
plugins {
    id 'androidx.navigation.safeargs'
}
如被墙了,可以使用镜像解决,
buildscript {
    ext.kotlin_version = "1.4.21"
    repositories {
        google()
        maven { url 'http://maven.aliyun.com/nexus/content/groups/public/' }
        jcenter()
    }
    dependencies {
        classpath 'com.android.tools.build:gradle:4.1.2'
        classpath "org.jetbrains.kotlin:kotlin-gradle-plugin:$kotlin_version"
        def nav_version = "2.3.5"
        classpath "androidx.navigation:navigation-safe-args-gradle-plugin:$nav_version"
    }
}
allprojects {
    repositories {
        google()
        maven { url 'http://maven.aliyun.com/nexus/content/groups/public/' }
        jcenter()
    }
}
使用方法如下,
nav graph中定义action
<action
	android:id="@+id/action_orderListFragment_to_orderDetailFragment"
	app:destination="@id/orderDetailFragment" >
	<argument
		android:name="orderId"
		app:argType="integer"
		android:defaultValue="-1" />
</action>
safe args插件会自动生成相应的directions类,大致内容如下,可以看到,最终还是将数据放到bundle中。
public class OrderListFragmentDirections {
  private OrderListFragmentDirections() {
  }

  @NonNull
  public static ActionOrderListFragmentToOrderDetailFragment actionOrderListFragmentToOrderDetailFragment(
      ) {
    return new ActionOrderListFragmentToOrderDetailFragment();
  }

  public static class ActionOrderListFragmentToOrderDetailFragment implements NavDirections {
    private final HashMap arguments = new HashMap();

    private ActionOrderListFragmentToOrderDetailFragment() {
    }

    @NonNull
    @SuppressWarnings("unchecked")
    public ActionOrderListFragmentToOrderDetailFragment setOrderId(int orderId) {
      this.arguments.put("orderId", orderId);
      return this;
    }

    @Override
    @SuppressWarnings("unchecked")
    @NonNull
    public Bundle getArguments() {
      Bundle __result = new Bundle();
      if (arguments.containsKey("orderId")) {
        int orderId = (int) arguments.get("orderId");
        __result.putInt("orderId", orderId);
      } else {
        __result.putInt("orderId", -1);
      }
      return __result;
    }
....
  }
}
safe args也可以用于全局操作,方法同上。
3. 使用bundle传递数据,方法如下
findNavController().navigate(
    R.id.action_orderListFragment_to_orderDetailFragment,
    bundleOf(
        "orderId" to 10,
        "orderCode" to "abcd"))
六、DeepLinkRequest 导航
通过NavDeepLinkRequest导航,需要在当前导航图下定义一个deeplink,如下
<fragment
    android:id="@+id/second2Fragment"
    android:name="com.xmcc.androidbasesample.fragment.navigation.deeplink.Second2Fragment"
    android:label="Second2Fragment" >
    <deepLink
        app:uri="second.abc"
        />
</fragment>
调用方法如下,这里需要注意两点,
1. 可以看到虽然是通过隐式调用的,但作用域是当前这个导航图,我们可以查看源码知道,如下
public void navigate(@NonNull NavDeepLinkRequest request, @Nullable NavOptions navOptions,
            @Nullable Navigator.Extras navigatorExtras) {
        NavDestination.DeepLinkMatch deepLinkMatch =
                mGraph.matchDeepLink(request);
        if (deepLinkMatch != null) {
            ...
        } else {
            //当前导航图获取不到该deeplink时,会抛如下异常
            throw new IllegalArgumentException("Navigation destination that matches request "
                    + request + " cannot be found in the navigation graph " + mGraph);
        }
}
2. 使用uri时,导航图中写的是second.abc,那么我们的程序中调用可以是http://second.abc或者https://second.abc,但是不能在second.abc后加"/",这点和我们后续要说的隐式deeplink不一样,容易搞混。
val request = NavDeepLinkRequest.Builder
        .fromUri("http://second.abc".toUri())
        .build()
findNavController().navigate(request)
七、为目的地创建深层链接
有两种deeplink,explicit and implicit(显式和隐式)
1. 显式deeplink,使用方法如下,
val pendingIntent: PendingIntent = NavDeepLinkBuilder(requireActivity())
    .setGraph(R.navigation.nav_graph)
    .setDestination(R.id.secondFragment)
    .setArguments(bundleOf("orderId" to 11))
    .setComponentName(FragmentNavigationUseActivity::class.java)
    .createPendingIntent()

val builder = NotificationCompat.Builder(requireContext(), "CHANNEL_ID")
    .setSmallIcon(R.drawable.ic_notifications_black_24dp)
    .setContentTitle("开学了")
    .setContentText("小朋友开学了,请注意")
    .setPriority(NotificationCompat.PRIORITY_HIGH)
    .setContentIntent(pendingIntent)
    .setAutoCancel(true)

with(NotificationManagerCompat.from(requireContext())) {
    notify(1, builder.build())
}
使用notification时需要注意API26+的需要增加如下代码,
// Create the NotificationChannel, but only on API 26+ because
// the NotificationChannel class is new and not in the support library
if (Build.VERSION.SDK_INT >= Build.VERSION_CODES.O) {
    val name = "channel-name"
    val descriptionText = "descriptionText"
    val importance = NotificationManager.IMPORTANCE_HIGH
    val channel = NotificationChannel("CHANNEL_ID", name, importance).apply {
        description = descriptionText
    }
    // Register the channel with the system
    val notificationManager: NotificationManager =
        requireContext().getSystemService(Context.NOTIFICATION_SERVICE) as NotificationManager
    notificationManager.createNotificationChannel(channel)
}
2. 隐式deeplink,使用方法如下,
在导航图中增加deeplink标签,代码如下
<fragment
    android:id="@+id/second2Fragment"
    android:name="com.xmcc.androidbasesample.fragment.navigation.deeplink.Second2Fragment"
    android:label="Second2Fragment" >
    <deepLink
        app:uri="second.abc"
        app:action="android.intent.action.VIEW"
        app:mimeType="type/subtype"
        />
</fragment>
在AndroidManifest.xml文件中增加导航图,代码如下,
<manifest
...
>
    ...
    <application
        ...
		>
        ...
        <activity
            android:name=".fragment.navigation.FragmentNavigationUseActivity"
            android:theme="@style/Animation" >
            <nav-graph android:value="@navigation/nav_deeplink"/>
        </activity>
        ...
    </application>
</manifest>
构建项目时,Navigation 组件会将 <nav-graph> 元素替换为生成的 <intent-filter> 元素,替换后内容如下,可以看到替换后的代码中有一项 android:path="/",所以在调用时候,也需要在url最后加上"/",这个问题坑了我比较长时间,最后查了转换后代码才发现。
<activity android:name="com.xmcc.androidbasesample.fragment.navigation.FragmentNavigationUseActivity"
 android:theme="@style/Animation">
	<intent-filter>
		<action android:name="android.intent.action.VIEW"/>
		<category android:name="android.intent.category.DEFAULT"/>
		<category android:name="android.intent.category.BROWSABLE"/>
		<data android:scheme="http"/>
		<data android:scheme="https"/>
		<data android:host="second.abc"/>
		<data android:path="/"/>
	</intent-filter>
</activity>
程序中调用方法如下,
val intent = Intent("android.intent.action.VIEW")
intent.data = Uri.parse("https://second.abc/")
intent.`package` = "com.xmcc.androidbasesample.free.debug"
startActivity(intent)
以上为navigation第一部分学习记录(主要是官网导航组件下从概览-为目标创建深层链接的内容 https://developer.android.com/guide/navigation?hl=zh-cn),如有错误,欢迎指出,后续还有第二部分。