通过本篇文章可以解决几个问题:
为啥 Handler 中不可以做耗时操作View.post 为什么可以获取到 View 的宽高Activity 在什么时候显示的?是 onResume() 中吗?为什么?
View.post() 的使用方法
class MainActivity : AppCompatActivity() {

    override fun onCreate(savedInstanceState: Bundle?) {
        super.onCreate  (savedInstanceState)
        setContentView(R.layout.activity_main)

        val btn = findViewById<Button>(R.id.btn)
        btn.post {
            val width = btn.width
            val height = btn.height
            Log.e("MainActivity", "btn: $width $height")
        }
    }
}

Logcat 日志:
2021-08-08 17:08:05.156 E/MainActivity: btn: 308 168
这样简单的方法为什么可以这么方便的获取宽高呢?
先看看 View.post 的方法做了啥:
// android.view.View
public class View implements Drawable.Callback, KeyEvent.Callback,
        AccessibilityEventSource {

    /**
     * <p>Causes the Runnable to be added to the message queue.
     * The runnable will be run on the user interface thread.</p>
     *
     * @param action The Runnable that will be executed.
     *
     * @return Returns true if the Runnable was successfully placed in to the
     *         message queue.  Returns false on failure, usually because the
     *         looper processing the message queue is exiting.
     *
     * @see #postDelayed
     * @see #removeCallbacks
     */
    public boolean post(Runnable action) {
        // 1
        final AttachInfo attachInfo = mAttachInfo;
        if (attachInfo != null) {
            return attachInfo.mHandler.post(action);
        }

        // Postpone the runnable until we know on which thread it needs to run.
        // Assume that the runnable will be successfully placed after attach.
        // 2
        getRunQueue().post(action);
        return true;
    }
}
View 的 post 方法传入了 Runnable 对象。方法注释上说:将Runnable添加到消息队列。Runnable将在用户界面线程上运行。消息队列 message queue 不就是 Handler 机制中的 MessageQueue 吗,照这注释上的意思是传进来的 Runnable 对象最终通过 Handler 来执行到主线程。到底是不是这样,我们接着往下看。
注释 1 处 mAttachInfo 对象是 ViewRootImpl 的构造方法中创建的,然后经过层层 View 的 dispatchAttachedToWindow 方法传递给 View 的 mAttachInfo 的。当我们在生命周期 onCreate、onStart() 和 onResume() 时,ViewRootImpl 还没有被创建,所以 mAttachInfo 对象为空。一会儿梳理下 ViewRootImpl 在什么时候创建的。注释 2 处调用了 getRunQueue() 的 post 并传入 Runnable 对象
private HandlerActionQueue mRunQueue;

// android.view.View#getRunQueue()
private HandlerActionQueue getRunQueue() {
    if (mRunQueue == null) {
        mRunQueue = new HandlerActionQueue();
    }
    return mRunQueue;
}
如果 mRunQueue 对象为空,则创建,最后返回 HandlerActionQueue 类型的对象 mRunQueue。接下来看 HandlerActionQueue。
// android.view.HandlerActionQueue
public class HandlerActionQueue {
    private HandlerAction[] mActions;
    private int mCount;

    public void post(Runnable action) {
        postDelayed(action, 0);
    }

    public void postDelayed(Runnable action, long delayMillis) {
        final HandlerAction handlerAction = new HandlerAction(action, delayMillis);

        synchronized (this) {
            if (mActions == null) {
                mActions = new HandlerAction[4];
            }
            mActions = GrowingArrayUtils.append(mActions, mCount, handlerAction);
            mCount++;
        }
    }

    public void executeActions(Handler handler) {
        synchronized (this) {
            final HandlerAction[] actions = mActions;
            for (int i = 0, count = mCount; i < count; i++) {
                final HandlerAction handlerAction = actions[i];
                handler.postDelayed(handlerAction.action, handlerAction.delay);
            }

            mActions = null;
            mCount = 0;
        }
    }

    private static class HandlerAction {
        final Runnable action;
        final long delay;

        public HandlerAction(Runnable action, long delay) {
            this.action = action;
            this.delay = delay;
        }

        public boolean matches(Runnable otherAction) {
            return otherAction == null && action == null
                    || action != null && action.equals(otherAction);
        }
    }
}
HandlerActionQueue 内部维护了一个初试大小为 4 的数组,HandlerAction 是 Runnable 对象和 delay 延时时间的一个包装类。HandlerActionQueue 的 post 方法调用了 postDelayed 传入了 Runnable 对象,第二个参数延时时间固定为 0,postDelayed 方法将 Runnable 对象和延时时间包装为 HandlerAction 对象并添加到数组中。
到这儿,View.post 方法就走完了。上面一会儿梳理下 ViewRootImpl 在什么时候创建的,现在来看下。
ViewRootImpl 在什么时候创建的
ViewRootImpl 是我们 View 体系中非常重要的类,其中 绘制、布局、测量,刷新布局等等都是在它内部发起的,而且 Activity 是和 ViewRootImpl 一一对应的,也就是一个 Activity 都有一个 ViewRootImpl 对象。具体我们在这里不在延伸了。
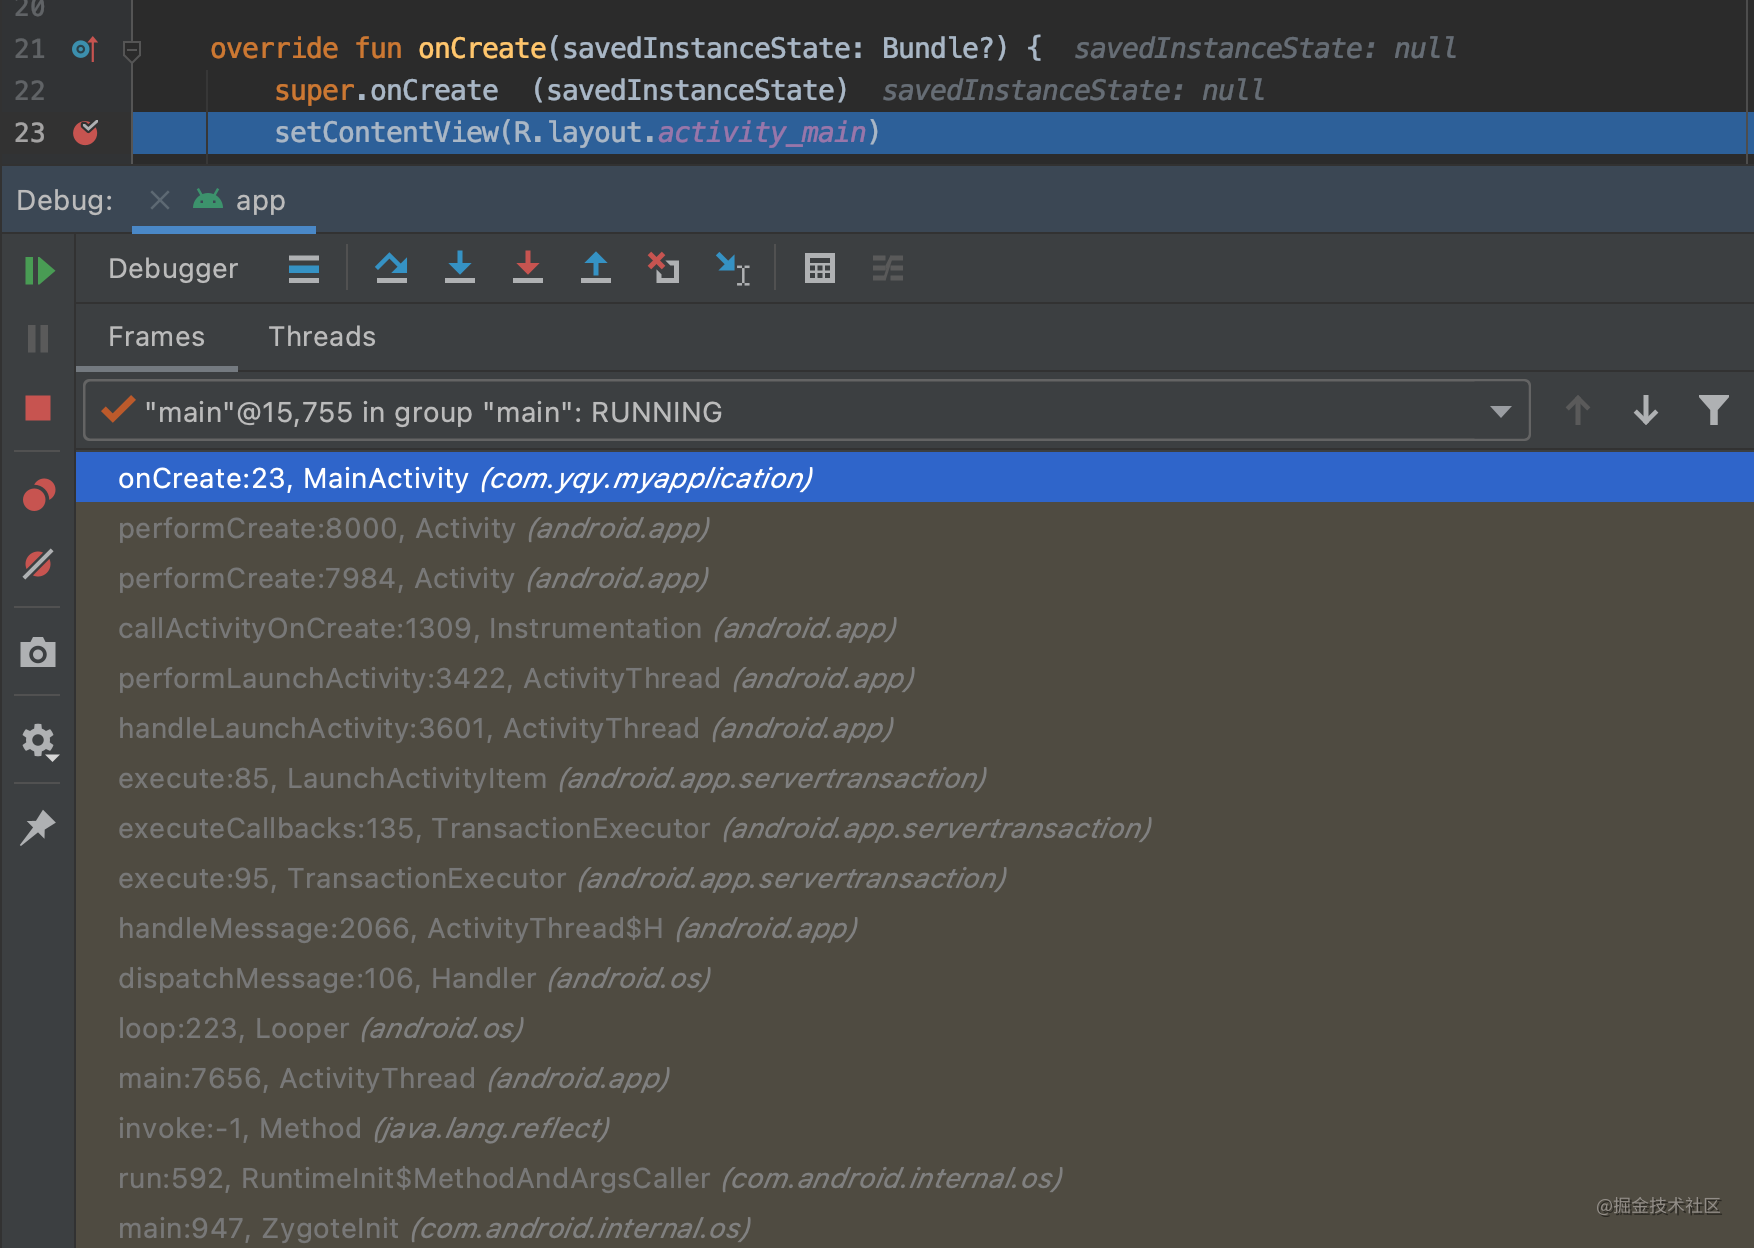
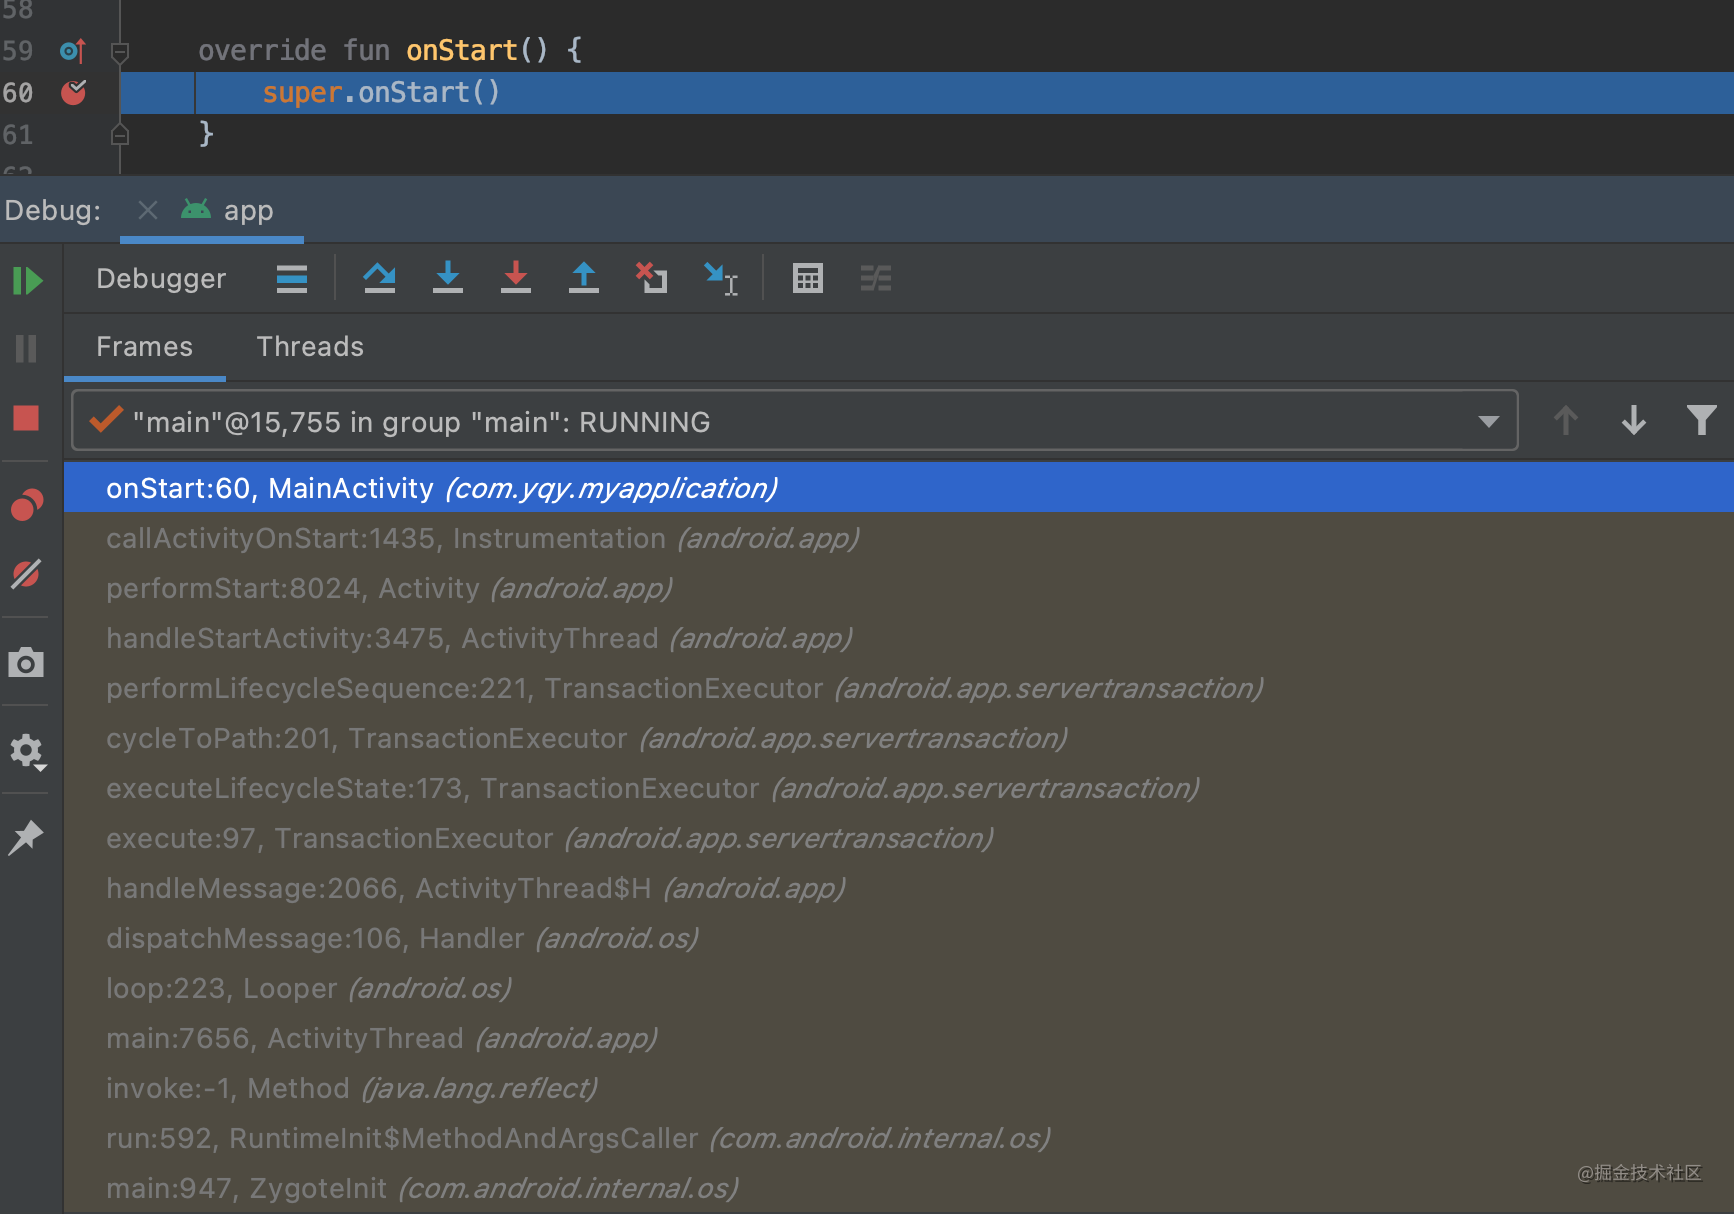
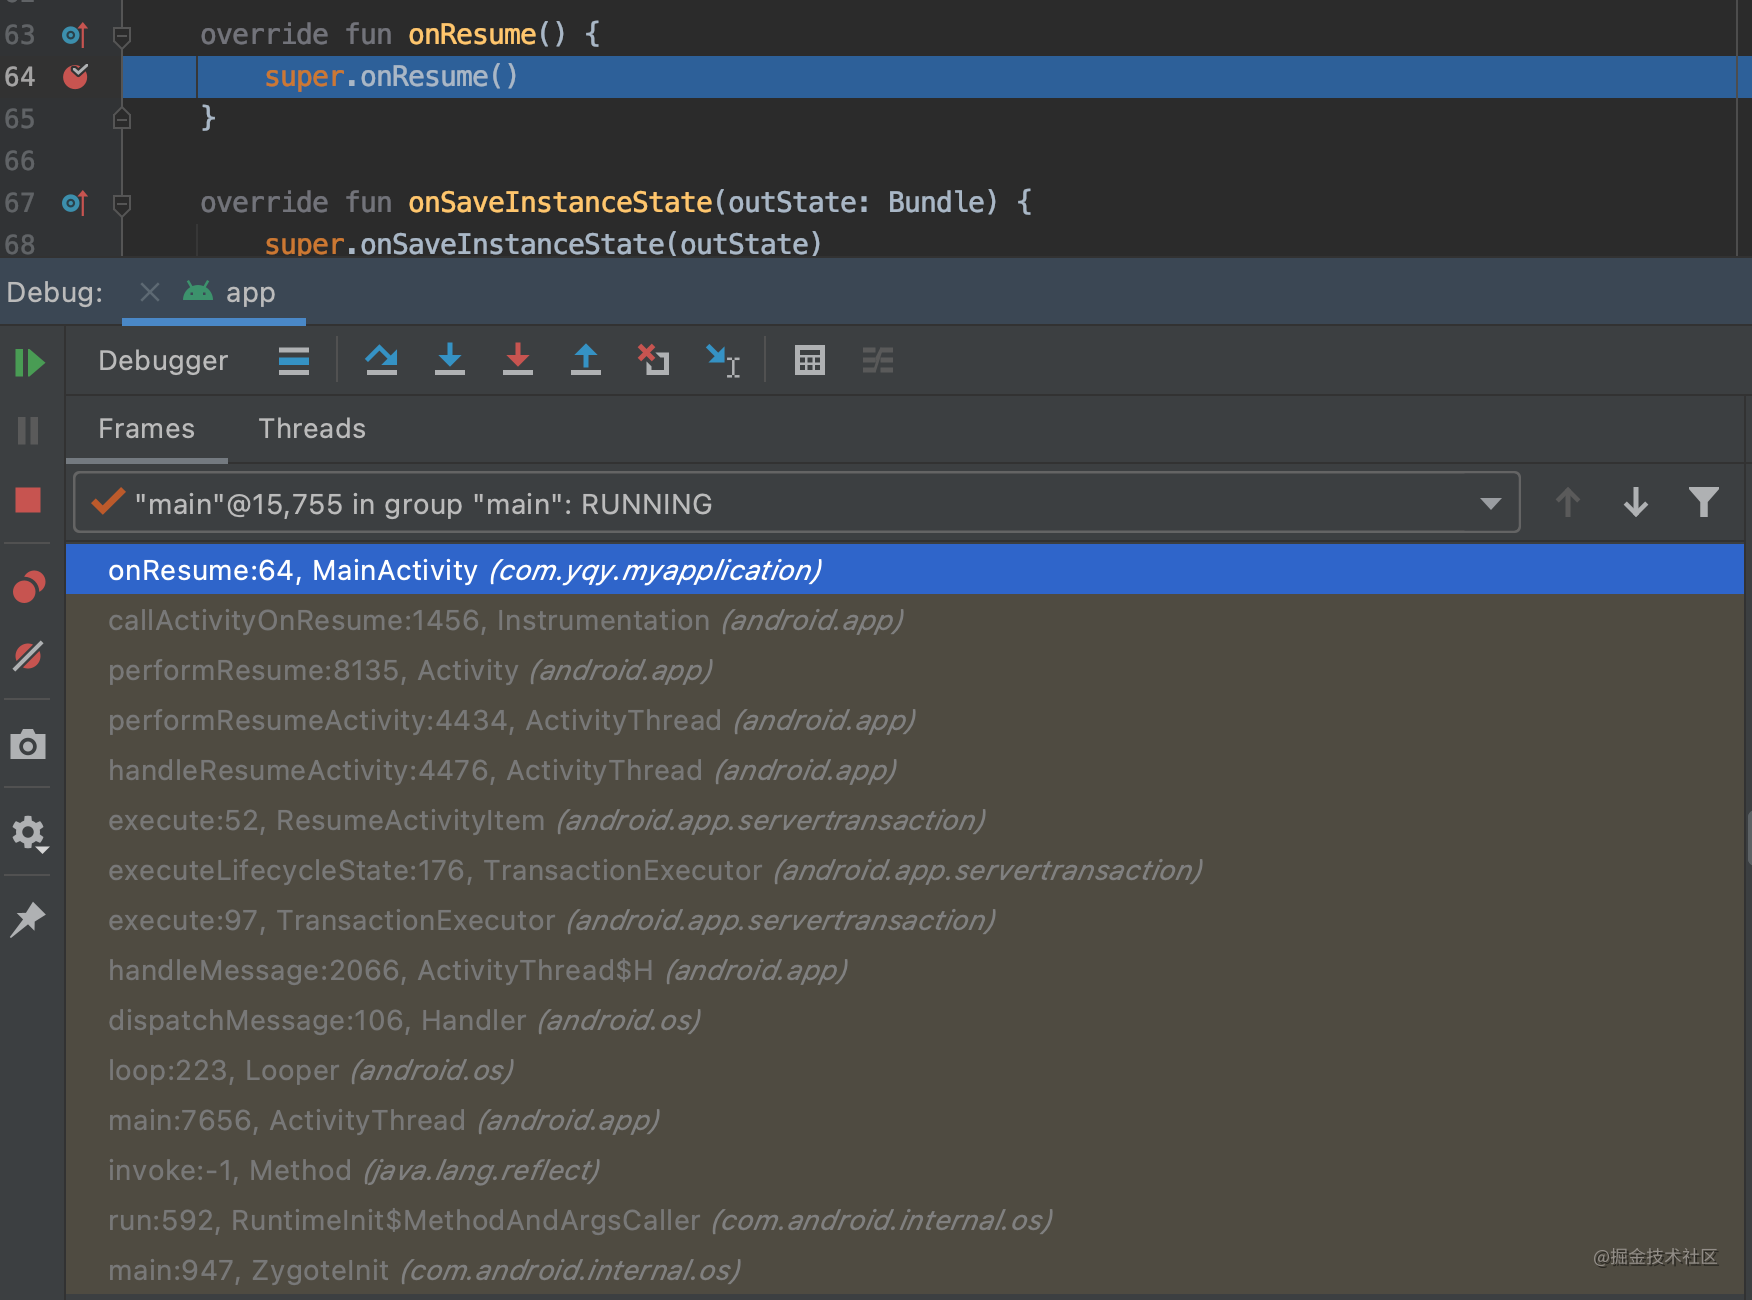
我们知道 Activity 的启动流程会走 ActivityThread 的 performLaunchActivity 方法,其中会调用到 Activity 的 onCreate,同样 onStart 会在 ActivityThread 的 performStart 方法调用,onResume 会在 performResumeActivity 中调用。看下这三个生命周期方法 debug 截图。


在这里只关注 onResume,从 ActivityThread 的 performResumeActivity 方法开始:
// android.app.ActivityThread
public final class ActivityThread extends ClientTransactionHandler {

    @Override
    public void handleResumeActivity(IBinder token, boolean finalStateRequest, boolean isForward,
            String reason) {
        ...

        // TODO Push resumeArgs into the activity for consideration
        // 1
        final ActivityClientRecord r = performResumeActivity(token, finalStateRequest, reason);
        ...
        if (r.window == null && !a.mFinished && willBeVisible) {
            r.window = r.activity.getWindow();
            View decor = r.window.getDecorView();
            decor.setVisibility(View.INVISIBLE);
            ViewManager wm = a.getWindowManager();
            WindowManager.LayoutParams l = r.window.getAttributes();
            a.mDecor = decor;
            l.type = WindowManager.LayoutParams.TYPE_BASE_APPLICATION;
            l.softInputMode |= forwardBit;
            if (r.mPreserveWindow) {
                a.mWindowAdded = true;
                r.mPreserveWindow = false;
                // Normally the ViewRoot sets up callbacks with the Activity
                // in addView->ViewRootImpl#setView. If we are instead reusing
                // the decor view we have to notify the view root that the
                // callbacks may have changed.
                ViewRootImpl impl = decor.getViewRootImpl();
                if (impl != null) {
                    impl.notifyChildRebuilt();
                }
            }
            if (a.mVisibleFromClient) {
                if (!a.mWindowAdded) {
                    a.mWindowAdded = true;
                    // 2
                    wm.addView(decor, l);
                } else {
                    a.onWindowAttributesChanged(l);
                }
            }

            // If the window has already been added, but during resume
            // we started another activity, then don't yet make the
            // window visible.
        } else if (!willBeVisible) {
            if (localLOGV) Slog.v(TAG, "Launch " + r + " mStartedActivity set");
            r.hideForNow = true;
        }
        ...
    }

}
performResumeActivity 方法中,注释 1 处调用了 performResumeActivity 方法,最终会调用 Activity 的 onResume 方法。注释 2 处调用了 WindowManagerImpl 对象 wm 的 addView 方法。
// android.view.WindowManagerImpl
public final class WindowManagerImpl implements WindowManager {
    @UnsupportedAppUsage
    private final WindowManagerGlobal mGlobal = WindowManagerGlobal.getInstance();

    public void addView(@NonNull View view, @NonNull ViewGroup.LayoutParams params) {
        applyDefaultToken(params);
        mGlobal.addView(view, params, mContext.getDisplayNoVerify(), mParentWindow,
                mContext.getUserId());
    }
}
WindowManagerImpl 的 addView 方法内部调用了 WindowManagerGlobal 对象 mGlobal 的 addView 方法。
// android.view.WindowManagerGlobal
public final class WindowManagerGlobal {
    public void addView(View view, ViewGroup.LayoutParams params,
            Display display, Window parentWindow, int userId) {
        ...
        // 1
        ViewRootImpl root;
        View panelParentView = null;

        synchronized (mLock) {
            ...
            // 2
            root = new ViewRootImpl(view.getContext(), display);

            view.setLayoutParams(wparams);

            mViews.add(view);
            mRoots.add(root);
            mParams.add(wparams);

            // do this last because it fires off messages to start doing things
            try {
                // 3
                root.setView(view, wparams, panelParentView, userId);
            } catch (RuntimeException e) {
                // BadTokenException or InvalidDisplayException, clean up.
                if (index >= 0) {
                    removeViewLocked(index, true);
                }
                throw e;
            }
        }
    }
}
在注释 1 处声明了 ViewRootImpl 类型变量 root;在注释 2 处创建了 ViewRootImpl 对象并赋值给 root;在注释 3 处调用了 ViewRootImpl 的 setView 方法。
到这儿 ViewRootImpl 的创建过程梳理完了。了解 ViewRootImpl 的创建过程 Activity 的显示流程非常有帮助,因为 Activity 的显示就是从 ViewRootImpl 创建后调用 setView 方法开始的。
Activity 是什么时候显示的
// android.view.ViewRootImpl
public final class ViewRootImpl implements ViewParent,
        View.AttachInfo.Callbacks, ThreadedRenderer.DrawCallbacks {

    /**
     * We have one child
     */
    public void setView(View view, WindowManager.LayoutParams attrs, View panelParentView,
            int userId) {
        ...
        // Schedule the first layout -before- adding to the window
        // manager, to make sure we do the relayout before receiving
        // any other events from the system.
        requestLayout();
        ...
    }

    @Override
    public void requestLayout() {
        if (!mHandlingLayoutInLayoutRequest) {
            checkThread();
            mLayoutRequested = true;
            scheduleTraversals();
        }
    }

    @UnsupportedAppUsage
    void scheduleTraversals() {
        if (!mTraversalScheduled) {
            mTraversalScheduled = true;
            // 1
            mTraversalBarrier = mHandler.getLooper().getQueue().postSyncBarrier();
            // 2
            mChoreographer.postCallback(
                    Choreographer.CALLBACK_TRAVERSAL, mTraversalRunnable, null);
            notifyRendererOfFramePending();
            pokeDrawLockIfNeeded();
        }
    }

    final class TraversalRunnable implements Runnable {
        @Override
        public void run() {
            doTraversal();
        }
    }
    final TraversalRunnable mTraversalRunnable = new TraversalRunnable();

    void doTraversal() {
        if (mTraversalScheduled) {
            mTraversalScheduled = false;
            // 1
            mHandler.getLooper().getQueue().removeSyncBarrier(mTraversalBarrier);

            if (mProfile) {
                Debug.startMethodTracing("ViewAncestor");
            }

            // 2
            performTraversals();

            if (mProfile) {
                Debug.stopMethodTracing();
                mProfile = false;
            }
        }
    }

    private void performTraversals() {
        ...
        // Execute enqueued actions on every traversal in case a detached view enqueued an action
        // 1
        getRunQueue().executeActions(mAttachInfo.mHandler);
        ...
        performMeasure(childWidthMeasureSpec, childHeightMeasureSpec);
        ...
        performLayout(lp, mWidth, mHeight);
        ...
        performDraw();
    }
}
ViewRootImpl 的 setView 方法中调用了 requestLayout 方法。到这儿调用了应用开发中经常调用的方法 requestLayout。requestLayout 方法调用了 scheduleTraversals 方法,在 scheduleTraversals 方法中注释 1 处添加了同步屏障,简单来说添加同步屏障的目的是让 Handler 消息队列中先不执行同步消息,遇到异步消息就执行,在异步消息执行后,需要主动移除同步屏障(这是 Handler 中很重要的知识点,后面专门文章学习 Handler)。在 scheduleTraversals 方法的注释 2 处,调用 mChoreographer 的 postCallback 方法,传入 mTraversalRunnable 对象,这里设计屏幕刷新机制,简单的说,等下次 Vsync 信号来的时候回调用 mTraversalRunnable 的 run (后面专门文章学习屏幕刷新机制)。TraversalRunnable 的 run 方法中调用了 doTraversal 方法,在 doTraversal 方法中注释 1 处移除了同步屏障,注释 2 处调用了 performTraversals 方法。在 performTraversals 方法中注释 1 处调用了 getRunQueue 方法返回的 HandlerActionQueue 对象的 executeActions 方法,传入了 mAttachInfo.mHandler,现在需要确定下 mAttachInfo.mHandler 这个 Handler 是否是主线程的 Handler,还有就是 HandlerActionQueue 的 executeActions 是怎么处理的。
先来看看 mAttachInfo.mHandler:AttachInfo 是 View 的静态内部类,
// android.view.View
public final class View {
    final static class AttachInfo {

         /**
         * A Handler supplied by a view's {@link android.view.ViewRootImpl}. This
         * handler can be used to pump events in the UI events queue.
         */
        final Handler mHandler;


         /**
         * Creates a new set of attachment information with the specified
         * events handler and thread.
         *
         * @param handler the events handler the view must use
         */
        AttachInfo(IWindowSession session, IWindow window, Display display,
                ViewRootImpl viewRootImpl, Handler handler, Callbacks effectPlayer,
                Context context) {
            mSession = session;
            mWindow = window;
            mWindowToken = window.asBinder();
            mDisplay = display;
            mViewRootImpl = viewRootImpl;
            mHandler = handler;
            mRootCallbacks = effectPlayer;
            mTreeObserver = new ViewTreeObserver(context);
        }
    }
}
mHandler 对象是在 AttachInfo 的构造函数中赋值的。
ViewRootImpl 的构造函数:
// android.view.ViewRootImpl
public final class ViewRootImpl implements ViewParent,
        View.AttachInfo.Callbacks, ThreadedRenderer.DrawCallbacks {

    final ViewRootHandler mHandler = new ViewRootHandler();

    public ViewRootImpl(Context context, Display display, IWindowSession session,
            boolean useSfChoreographer) {
        ...
        mAttachInfo = new View.AttachInfo(mWindowSession, mWindow, display, this, mHandler, this,
                context);
        ...
    }
}
mAttachInfo 是在 ViewRootImpl 的构造函数中创建的,并且传入了 mHandler 对象。mHandler 的类型是 ViewRootHandler。
final class ViewRootHandler extends Handler {}
ViewRootHandler 继承了 Handler,mHandler 对象被创建时使用的无参构造方法。所以 new ViewRootHandler() 会调用父类的构造方法 Handler()
// android.os.Handler
public class Handler {

    public Handler() {
        this(null, false);
    }

    public Handler(@Nullable Callback callback, boolean async) {
        if (FIND_POTENTIAL_LEAKS) {
            final Class<? extends Handler> klass = getClass();
            if ((klass.isAnonymousClass() || klass.isMemberClass() || klass.isLocalClass()) &&
                    (klass.getModifiers() & Modifier.STATIC) == 0) {
                Log.w(TAG, "The following Handler class should be static or leaks might occur: " +
                    klass.getCanonicalName());
            }
        }
        // 1
        mLooper = Looper.myLooper();
        if (mLooper == null) {
            throw new RuntimeException(
                "Can't create handler inside thread " + Thread.currentThread()
                        + " that has not called Looper.prepare()");
        }
        mQueue = mLooper.mQueue;
        mCallback = callback;
        mAsynchronous = async;
    }
}
Handler 的无参构造方法又调用了 Handler(@Nullable Callback callback, boolean async) 构造方法。注释 1 处,获取 当前线程的 Looper,而我们知道,ViewRootImpl 是在 handleResumeActivity 后面的流程创建的,所以这里获取的 Looper 是主线程 Looper。那 ViewRootHandler 也就是主线程队列的 Handler了。
也就是调用 HandlerActionQueue 的 executeActions 方法时传入的 mAttachInfo.mHandler 是主线程 Handler 哟,再回头看 HandlerActionQueue 的 executeActions 是怎么处理的:
// android.view.HandlerActionQueue
public class HandlerActionQueue {
    private HandlerAction[] mActions;
    private int mCount;

    public void post(Runnable action) {
        postDelayed(action, 0);
    }

    public void postDelayed(Runnable action, long delayMillis) {
        final HandlerAction handlerAction = new HandlerAction(action, delayMillis);

        synchronized (this) {
            if (mActions == null) {
                mActions = new HandlerAction[4];
            }
            mActions = GrowingArrayUtils.append(mActions, mCount, handlerAction);
            mCount++;
        }
    }

    public void executeActions(Handler handler) {
        synchronized (this) {
            final HandlerAction[] actions = mActions;
            // 1
            for (int i = 0, count = mCount; i < count; i++) {
                final HandlerAction handlerAction = actions[i];
                // 2
                handler.postDelayed(handlerAction.action, handlerAction.delay);
            }

            mActions = null;
            mCount = 0;
        }
    }

    private static class HandlerAction {
        final Runnable action;
        final long delay;

        public HandlerAction(Runnable action, long delay) {
            this.action = action;
            this.delay = delay;
        }

        public boolean matches(Runnable otherAction) {
            return otherAction == null && action == null
                    || action != null && action.equals(otherAction);
        }
    }
}
在 HandlerActionQueue 的 executeActions 方法的注释 1 处,遍历缓存的包装着 Runnable 和 延时时间的 HandlerAction 数组,HandlerAction 的 action 是我们调用 View.post 方法传入的 Runnable 对象,而这时候 HandlerAction delay 属性是 0,为啥是 0 在上面分析 View.post 时分析过了。在注释 2 处,调用 handler 的 postDelayed 方法,传入 Runnable 对象和延时时间 0,这个用法和我们平常用 Handler 时候是一样的,最终 Handler 会将 Runnable 对象包装成 Message 发送到消息队列,此时发送的消息是同步消息。再回顾下 ViewRootImpl 的部分源码:
// android.view.ViewRootImpl
public final class ViewRootImpl implements ViewParent,
        View.AttachInfo.Callbacks, ThreadedRenderer.DrawCallbacks {

    /**
     * We have one child
     */
    public void setView(View view, WindowManager.LayoutParams attrs, View panelParentView,
            int userId) {
        ...
        // Schedule the first layout -before- adding to the window
        // manager, to make sure we do the relayout before receiving
        // any other events from the system.
        requestLayout();
        ...
    }

    @Override
    public void requestLayout() {
        if (!mHandlingLayoutInLayoutRequest) {
            checkThread();
            mLayoutRequested = true;
            scheduleTraversals();
        }
    }

    @UnsupportedAppUsage
    void scheduleTraversals() {
        if (!mTraversalScheduled) {
            mTraversalScheduled = true;
            // 1
            mTraversalBarrier = mHandler.getLooper().getQueue().postSyncBarrier();
            // 2
            mChoreographer.postCallback(
                    Choreographer.CALLBACK_TRAVERSAL, mTraversalRunnable, null);
            notifyRendererOfFramePending();
            pokeDrawLockIfNeeded();
        }
    }

    final class TraversalRunnable implements Runnable {
        @Override
        public void run() {
            doTraversal();
        }
    }
    final TraversalRunnable mTraversalRunnable = new TraversalRunnable();

    void doTraversal() {
        if (mTraversalScheduled) {
            mTraversalScheduled = false;
            // 1
            mHandler.getLooper().getQueue().removeSyncBarrier(mTraversalBarrier);

            if (mProfile) {
                Debug.startMethodTracing("ViewAncestor");
            }

            // 2
            performTraversals();

            if (mProfile) {
                Debug.stopMethodTracing();
                mProfile = false;
            }
        }
    }

    private void performTraversals() {
        ...
        // Execute enqueued actions on every traversal in case a detached view enqueued an action
        // 1
        getRunQueue().executeActions(mAttachInfo.mHandler);
        ...
        performMeasure(childWidthMeasureSpec, childHeightMeasureSpec);
        ...
        performLayout(lp, mWidth, mHeight);
        ...
        performDraw();
    }
}
在 ViewRootImpl 的 scheduleTraversals 方法中添加了同步屏障。调用 mChoreographer.postCallback 发送了一条异步消息到主线程的消息队列中,当收到 Vsync 信号后会调用异步消息的 TraversalRunnable 的 run 方法,调用了 doTraversal 方法,在 doTraversal 方法中先是移除了同步屏障,然后调用了 performTraversals 方法,在 performTraversals 方法中先调用了 HandlerActionQueue 的 executeActions 方法,将我们调用 View.post 方法传入的 Runnable 发送到主线程的消息队列,消息是同步类型。Handler 的消息队列循环过程中,在一个消息执行完之后才会取下一个消息。因为这一特性,所以在异步消息没执行完之前,消息队列中的消息是不会执行的。所以调用了 HandlerActionQueue 的 executeActions 方法,发送到主线程消息队列的消息们不会被立即执行,等 performTraversals 方法执行完,也就是异步消息结束之后, HandlerActionQueue 的 executeActions 方法,发送到主线程消息队列的消息们才会被执行。ViewRoomImpl 的 performTraversals 方法注释 1 处,开始了 View 绘制流程,依次是测量 performMeasure、布局 performLayout 和绘制 performDraw,这三个方法走完,标志着我们的 UI 已经完成显示了。此时异步消息执行结束,主线程的消息队列会依次去后面的消息。当执行到调用 View.post 传入的 Runnable 时,肯定可以获取到 View 的宽高。
回答问题
第一个问题:为啥 Handler 中不可以做耗时操作,就是因为 Handler 的消息是执行完一个,再执行下一个,如果你在某一消息中做了耗时操作,会影响后面消息的执行,从上面分析 ViewRootImpl 流程中了解到,我们 UI 绘制其实是主线程的一条消息。所以如果在某一消息中做了耗时操作,是会影响 UI 绘制,导致掉帧卡顿。
第三个问题:Activity 在什么时候显示的?是 onResume() 中吗?为什么? 首先不是 onResume 方法中,是onResume 方法之后,在 handleResumeActivity 中调用了 performResumeActivity 最终会调用到 onResume 方法,在 performResumeActivity 方法之后,调用了 WindowManagerImpl 的 addView 方法,创建了 ViewRootImpl 对象,并调用 ViewRootImpl 的 requestLayout 方法,开始 UI 的绘制流程。
第二个问题:View.post 为什么可以获取到 View 的宽高 它的答案就是上面所有知识点啦。
如果感觉文章可以学到东西,欢迎大佬关注小弟的公众号:Android 翻山之路
