View的绘制流程
View 的绘制流程是从 ViewRootImpl 的 performTraversals() 方法开始的,经过测量(measure)、布局(layout)和绘制(draw)三个过程才能把一个 View 绘制出来,measure方法用于测量 View 的宽高,layout用于确定 View 在父容器中的放置位置,draw负责做具体的绘制操作。
ViewRootImpl 的 performTraversal() 方法会依次调用 performMeasure,performLayout和 performDraw三个方法,这三个方法分别完成 DecorView 的测量、布局和绘制三大流程。
测量过程
对于 ViewGroup,除了要完成自己的测量,还要遍历调用子元素的 measure() 方法,而 View 只需通过 measure() 方法就能确定测量规格。
其中,MeasureSpec 在很大程度上决定了一个 View 的尺寸规格,MeasureSpec由两部分组成,一部分是测量模式,另一部分是测量的尺寸大小。
测量模式分为三类:
- EXACTLY:对应match_parent和具体数值这两种,检测到View所需要的精确大小
- AT_MOST :对应wrap_content,View的大小不能大于父容器的大小
- UNSPECIFIED:不对View进行任何限制,要多大给多大,一般用于系统内部,如ListView,ScrollView等
View 的 measure() 方法会调用 onMeasure() 方法,我们重写此方法,此方法的参数widthMeasureSpec 和 heightMeasureSpec 是从父 View 传过来的宽高测量规格,可以以此来获取默认宽高。
布局过程
layout() 方法的作用是 ViewGroup 用于确定子元素的位置,当 ViewGroup 的位置确定后,会在 onLayout() 方法中遍历所有子 View 并调用子 View 的 layout() 方法,确定子View 自己的位置。
View 的 layout() 方法首先会通过 setFrame() 方法设定 View 的边框,也就是 mLeft、mRight、mTop 和 mBottom 四个顶点的值,这时 View 在父 View 中的位置就确定了,设定了四个顶点后,layout() 方法就会调用onLayout() 方法确定子 View 的位置。
绘制过程
绘制过程的 draw() 方法中主要的 4 个绘制步骤为:绘制背景、绘制 View 内容、绘制子 View 内容以及绘制装饰(比如 foreground 和 scrollbar)。
getWidth()和getMeasuredWidth()的区别
getMeasuredWidth()必须在onMeasure之后使用才有效,getMeasuredWidth() 的取值最终来源于setMeasuredDimension() 方法调用时传递的参数, getWidth()返回的是,mRight - mLeft,mRight、mLeft分别表示 View 相对父容器的左右边缘位置,getWidth()必须在layout执行之后才有效。
        view.post {
            val width: Int = view.width
            val measuredWidth: Int = view.measuredWidth
            Log.i(TAG, "width: $width")
            Log.i(TAG, "measuredWidth: $measuredWidth")
        }
invalidate,postInvalidate和requestLayout区别
invalidate()方法在 UI 线程中调用,重绘当前 UI。postInvalidate() 方法在非 UI 线程中调用,通过Handler通知 UI 线程重绘,requestLayout()也可以达到重绘view的目的,但是与前两者不同,它会先调用onLayout()重新排版,再调用onDraw方法。
自定义View实现方式
- 继承系统View控件:继承自TextView等系统控件,在此基础上进行扩展;
- 继承系统ViewGroup:继承自LinearLayout等系统控件,在此基础上进行扩展;
- 继承View:不复用系统控件逻辑,继承View进行功能定义;
- 继承ViewGroup:不复用系统控件逻辑,继承ViewGroup进行功能定义;
- 自定义组合控件:多个控件组合成为一个新的控件,方便复用。
坐标系
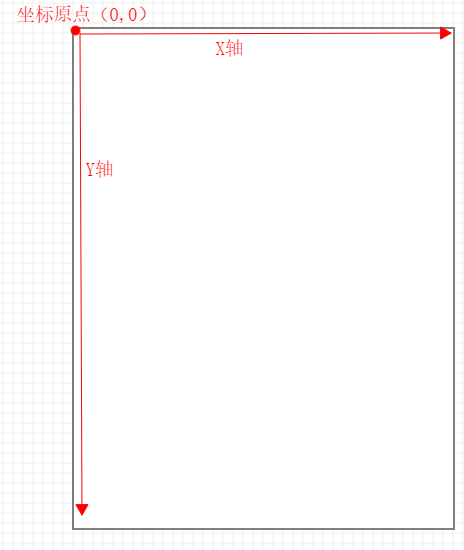
以屏幕左上角作为原点,原点向右是X轴的正轴,向下是Y轴正轴。

View的坐标系

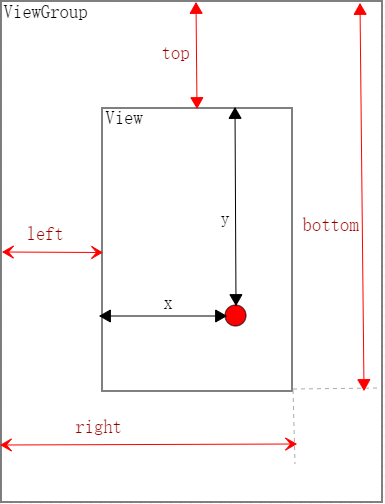
View的宽高计算:
val width = right - left
val height = bottom - top
View也提供了 width 和 height 来获取View的宽高,我们可以直接调用。
构造函数
class MyView : View {

    //创建对象的时候用到
    constructor(context: Context?) : super(context) {}

    //在xml布局文件中使用时自动调用
    constructor(context: Context?, attrs: AttributeSet?) : super(context, attrs) {}

    //不会自动调用,如果有默认style时,在第二个构造函数中调用
    constructor(context: Context?, attrs: AttributeSet?, defStyleAttr: Int) : super(
        context,
        attrs,
        defStyleAttr
    ) {
    }

    //API>21时才会用到,不会自动调用,如果有默认style时,在第二个构造函数中调用
    @RequiresApi(api = Build.VERSION_CODES.LOLLIPOP)
    constructor(
        context: Context?,
        attrs: AttributeSet?,
        defStyleAttr: Int,
        defStyleRes: Int
    ) : super(context, attrs, defStyleAttr, defStyleRes) {
    }
}
自定义属性
    <declare-styleable name="MyView">
        <attr name="viewAttr1" format="string" />
        <attr name="viewAttr2" format="string" />
    </declare-styleable>
class MyView(context: Context?, attrs: AttributeSet?) : View(context, attrs) {

    init {
        val typeArray = context?.obtainStyledAttributes(attrs, R.styleable.MyView)
        val viewAttr1 = typeArray?.getString(R.styleable.MyView_viewAttr1)
        val viewAttr2 = typeArray?.getString(R.styleable.MyView_viewAttr2)
        typeArray?.recycle()
    }

}
    <com.example.openglapp.MyView
        android:layout_width="match_parent"
        android:layout_height="match_parent"
        app:viewAttr1="hello"
        app:viewAttr2="world" />
继承系统View控件
这种方式会复用系统的逻辑,大多数情况下希望复用系统的onMeasure和onLayout流程,所以我们只需要重写onDraw方法。
下面,我们继承AppCompatTextView系统控件,给其绘制背景
class MyView(context: Context, attrs: AttributeSet?) : AppCompatTextView(context, attrs) {

    private val paint: Paint = Paint()

    override fun onDraw(canvas: Canvas?) {
        super.onDraw(canvas)
        paint.color = context.getColor(R.color.blue)
        val rect = Rect(0, 0, width, height)
        //绘制背景
        canvas?.drawRect(rect, paint)
    }

}
继承系统ViewGroup
这里简单继承了LinearLayout,往里面加入Button和TextView
class CusLinearLayout(context: Context) : LinearLayout(context) {

    private val button: Button = Button(context)
    private val textView = TextView(context)

    init {
        orientation = VERTICAL
        val layoutParam =
            LayoutParams(DensityUtils.dp2px(context, 300f), DensityUtils.dp2px(context, 300f))
        button.layoutParams = layoutParam
        textView.layoutParams = layoutParam
        textView.text = "welcome to pay attention to me"
        button.text = "button"
        button.setOnClickListener {
            Toast.makeText(context, "click", Toast.LENGTH_SHORT).show()
        }
        addView(button)
        addView(textView)
    }
}
继承View
这种方式因为不复用系统控件的逻辑,所以onDraw和onMeasure方法都要重写。
在View的源码中并没有对AT_MOST和EXACTLY两个模式做出区分,也就是说,View在 wrap_content 和 match_parent 两个模式下是完全相同的,都是 match_parent,这显然与我们平时用的View不同,所以我们要重写onMeasure方法。
class MyView(context: Context, attrs: AttributeSet?) : View(context, attrs) {

    private val paint: Paint = Paint()

    override fun onDraw(canvas: Canvas?) {
        super.onDraw(canvas)
        paint.color = Color.RED
        val viewWidth = width - paddingStart - paddingEnd
        val viewHeight = height - paddingTop - paddingBottom
        canvas?.drawRect(
            paddingStart.toFloat(),
            paddingTop.toFloat(), (viewWidth - paddingStart).toFloat(),
            (viewHeight + paddingTop).toFloat(), paint
        )
    }

    override fun onMeasure(widthMeasureSpec: Int, heightMeasureSpec: Int) {
        super.onMeasure(widthMeasureSpec, heightMeasureSpec)
        val widthSize = MeasureSpec.getSize(widthMeasureSpec)
        val widthMode = MeasureSpec.getMode(widthMeasureSpec)
        val heightSize = MeasureSpec.getSize(heightMeasureSpec)
        val heightMode = MeasureSpec.getMode(heightMeasureSpec)

        if (widthMode == MeasureSpec.AT_MOST && heightMode == MeasureSpec.AT_MOST) {
            //该方法用来设置View的宽高
            setMeasuredDimension(
                DensityUtils.dp2px(context, 300f),
                DensityUtils.dp2px(context, 300f)
            )
        } else if (widthMode == MeasureSpec.AT_MOST) {
            setMeasuredDimension(DensityUtils.dp2px(context, 300f), heightSize)
        } else if (heightMode == MeasureSpec.AT_MOST) {
            setMeasuredDimension(widthSize, DensityUtils.dp2px(context, 300f))
        }
    }

}
同时贴上dp和px的互转工具类
class DensityUtils {

    companion object {
        fun px2dp(context: Context, pxValue: Float): Int {
            val scale = context.resources.displayMetrics.density
            return (pxValue / scale + 0.5f).toInt()
        }

        fun dp2px(context: Context, dpValue: Float): Int {
            val scale = context.resources.displayMetrics.density
            return (dpValue * scale + 0.5f).toInt()
        }
    }

}
继承ViewGroup
这里简单实现一个流式布局FlowLayout
class FlowLayout : ViewGroup {

    constructor(context: Context?) : super(context) {}

    constructor(context: Context?, attrs: AttributeSet?) : super(context, attrs) {}

    override fun onLayout(changed: Boolean, l: Int, t: Int, r: Int, b: Int) {
        for (i in 0 until childCount) {
            val child = getChildAt(i)
            val rect = child.tag as Rect
            child.layout(rect.left, rect.top, rect.right, rect.bottom)
        }
    }

    override fun onMeasure(widthMeasureSpec: Int, heightMeasureSpec: Int) {
        super.onMeasure(widthMeasureSpec, heightMeasureSpec)
        //遍历去调用所有子元素的measure方法,这样child.measuredHeight才有值
        measureChildren(widthMeasureSpec, heightMeasureSpec)

        var measuredWidth = 0
        var measureHeight = 0
        val widthMode = MeasureSpec.getMode(widthMeasureSpec)
        val widthSize = MeasureSpec.getSize(widthMeasureSpec)
        val heightMode = MeasureSpec.getMode(heightMeasureSpec)
        val heightSize = MeasureSpec.getSize(heightMeasureSpec)
        //由于计算子view所占宽度,先减去PaddingRight,PaddingLeft在计算子元素位置时加上
        val compute = compute(widthSize - paddingRight)

        if (widthMode == MeasureSpec.EXACTLY) {
            measuredWidth = widthSize
        } else if (widthMode == MeasureSpec.AT_MOST) {
            measuredWidth = compute["allWidth"]!!
        }
        if (heightMode == MeasureSpec.EXACTLY) {
            measureHeight = heightSize
        } else if (heightMode == MeasureSpec.AT_MOST) {
            measureHeight = compute["allHeight"]!!
        }
        setMeasuredDimension(measuredWidth, measureHeight)
    }

    private fun compute(flowWidth: Int): Map<String, Int> {
        var aRow = true
        var rowsWidth = paddingLeft //当前行已占宽度
        var columnHeight = paddingTop //当前行已占高度
        var rowsMaxHeight = 0 //当前行所有子元素的最大高度

        for (i in 0 until childCount) {
            val child = getChildAt(i)
            //获取元素测量高度和宽度
            val measureWidth = child.measuredWidth
            val measureHeight = child.measuredHeight

            //获取元素边距
            val marginParams: MarginLayoutParams = child.layoutParams as MarginLayoutParams
            //子元素所占宽度
            val childWidth = marginParams.leftMargin + marginParams.rightMargin + measureWidth
            val childHeight = marginParams.topMargin + marginParams.bottomMargin + measureHeight
            rowsMaxHeight = rowsMaxHeight.coerceAtLeast(childHeight)
            //判断是否换行:该行已占大小+该元素大小>父容器宽度,则换行
            if (rowsWidth + childWidth > flowWidth) {
                rowsWidth = paddingLeft
                columnHeight += rowsMaxHeight
                rowsMaxHeight = childHeight
                aRow = false
            }
            rowsWidth += childWidth
            //给View设置tag,在onLayout给子元素设置位置遍历取出
            child.tag = Rect(
                rowsWidth - childWidth + marginParams.leftMargin,
                columnHeight + marginParams.topMargin,
                rowsWidth - marginParams.rightMargin,
                columnHeight + childHeight - marginParams.bottomMargin
            )
        }
        val flowMap = HashMap<String, Int>()
        flowMap["allWidth"] = if (aRow) rowsWidth else flowWidth
        //FlowLayout测量高度 = 当前行顶部已占高度 + 当前行内子元素最大高度 + FlowLayout的PaddingBottom
        flowMap["allHeight"] = columnHeight + rowsMaxHeight + paddingBottom
        return flowMap
    }

}
使用方式
<?xml version="1.0" encoding="utf-8"?>
<LinearLayout xmlns:android="http://schemas.android.com/apk/res/android"
    xmlns:tools="http://schemas.android.com/tools"
    android:layout_width="wrap_content"
    android:layout_height="wrap_content"
    tools:context=".MainActivity">

    <com.xzj.normalapp.FlowLayout
        android:id="@+id/flowLayout"
        android:layout_width="wrap_content"
        android:layout_height="wrap_content"
        android:padding="5dp" />

</LinearLayout>
class MainActivity : AppCompatActivity() {
    private var flowLayout: FlowLayout? = null
    private var list: MutableList<String> = ArrayList()

    override fun onCreate(savedInstanceState: Bundle?) {
        super.onCreate(savedInstanceState)
        setContentView(R.layout.activity_main)
        initFlow()
    }

    private fun initFlow() {
        val dp5 = DensityUtils.dp2px(this, 5f)
        val dp15 = DensityUtils.dp2px(this, 15f)
        flowLayout = findViewById(R.id.flowLayout)
        for (i in 0 until 10) { //加入的测试数据
            list.add("my")
            list.add("name")
            list.add("is")
            list.add("Uncle Xing")
        }
        //往容器内添加文本
        val layoutParams = LinearLayout.LayoutParams(
            ViewGroup.LayoutParams.WRAP_CONTENT,
            ViewGroup.LayoutParams.WRAP_CONTENT
        )
        layoutParams.setMargins(dp15, dp5, dp15, dp5)
        if (flowLayout != null) {
            flowLayout?.removeAllViews()
        }
        for (i in 0 until list.size) {
            val tv = TextView(this)
            tv.setPadding(dp15, dp5, dp15, dp5)
            tv.text = list[i]
            tv.setSingleLine()
            tv.layoutParams = layoutParams
            flowLayout?.addView(tv, layoutParams)
        }
    }

}
自定义组合控件
这方面,最常见的就是自定义标题栏,那下面就以此为例吧
自定义属性
    <declare-styleable name="MyToolbar">
        <attr name="left_button_visible" format="boolean" />
        <attr name="right_button_visible" format="boolean" />
        <attr name="title_text" format="string" />
        <attr name="right_button_text" format="string" />
        <attr name="left_button_text" format="string" />
    </declare-styleable>
标题栏的布局如下
<merge xmlns:android="http://schemas.android.com/apk/res/android">

    <Button
        android:id="@+id/toolbar_left"
        android:layout_width="wrap_content"
        android:layout_height="wrap_content"
        android:layout_alignParentStart="true"
        android:layout_centerVertical="true"
        android:layout_marginStart="7dp"
        android:minWidth="45dp"
        android:minHeight="45dp"
        android:textSize="14sp" />

    <TextView
        android:id="@+id/toolbar_title"
        android:layout_width="wrap_content"
        android:layout_height="wrap_content"
        android:layout_centerInParent="true"
        android:singleLine="true"
        android:textSize="17sp" />

    <Button
        android:id="@+id/toolbar_right"
        android:layout_width="wrap_content"
        android:layout_height="wrap_content"
        android:layout_alignParentEnd="true"
        android:layout_centerVertical="true"
        android:layout_marginEnd="7dp"
        android:minWidth="45dp"
        android:minHeight="45dp"
        android:textSize="14sp" />

</merge>
自定义标题栏
class MyToolbar(context: Context?, attrs: AttributeSet?) : RelativeLayout(context, attrs) {

    private var leftBtn: Button? = null
    private var rightBtn: Button? = null
    private var title: TextView? = null

    init {
        inflate(context, R.layout.toolbar, this)

        leftBtn = findViewById(R.id.toolbar_left)
        rightBtn = findViewById(R.id.toolbar_right)
        title = findViewById(R.id.toolbar_title)

        val attributes = context?.obtainStyledAttributes(attrs, R.styleable.MyToolbar)
        attributes?.let {
            //设置左边按钮是否显示
            val leftVisible = it.getBoolean(R.styleable.MyToolbar_left_button_visible, true)
            leftBtn?.visibility = if (leftVisible) View.VISIBLE else View.GONE
            //设置左边按钮的文字
            val leftText = it.getString(R.styleable.MyToolbar_left_button_text)
            if (!TextUtils.isEmpty(leftText)) {
                leftBtn?.text = leftText
            }

            //设置标题
            val titleText = it.getString(R.styleable.MyToolbar_title_text)
            if (!TextUtils.isEmpty(titleText)) {
                title?.text = titleText
            }

            //设置右边按钮是否显示
            val rightVisible = it.getBoolean(R.styleable.MyToolbar_right_button_visible, true)
            rightBtn?.visibility = if (rightVisible) View.VISIBLE else View.GONE
            //设置右边按钮文字
            val rightText = it.getString(R.styleable.MyToolbar_right_button_text)
            if (!TextUtils.isEmpty(rightText)) {
                rightBtn?.text = rightText
            }
        }
    }

}
使用
    <com.xzj.normalapp.MyToolbar
        android:layout_width="match_parent"
        android:layout_height="45dp"
        app:left_button_text="left"
        app:left_button_visible="true"
        app:right_button_text="right"
        app:right_button_visible="true"
        app:title_text="标题" />