AIDL是什么?
? AIDL是Android中IPC(Inter-Process Communication)方式中的一种,AIDL是Android Interface definition language的缩写,作用在两个进程(App)间通讯
其实可以理解一个app作为服务器 一个app作为客户端 .客户端可以从服务器获取数据
本文目的:
? 快速了解AIDL的基本格式,可以快速实现一个通讯流程.以及我在学习中踩得坑.
1.使用方法
目标:一个Server App负责提供数据 一个Client App 需要获取数据
-
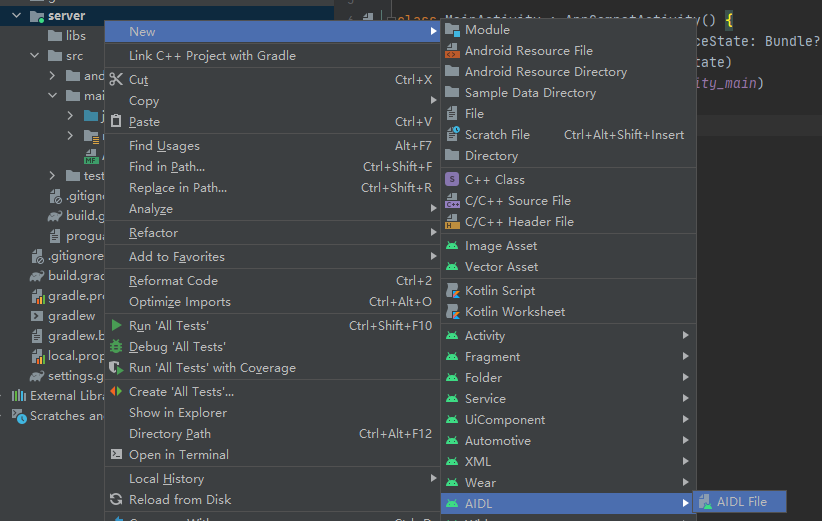
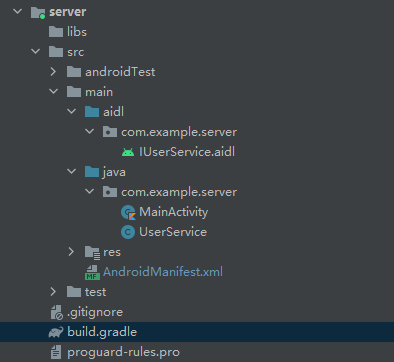
在server model中新建一个IUserService.aidl文件
重点:必须要rebuild project 一下 as会生成一个辅助文件 IUserService.java

// IUserService.aidl package com.example.server; interface IUserService { String getUserName(); } -
service app 中 新建一个Service
public class UserService extends Service { @Override public IBinder onBind(Intent intent) { return binder; } //IUserService.java 必须在rebuild project后才可以生成 IBinder binder = new IUserService.Stub() { @Override public String getUserName() { return "法外狂徒-张三"; } }; } -
注册service exported必须要加 允许外部调用 intent-filter添加action标识
<service android:name=".UserService" android:exported="true"> <intent-filter> <action android:name="com.example.server.action" /> </intent-filter> </service> -
添加一个默认的空的MainActviity 并注册

-
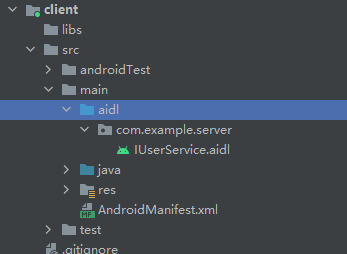
新建一个client app 并将server中的aidl目录整体copy过来 不要更改包名 直接粘贴过来

-
rebuild project 一下 as会生成一个辅助文件 IUserService.java 等下要使用IUserService.java文件
-
新建一个ServiceConnection 监听service 连接和断开
private IUserService mService; private ServiceConnection conn = new ServiceConnection() { @Override public void onServiceConnected(ComponentName name, IBinder iBinder) { Log.d("-----------------", "connect success"); mService = IUserService.Stub.asInterface(iBinder); } @Override public void onServiceDisconnected(ComponentName componentName) { Log.d("-----------------", "error disconnect"); mService = null; } }; -
先绑定先 bindservice 然后 可以获取server中的name字段 没啥重点 直接贴代码了
MainActivity.class
public class MainActivity extends AppCompatActivity {
    private IUserService mService;
    private ServiceConnection conn = new ServiceConnection() {
        @Override
        public void onServiceConnected(ComponentName componentName, IBinder iBinder) {
            Log.d("-----------------", "connect success");
            mService = IUserService.Stub.asInterface(iBinder);
        }

        @Override
        public void onServiceDisconnected(ComponentName componentName) {
            Log.d("-----------------", "error disconnect");
            mService = null;
        }
    };

    @Override
    public void onCreate(@Nullable Bundle savedInstanceState) {
        super.onCreate(savedInstanceState);
        setContentView(R.layout.activity_main);
    }

    public void onClick(View view) {
        switch (view.getId()) {
            case R.id.bind_service:
                Intent intent = new Intent();
                intent.setPackage("com.example.server");
                intent.setAction("com.example.server.action");
                boolean a = bindService(intent, conn, Context.BIND_AUTO_CREATE);
                Toast.makeText(this, "服务绑定" + a, Toast.LENGTH_LONG).show();
                break;
            case R.id.get_user_name:
                try {
                    String name = mService.getUserName();
                    Toast.makeText(this, "从server获取的name是:" + name, Toast.LENGTH_LONG).show();
                } catch (RemoteException e) {
                    e.printStackTrace();
                }
                break;
            default:
                break;
        }
    }
}
MainActivity的xml 没啥特别的 就两个按钮
<?xml version="1.0" encoding="utf-8"?> <LinearLayout xmlns:android="http://schemas.android.com/apk/res/android" xmlns:app="http://schemas.android.com/apk/res-auto" xmlns:tools="http://schemas.android.com/tools" android:layout_width="match_parent" android:layout_height="match_parent" android:orientation="vertical" tools:context=".MainActivity"> <androidx.appcompat.widget.AppCompatButton android:id="@+id/bind_service" android:layout_width="match_parent" android:layout_height="60dp" android:onClick="onClick" android:text="绑定服务" /> <androidx.appcompat.widget.AppCompatButton android:id="@+id/get_user_name" android:layout_width="match_parent" android:layout_height="60dp" android:onClick="onClick" android:text="获取信息" /> </LinearLayout> -
如果你的client端的 targetSdkVersion大约等于30 也就是andorid 11你需要在client的AndroidManifest.xml文件中添加之下代码
<?xml version="1.0" encoding="utf-8"?>
<manifest xmlns:android="http://schemas.android.com/apk/res/android"
    package="com.example.client">

    <queries>
        // 是server的 applicationId  包名
        <package android:name="com.example.server" />
    </queries>

    <application>
        ...
    </application>

</manifest>
2.需要注意的点
-
IUserService.Stub 无法导入 找不到文件
rebuild project 一下项目
-
服务绑定失败
查看第3步 是否添加exported标签
-
服务绑定失败
解决办法查看 第9步中的代码
查看build.gradle中的targetSdkVersion是否大约等于30 从android11 也就是30开始 app间的可见规则更改 详情可以查看谷歌文档 https://developer.android.google.cn/training/basics/intents/package-visibility
-
client获取信息时崩溃
查看绑定服务是否正常
3.demo及地址
码云地址 地址
tip:
这只是最基本的使用方法,如果查看aidl支持的类型 请百度
api30的改动经过我的测试 如果没有添加标签 会出现绑定service失败的情况
server 30 client 30 ×
server 30 client 29 √
server 29 client 30 ×
结论 和server关系不大 主要看client目标版本号
参考博客:
bolg:https://www.jianshu.com/p/d1fac6ccee98