探究服务
Android 多线程
线程的基本用法
Android多线程和java多线程基本都使用相同的语法,下面展示两种写法
class MyThread extends Thread{
	public void run(){
	//具体的操作逻辑
	}
}
new MyThread().start();
class MyRunable implements Runnable{
 	@Override
	public void run() {
	}
}
new Thread(new MyRunable()).start();
Message.what用来有Hander中用来标注是哪一个子线程发送过来的数据,从而可以对其进行一定规则的处理,就是一个村子里面有很多人一样的,what就是很每个人取一个名字,然后你可以根据名字来区分这些人,然后选择对应的操作。
<?xml version="1.0" encoding="utf-8"?>
<RelativeLayout xmlns:android="http://schemas.android.com/apk/res/android"

    android:layout_width="match_parent"
    android:layout_height="match_parent">

    <Button
        android:layout_width="match_parent"
        android:layout_height="wrap_content"
        android:text="Change Text"
        android:textAllCaps="false"/>

    <TextView
        android:layout_width="wrap_content"
        android:layout_height="wrap_content"
        android:text="Hello World!"
        android:layout_centerInParent="true"/>

</RelativeLayout>
package com.example.androidthreadtest;

import androidx.appcompat.app.AppCompatActivity;

import android.os.Bundle;
import android.os.Handler;
import android.os.Looper;
import android.os.Message;
import android.system.StructMsghdr;
import android.view.View;
import android.widget.Button;
import android.widget.TextView;
import android.widget.Toast;

public class MainActivity extends AppCompatActivity implements View.OnClickListener {

    public static final int UPDATE_TEXT = 1;

    private Button button;

    private TextView text;

    private Handler handler = new Handler(Looper.getMainLooper()){

        public void handleMessage(Message msg){
            switch (msg.what){
                case UPDATE_TEXT:
                    //这里可以进行UI操作
                    Toast.makeText(MainActivity.this, "主线程", Toast.LENGTH_SHORT).show();
                    text.setText("I Love You 金逸飞");
                    break;
                default:
                    break;
            }
        }

    };
    @Override
    protected void onCreate(Bundle savedInstanceState) {
        super.onCreate(savedInstanceState);
        setContentView(R.layout.activity_main);
        text = findViewById(R.id.text_view);
        button = findViewById(R.id.button);
        button.setOnClickListener(this);
    }

    @Override
    public void onClick(View view) {
        switch (view.getId()){
            case R.id.button:
                new Thread(new Runnable() {
                    @Override
                    public void run() {
                        Message message = new Message();
                        message.what = UPDATE_TEXT;
                        handler.sendMessage(message);//将Message对象发送出去
                    }
                }).start();
                break;
            default:
                break;
        }
    }
}
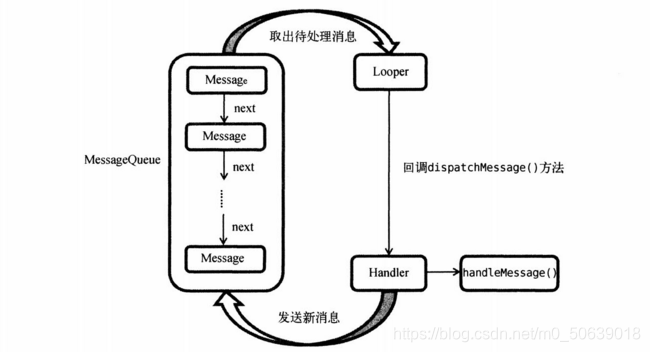
解析异步消息处理机制
| 名称 | 介绍 |
|---|---|
| Message | 在线程间传递消息,用于在不同线程间交换数据 |
| Hanlder | 处理者,主要用于发送和处理消息。一般用sendMessage()发送消息;处理后传递到handlerMessage(),一般需要重写 |
| MessangQueue | 消息队列,存放通过Hanlder发送的消息,每一个线程只会有一个MessageQueue对象 |
| Looper | 是MessageQueue的管家,调用loop()后进入无限循环每当发现MessageQueue中存在一条消息,就会将它取出,并传递到Handler的handlerMessage()方法中。每个线程只会有一个Looper对象 |
步骤:
- 首先需要在主线程当中创建一个
Handler对象,并重写handleMessage()方法。 - 然后当子线程中需要进行UI操作时,就创建一个
Message对象,并通过Handler将这条消息发送出去(sendMessage()方法)。 - 之后这条消息会被添加到
MessageQueue的队列中等待被处理,而Looper则会一直尝试从MessageQueue中取出待处理消息, - 最后分发回 Handler的
handleMessage()方法中。由于Handler是在主线程中创建的,所以此时handleMessage()方法中的代码也会在主线程中运行,于是我们在这里就可以安心地进行UI操作了。

另外:runOnUIThread():是一个异步消息处理机制的接口封装。
runOnUiThread(new Runnable() {
        @Override
        public void run() {
        //这里可用于更新UI
        }
});
使用AsyncTask(已弃用)
三个泛型参数:
| 参数 | 用途 |
|---|---|
| Params | 在执行AsyncTask时需要传入的参数,可用于在后台任务中使用 |
| Progress | 后台任务执行时,如果需要在界面上显示当前进度,则使用这里指定的泛型类型作为进度单位 |
| Result | 当任务执行完毕后,如果需要对结果进行返回,则使用这里指定的泛型类型作为返回值类型 |
因此,一个最简单的自定义AsyncTask就可以写成如下方式:
class DownloadTask extends AsyncTask<Void,Integer,Boolean> {
重写的方法
| 方法 | 作用 |
|---|---|
| onPreExecute() | 在后台任务开始前执行之前的调用,用于进行一些界面上的初始化操作,比如显示一个进度条对话框等等 |
| doInBackground() | 所有代码在子线程中运行,可以在这里处理所有耗时的任务 |
| onProgressUpdate() | 这个方法中的参数是在后台任务中传递过来的。在这里可以对UI进行操作。 |
服务的基本用法
package com.example.servicetestr;

import android.app.Service;
import android.content.Intent;
import android.os.IBinder;

public class MyService extends Service {
    public MyService() {
    }

    @Override
    public IBinder onBind(Intent intent) {
        throw new UnsupportedOperationException("Not yet implemented");
    }

    @Override
    public void onCreate() {
        super.onCreate();
    }

    //在启动服务的时候调用
    @Override
    public int onStartCommand(Intent intent, int flags, int startId) {
        return super.onStartCommand(intent, flags, startId);
    }

    @Override
    public void onDestroy() {
        super.onDestroy();
    }
}
服务的基本用法
启动和停止服务
MyService.java
package com.example.servicetestr;

import android.app.Service;
import android.content.Intent;
import android.os.IBinder;
import android.util.Log;

public class MyService extends Service {
    public MyService() {
    }

    @Override
    public IBinder onBind(Intent intent) {
        throw new UnsupportedOperationException("Not yet implemented");
    }

    @Override
    public void onCreate() {
        super.onCreate();
        Log.d("MainActivity","onCreate executed");
    }

    //在启动服务的时候调用
    @Override
    public int onStartCommand(Intent intent, int flags, int startId) {
        Log.d("MainActivity","onStartCommand executed");
        return super.onStartCommand(intent, flags, startId);
    }

    @Override
    public void onDestroy() {
        super.onDestroy();
        Log.d("MainActivity","onDestroy executed");
    }
}
MainActivity.java
@Override
    protected void onCreate(Bundle savedInstanceState) {
        super.onCreate(savedInstanceState);
        setContentView(R.layout.activity_main);
        Button startService = findViewById(R.id.start_service);
        Button stopService = findViewById(R.id.stop_service);
        startService.setOnClickListener(this);
        stopService.setOnClickListener(this);
    }

    @Override
    public void onClick(View view) {
        switch (view.getId()){
            case R.id.start_service:{
                Intent startIntent = new Intent(this,MyService.class);
                startService(startIntent);
                break;
            }
            case R.id.stop_service:{
                Intent stopIntent = new Intent(this,MyService.class);
                stopService(stopIntent);
                break;
            }
            default:
                break;
        }
    }
活动和服务进行通信
MainActivity.java
private MyService.DownloadBinder downloadBinder;

    private ServiceConnection connection = new ServiceConnection() {
        @Override
        public void onServiceConnected(ComponentName componentName, IBinder iBinder) {
            downloadBinder = (MyService.DownloadBinder) iBinder;
            downloadBinder.startDownload();
            downloadBinder.getProgress();
        }

        @Override
        public void onServiceDisconnected(ComponentName componentName) {
        }
    };

    @Override
    protected void onCreate(Bundle savedInstanceState) {
        super.onCreate(savedInstanceState);
        setContentView(R.layout.activity_main);
        Button startService = findViewById(R.id.start_service);
        Button stopService = findViewById(R.id.stop_service);
        Button bindService = findViewById(R.id.bind_service);
        Button unbindService = findViewById(R.id.unbind_service);
        startService.setOnClickListener(this);
        stopService.setOnClickListener(this);
        bindService.setOnClickListener(this);
        unbindService.setOnClickListener(this);
    }

    @Override
    public void onClick(View view) {
        switch (view.getId()){
            case R.id.start_service:{
                Intent startIntent = new Intent(this,MyService.class);
                startService(startIntent);
                break;
            }
            case R.id.stop_service:{
                Intent stopIntent = new Intent(this,MyService.class);
                stopService(stopIntent);
                break;
            }
            case R.id.bind_service:{
                Intent bindIntent = new Intent(this,MyService.class);
                bindService(bindIntent,connection,BIND_AUTO_CREATE);
                break;
            }
            case R.id.unbind_service:{
                Intent unbindIntent = new Intent(this,MyService.class);
                unbindService(connection);
                break;
            }
            default:
                break;
        }
    }
MyService.java
private DownloadBinder mBinder = new DownloadBinder();

    class DownloadBinder extends Binder{
        public void startDownload(){
            Log.d("MyService","startDownload executed");

        }

        public int getProgress(){
            Log.d("MyService","getProgress executed");
            return 0;
        }
    }

    public MyService() {
    }

    @Override
    public IBinder onBind(Intent intent) {
        return mBinder;
    }
服务的更多技巧
使用前台服务
@Override
        public void onCreate() {
            super.onCreate();
            Log.d("MainActivity","onCreate executed");
            Intent intent = new Intent(this,MainActivity.class);
            PendingIntent pi = PendingIntent.getActivity(this,0, intent,0);
            Notification notification = new NotificationCompat.Builder(this)
                    .setContentTitle("This is content title")
                    .setContentText("This is content text")
                    .setWhen(System.currentTimeMillis())
                    .setSmallIcon(R.mipmap.ic_launcher)
                    .setLargeIcon(BitmapFactory.decodeResource(getResources(),R.mipmap.ic_launcher))
                    .setContentIntent(pi)
                    .build();
            startForeground(1,notification);
    }
IntentService.java
MyIntentService.java
package com.example.servicetestr;

import android.app.IntentService;
import android.content.Intent;
import android.util.Log;

import androidx.annotation.Nullable;
import androidx.core.app.JobIntentService;

public class MyIntentService extends IntentService {

    public MyIntentService(String name) {
        super(name);
    }

    @Override
    protected void onHandleIntent(@Nullable Intent intent) {
        //打印当前线程id
        Log.d("MyIntentService","Thread id is "+Thread.currentThread().getId());
    }

    @Override
    public void onDestroy() {
        super.onDestroy();
        Log.d("MyIntentService","onDestroy executed");
    }
}