目录
5. 修改cpp/CMakeLists.txt, 准备编译cpp工程
7. 编写简单android界面, 测试ImageClassify结果
环境:
win10
jdk1.8
android studio 4.2.2
?? ?SDK Platforms:
?? ??? ?Android 11(R) API Level 30
?? ?SDK Tools:
?? ??? ?Cmake 3.10.2
?? ??? ?NDK 20.0.5594570
TNN v0.3.0
?? ?官方提供的android库: https://github.com/Tencent/TNN/releases/download/v0.3.0/tnn-v0.3.0-android.zip
?? ?源码: https://github.com/Tencent/TNN/archive/refs/tags/v0.3.0.zip
0. 准备
下载jdk1.8
安装android studio, 打开, 配置好jdk,sdk等, 去Tools--SDK Manager, 确保以下环境已安装:
?? ?SDK Platforms:
? ? ? ? ***Android 11(R) API Level 30
?? ?SDK Tools:
?? ??? ?***Android SDK Build-Tools 31(右下角show package details, 勾选30.0.2)
?? ??? ?***Cmake 3.10.2
?? ??? ?***NDK 20.0.5594570
下载TNN0.3.0编译好的android库 以及 源码(为了借用里面android demo代码), 解压
1. 创建android ndk工程
打开android studio, 新建Native C++工程,
 这里Minimum SDK: API 19 Android 4.4
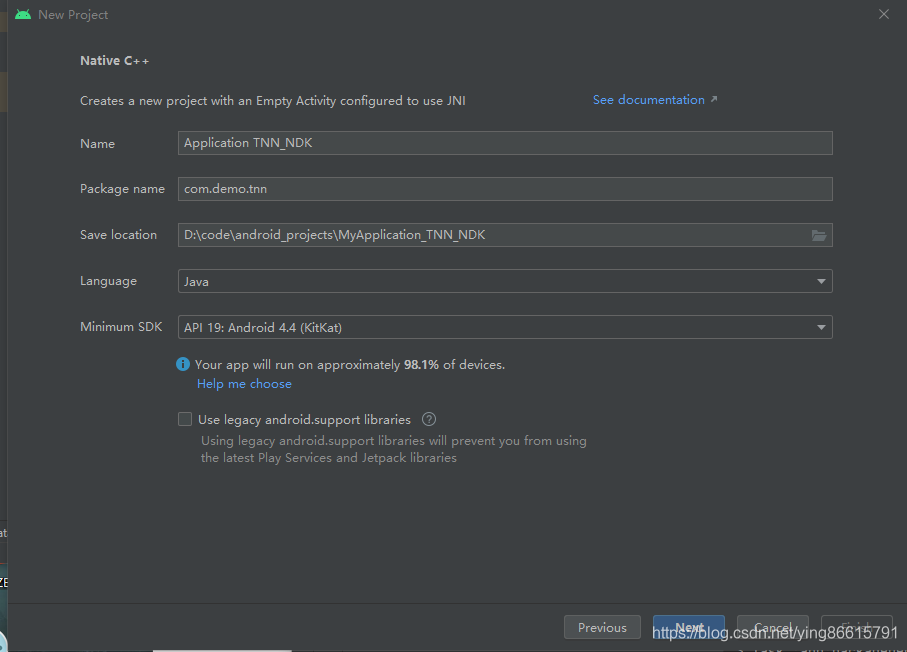

工程建立后文件结构如下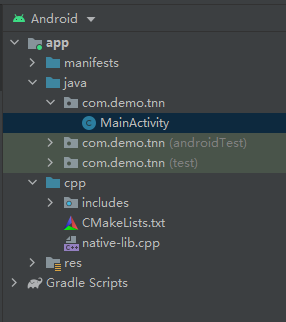
切换Project视图, 结构如下
之后点run运行看看没有报错就好.
我这里默认使用 Build Tools 31进行build, 提示错误, 需要用低版本的Build Tools

解决: 去Tools--SDK Manager--SDK Tools查看已安装的版本(右下角Show Package Details勾选)
这里我选择了30.0.2, 点Apply就能安装了(上面第0步已经提到了)
之后去app/build.gradle, 把buildToolsVersion "31.0.0"改为buildToolsVersion "30.0.2"
这里给出我用到的app/build.gradle
plugins {
    id 'com.android.application'
}

android {
    compileSdkVersion 30
    buildToolsVersion "30.0.2"

    defaultConfig {
        applicationId "com.demo.tnn"
        minSdkVersion 19
        targetSdkVersion 30
        versionCode 1
        versionName "1.0"

        testInstrumentationRunner "androidx.test.runner.AndroidJUnitRunner"
        externalNativeBuild {
            cmake {
                cppFlags ''
            }
        }
    }

    buildTypes {
        release {
            minifyEnabled false
            proguardFiles getDefaultProguardFile('proguard-android-optimize.txt'), 'proguard-rules.pro'
        }
    }
    compileOptions {
        sourceCompatibility JavaVersion.VERSION_1_8
        targetCompatibility JavaVersion.VERSION_1_8
    }
    externalNativeBuild {
        cmake {
            path file('src/main/cpp/CMakeLists.txt')
            version '3.10.2'
        }
    }
    buildFeatures {
        viewBinding true
    }
}

dependencies {

    implementation 'androidx.appcompat:appcompat:1.2.0'
    implementation 'com.google.android.material:material:1.2.1'
    implementation 'androidx.constraintlayout:constraintlayout:2.0.1'
    testImplementation 'junit:junit:4.+'
    androidTestImplementation 'androidx.test.ext:junit:1.1.2'
    androidTestImplementation 'androidx.test.espresso:espresso-core:3.3.0'
}
2. 分析默认生成的工程
cpp目录, 就是使用NDK进行cpp开发的工程目录, 编译(Build--Make Project)后默认生成so库文件名为libnative-lib.so, 位于app\build\intermediates\stripped_native_libs\debug\out\lib\(架构)\目录下.
如果需要提取so文件, 就从这里把so文件复制到其他地方保存.
而在ndk工程中编译时会自动把需要的so文件打包到apk里面,
这个ndk工程的编译是通过cpp/CMakeLists.txt实现的, 在里面可以指定cpp的各种依赖(头文件, 库文件等)
com.demo.tnn.MainActivity里, 一开始通过System.loadLibrary("native-lib")将libnative-lib.so库导入进来. 底下声明了一个native函数stringFromJNI, java中就是通过这种native方法和cpp(so库)交互的, 这里并且没有用到额外的jni头文件, 它的实现位于cpp/native-lib.cpp里面.
然而一般情况下, 我们需要建立额外的xxx_jni.h文件用来声明所有的native函数.
通过以上分析, 总结一下如果要在android用TNN的so库, 大概需要以下步骤:
0. 新建java类, 来声明android里用到的tnn函数接口, 这些接口都是native方法(即jni)
1. 新建h头文件, 声明这些jni的cpp函数
2. 新建cpp文件, 实现这些jni
3. 把用到的TNN相关的头文件和so库写在cpp/CMakeLists.txt里
下面以TNN android demo中的ImageClassify为例
3. 写好java native接口
解压TNNv0.3.0源码,?
借鉴examples\android\demo\src\main\java\com\tencent\tnn\demo\ImageClassify.java文件
里面是ImageClassify在android用到的各个函数接口
(注意生成的so库和对应的java native方法接口是绑定的, 其他地方使用的时候, 这些java native类的包名(目录结构)和类名都不能变)
新建com.tencent.tnn.demo.ImageClassify类, 把上面的ImageClassify.java内容复制到自己新建的这个类
package com.tencent.tnn.demo;

import android.graphics.Bitmap;

public class ImageClassify {
    public native int init(String modelPath, int width, int height, int computeUnitType);
    public native boolean checkNpu(String modelPath);
    public native int deinit();
    public native int[] detectFromImage(Bitmap image, int width, int height);
}
4. 实现这些java native方法(jni)
借鉴官方写好的接口
将examples\android\demo\src\main\jni\cc下?
helper_jni.cc
helper_jni.h
image_classify_jni.cc
image_classify_jni.h
复制到自己工程cpp目录下
借鉴官方写好的接口
将examples\base下?
image_classifier.cc
image_classifier.h
sample_timer.cc
sample_timer.h
tnn_sdk_sample.cc
tnn_sdk_sample.h
复制到自己工程cpp目录下
新建com.tencent.tnn.demo.ImageClassify类, 把examples\android\demo\src\main\java\com\tencent\tnn\demo\Helper.java内容复制到自己新建的类 (这是为了对应helper_jni.h中的JNIEXPORT JNICALL jstring TNN_HELPER(getBenchResult)(JNIEnv *env, jobject thiz))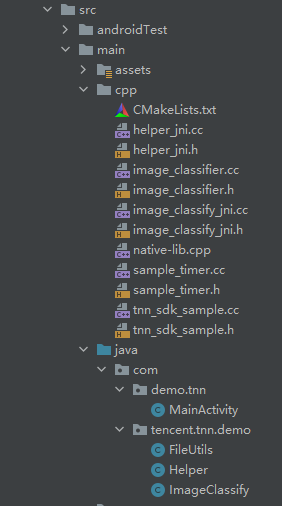
5. 修改cpp/CMakeLists.txt, 准备编译cpp工程
首先解压下载的TNN android库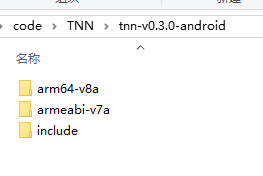
这里官方只提供了arm64-v8a和armeabi-v7a结构的, 所以在CMakeLists只能针对这两种架构进行编译, 其他结构如x86会报错. Android Studio默认gradle会对所有ABI(架构)进行构建
首先把本工程cpp目录下的头文件, 以及TNN android库里面的头文件目录添加到include_directories, CMAKE_SOURCE_DIR就是CMakeLists.txt所在目录, 就是cpp目录
TNN android库里面的头文件是和TNN android库的so文件搭配的, 这个是最关键的
set(TNN_ROOT D:/code/TNN)
set(TNN_ANDROID_ROOT ${TNN_ROOT}/tnn-v0.3.0-android)
include_directories(${TNN_ANDROID_ROOT}/include)
include_directories(${CMAKE_SOURCE_DIR}/)
再针对arm64-v8a和armeabi-v7a两种架构进行编译, 对于其他平台, 这里只编译native-lib.cpp(前提是没有改动这个文件)
最后通过-ljnigraphics链接jnigraphics库, 目的是解决错误: undefined reference to 'AndroidBitmap_getInfo'
完整的CMakelists.txt内容如下:
# For more information about using CMake with Android Studio, read the
# documentation: https://d.android.com/studio/projects/add-native-code.html

# Sets the minimum version of CMake required to build the native library.

cmake_minimum_required(VERSION 3.10.2)

# Declares and names the project.

project("tnn")

set(TNN_ROOT D:/code/TNN)
set(TNN_ANDROID_ROOT ${TNN_ROOT}/tnn-v0.3.0-android)
include_directories(${TNN_ANDROID_ROOT}/include)
include_directories(${CMAKE_SOURCE_DIR}/)


if((ANDROID_ABI STREQUAL "arm64-v8a") OR (ANDROID_ABI STREQUAL "armeabi-v7a"))
    #=== 导入TNN库libTNN.so
    add_library (tnn_lib SHARED IMPORTED)
    set_target_properties(tnn_lib PROPERTIES IMPORTED_LOCATION ${TNN_ANDROID_ROOT}/${ANDROID_ABI}/libTNN.so)

    #=== 编译写好的接口, 生成链接文件
    file(GLOB_RECURSE TNN_WRAPPER_SRCS ${CMAKE_SOURCE_DIR}/*.cc)    # 包含TNN的代码
    file(GLOB_RECURSE OTHER_SRCS ${CMAKE_SOURCE_DIR}/*.cpp)         # 不包含TNN的代码
    add_library( # Sets the name of the library.
            native-lib
            # Sets the library as a shared library.
            SHARED
            # Provides a relative path to your source file(s).
            ${TNN_WRAPPER_SRCS} ${OTHER_SRCS})

    #=== 将TNN库与目标文件链接
    target_link_libraries( # Specifies the target library.
            native-lib tnn_lib)
else()
    #=== 编译不包含TNN的接口, 生成链接文件
    file(GLOB_RECURSE OTHER_SRCS ${CMAKE_SOURCE_DIR}/native-lib.cpp) # 不包含TNN的代码
    add_library( # Sets the name of the library.
            native-lib
            # Sets the library as a shared library.
            SHARED
            # Provides a relative path to your source file(s).
            ${OTHER_SRCS})
endif()


#=== log-lib是工程建立后默认就有的
#=== 似乎用来在android中打印cpp代码的log
#=== 参考https://stackoverflow.com/questions/4629308/any-simple-way-to-log-in-android-ndk-code
find_library( # Sets the name of the path variable.
        log-lib
        # Specifies the name of the NDK library that
        # you want CMake to locate.
        log )

#=== 添加动态链接库jnigraphics解决AndroidBitmap_getInfo报错
target_link_libraries( # Specifies the target library.
        native-lib
        -ljnigraphics
        # Links the target library to the log library
        # included in the NDK.
        ${log-lib} )
6. 编译cpp工程
现在点Build--Make Project可以编译整个工程, 如果没有报错, 可以在app\build\intermediates\stripped_native_libs\debug\out下面看到生成的库文件
7. 编写简单android界面, 测试ImageClassify结果
设计界面(这里也是借鉴TNN官方的examples/android/demo/src/main/res/layout/fragment_image_detector.xml)
这里给出完整的activity_main.xml
<?xml version="1.0" encoding="utf-8"?>
<androidx.constraintlayout.widget.ConstraintLayout xmlns:android="http://schemas.android.com/apk/res/android"
    xmlns:app="http://schemas.android.com/apk/res-auto"
    xmlns:tools="http://schemas.android.com/tools"
    android:layout_width="match_parent"
    android:layout_height="match_parent"
    tools:context=".MainActivity">

    <TextView
        android:id="@+id/tnn_result"
        android:layout_width="wrap_content"
        android:layout_height="wrap_content"
        android:text="@string/textview_tnn_result"
        app:layout_constraintBottom_toTopOf="@+id/button_run_tnn"
        app:layout_constraintLeft_toLeftOf="parent"
        app:layout_constraintRight_toRightOf="parent"
        app:layout_constraintTop_toTopOf="parent"
        app:layout_constraintVertical_bias="0.9" />

    <Button
        android:id="@+id/button_run_tnn"
        android:layout_width="wrap_content"
        android:layout_height="wrap_content"
        android:text="@string/button_run_tnn"
        app:layout_constraintBottom_toBottomOf="parent"
        app:layout_constraintEnd_toEndOf="parent"
        app:layout_constraintStart_toEndOf="@+id/toggleButton_gpu"
        app:layout_constraintTop_toTopOf="parent"
        app:layout_constraintVertical_bias="0.9" />

    <ImageView
        android:id="@+id/image_origin"
        android:layout_width="wrap_content"
        android:layout_height="wrap_content"
        app:layout_constraintBottom_toTopOf="@+id/tnn_result"
        app:layout_constraintEnd_toEndOf="parent"
        app:layout_constraintStart_toStartOf="parent"
        app:layout_constraintTop_toTopOf="parent"
        tools:srcCompat="@tools:sample/avatars" />

    <ToggleButton
        android:id="@+id/toggleButton_gpu"
        android:layout_width="wrap_content"
        android:layout_height="wrap_content"
        android:background="@drawable/toggle_selector"
        android:textOff=""
        android:textOn=""
        app:layout_constraintBottom_toBottomOf="parent"
        app:layout_constraintEnd_toStartOf="@id/button_run_tnn"
        app:layout_constraintStart_toStartOf="parent"
        app:layout_constraintTop_toTopOf="parent"
        app:layout_constraintVertical_bias="0.9" />

    <TextView
        android:id="@+id/textView"
        android:layout_width="wrap_content"
        android:layout_height="wrap_content"
        android:text="GPU"
        app:layout_constraintBottom_toBottomOf="parent"
        app:layout_constraintEnd_toStartOf="@id/toggleButton_gpu"
        app:layout_constraintHorizontal_bias="0.765"
        app:layout_constraintStart_toStartOf="parent"
        app:layout_constraintTop_toTopOf="parent"
        app:layout_constraintVertical_bias="0.883" />

</androidx.constraintlayout.widget.ConstraintLayout>
借鉴TNN android demo把这些文件复制到自己的工程里?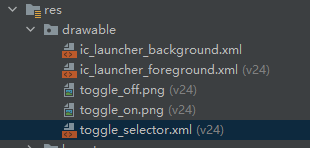
assets文件夹需要手动创建(右键main--new--folder--assets folder)
TNN-0.3.0\model下SqueezeNet整个文件夹复制到自己的assets下
再把src/main/java/com/tencent/tnn/demo/FileUtils.java复制到自己工程里,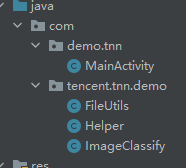
最后写个简单的交互demo, run通就行了. 这里给出我的完整的MainActivity.java代码
package com.demo.tnn;

import androidx.appcompat.app.AppCompatActivity;
import androidx.core.content.ContextCompat;

import android.Manifest;
import android.content.Context;
import android.content.pm.PackageManager;
import android.content.res.AssetManager;
import android.graphics.Bitmap;
import android.graphics.BitmapFactory;
import android.graphics.drawable.ColorDrawable;
import android.os.Bundle;
import android.os.Environment;
import android.util.Log;
import android.view.View;
import android.widget.CompoundButton;
import android.widget.TextView;

import com.demo.tnn.databinding.ActivityMainBinding;
import com.tencent.tnn.demo.FileUtils;
import com.tencent.tnn.demo.Helper;
import com.tencent.tnn.demo.ImageClassify;

import java.io.BufferedReader;
import java.io.File;
import java.io.FileOutputStream;
import java.io.IOException;
import java.io.InputStream;
import java.io.InputStreamReader;
import java.io.OutputStream;
import java.util.ArrayList;

public class MainActivity extends AppCompatActivity {

    private final static String TAG = String.format("==== TNN NDK %s ====", MainActivity.class.getSimpleName());
    private static final String IMAGE = "tiger_cat.jpg";
    private static final String RESULT_LIST = "synset.txt";
    private static final int NET_INPUT = 224;
    private boolean mUseGPU = false;
    private String resultPre = null;
    private ImageClassify mImageClassify = new ImageClassify();

    // Used to load the 'native-lib' library on application startup.
    static {
        System.loadLibrary("native-lib");
    }
    /**
     * A native method that is implemented by the 'native-lib' native library,
     * which is packaged with this application.
     */
    public native String stringFromJNI();

    private ActivityMainBinding binding;

    @Override
    protected void onCreate(Bundle savedInstanceState) {
        super.onCreate(savedInstanceState);

        binding = ActivityMainBinding.inflate(getLayoutInflater());
        setContentView(binding.getRoot());

        // Example of a call to a native method
        //TextView tv = binding.sampleText;
        //tv.setText(stringFromJNI());

        resultPre = getResources().getString(R.string.textview_tnn_result);
        binding.buttonRunTnn.setOnClickListener(new View.OnClickListener() {
            @Override
            public void onClick(View view) {
                binding.toggleButtonGpu.setEnabled(false);
                startTNN();
                binding.toggleButtonGpu.setEnabled(true);
            }
        });
        binding.toggleButtonGpu.setOnCheckedChangeListener(new CompoundButton.OnCheckedChangeListener() {
            @Override
            public void onCheckedChanged(CompoundButton buttonView, boolean isChecked) {
                onSwichGPU(isChecked);
            }
        });
        binding.tnnResult.setText(resultPre+"Hello World!");
    }

    private void onSwichGPU(boolean b)
    {
        mUseGPU = b;
        binding.tnnResult.setText(String.format(resultPre + "mUseGPU: %b", b));
    }
    private void startTNN() {
        // ==== 0. copy model file from assets to app Files
        //String targetDir =  getFilesDir().getAbsolutePath(); // 复制到内部存储上
        String targetDir = getExternalFilesDir("").getAbsolutePath(); // 复制到sdcard上
        String[] modelPathsDetector = {
                "squeezenet_v1.1.tnnmodel",
                "squeezenet_v1.1.tnnproto",
        };
        // 把模型复制到targetDir: com.demo.tnn/files目录下
        for (int i = 0;i< modelPathsDetector.length; i++) {
            String modelFilePath = modelPathsDetector[i];
            String interModelFilePath = targetDir + "/" + modelFilePath ;
            FileUtils.copyAsset(getAssets(), "SqueezeNet/"+modelFilePath, interModelFilePath);
        }

        // ==== 1. 设置图片
        final Bitmap originBitmap = FileUtils.readBitmapFromFile(getAssets(), IMAGE);
        final Bitmap scaleBitmap = Bitmap.createScaledBitmap(originBitmap, NET_INPUT, NET_INPUT, false);
        binding.imageOrigin.setImageBitmap(originBitmap);
        // 读取标签
        ArrayList<String> result_list = FileUtils.ReadListFromFile(getAssets(), RESULT_LIST);
        // ==== 2. init model
        int device = 0; // CPU
        if (mUseGPU) {
            device = 1; // GPU
        }
        int result = mImageClassify.init(targetDir, NET_INPUT, NET_INPUT, device);
        // ==== 3. run model
        if (result == 0) {
            Log.d(TAG, "detect from image");
            int [] indexArray= mImageClassify.detectFromImage(scaleBitmap, NET_INPUT, NET_INPUT);
            Log.d(TAG, "detect from image result " + result + " index :" + indexArray);
            if(indexArray != null && indexArray.length > 0) {
                Log.d(TAG, "detect index " + indexArray[0]);
                // 解析识别结果
                String resultText = "result: " + result_list.get(indexArray[0]) + " " + Helper.getBenchResult();
                binding.tnnResult.setText(resultPre + resultText);
            }
            // 释放模型
            mImageClassify.deinit();
        } else {
            Log.e(TAG, "failed to init model " + result);
        }
    }
}
8. 结果
测试手机, 红米note10 pro, miui 12.5
run app后的结果,
以上是直接在android中通过ndk开发TNN的应用,
上面提到, 编译后会生成libXXXX.so库, 可以把这些库文件保存起来, 在其他android工程中调用
具体怎么调用:
0. 写好java接口, 上面的例子中用到的接口就是Helper.java和ImageClassify.java这两个,?保证包名类名和当初编译so库时的一样, 否则在新工程编译时会因为函数名变化了而找不到函数
1. 在app/src/main下新建jniLibs文件夹, 建立后System.loadLibrary("xxx")会默认在这个文件夹下面查找so库(如果不想用jniLibs这个文件夹, 想让工程去其他文件夹查找, 就要在build.gradle中指定jniLibs.srcDirs=xxx)
2. System.loadLibrary后, 就可以在android中调用啦
有机会再学学怎么脱离android studio, 单独使用ndk-build在命令行打包so库, 参考https://blog.csdn.net/luo_boke/article/details/109362013
?
?
?
?
?
?
?
?
?
?
?
?