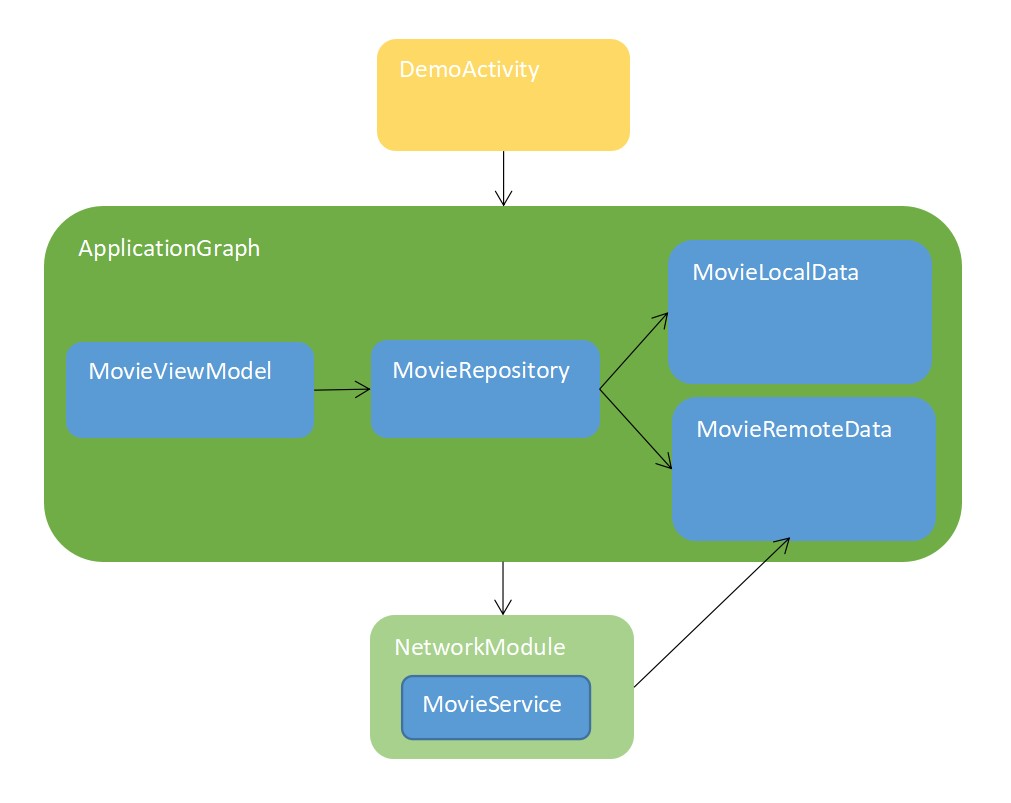
依赖关系图

Dagger2的功能十分强大,上述实战仍有不少未提及的高阶用法,感兴趣者可进一步尝试。
- 自定义作用域的@Scope
- 注释子组件的@Subcomponent
- 注释抽象方法的@Binds
- 一个接口指定多个实现的@Named
…
Dagger2导航的支持
Android Studio针对Dagger2的导航进行了支持,方便开发者快速回溯依赖关系。

- 点击向上的箭头可以查看该实例注入的提供方
- 点击向下的树形图会将您转到或展开该实例被用作依赖项的位置或列表
Dagger2在SystemUI上应用
对于小型项目而言,引入DI框架显得大材小用、大动干戈。而且对于后期接手人员,如果对于DI框架不熟悉的话,维护将变得尤为困难。似乎只有大型项目才能让它自由地施展拳脚。
前些年我在调查某个导航栏Bug的时候查阅过SystemUI的代码,当时意外地发现大量的模块包括StatusBar、Recents、Keyguard等都是DI方式引入的。虽然对Dagger略有耳闻,但仍看得云里雾里,不得其解。
SystemUI作为Android系统里最核心最复杂的App,称之为大型项目毫不过分。现在就来看看Dagger2如何助力这个大型App管理大量的系统组件。
※ 源码版本:Android 11
SystemUI中主要的依赖实例都管理在Denpency类中。
public class Dependency {
    ...
    @Inject @Background Lazy<Executor> mBackgroundExecutor;
    @Inject Lazy<ClockManager> mClockManager;
    @Inject Lazy<ActivityManagerWrapper> mActivityManagerWrapper;
    @Inject Lazy<DevicePolicyManagerWrapper> mDevicePolicyManagerWrapper;
    @Inject Lazy<PackageManagerWrapper> mPackageManagerWrapper;
    @Inject Lazy<SensorPrivacyController> mSensorPrivacyController;
    @Inject Lazy<DockManager> mDockManager;
    @Inject Lazy<INotificationManager> mINotificationManager;
    @Inject Lazy<SysUiState> mSysUiStateFlagsContainer;
    @Inject Lazy<AlarmManager> mAlarmManager;
    @Inject Lazy<KeyguardSecurityModel> mKeyguardSecurityModel;
    @Inject Lazy<DozeParameters> mDozeParameters;
    @Inject Lazy<IWallpaperManager> mWallpaperManager;
    @Inject Lazy<CommandQueue> mCommandQueue;
    @Inject Lazy<Recents> mRecents;
    @Inject Lazy<StatusBar> mStatusBar;
    @Inject Lazy<DisplayController> mDisplayController;
    @Inject Lazy<SystemWindows> mSystemWindows;
}
后面以StatusBar实例的注入为例阐述下SystemUI里Dagger2的注入流程。
随着SystemServer发出启动SystemUIService的请求,SystemUI的Application将首先被实例化。在实例化之前,指定的AppComponentFactory实现类将会收到回调。
// AndroidManifest.xml
<application
        android:name=".SystemUIApplication"
        ...
        tools:replace="android:appComponentFactory"
        android:appComponentFactory=".SystemUIAppComponentFactory">
</Application>
调用super得到Application实例之后向其注册Context准备完毕的回调,该回调会执行SystemUIFactory和DI组件的初始化。
public class SystemUIAppComponentFactory extends AppComponentFactory {
    @Inject
    public ContextComponentHelper mComponentHelper;
    ...
    @Override
    public Application instantiateApplicationCompat(
            @NonNull ClassLoader cl, @NonNull String className)
            throws InstantiationException, IllegalAccessException, ClassNotFoundException {
        Application app = super.instantiateApplicationCompat(cl, className);
        if (app instanceof ContextInitializer) {
            // 注册Context成功取得的回调
            ((ContextInitializer) app).setContextAvailableCallback(
                    context -> {
                        SystemUIFactory.createFromConfig(context);
                        SystemUIFactory.getInstance().getRootComponent().inject(
                                SystemUIAppComponentFactory.this);
                    }
            );
        }

        return app;
    }
    ...
}
Application的onCreate()回调的时候意味着Context已准备完毕,接着执行上述回调。
public class SystemUIApplication extends Application implements
        SystemUIAppComponentFactory.ContextInitializer {
    ...
    @Override
    public void setContextAvailableCallback(
            SystemUIAppComponentFactory.ContextAvailableCallback callback) {
        mContextAvailableCallback = callback;
    }

    @Override
    public void onCreate() {
        ...
        log.traceBegin("DependencyInjection");
        mContextAvailableCallback.onContextAvailable(this);★
        mRootComponent = SystemUIFactory.getInstance().getRootComponent();
        mComponentHelper = mRootComponent.getContextComponentHelper();
        ...
    }
}
回调将先创建SystemUIFactory实例,并初始化SystemUI App的Dagger组件。之后初始化DI子组件并向Dependency实例注入依赖。
public class SystemUIFactory {
    public static void createFromConfig(Context context) {
        ...
        try {
            Class<?> cls = null;
            cls = context.getClassLoader().loadClass(clsName);
            // 1. 创建SystemUIFactory实例
            mFactory = (SystemUIFactory) cls.newInstance();
            mFactory.init(context);
        }
    }

    private void init(Context context) {
        // 2. 取得SystemUI的Dagger组件实例
        mRootComponent = buildSystemUIRootComponent(context);
        // 3. 创建Dependency实例并绑定到DependencyInjector子组件中
        Dependency dependency = new Dependency();
        mRootComponent.createDependency().createSystemUI(dependency);
        // 4. 初始化Dependency
        dependency.start();
    }

    // 初始化Dagger组件
    protected SystemUIRootComponent buildSystemUIRootComponent(Context context) {
        return DaggerSystemUIRootComponent.builder()
                .dependencyProvider(new DependencyProvider())
                .contextHolder(new ContextHolder(context))
                .build();
    }
    ...
}
Dependency类里掌管着各式各样的依赖,被依赖的各实例通过Map管理。但并不是在初始化的时候就缓存它们。而先将各实例对应的懒加载回调缓存进去。其后在各实例确实需要使用的时候通过注入的懒加载获取和缓存。
public class Dependency {
    // 使用class作为key将对应实例缓存的Map
    private final ArrayMap<Object, Object> mDependencies = new ArrayMap<>();
    // 缓存实例的懒加载回调的Map
    private final ArrayMap<Object, LazyDependencyCreator> mProviders = new ArrayMap<>();

    protected void start() {
        mProviders.put(ActivityStarter.class, mActivityStarter::get);
        mProviders.put(Recents.class, mRecents::get);
        mProviders.put(StatusBar.class, mStatusBar::get);
        mProviders.put(NavigationBarController.class, mNavigationBarController::get);
        ...
    }

    // 根据class查询缓存,尚未缓存的话通过懒加载回调获取注入的实例并缓存
    private synchronized <T> T getDependencyInner(Object key) {
        T obj = (T) mDependencies.get(key);
        if (obj == null) {
            obj = createDependency(key);
            mDependencies.put(key, obj);
            if (autoRegisterModulesForDump() && obj instanceof Dumpable) {
                mDumpManager.registerDumpable(obj.getClass().getName(), (Dumpable) obj);
            }
        }
        return obj;
    }

    protected <T> T createDependency(Object cls) {
        Preconditions.checkArgument(cls instanceof DependencyKey<?> || cls instanceof Class<?>);
        LazyDependencyCreator<T> provider = mProviders.get(cls);
        return provider.createDependency();
    }

    private interface LazyDependencyCreator<T> {
        T createDependency();
    }
}
Application创建好之后SystemUI的主Service将启动起来,并逐个启动其他Service。
public class SystemUIService extends Service {
    ...
    @Override
    public void onCreate() {
        super.onCreate();
        // Start all of SystemUI
        ((SystemUIApplication) getApplication()).startServicesIfNeeded();
        ...
    }
}
通过ContextComponentHelper解析预设的service类名得到实例并启动。
public class SystemUIApplication {
   public void startServicesIfNeeded() {
        String[] names = SystemUIFactory.getInstance().getSystemUIServiceComponents(getResources());
        startServicesIfNeeded(/* metricsPrefix= */ "StartServices", names);
    }

    private void startServicesIfNeeded(String metricsPrefix, String[] services) {
        ...
       final int N = services.length;
        for (int i = 0; i < N; i++) {
            String clsName = services[i];
            try {
                // 从ContextComponentHelper里获取对应的实例
                SystemUI obj = mComponentHelper.resolveSystemUI(clsName);
                if (obj == null) {
                    Constructor constructor = Class.forName(clsName).getConstructor(Context.class);
                    obj = (SystemUI) constructor.newInstance(this);
                }
                mServices[i] = obj;
            }

           mServices[i].start();
             ...
        }
        mRootComponent.getInitController().executePostInitTasks();
       }
}
配置的Service列表。
// config.xml
<string-array name="config_systemUIServiceComponents" translatable="false">
    ...
    <item>com.android.systemui.recents.Recents</item>
    <item>com.android.systemui.volume.VolumeUI</item>
    <item>com.android.systemui.stackdivider.Divider</item>
    <item>com.android.systemui.statusbar.phone.StatusBar</item> ★
    ...
</string-array>
ContextComponentHelper单例已声明由Dagger组件提供。
@Singleton
@Component(modules = {...})
public interface SystemUIRootComponent {
    ...
    /**
     * Creates a ContextComponentHelper.
     */
    @Singleton
    ContextComponentHelper getContextComponentHelper();
}
模块SystemUIModule负责注入ContextComponentHelper实例,实际注入的是ContextComponentResolver实例。
@Module(...)
public abstract class SystemUIModule {
    ...
    /** */
    @Binds
    public abstract ContextComponentHelper bindComponentHelper(
            ContextComponentResolver componentHelper);
}
ContextComponentResolver用于解析Activity和Service等实例,通过class实例从Map查询得到的Provider里取得对应的Service实例。 它的构造函数注释了@Inject。它依赖几个Map参数,比如StatusBar的Provider是注入到其中的SystemUI Map里。
@Singleton
public class ContextComponentResolver implements ContextComponentHelper {
    @Inject
    ContextComponentResolver(Map<Class<?>, Provider<Activity>> activityCreators,
            Map<Class<?>, Provider<Service>> serviceCreators,
            Map<Class<?>, Provider<SystemUI>> systemUICreators,
            Map<Class<?>, Provider<RecentsImplementation>> recentsCreators,
            Map<Class<?>, Provider<BroadcastReceiver>> broadcastReceiverCreators) {
        mSystemUICreators = systemUICreators;
        ...
    }
    ...
    @Override
    public SystemUI resolveSystemUI(String className) {
        return resolve(className, mSystemUICreators);
    }

    // 依据名称得到的class实例去查询Provider实例,进而取得对应SystemUI的实例
    private <T> T resolve(String className, Map<Class<?>, Provider<T>> creators) {
        try {
            Class<?> clazz = Class.forName(className);
            Provider<T> provider = creators.get(clazz);
            return provider == null ? null : provider.get();
        } catch (ClassNotFoundException e) {
            return null;
        }
    }
}
在SystemUIBinder的Module里声明了以ClassKey为StatusBar.class,value由StatusBarPhoneModule模块注入到Map里。而Provider#get()的实例将拿到provideStatusBar注入的实例。(StatusBar构造器的参数竟有76个之多,简直恐怖。。。)
@Module(includes = {RecentsModule.class, StatusBarModule.class...})
public abstract class SystemUIBinder {
    /** Inject into StatusBar. */
    @Binds
    @IntoMap
    @ClassKey(StatusBar.class)
    public abstract SystemUI bindsStatusBar(StatusBar sysui);
    ...
}

@Module(includes = {StatusBarPhoneModule.class...})
public interface StatusBarModule {
}

@Module(includes = {StatusBarPhoneDependenciesModule.class})
public interface StatusBarPhoneModule {
    @Provides
    @Singleton
    static StatusBar provideStatusBar(
            Context context,
            NotificationsController notificationsController,
            LightBarController lightBarController,
            AutoHideController autoHideController,
            KeyguardUpdateMonitor keyguardUpdateMonitor,
            StatusBarIconController statusBarIconController,
            ...) {
        return new StatusBar(...);
    }
}
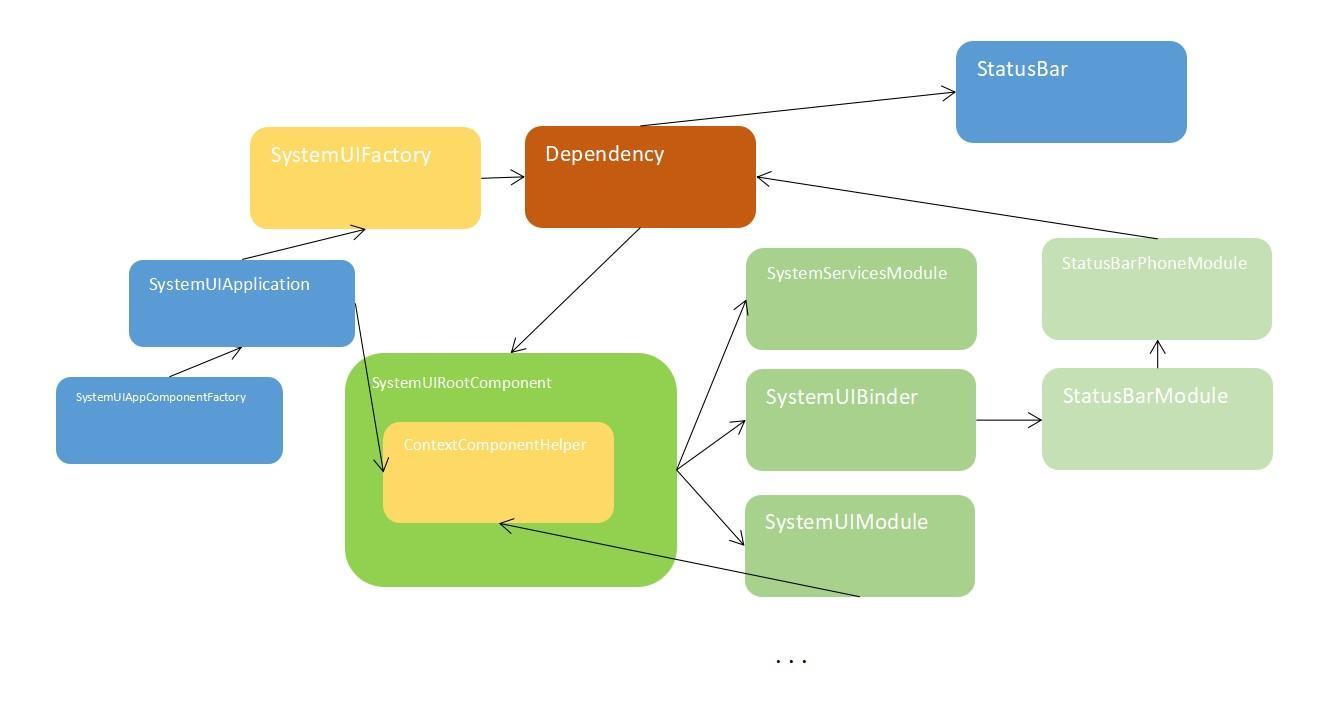
SystemUI里DI关系图

结语
回顾下依赖注入技术的必要性。
oller lightBarController,
AutoHideController autoHideController,
KeyguardUpdateMonitor keyguardUpdateMonitor,
StatusBarIconController statusBarIconController,
…) {
return new StatusBar(…);
}
}
#### SystemUI里DI关系图

[外链图片转存中...(img-ZAgev4Ll-1630571247476)]

### 结语

回顾下依赖注入技术的必要性。