 onPressed: calculator,

tooltip: 'Increment',

child: Icon(Icons.add),
)
*   修改代码


1.  新建一个`calculatorByComputeFunction`方法,用`compute`调用`bigCompute`方法:
void calculatorByComputeFunction() async {
// 使用`compute`调用`bigCompute`方法,传参0

int result = await compute(bigCompute, 0);

print(result);
}
1. 修改**FloatingActionButton**的点击事件方法为`calculatorByComputeFunction`
FloatingActionButton(
onPressed: calculatorByComputeFunction,

tooltip: 'Increment',

child: Icon(Icons.add),
)
咱点击试试?


> \[VERBOSE-2:ui\_dart\_state.cc(186)\] Unhandled Exception: Invalid argument(s): Illegal argument in isolate message : (object is a closure - Function 'bigCompute':.)


1.  解决**Error**:将`bigCompute`改为为**static**方法(改为全局函数也是可行的)
static Future bigCompute(int initalNumber) async {
int total = initalNumber;

for (var i = 0; i < 1000000000; i++) {

  total += i;

}

return total;
}
> 警告:还有一个需要注意的是所有的`Platform-Channel`的通信必须在**Main Isolate**中执行,譬如在其他**Isolate**中调用`rootBundle.loadString("assets/***")`就掉坑里了。


2\. 直接使用`Isolate`


上面我们用`compute`方法,基本上没有看到`Isolate`的身影,因为**Flutter**帮我们做了很多工作,包括`Isolate`创建,销毁,方法的执行等等。一般情况下我们使用这个方法就够了。


但是这个方法有个缺陷,我们只能执行一个任务,当我们有多个类似的耗时操作时候,如果使用这个`compute`方法将会出现大量的创建和销毁,是一个高消耗的过程,如果能复用`Isolate`那就是最好的实现方式了。


多线程`Isolate`间通信的原理如下:


1.  当前`Isolate`接收其他`Isolate`消息的实现逻辑:?`Isolate`之间是通过**Port**进行通信的,`ReceivePort`是接收器,它配套有一个`SendPort`发送器, 当前`Isolate`可以把`SendPort`发送器送给其他`Isolate`,其他`Isolate`通过这个`SendPort`发送器就可以发送消息给当前`Isolate`了。


2.  当前`Isolate`给其他`Isolate`发消息的实现逻辑: 其他`Isolate`通过当前`Isolate`的`SendPort`发送器发送一个`SendPort2`发送器2过来,其他的`Isolate`则持有`SendPort 2`发送器2对应的接收器`ReceivePort2`接收器2,当前`Isolate`通过`SendPort 2`发送消息就可以被其他`Isolate`收到了。


是不是很绕!我再打个比喻:市面上有一套通信工具套件,这套通信工具套件包括一个接电话的工具和一个打电话的工具。A留有接电话的,把打电话的送给B,这样B就可以随时随地给A打电话了(此时是单向通信)。 如果B也有一套工具,把打电话的送给A,这样A也能随时随地给B打电话了(此时是双向通信了)。


上代码:
class _MyHomePageState extends State
with SingleTickerProviderStateMixin {

// 1.1 新建的isolate

Isolate isolate;

// 1.2 Main Isolate的接收器

ReceivePort mainIsolaiteReceivePort;

// 1.3 Other Isolate的发送器

SendPort otherIsolateSendPort;


// 新建(复用)Isolate

void spawnNewIsolate() async {

    // 2.1 建一个接收Main Isolate的接收器

    if (mainIsolaiteReceivePort == null) {

      mainIsolaiteReceivePort = ReceivePort();

    }

    try {

      if (isolate == null) {

        // 2.2 新建的isolate, 把Main Isolate发送器传给新的isolate,calculatorByIsolate是需要执行的任务

        isolate = await Isolate.spawn(

            calculatorByIsolate, mainIsolaiteReceivePort.sendPort);

        // 2.3 Main Isolate 通过接收器接收新建的isolate发来的消息

        mainIsolaiteReceivePort.listen((dynamic message) {

          if (message is SendPort) {

            // 2.4 如果新建的isolate发来的是一个发送器,就通过这个发送器给新建的isolate发送值过去(此时双向通讯建立成功)

            otherIsolateSendPort = message;

            otherIsolateSendPort.send(1);

            print("双向通讯建立成功,主isolate传递初始参数1");

          } else {

            // 2.5 如果新建的isolate发来了一个值,我们知道是耗时操作的计算结果。

            print("新建的isolate计算得到的结果$message");

          }

        });

      } else {

        // 2.6 复用otherIsolateSendPort

        if (otherIsolateSendPort != null) {

          otherIsolateSendPort.send(1);

          print("双向通讯复用,主isolate传递初始参数1");

        }

      }

    } catch (e) {}

}


// 这个是新的Isolate中执行的任务

static void calculatorByIsolate(SendPort sendPort) {

    // 3.1 新的Isolate把发送器发给Main Isolate

    ReceivePort receivePort = new ReceivePort();

    sendPort.send(receivePort.sendPort);


    // 3.2 如过Main Isolate发过来了初始数据,就可以进行耗时计算了

    receivePort.listen((val) {

      print("从主isolate传递过来的初始参数是$val");

      int total = val;

      for (var i = 0; i < 1000000000; i++) {

        total += i;

      }

      // 3.3 通过Main Isolate的发送器发给Main Isolate计算结果

      sendPort.send(total);

    });

}


@override

void dispose() {

    // 释放资源

    mainIsolaiteReceivePort.close();

    isolate.kill();

    super.dispose();

}
}
代码注释的很详细了,就不再解释了。是不是代码好多的感觉,其实如果理解流程了逻辑倒不复杂。
关于`Isolate`的概念和使用我们就介绍到这里,接下来我们来介绍`Isolate`中的一个重要知识点`Event Loop`.
Event Loop
----------
`Loop`这个概念绝大部分开发者都应该很熟悉了,iOS中有`NSRunLoop`,Android中有`Looper`, js中有`Event Loop`,名字上类似,其实所做的事情也是类似的。
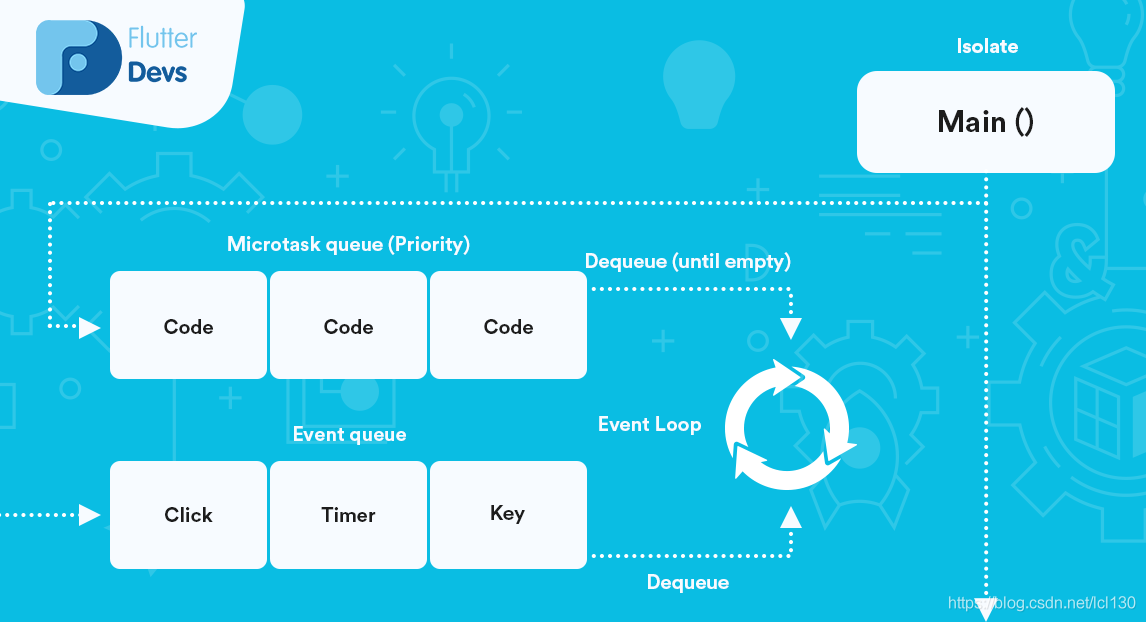
**Event Loop**的官方介绍如下图:
* 静态示意图

> 执行完`main()`函数后将会创建一个`Main Isolate`。
* 动态示意图
* **Event Loop**会处理两个队列`MicroTask queue`和`Event queue`中的任务;
* `Event queue`主要处理外部的事件任务:`I/O`,`手势事件`,`定时器`,`isolate间的通信`等;
* `MicroTask queue`主要处理内部的任务:譬如处理`I/O`事件的中间过程中可能涉及的一些特殊处理等;
* 两个队列都是先进先出的处理逻辑,优先处理`MicroTask queue`的任务,当`MicroTask queue`队列为空后再执行`Event queue`中的任务;
* 当两个队列都为空的时候就进行GC操作,或者仅仅是在等待下个任务的到来。
为了比较好的理解?**Event Loop**?的异步逻辑,我们来打个比喻:就像我去长沙某网红奶茶品牌店买杯“幽兰拿铁”(由于是现做的茶,比较耗时)的过程。
> 1. 我来到前台给服务员说我要买一杯你们店的“幽兰拿铁”,然后服务员递给了我一个有编号的飞盘(获取凭证);
> 2. 奶茶店的备餐员工就将我的订单放在订单列表的最后面,他们按照顺序准备订单上的商品,准备好一个就让顾客去领取(Event queue 先进先出进行处理),而我就走开了,该干啥干啥去了(异步过程,不等待处理结果);
> 3. 突然他们来了个超级VIP会员的订单,备餐员工就把这个超级VIP订单放在了其他订单的最前面,优先安排了这个订单的商品(MicroTask优先处理)---此场景为虚构;
> 4. 当我的订单完成后,飞盘开始震动(进行结果回调),我又再次回到了前台,如果前台妹子递给我一杯奶茶(获得结果),如果前台妹子说对不起先生,到您的订单的时候没水了,订单没法完成了给我退钱(获得异常错误错误)。
我们常用的异步操作`Future`,`async`,`await`都是基于**Event Loop**,我们接下来就来介绍他们异步操作背后的原理。
`Future`
我们接下来用代码总体说明一下`Future`背后的逻辑:
final myFuture = http.get(‘https://my.image.url’);
myFuture.then((resp) {
setImage(resp);
}).catchError((err) {
print('Caught $err'); // Handle the error.
});
// 继续其他任务
…
> 1.  `http.get('https://my.image.url')`返回的是一个未完成状态的`Future`, 可以理解为一个句柄,同时`http.get('https://my.image.url')`被丢进了`Event queue`中等待被执行,然后接着执行当前的其他任务;

> 2.  当`Event queue`执行完这个`get`请求成功后会回调`then`方法,将结果返回,`Future`为完成状态 ,就可以进行接下来的操作了;

> 3.  当`Event queue`执行完这个`get`请求失败后会回调`catchError`方法,将错误返回,`Future`为失败状态 ,就可以进行错误处理了。


我们接下来分别介绍下`Future`的一些相关函数:


构造函数


*   `Future(FutureOr<T> computation())`
final future1 = Future(() {
return 1;
});
> `computation`被放入了`Event queue`队列中


*   `Future.value`
final future2 = Future.value(2);
> 值在`MicroTask queue`队列中返回


*   `Future.error(Object error, [StackTrace? stackTrace])`
final future3 = Future.error(3);
> 这个`error`表示出现了错误,其中的值不一定需要给一个`Error`对象


*   `Future.delay`
final future4 = Future.delayed(Duration(seconds: 1), () {
return 4;
});
> 延迟一定时间再执行


Future结果回调`then`
final future = Future.delayed(Duration(seconds: 1), () {
print('进行计算');

return 4;
});
|