一、服务是什么
Service是安卓中实现程序后台运行的解决方案,适合去执行不需要和用户交互且还要长期运行的项目。如下载、音乐播放等。服务的运行不依赖于任何用户界面。
二、服务的基本用法
1、启动和停止服务
activity_main.xml
<LinearLayout xmlns:android="http://schemas.android.com/apk/res/android"
    android:layout_width="match_parent"
    android:layout_height="match_parent"
    android:orientation="vertical">
    <Button
        android:id="@+id/start_service"
        android:layout_width="match_parent"
        android:layout_height="wrap_content"
        android:text="开始服务"/>
    <Button
        android:id="@+id/stop_service"
        android:layout_width="match_parent"
        android:layout_height="wrap_content"
        android:text="停止服务"/>
</LinearLayout>
New——>Service——>Service创建一个服务
MyService.java
public class MyService extends Service {
    public MyService() {

    }
    //服务创建时调用
    @Override
    public void onCreate() {
        super.onCreate();
        Log.d("MyService","onCreate executed");
    }
    //服务启动时调用
    @Override
    public int onStartCommand(Intent intent, int flags, int startId) {
        Log.d("MyService","onStartCommand executed");
        return super.onStartCommand(intent, flags, startId);
    }
    //服务销毁时调用
    @Override
    public void onDestroy() {
        super.onDestroy();
        Log.d("MyService","onDestory executed");
    }
    //服务被绑定时调用
    @Override
    public IBinder onBind(Intent intent) {
        Log.d("MyService","onBind executed");
    }
}
MainActivity.java
public class MainActivity extends AppCompatActivity implements View.OnClickListener{
    private Button startService;
    private Button stopService;

    @Override
    protected void onCreate(Bundle savedInstanceState) {
        super.onCreate(savedInstanceState);
        setContentView(R.layout.activity_main);
        startService = findViewById(R.id.start_service);
        stopService = findViewById(R.id.stop_service);
        startService.setOnClickListener(this);
        stopService.setOnClickListener(this);
    }

    @Override
    public void onClick(View view) {
        switch (view.getId()){
            case R.id.start_service:
                Intent startIntent = new Intent(this,MyService.class);
                //启动服务
                startService(startIntent);
                break;
            case R.id.stop_service:
                Intent stopIntent = new Intent(this,MyService.class);
                //停止服务
                stopService(stopIntent);
                break;
            default:
                break;
        }
    }
}
在清单文件中会自动注册Service
<service
            android:name=".MyService"
            android:enabled="true"
            android:exported="true">
</service>
方法详解:
startService(Intent service):启动服务
stopService(Intent service):停止服务
MainActivity中控制服务的启动和停止,启动服务时onCreate()和onStartCommand()方法都执行了,停止服务时,执行了onDestory()方法
2、活动和服务进行通信
(1)在Service中创建内部类,如:MyBinder,继承自Binder类
(2)在MyBinder类中编写服务要执行的工作
(3).创建MyBinder的对象
(4)在Service中重写onBind()方法,在该方法中返回MyBinder的对象
(5)在绑定Service的Activity中创建ServiceConnection的对象,并重写onServiceConnected()方法,在该方法中调用MyBinder实例的各种方法。这样就能在活动中控制服务执行什么事情
(6)调用bindService()绑定服务
(7)调用unbindService()解绑服务
activity_main.xml页面新增代码:
<!--绑定服务按钮-->
    <Button
        android:id="@+id/bind_service"
        android:layout_width="match_parent"
        android:layout_height="wrap_content"
        android:text="绑定服务"/>
    <!--解绑服务按钮-->
    <Button
        android:id="@+id/unbind_service"
        android:layout_width="match_parent"
        android:layout_height="wrap_content"
        android:text="解绑服务"/>
MyService.java
public class MyService extends Service {
    public MyService() {

    }
    //创建Binder实例
    private DownloadBinder mBinder = new DownloadBinder();
    class DownloadBinder extends Binder {
        //开始下载
        public void startDownload(){
            Log.d("MyService","startDownload executed");
        }
        //获得进度
        public int getProgress(){
            Log.d("MyService","getProgress executed");
            return 0;
        }
    }
    //服务绑定时调用
    @Override
    public IBinder onBind(Intent intent) {
    	Log.d("MyService","onBind executed");
        return mBinder;
    }
    //服务解绑时调用
    @Override
    public boolean onUnbind(Intent intent) {
    	Log.d("MyService","onUnbind executed");
        return super.onUnbind(intent);
    }
    @Override
    public void onCreate() {
        super.onCreate();
        Log.d("MyService","onCreate executed");
    }
    @Override
    public int onStartCommand(Intent intent, int flags, int startId) {
        Log.d("MyService","onStartCommand executed");
        return super.onStartCommand(intent, flags, startId);
    }
    @Override
    public void onDestroy() {
        super.onDestroy();
        Log.d("MyService","onDestory executed");
    }
}
Service的方法:
onBind(Intent intent) :绑定服务时调用,返回值为Binder的实例
onUnbind(Intent intent):解绑服务时调用
MainActivity.java
 public class MainActivity extends AppCompatActivity implements View.OnClickListener{
    private Button startService;
    private Button stopService;
    private Button bindService;
    private Button unbindService;
    private MyService.DownloadBinder downloadBinder;
    private ServiceConnection connection = new ServiceConnection() {
        //Activity与Service绑定成功时调用
        @Override
        public void onServiceConnected(ComponentName componentName, IBinder service) {
            downloadBinder = (MyService.DownloadBinder)service;
            downloadBinder.startDownload();
            downloadBinder.getProgress();

        }
        //Activity与Service解除绑定时调用
        @Override
        public void onServiceDisconnected(ComponentName componentName) {

        }
    };

    @Override
    protected void onCreate(Bundle savedInstanceState) {
        super.onCreate(savedInstanceState);
        setContentView(R.layout.activity_main);
        startService = findViewById(R.id.start_service);
        stopService = findViewById(R.id.stop_service);
        bindService = findViewById(R.id.bind_service);
        unbindService = findViewById(R.id.unbind_service);
        startService.setOnClickListener(this);
        stopService.setOnClickListener(this);
        bindService.setOnClickListener(this);
        unbindService.setOnClickListener(this);
    }

    @Override
    public void onClick(View view) {
        switch (view.getId()){
            case R.id.start_service:
                Intent startIntent = new Intent(this,MyService.class);
                //启动服务
                startService(startIntent);
                break;
            case R.id.stop_service:
                Intent stopIntent = new Intent(this,MyService.class);
                //停止服务
                stopService(stopIntent);
                break;
            case R.id.bind_service:
                Intent bindIntent = new Intent(this,MyService.class);
                //绑定服务
                bindService(bindIntent,connection,BIND_AUTO_CREATE);
                break;
            case R.id.unbind_service:
                //解绑服务
                unbindService(connection);
                break;
            default:
                break;
        }
    }
}
ServiceConnection:用来监听访问者与Service间的连接情况
如果成功连接,回调 onServiceConnected()
如果异常终止或者其他原因终止导致Service与访问者断开连接,则回调onServiceDisconnected方法
onServiceConnected(ComponentName componentName, IBinder service):Activity与Service绑定成功时调用。通过第二个参数实现Activity与被绑定Service之间的通信
onServiceDisconnected(ComponentName componentName):Activity与Service解绑时调用
MainActivity的方法:
bindService(Intent service, ServiceConnection conn, int flags):绑定服务
- 第一个参数:Intent对象
- 第二个参数:ServiceConnection实例
- 第三个参数:标志位
BIND_AUTO_CREATE:表示活动和服务进行绑定后自动创建服务
unbindService(ServiceConnection conn):解绑服务
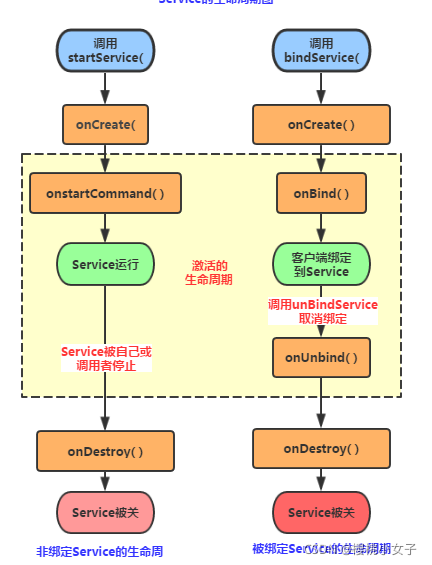
3、服务的生命周期

启动Service的两种方式:startService()和bindService()
StartService启动Service:
点击开始服务按钮,依次执行:
onCreate()、onStartCommand()
调用startService()时,先执行onCreate()方法创建Service实例。再执行onStartCommand()方法。
onCreate()方法在Service整个生命周期中只会被调用一次
再点击开始服务按钮,执行:
onStartCommand()
每调用一次startService()方法都会回调onStartCommand()方法。多次调用startService()方法不会重新创建Service对象,会复用前面产生的Service对象

点击停止服务按钮,执行:
onDestory()
调用stopService()或stopSelf()时,执行onDestory()方法,停止服务
每个服务只有一个实例,不管调用多少次startServie(),只要调用一次stopService()或stopSelf()就会停止服务

BindService启动Service:
点击绑定服务按钮,依次执行:
onCreate()、onBind()
调用bindService()时,先执行onCreate()方法创建Service实例。再执行onBind()方法

再点击绑定服务按钮:
什么也不执行
点击解除绑定按钮,执行:
onUnbind()、onDestory()
调用unbindService()方法时,执行onUnbind()方法。再执行onDestory()方法
绑定多客户端情况下,当解除所有的绑定时,才会调用onDestory()方法

4、前台服务
服务一般都是在后台运行的。因为服务优先级较低,所以如果系统内存不足,可能会回收掉正在后台运行的服务。若希望服务一直保持运行状态,使用前台服务。
public class MyService extends Service {
    public MyService() {
    }
    private DownloadBinder mBinder = new DownloadBinder();
    class DownloadBinder extends Binder {
        public void startDownload(){
            Log.d("MyService","startDownload executed");
        }
        //获得进度
        public int getProgress(){
            Log.d("MyService","getProgress executed");
            return 0;
        }
    }
    @Override
    public IBinder onBind(Intent intent) {
       return mBinder;
    }
    @Override
    public void onCreate() {
        String CHANNEL_ONE_ID = "com.primedu.cn";
        String CHANNEL_ONE_NAME = "Channel One";
        NotificationChannel notificationChannel = null;
        if (android.os.Build.VERSION.SDK_INT >= android.os.Build.VERSION_CODES.O) {
            notificationChannel = new NotificationChannel(CHANNEL_ONE_ID,
                    CHANNEL_ONE_NAME, NotificationManager.IMPORTANCE_HIGH);
            notificationChannel.enableLights(true);
            notificationChannel.setLightColor(Color.RED);
            notificationChannel.setShowBadge(true);            notificationChannel.setLockscreenVisibility(Notification.VISIBILITY_PUBLIC);
            NotificationManager manager = (NotificationManager) getSystemService(NOTIFICATION_SERVICE);
            manager.createNotificationChannel(notificationChannel);
        }
        Intent intent = new Intent(this,MainActivity.class);
        PendingIntent pi = PendingIntent.getActivity(this,0,intent,0);
        Notification notification = new NotificationCompat.Builder(this)
                .setContentTitle("aaa")        //设置通知的标题
                .setContentText("This is content text")//设置通知的内容
                .setWhen(System.currentTimeMillis()) //设置通知时间
                .setSmallIcon(R.mipmap.ic_launcher)             .setLargeIcon(BitmapFactory.decodeResource(getResources(),R.mipmap.ic_launcher))设置、
                .setContentIntent(pi)
                .setChannelId(CHANNEL_ONE_ID)n
                .getNotification();
        notification.flags |= Notification.FLAG_NO_CLEAR;
        startForeground(1,notification);
    }
}
MainActivity.java:
代码与上面活动与服务进行通信时的MainActivity代码相同。
在清单文件中需要写入:
<uses-permission android:name="android.permission.FOREGROUND_SERVICE" />
点击启动服务或绑定服务按钮:
系统状态栏显示:

5、IntentService
5.1、IntentService介绍
服务默认运行在主线程中,如果在服务中处理一些耗时的工作,会导致出现ANR。
而多线程无法自动停止服务,必须调用stopService()才能停止活动。所以Android提供一个专门的类IntentService来操作耗时操作,且能在服务操作完成后自定停止服务。
IntentService:
- 定义:是继承与Service并处理异步请求的一个类,在IntentService中有
一个工作线程来处理耗时操作,请求的Intent记录会加入队列 - 作用:处理异步请求&实现多线程
- 用法:(1)定义IntentService的子类,重写onHandleIntent()方法(2)在Activity中开启服务
activity_main.xml
 <Button
        android:id="@+id/start_intent_service"
        android:layout_width="match_parent"
        android:layout_height="wrap_content"
        android:text="Start IntentService"/>
MyIntentService.java
public class MyIntentService extends IntentService {

    public MyIntentService(String name) {
        super(name);
    }
    //在该方法中执行耗时任务
    @Override
    protected void onHandleIntent(@Nullable Intent intent) {
        Log.d("MyIntentService","Thread id is"+Thread.currentThread().getId());
    }
    @Override
    public void onDestroy() {
        super.onDestroy();
        Log.d("MyIntentService","onDestory executed");
    }
}
onHandleIntent(Intent intent):IntentService的子类中会重写该方法,在该方法中执行耗时任务
MainActivity.java
public class MainActivity extends AppCompatActivity{
    private Button startIntentService;
    @Override
    protected void onCreate(Bundle savedInstanceState) {
        super.onCreate(savedInstanceState);
        setContentView(R.layout.activity_main);
        startIntentService = findViewById(R.id.start_intent_service1);
        startIntentService.setOnClickListener(new View.OnClickListener() {
            @Override
            public void onClick(View view) {
                Log.d("MainActivity","Thread id is"+Thread.currentThread().getId());
                Intent intentService = new Intent(MainActivity.this,MyIntentService.class);
                startService(intentService);
            }
        });
    }
}
运行结果:

MainActivity和MyIntentService所在线程不一样,说明MyIntentService在子线程中执行。执行了onDestory()方法,说明MyIntentService在运行完毕后自动停止
5.2、IntentService与Service的区别
1.运行线程:
Service的运行线程是主线程,在主线程中不能处理耗时操作,否则会报ANR
IntentService创建一个工作线程,在工作线程中执行耗时任务
2.结束服务操作:
Service需要调用stopSelf()或stopService()方法才能结束服务
IntentService能自动结束服务
3.其他
IntentService为Service的onBind()提供默认实现,返回null
为onStartCommand()提供默认实现
