文章目录
- 【43.保留小数】
- 【44.实体类copy】
- 【45.一些实用方法】
- 【46.添加集合提交数据时】
- 【47.Cannot inline bytecode built with JVM target 1.8 into bytecode that is being built with JVM target 1.6】
- 【48.Android 通过接口传值简单讲解】
- 【49.有规律的显示时间】
- 【50.系统AlertDialog点击确定弹窗不消失】
- 【51.自定义Dialog(系统)】
- 【52.AndroidStudio连不上夜神模拟器】
- 【53.View.inflate 与 LayoutInflate.inflate区别】
- 【54.Android studio引入aar包】
- 【55.查看布局视图】
【43.保留小数】
方法一、
//如果用Android包下的则API>24
double aa = 2.3565666;
BigDecimal bigDecimal = new BigDecimal(aa);
//常量值自己去试试
System.out.println("= " + bigDecimal.setScale(2, BigDecimal.ROUND_DOWN));
//ROUND_DOWN--直接删除多余的小数位
//ROUND_UP--临近位非零,则直接进位;临近位为零,不进位
//ROUND_HALF_UP--四舍五入
//ROUND_HALF_DOWN--四舍五入
//注意返回值
double bg = bigDecimal.setScale(2, BigDecimal.ROUND_HALF_UP).doubleValue();
System.out.println("bg = " + bg);
方式二:(舍入方式)
java.text.DecimalFormat df = new java.text.DecimalFormat("#.00");
df.format(你要格式化的数字);
方式三:(格式化)
System.out.println("String.format = " + String.format("%.2f", aa));
方式四:(用的此)
NumberFormat ddf = NumberFormat.getNumberInstance();
ddf.setMaximumFractionDigits(2);
//去掉逗号
ddf.setGroupingUsed(false);
System.out.println("ddf = " + ddf.format(aa));
【44.实体类copy】
只能是相同实体类
https://www.jianshu.com/p/7034e9a8c2df
public class CloneObjectUtils {
    public static <T> T cloneObject(T obj) {
        T result = null;
        ByteArrayOutputStream byteArrayOutputStream = null;
        ByteArrayInputStream byteArrayInputStream = null;
        ObjectOutputStream outputStream = null;
        ObjectInputStream inputStream = null;

        try {
            //对象写到内存中
            byteArrayOutputStream = new ByteArrayOutputStream();
            outputStream = new ObjectOutputStream(byteArrayOutputStream);
            outputStream.writeObject(obj);

            //从内存中再读出来
            byteArrayInputStream = new ByteArrayInputStream(byteArrayOutputStream.toByteArray());
            inputStream = new ObjectInputStream(byteArrayInputStream);
            result = (T) inputStream.readObject();

        } catch (IOException e) {
            e.printStackTrace();
        } catch (ClassNotFoundException e) {
            e.printStackTrace();
        } finally {
            try {
                if (outputStream != null)
                    outputStream.close();
                if (inputStream != null)
                    inputStream.close();
                if (byteArrayOutputStream != null)
                    byteArrayOutputStream.close();
                if (byteArrayInputStream != null)
                    byteArrayInputStream.close();

            } catch (IOException e) {
                e.printStackTrace();
            }
        }
        return result;
    }

}
【45.一些实用方法】
有5个Boolean值,当全部为true或者为false时为true,只要有一个不一样就为false??
//(异或^)这里是当所有相同时返回true,有一个不同返回false
public static boolean checkSameBoolean(List<Boolean> list) {
    int m = 0;
    for (int i = 0; i < list.size(); i++) {
        Boolean aBoolean = list.get(i);
        if (aBoolean) {
            m++;
        } else {
            m--;
        }
    }
    return Math.abs(m) == list.size();
}

//方法二、未验证
public static boolean checkSameBoolean2(List<Boolean> list) {
    if (list == null || list.size() == 0) return false;
    Boolean aBoolean = list.get(0);
    for (int i = 1; i < list.size(); i++) {
        if (aBoolean != list.get(i)) {
            return false;
        }
    }
    return true;
}
//kotlin
fun checkSameBoolean(list:MutableList<Boolean>):Boolean{
    if(list.isNullOrEmpty()) return false;
    val first=list[0]
    list.filterNot{ it == first }.forEach { _->return false}
    return true
}
判断是否有相同值
//判断数组中是否有相同值 方法一、
int[] ar = new int[]{1, 2, 1};
for (int i = 0; i < ar.length; i++) {
    for (int j = i + 1; j < ar.length; j++) {
        if (ar[i] == ar[j]) {
            System.out.println("true = " + true);
        }
    }
}
//方法二、
int[] ar = new int[]{1, 2, 3};
Set set = new HashSet();
for (int i = 0; i < ar.length; i++) {
    set.add(ar[i]);
}
System.out.println("set = " + set.size() + "  " + ar.length);
去除重复
//java数组中去掉重复数据可以使用set集合,set本身内部是不保存重复的数据的
public static void main(String[] args) {
    int[] testArr = {5, 5, 1, 2, 3, 6, -7, 8, 6, 45, 5};//新建一个int类型数组
    System.out.println(Arrays.toString(testArr));
    Set<Integer> set = new TreeSet<Integer>();//新建一个set集合
    for (int i : testArr) {
        set.add(i);
    }
    Integer[] arr2 = set.toArray(new Integer[0]);
    // 数组的包装类型不能转 只能自己转;吧Integer转为为int数组;
    int[] result = new int[arr2.length];
    for (int i = 0; i < result.length; i++) {
        result[i] = arr2[i];
    }
    System.out.println(Arrays.toString(arr2));
}
【46.添加集合提交数据时】
实体类在for里面new,list字段在for里面添加
for(){
   A a=new A();
   .....
   data_list.add(a);
}
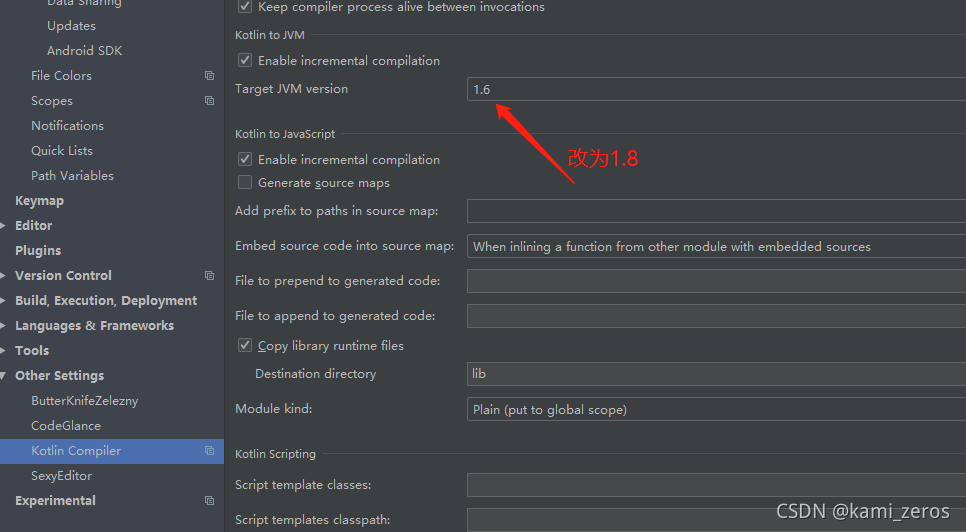
【47.Cannot inline bytecode built with JVM target 1.8 into bytecode that is being built with JVM target 1.6】

解决方案:
android {
    ...
    compileOptions {
        sourceCompatibility = 1.8
        targetCompatibility = 1.8
    }

    kotlinOptions {
        jvmTarget = "1.8"
    }
}
看下这里:

【48.Android 通过接口传值简单讲解】
http://blog.csdn.net/sunshine_mood/article/details/49874039
第一步:定义接口类:
public interface Listener {
    void send(String s);
}
第二步:传递类发送数据:
public class Data {
    public Listener mListener;//接口

    public Data(Listener mListener) {
        this.mListener = mListener;
    }
    public void sends(){
        mListener.send("越努力越成功,越聚贵人!");//开始发送数据
    }
}
第三步:接受类接收数据:
public class MainActivity extends Activity implements Listener{
    @Override
    protected void onCreate(Bundle savedInstanceState) {
        super.onCreate(savedInstanceState);
        setContentView(R.layout.activity_main);
        Data data = new Data(this);//实例化data类
        data.sends();//启动发送
    }

    @Override
    public void send(String s) {
        Log.e("tag: ",s);
    }
}
【49.有规律的显示时间】
http://blog.csdn.net/sunshine_mood/article/details/49873809
private long currentTime;//当前系统时间
private long oldTime;//过去时间

//以七秒为周期显示时间
public String getTimes(){
        currentTime = System.currentTimeMillis();//获得当前时间
        SimpleDateFormat sdf = new SimpleDateFormat("yyyy年MM月dd日 HH:mm:ss");//格式化日期
        Date data = new Date();
        String str = sdf.format(data);
        if(currentTime-oldTime>=7*1000){//每隔7秒钟返回一下时间
            oldTime = currentTime;
            return str;
        }else{
            return "";
        }
    }
【50.系统AlertDialog点击确定弹窗不消失】
1.种
final AlertDialog mDialog=new AlertDialog.Builder(this).setPositiveButton("确定", null).setNegativeButton("取消", null).create();
        mDialog.setOnShowListener(new DialogInterface.OnShowListener() {
            @Override
            public void onShow(DialogInterface dialog) {
                Button positionButton=mDialog.getButton(AlertDialog.BUTTON_POSITIVE);
                Button negativeButton=mDialog.getButton(AlertDialog.BUTTON_NEGATIVE);
                positionButton.setOnClickListener(new View.OnClickListener() {
                    @Override
                    public void onClick(View v) {
                        Toast.makeText(MainActivity.this,"确定",Toast.LENGTH_SHORT).show();
                        mDialog.dismiss();
                    }
                });
                negativeButton.setOnClickListener(new View.OnClickListener() {
                    @Override
                    public void onClick(View v) {
                        Toast.makeText(MainActivity.this,"取消",Toast.LENGTH_SHORT).show();

                    }
                });
            }
        });

        mDialog.show();

原文链接:https://blog.csdn.net/wanglaohushiwo/article/details/54316616
2.种
final AlertDialog dialog = new AlertDialog.Builder(mContext).setView(view)
                            .setPositiveButton("确定", null)
                            .setNegativeButton("取消", new DialogInterface.OnClickListener() {
                                @Override
                                public void onClick(DialogInterface dialog, int which) {
                                    dialog.dismiss();
                                }
                            }).create();
//这里必须要先调show()方法,后面的getButton才有效
dialog.show();

dialog.getButton(AlertDialog.BUTTON_POSITIVE).setOnClickListener(new View.OnClickListener() {
	@Override
	public void onClick(View v) {
		if (TextUtils.isEmpty(et.getText())) {
			showToast("文字不能为空");
			return;
		}
		dialog.dismiss();
	}
});
【51.自定义Dialog(系统)】
https://www.cnblogs.com/gzdaijie/p/5222191.html
<?xml version="1.0" encoding="utf-8"?>
<LinearLayout xmlns:android="http://schemas.android.com/apk/res/android"
    android:layout_width="match_parent"
    android:layout_height="wrap_content"
    android:orientation="vertical">

    <TextView
        android:id="@+id/title"
        android:layout_width="match_parent"
        android:layout_height="wrap_content"
        android:background="#00ffff"
        android:gravity="center"
        android:padding="10dp"
        android:text="Dialog标题"
        android:textSize="18sp" />

    <EditText
        android:id="@+id/dialog_edit"
        android:layout_width="match_parent"
        android:layout_height="wrap_content"
        android:hint="请输入内容"
        android:minLines="2"
        android:textScaleX="1" />

    <LinearLayout
        android:layout_width="match_parent"
        android:layout_height="40dp"
        android:orientation="horizontal">

        <Button
            android:id="@+id/btn_cancel"
            android:layout_width="match_parent"
            android:layout_height="match_parent"
            android:layout_weight="1"
            android:background="#00ffff"
            android:text="取消" />

        <View
            android:layout_width="1dp"
            android:layout_height="40dp"
            android:background="#D1D1D1"/>

        <Button
            android:id="@+id/btn_comfirm"
            android:layout_width="match_parent"
            android:layout_height="match_parent"
            android:layout_weight="1"
            android:background="#00ffff"
            android:text="确定" />
    </LinearLayout>
</LinearLayout>
AlertDialog.Builder builder = new AlertDialog.Builder(this);
View dialogView = View.inflate(this, R.layout.custom_dialog, null);
//ViewGroup viewGroup = (ViewGroup) LayoutInflater.from(context).inflate(R.layout.dialog_change_product_time, null);
//viewGroup.setOnTouchListener((v, event) -> true);//触摸容器不dismiss
TextView title = dialogView.findViewById(R.id.title);
EditText input_edt =  dialogView.findViewById(R.id.dialog_edit);//输入内容
Button btn_cancel = dialogView.findViewById(R.id.btn_cancel);//取消按钮
Button btn_comfirm =  dialogView.findViewById(R.id.btn_comfirm);//确定按钮

builder.setView(dialogView);
builder.setCancelable(true);
AlertDialog dialog = builder.create();
dialog.show();
【52.AndroidStudio连不上夜神模拟器】
https://www.cnblogs.com/yoyoketang/p/9024620.html

意思是模拟器adb版本36,SDK的adb版本41,对不上导致的。复制替换即可
替换adb版本
- 1.查看当前android-sdk的adb版本号,cmd打开输入adb
- 2.查看夜神模拟器(nox)的adb版本号,找到安装的路径:\Nox\bin,里面有个nox_adb.exe,其实就是adb.exe,为了避免冲突在nox里面换了个名称。在地址栏左上角输入cmd
- 3.然后在cmd参考输入nox_adb,就可以查看nox里面adb版本号了
- 4.找到版本号不一样原因了,接下来把android-sdk里面的adb.exe版本复制出来,然后改个名称叫nox_adb.exe,替换nox安装的路径:\Nox\bin下的nox_adb.exe文件就行了
- 5.接下来关掉夜神模拟器,重启模拟器,在cmd输入adb devices就可以了
adb
adb devices   //列出所有设备
adb kill-server    //杀死所有adb服务
adb start-server   //重启adb服务
gradle dependencies

cd ..  //返回上级目录
【53.View.inflate 与 LayoutInflate.inflate区别】
https://blog.csdn.net/chenliguan/article/details/82314122
- View.inflate:没有将item的布局文件最外层的所有layout属性设置
- LayoutInflate.inflate:将item的布局文件最外层的所有layout属性设置(有边框)
@Override
public ViewHolder onCreateViewHolder_(ViewGroup parent, int viewType) {
	View itemView = View.inflate(mContext, R.layout.item_consume_recharge_record, null);
	return new ConsumeRechargeRecordViewHolder(itemView);
}
@Override
public ViewHolder onCreateViewHolder_(ViewGroup parent, int viewType) {
	View itemView = LayoutInflater.from(mContext).inflate(R.layout.item_consume_recharge_record, parent, false);
    return new ConsumeRechargeRecordViewHolder(itemView);
}


【54.Android studio引入aar包】
-
第一步:将aar文件拷贝到libs目录下 libs与src同级
-
第二步:修改Module的build.gradle 配置文件:

-
第三步:
修改dependencies:
添加一行:并重新rebuild
implementation (name:‘usericonchooserutil’, ext:‘aar’)
【多组件模式】https://www.jianshu.com/p/dfaa2326c741
提示:Failed to resolve 的坑~

其它所有直接或间接依赖该library module的module中都应 声明该aar文件所在libs目录的相对路径 或在project的build.gradle文件中进行统一配置声明。否则会同步依赖失败,提示 Failed to resolve
- 1.将aar文件拷入想要依赖的library module下的libs文件夹中;
- 2.在module或project中声明aar文件路径:
方式一、在module中声明:
在依赖aar文件的library module的build.gradle文件中配置如下:
repositories {
    flatDir {
        dirs 'libs'
    }
}
在其它所有直接或间接依赖该library module的module中配置build.gradle文件如下:
repositories {
    flatDir {
        dirs '../xxx/libs','libs'  //将xxx替换为引入aar文件的module名
    }
}
方式二、在project的build.gradle文件中统一配置如下:
allprojects {
    repositories
        flatDir {
            dirs project(':xxx').file('libs')  //将xxx替换为引入aar文件的module名
        }
    }
}
3.在依赖aar文件的library module下的build.gradle文件中添加依赖如下:
implementation(name: 'xxx', ext: 'aar')  //只允许在依赖aar文件的module下调用该aar文件
或
api (name:'xxx',ext:'aar')  //在其他依赖该library module的module中,也可调用该library module所依赖的aar文件
【55.查看布局视图】
方法一、然后打开要抓取的App即可查看布局视图

方法二、AndroidStudio自带
在 Tools —> Layout Inspector