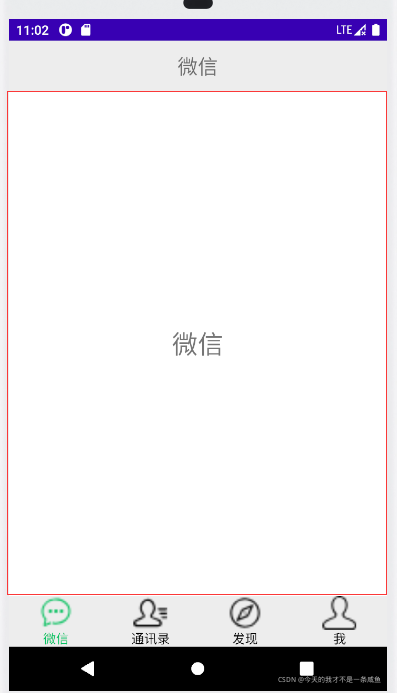
移动开发——实现微信APP门户界面设计
顶部界面设计

首先我们要实现的是顶部的标题,在此建立一个top.xml文件,使用水平线性布局,将一个TextView组件放入界面。其次设置组件的属性。
底部界面设计

底部界面布局
建立一个bottom.xml的文件,使用水平线性布局,拉入4个垂直线性布局的LinearLayout组件,在每个LinearLayout组件中放入一个TextView组件和一个imgView组件,设置各个组件的属性。
图片和文字的颜色切换
将下载好的图片拉进drawable的文件中,添加四个图片颜色切换的Drawable Resource File和一个文字颜色切换的Drawable Resource File。
图片颜色切换代码(以第一个为例):
<?xml version="1.0" encoding="utf-8"?>
<selector xmlns:android="http://schemas.android.com/apk/res/android">
    <item android:state_selected="true" android:drawable="@drawable/wx2"></item>
    <item android:drawable="@drawable/wx1"></item>
</selector>
文字颜色切换代码
<?xml version="1.0" encoding="utf-8"?>
<selector xmlns:android="http://schemas.android.com/apk/res/android">
    <item android:state_selected="true" android:color="#07C160"></item>
    <item android:color="@color/black"></item>
</selector>
主体界面设计

把activity_main.xml文件改为垂直线性布局,拉入一个FrameLayout组件,在其中添加四个FrameLayout组件作为四个界面。
新建四个Fragment类,在其中添加一个TextView组件提示此时的界面,修改各个组件的属性。
界面切换实现
初始化成员参数
private LinearLayout linearWx,linearTxl,linearFx,linearW;
private ImageView imgWx,imgTxl,imgFx,imgW,imgCur;
private TextView textWx,textTxl,textFx,textW,textCur;
private void initFun(){
        linearWx = findViewById(R.id.wx_linear);
        linearWx.setOnClickListener(this);
        linearTxl = findViewById(R.id.txl_linear);
        linearTxl.setOnClickListener(this);
        linearFx = findViewById(R.id.fx_linear);
        linearFx.setOnClickListener(this);
        linearW = findViewById(R.id.w_linear);
        linearW.setOnClickListener(this);

        imgWx = findViewById(R.id.imageView);
        imgTxl = findViewById(R.id.imageView2);
        imgFx = findViewById(R.id.imageView3);
        imgW = findViewById(R.id.imageView4);
        imgCur = findViewById(R.id.imageView);

        textWx = findViewById(R.id.textView);
        textTxl = findViewById(R.id.textView2);
        textFx = findViewById(R.id.textView3);
        textW = findViewById(R.id.textView4);
        textCur = findViewById(R.id.textView);
    }
默认显示微信菜单
private void addFragment(Fragment fragment){
        FragmentManager fragmentManager = getSupportFragmentManager();
        FragmentTransaction transaction = fragmentManager.beginTransaction();
        transaction.add(R.id.body, fragment);
        transaction.commit();
    }
Fragment切换的实现
private void changeFragment(Fragment fragment){
        FragmentManager fragmentManager = getSupportFragmentManager();
        FragmentTransaction transaction = fragmentManager.beginTransaction();
        transaction.replace(R.id.body, fragment);
        transaction.commit();
    }
图片文字颜色切换
	private void colorChange(int id){
        textCur.setSelected(false);
        imgCur.setSelected(false);
        switch (id){
            case 1:
                imgWx.setSelected(true);
                imgCur=imgWx;
                textWx.setSelected(true);
                textCur=textWx;
                break;
            case 2:
                imgTxl.setSelected(true);
                imgCur=imgTxl;
                textTxl.setSelected(true);
                textCur=textTxl;
                break;
            case 3:
                imgFx.setSelected(true);
                imgCur=imgFx;
                textFx.setSelected(true);
                textCur=textFx;
                break;
            case 4:
                imgW.setSelected(true);
                imgCur=imgW;
                textW.setSelected(true);
                textCur=textW;
                break;
            default:
                break;
        }
    }
重写点击事件的监听方法
@Override
    public void onClick(View view) {
        switch (view.getId()){
            case R.id.wx_linear:
                changeFragment(new BodyWx());
                colorChange(1);
                break;
            case R.id.txl_linear:
                changeFragment(new BodyTxl());
                colorChange(2);
                break;
            case R.id.fx_linear:
                changeFragment(new BodyFx());
                colorChange(3);
                break;
            case R.id.w_linear:
                changeFragment(new BodyW());
                colorChange(4);
                break;
            default:
                break;
        }
    }
重写OnCreate方法
protected void onCreate(Bundle savedInstanceState) {
	super.onCreate(savedInstanceState);
    supportRequestWindowFeature(Window.FEATURE_NO_TITLE);
    setContentView(R.layout.activity_main);
	initFun();
    addFragment(new BodyWx());
    imgWx.setSelected(true);
    textWx.setSelected(true);
}
APP展示
