onDraw()
- 自定义绘制的方式是重写绘制方法,其中最常用的是 onDraw()
- 绘制的关键是 Canvas 的使用
- Canvas 的绘制类方法: drawXXX() (关键参数:Paint)
- Canvas 的辅助类方法:范围裁切和几何变换
- 可以使用不同的绘制方法来控制遮盖关系
一、Canvas 的 drawXXX() 系列方法及?Paint?最常见的使用?Canvas.drawXXX()?是自定义绘制最基本的操作。
- MainActivity.java不用添加代码
- MyNewView.java
public class MyNewView extends View {

    private Paint paint;

    public MyNewView(Context context, @Nullable AttributeSet attrs) {
        super(context, attrs);
        paint = new Paint();
    }

    @Override
    protected void onDraw(Canvas canvas) {
        super.onDraw(canvas);
        //设置颜色
        paint.setColor(Color.BLUE);
        //Style修改为画线模式
        paint.setStyle(Paint.Style.STROKE);
        //设置抗锯齿开关
        paint.setAntiAlias(true);
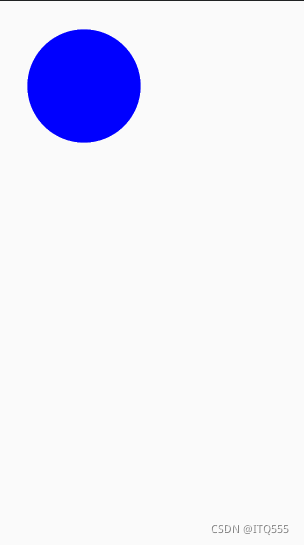
        canvas.drawCircle(300,300,200,paint);
        //把整个区域染成纯黑色,覆盖掉原有内容
        canvas.drawColor(Color.BLACK);
        //在原有的绘制效果上加一层半透明的红色遮罩
        canvas.drawColor(Color.parseColor("#88880000"));
    }

}- activity_main.xml
<RelativeLayout xmlns:android="http://schemas.android.com/apk/res/android"
    xmlns:app="http://schemas.android.com/apk/res-auto"
    xmlns:tools="http://schemas.android.com/tools"
    android:layout_width="match_parent"
    android:layout_height="match_parent"
    tools:context=".MainActivity">

    <com.android.newview.view.MyNewView
        android:layout_width="wrap_content"
        android:layout_height="wrap_content"
        android:layout_centerInParent="true" />

</RelativeLayout>
效果图:
Canvas.drawColor(@ColorInt int color) 颜色填充
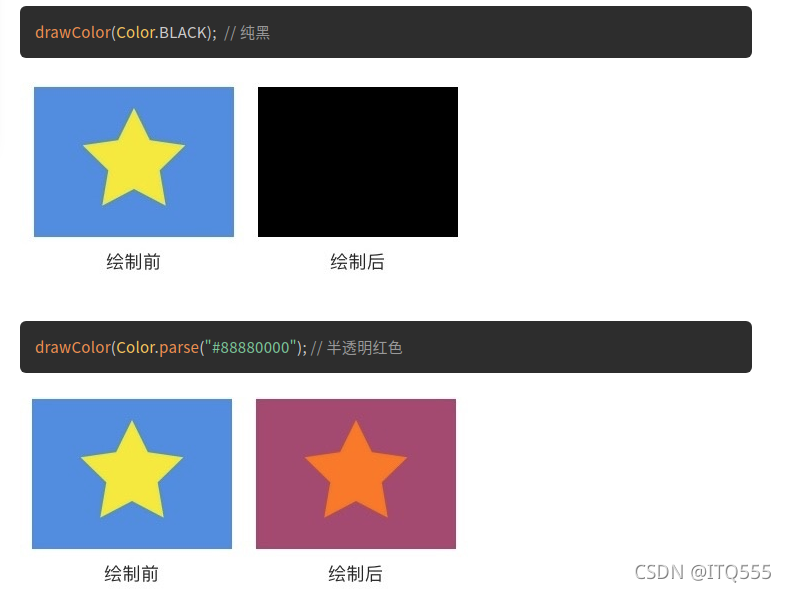
这是最基本的?drawXXX()?方法:在整个绘制区域统一涂上指定的颜色。
例如,
drawColor(Color.BLACK)?会把整个区域染成纯黑色,覆盖掉原有内容;?
drawColor(Color.parse("#88880000")?会在原有的绘制效果上加一层半透明的红色遮罩。
类似的方法还有?drawRGB(int r, int g, int b)?和?drawARGB(int a, int r, int g, int b)?,它们和?drawColor(color)?只是使用方式不同,作用都是一样的。
canvas.drawRGB(100, 200, 100);
canvas.drawARGB(100, 100, 200, 100);
这类颜色填充方法一般用于在绘制之前设置底色,或者在绘制之后为界面设置半透明蒙版。
?
drawCircle(float centerX, float centerY, float radius, Paint paint) 画圆
- Paint.setColor(int color)
- Paint.setARGB(int a, int r, int g, int b)
- a表示透明度
- paint.setARGB(100, 255, 0, 0)
-
Paint.?setShader(Shader shader)
- 设置了?
Shader?之后,Paint?在绘制图形和文字时就不再使用?setColor/ARGB()?设置的颜色了,而是使用?Shader?的方案中的颜色 - 在 Android 的绘制里使用?
Shader?,并不直接用?Shader?这个类,而是用它的几个子类 LinearGradient、RadialGradient、SweepGradient、BitmapShader、ComposeShader- LinearGradient 线性渐变
- LinearGradient(float x0, float y0, float x1, float y1, int color0, int color1, Shader.TileMode tile)
- 设置两个点和两种颜色,以这两个点作为端点,使用两种颜色的渐变来绘制颜色
TileMode?一共有 3 个值可选:?CLAMP,?MIRROR?和?REPEAT
-
RadialGradient 辐射渐变
-
RadialGradient(float centerX, float centerY, float radius, int centerColor, int edgeColor, TileMode tileMode)
-
SweepGradient 扫描渐变
-
SweepGradient(float cx, float cy, int color0, int color1)
- 设置了?
-
BitmapShader
- BitmapShader(Bitmap bitmap, Shader.TileMode tileX, Shader.TileMode tileY)
-
ComposeShader 混合着色器
-
Paint.setStyle(Paint.Style style)
-
paint.setStyle(Paint.Style.STROKE); // Style 修改为画线模式
FILL 是填充模式,STROKE 是画线模式(即勾边模式),
FILL_AND_STROKE 是两种模式一并使用:既画线又填充。
它的默认值是 FILL,填充模式
-
-
Paint.setStrokeWidth(float width)
-
抗锯齿?
-
方法一:
Paint paint = new Paint(Paint.ANTI_ALIAS_FLAG);
方法二:
Paint.setAntiAlias(boolean aa)
-
drawRect(float left, float top, float right, float bottom, Paint paint) 画矩形
left,?top,?right,?bottom?是矩形四条边的坐标
drawPoint(float x, float y, Paint paint) 画点
x?和?y?是点的坐标- 点的大小可以通过?
paint.setStrokeWidth(width)?来设置 - 点的形状可以通过?
paint.setStrokeCap(cap)?来设置
drawPoints(float[] pts, int offset, int count, Paint paint) / drawPoints(float[] pts, Paint paint) 画点(批量)
paint.setStrokeWidth(20);
paint.setStrokeCap(Paint.Cap.ROUND);
float[] points = {0,0,50,50,50,100,100,50,100,100,150,50,150,100};
canvas.drawPoints(points,2,8,paint);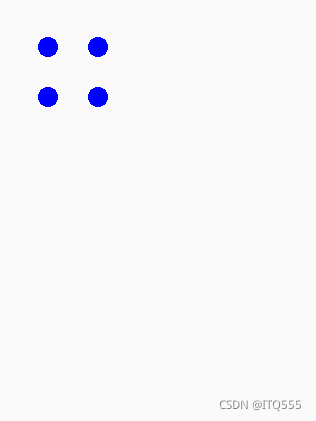
drawOval(float left, float top, float right, float bottom, Paint paint) 画椭圆
- 只能绘制横着的或者竖着的椭圆?,斜的椭圆需要配合几何变换
left,?top,?right,?bottom?是这个椭圆的左、上、右、下四个边界点的坐标
paint.setStyle(Style.FILL);
canvas.drawOval(50, 50, 350, 200, paint);

paint.setStyle(Style.STROKE);
canvas.drawOval(400, 50, 700, 200, paint);
drawLine(float startX, float startY, float stopX, float stopY, Paint paint) 画线
startX,?startY,?stopX,?stopY?分别是线的起点和终点坐标- 由于直线不是封闭图形,所以?
setStyle(style)?对直线没有影响
drawLines(float[] pts, int offset, int count, Paint paint) / drawLines(float[] pts, Paint paint) 画线(批量)
//设置线的粗细
paint.setStrokeWidth(10);
canvas.drawLine(50,50,320,367,paint);

float[] points = {20,20,120,20,70,20,70,120,20,120,120,120,150,20,250,20,150,20,150,120,250,20,250,120,150,120,250,120};
canvas.drawLines(points,paint);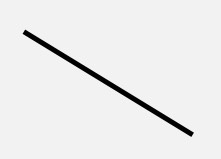
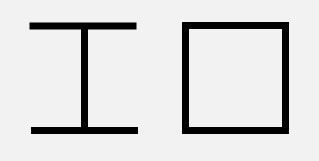
drawRoundRect(float left, float top, float right, float bottom, float rx, float ry, Paint paint) 画圆角矩形
left,?top,?right,?bottom?是四条边的坐标,rx?和?ry?是圆角的横向半径和纵向半径
//设置椭圆样式
paint.setStyle(Paint.Style.STROKE);
canvas.drawRoundRect(100,100,500,300,50,50,paint);
drawArc(float left, float top, float right, float bottom, float startAngle, float sweepAngle, boolean useCenter, Paint paint) 绘制弧形或扇形
drawArc()?使用一个椭圆来描述弧形left,?top,?right,?bottom?描述的是这个弧形所在的椭圆startAngle?是弧形的起始角度(x 轴的正向,即正右的方向,是 0 度的位置)sweepAngle?是弧形划过的角度,(顺时针为正角度,逆时针为负角度)useCenter?表示是否连接到圆心,如果不连接到圆心,就是弧形,如果连接到圆心,就是扇形
//填充模式
paint.setStyle(Paint.Style.FILL);
//绘制扇形
canvas.drawArc(200,100,800,500,-110,100,true,paint);
//绘制弧形
canvas.drawArc(200,100,800,500,20,140,false,paint);
//画线模式
paint.setStyle(Paint.Style.STROKE);
//绘制封口的弧形
canvas.drawArc(200,100,800,500,180,60,true,paint);
//绘制不封口的弧形
canvas.drawArc(200,100,800,500,180,60,false,paint);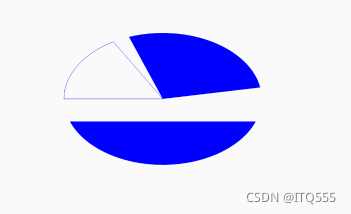

?drawPath(Path path, Paint paint) 画自定义图形
Path path = new Path();

{
    // 使用 path 对图形进行描述
    path.addArc(200, 200, 400, 400, -225, 225);
    path.arcTo(400, 200, 600, 400, -180, 225, false);
    path.lineTo(400, 542);
}

@Override
protected void onDraw(Canvas canvas) {
    super.onDraw(canvas);
    // 绘制出 path 描述的图形(心形)
    canvas.drawPath(path, paint);
    }
}
xxxTo()?——画线(直线或曲线)
- lineTo(float x, float y) / rLineTo(float x, float y) 画直线
- 从当前位置向目标位置画一条直线,?
x?和?y?是目标位置的坐标 lineTo(x, y)?的参数是绝对坐标rLineTo(x, y)?的参数是相对当前位置的相对坐标
- 从当前位置向目标位置画一条直线,?
paint.setStyle(Paint.Style.STROKE);
// 由当前位置 (0, 0) 向 (100, 100) 画一条直线
path.lineTo(100,100);
// 由当前位置 (100, 100) 向正右方 100 像素的位置画一条直线
path.rLineTo(100,0);
canvas.drawPath(path,paint);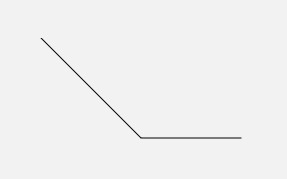
?moveTo(float x, float y) / rMoveTo(float x, float y) 移动到目标位置
GPS_PROVIDER
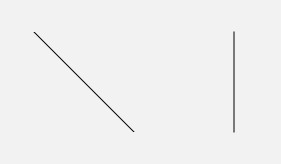
arcTo()?和?addArc()也是用来画线的,但并不使用当前位置作为弧线的起点
arcTo( ) 和?Canvas.drawArc()?比起来,少了一个参数?useCenter,而多了一个参数?forceMoveTo
- 因为?
arcTo()?只用来画弧形而不画扇形,所以不再需要?useCenter?参数 - 而
forceMoveTo?参数的意思是,绘制是要「抬一下笔移动过去」,还是「直接拖着笔过去」,区别在于是否留下移动的痕迹
path.lineTo(100,100);
//强制移动到弧形起点(无痕迹)
//path.arcTo(100,100,300,300,-90,90,true);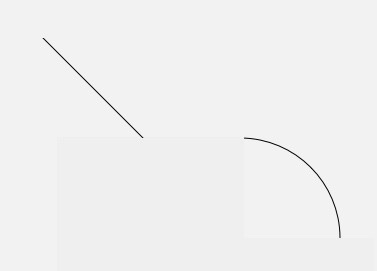
path.lineTo(100,100);
// 直接连线连到弧形起点(有痕迹)
path.addArc(100,100,300,300,-90,90);*/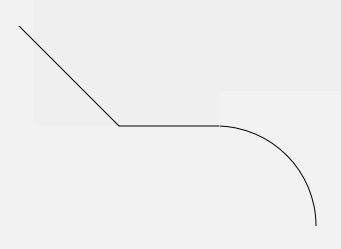
addArc()?是一个直接使用了?forceMoveTo = true?的简化版?arcTo()
close() 封闭当前子图形
//子图形未封闭
path.moveTo(100,100);
path.lineTo(200,100);
path.lineTo(150,150);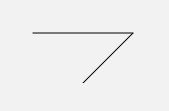
path.moveTo(100,100);
path.lineTo(200,100);
path.lineTo(150,150);
//使用 close() 封闭子图形,等价于 path.lineTo(100, 100)
path.close();
// close() 和 lineTo(起点坐标) 是完全等价的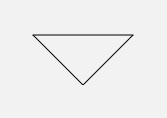
- 当需要填充图形时(即?
Paint.Style?为?FILL?或?FILL_AND_STROKE),Path?会自动封闭子图形
paint.setStyle(Style.FILL);
path.moveTo(100, 100);
path.lineTo(200, 100);
path.lineTo(150, 150);
// 这里只绘制了两条边,但由于 Style 是 FILL ,所以绘制时会自动封口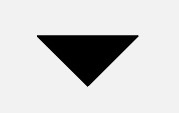
线条形状
setStrokeWidth(float width)
- 设置线条宽度。单位为像素,默认值是 0
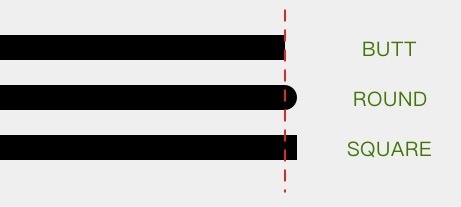
setStrokeCap(Paint.Cap cap)
- 设置线头的形状
- 线头形状有三种:
BUTT?平头、ROUND?圆头、SQUARE?方头(默认为?BUTT)
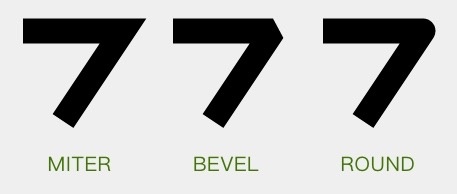
setStrokeJoin(Paint.Join join)
- 设置拐角的形状
MITER?尖角、?BEVEL?平角和?ROUND?圆角(默认为?MITER)
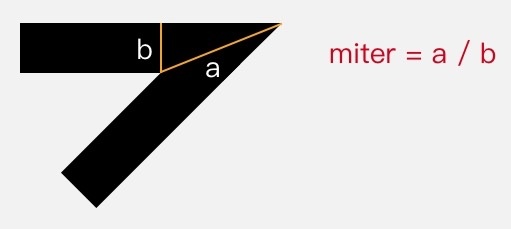
setStrokeMiter(float miter)
- 用于设置?
MITER?型拐角的延长线的最大值 - ?miter limit 的默认值是 4,对应的是一个大约 29° 的锐角
- 默认情况下,大于这个角的尖角会被保留,而小于这个夹角的就会被「削成平头」
drawText(String text, float x, float y, Paint paint) 绘制文字
- 参数?
text?是用来绘制的字符串,x?和?y?是绘制的起点坐标 Paint.setTextSize(textSize)?可以设置文字的大小
String text = "Hello World !";
paint.setTextSize(18);
canvas.drawText(text, 100, 25, paint);
paint.setTextSize(36);
canvas.drawText(text, 100, 70, paint);
paint.setTextSize(60);
canvas.drawText(text, 100, 145, paint);
paint.setTextSize(84);
canvas.drawText(text, 100, 240, paint);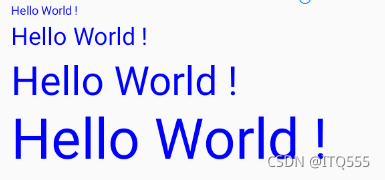
属性动画Property Animation
ViewPropertyAnimator
- ?
View.animate().translationX()
path.addCircle(100,100,50, Path.Direction.CW);
canvas.drawPath(path,paint);
this.animate().translationX(1000).setDuration(2000);- 其他方法
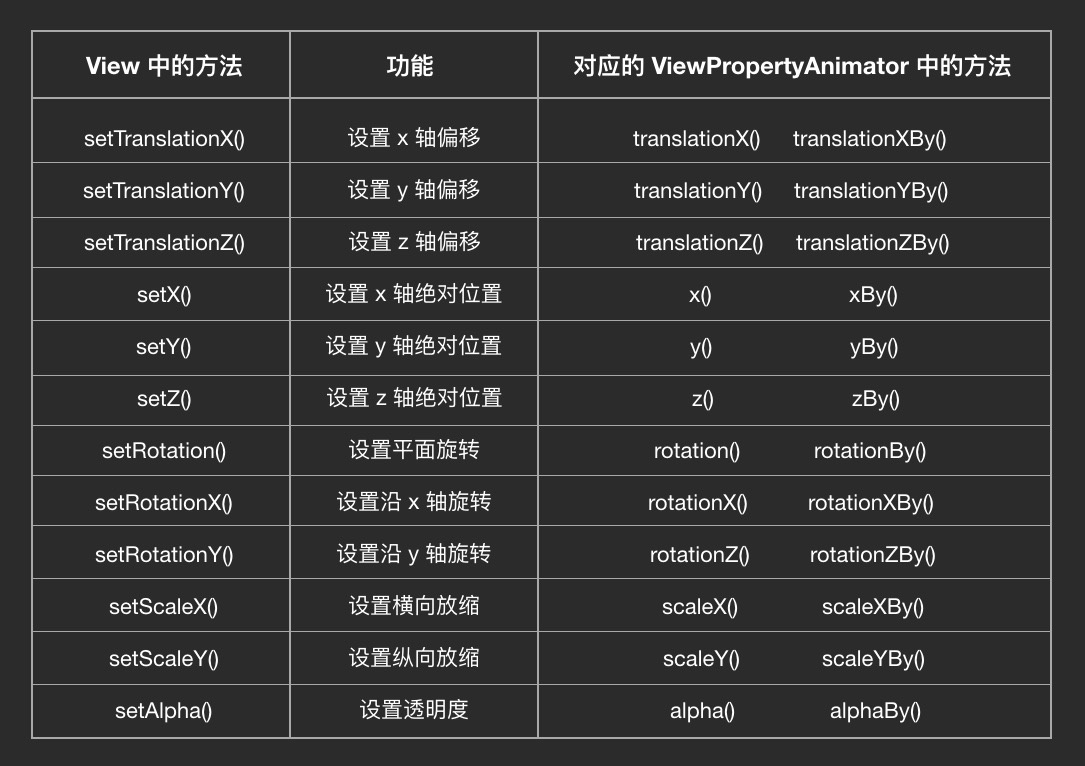
- 其中,translationX(100)和translationXBy(100)的区别是,
translationX(100)?表示用动画把?View?的?translationX?值渐变为?100,而?translationXBy(100)?则表示用动画把?View?的?translationX?值渐变地增加?100 。即translationX(100)是只移动到100,而translationXBy(100),如果点击按钮控制动画,则每点击一次就会移动一次100? 。
示例代码:
SportsView.java
public class SportsView extends View {

    float radius = 200;

    RectF arcRectF = new RectF();
    Paint paint = new Paint(Paint.ANTI_ALIAS_FLAG);

    float progress = 0;

    public float getProgress() {
        return progress;
    }

    public void setProgress(float progress) {
        this.progress = progress;
        invalidate();
    }

    public SportsView(Context context) {
        super(context);
    }

    public SportsView(Context context, @Nullable AttributeSet attrs) {
        super(context, attrs);
    }

    public SportsView(Context context, @Nullable AttributeSet attrs, int defStyleAttr) {
        super(context, attrs, defStyleAttr);
    }

    {
        paint.setTextSize(40);
        paint.setTextAlign(Paint.Align.CENTER);
    }

    @Override
    protected void onDraw(Canvas canvas) {
        super.onDraw(canvas);

        float centerX = getWidth() / 2;
        float centerY = getHeight() / 2;
        paint.setColor(Color.parseColor("#E91E63"));
        paint.setStyle(Paint.Style.STROKE);
        paint.setStrokeCap(Paint.Cap.ROUND);
        paint.setStrokeWidth(35);
        arcRectF.set(centerX - radius,centerY - radius,centerX + radius,centerY + radius);
        //当sweepAngle为 progress * 3.6f 时可以实现一圈的绘制
        canvas.drawArc(arcRectF,135,progress * 2.7f,false,paint);

        paint.setColor(Color.BLACK);
        paint.setStyle(Paint.Style.FILL);
        canvas.drawText((int)progress + "%",centerX,centerY - (paint.ascent() + paint.descent()) / 2,paint);
    }

}
activity_main.xml
<android.support.constraint.ConstraintLayout
    xmlns:android="http://schemas.android.com/apk/res/android"
    xmlns:app="http://schemas.android.com/apk/res-auto"
    xmlns:tools="http://schemas.android.com/tools"
    android:layout_width="match_parent"
    android:layout_height="match_parent"
    tools:context=".MainActivity">

    <com.android.newview.view.SportsView
        android:id="@+id/my_view"
        android:layout_width="300dp"
        android:layout_height="300dp"
        app:layout_constraintBottom_toBottomOf="parent"
        app:layout_constraintEnd_toEndOf="parent"
        app:layout_constraintHorizontal_bias="0.369"
        app:layout_constraintStart_toStartOf="parent"
        app:layout_constraintTop_toTopOf="parent"
        app:layout_constraintVertical_bias="0.125"
        tools:ignore="MissingConstraints" />

    <Button
        android:id="@+id/button"
        android:layout_width="wrap_content"
        android:layout_height="wrap_content"
        android:layout_centerInParent="true"
        android:layout_marginTop="104dp"
        android:layout_marginEnd="232dp"
        android:text="OK"
        android:textSize="20dp"
        app:layout_constraintEnd_toEndOf="parent"
        app:layout_constraintTop_toBottomOf="@+id/my_view"
        tools:ignore="MissingConstraints" />


</android.support.constraint.ConstraintLayout>
MainActivity.java
public class MainActivity extends AppCompatActivity {

    private SportsView view;
    private Button button;

    @Override
    protected void onCreate(Bundle savedInstanceState) {
        super.onCreate(savedInstanceState);
        setContentView(R.layout.activity_main);

        button = findViewById(R.id.button);
        view = findViewById(R.id.my_view);

        button.setOnClickListener(new View.OnClickListener() {
            @Override
            public void onClick(View v) {
                Log.i("TAG", "onClick: The button is clicked !");
                ObjectAnimator animator = ObjectAnimator.ofFloat(view,"progress",0,87);
                animator.start();
            }
        });
    }
}
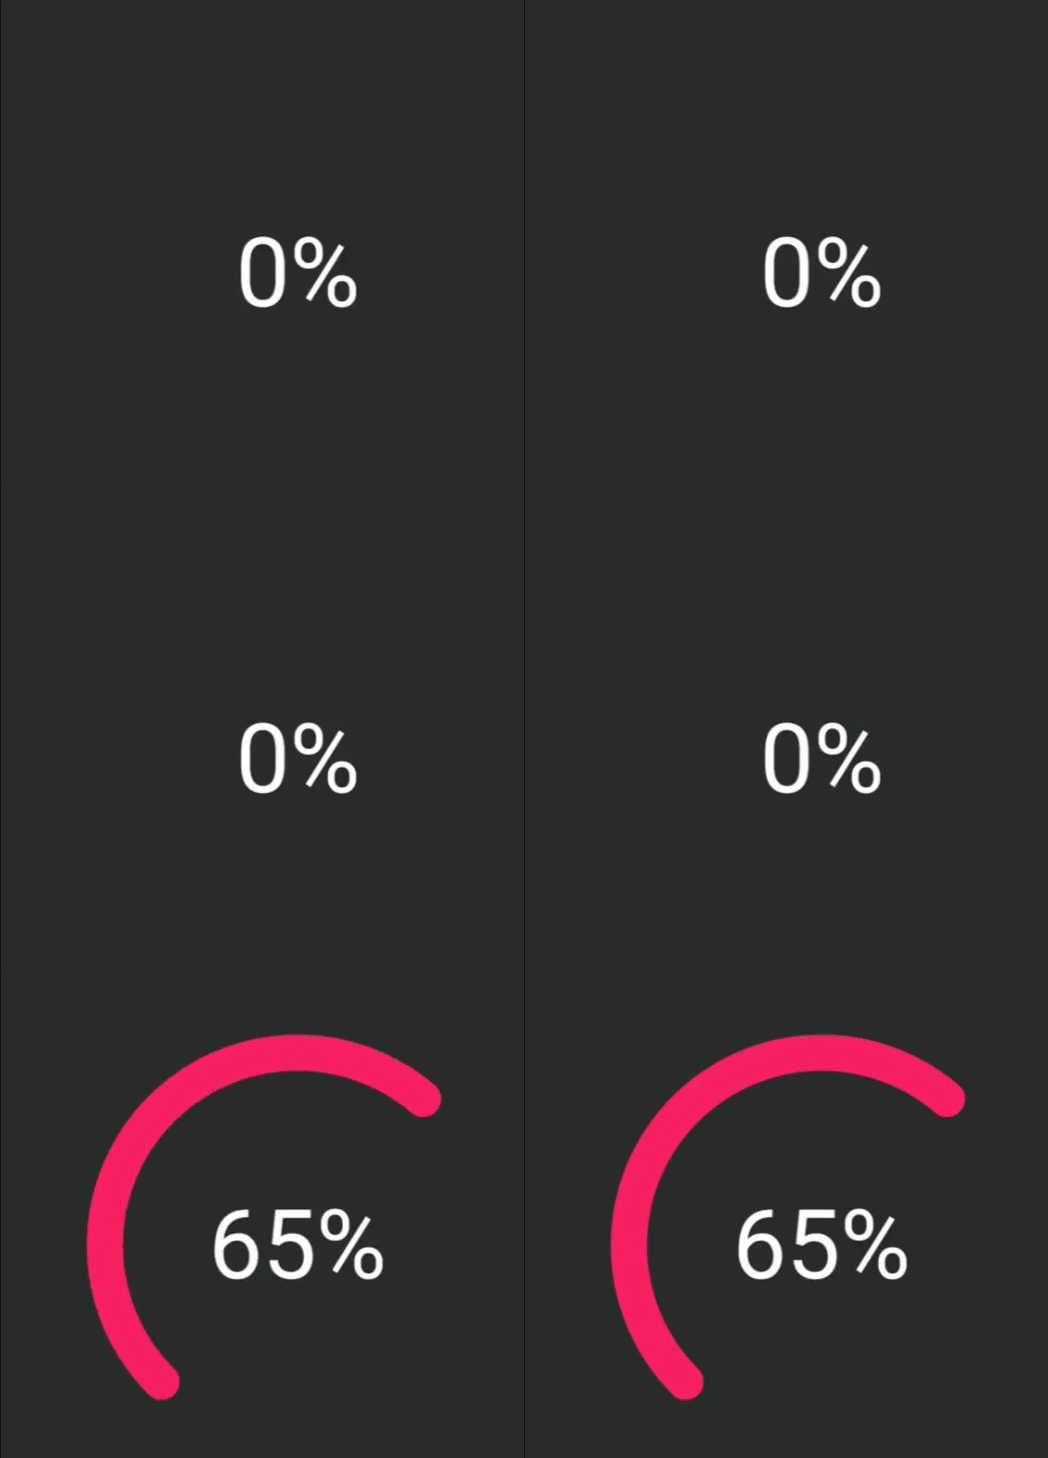
效果图:
setDuration(int duration) 设置动画时长
setInterpolator(Interpolator interpolator) 设置 Interpolator
Interpolator?是速度设置器- AccelerateDecelerateInterpolator是默认的?
Interpolator
AccelerateDecelerateInterpolator? 先加速再减速
- 它是一种最符合物理世界的模型,所以如果要做最简单的状态变化(位移、放缩、旋转等等),那么一般不用设置?
Interpolator,就用这个默认的最好
LinearInterpolator??匀速
AccelerateInterpolator??持续加速
- 主要用在离场效果中,比如某个物体从界面中飞离
DecelerateInterpolator??持续减速直到 0
- 主要用于入场效果,比如某个物体从界面的外部飞入界面后停在某处
AnticipateInterpolator??
- 先回拉一下再进行正常动画轨迹
- 效果看起来有点像投掷物体或跳跃等动作前的蓄力
OvershootInterpolator
- 动画会超过目标值一些,然后再弹回来
AnticipateOvershootInterpolator
- 开始前回拉,最后超过一些然后回弹
BounceInterpolator
- 在目标值处弹跳
- 有点像玻璃球掉在地板上的效果
CycleInterpolator
- 可以自定义曲线的周期
- 动画可以不到终点就结束,也可以到达终点后回弹
- 回弹的次数由曲线的周期决定,曲线的周期由?
CycleInterpolator()?构造方法的参数决定
PathInterpolator
- 自定义动画完成度 / 时间完成度曲线
Path interpolatorPath = new Path();
// 匀速
interpolatorPath.lineTo(1, 1);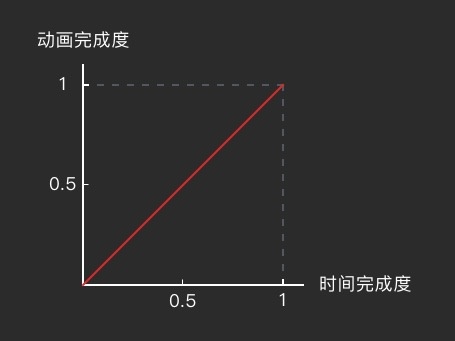
Path interpolatorPath = new Path();
// 先以「动画完成度 : 时间完成度 = 1 : 1」的速度匀速运行 25%
interpolatorPath.lineTo(0.25f, 0.25f);
// 然后瞬间跳跃到 150% 的动画完成度
interpolatorPath.moveTo(0.25f, 1.5f);
// 再匀速倒车,返回到目标点
interpolatorPath.lineTo(1, 1);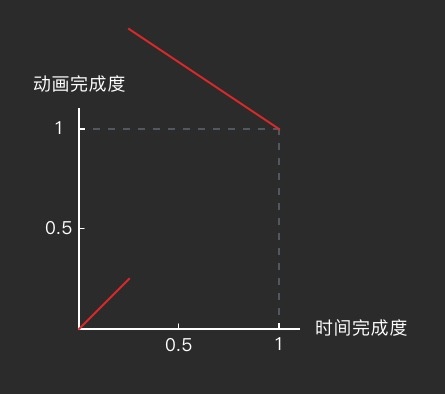
FastOutLinearInInterpolator??加速运动
- FastOutLinearInInterpolator 使用了贝塞尔曲线
AccelerateInterpolator?用的是指数曲线- 效果和 AccelerateInterpolator 几乎一模一样
FastOutSlowInInterpolator??先加速再减速
与AccelerateDecelerateInterpolator相比,FastOutSlowInInterpolator?的前期加速度要快得多
LinearOutSlowInInterpolator??持续减速
- 与DecelerateInterpolator相比,
LinearOutSlowInInterpolator?的初始速度更高
参考文档:HenCoder Android 开发进阶: 自定义 View 1-1 绘制基础![]() https://rengwuxian.com/ui-1-1/
https://rengwuxian.com/ui-1-1/
HenCoder Android 开发进阶: 自定义 View 1-2 Paint 详解![]() https://rengwuxian.com/ui-1-2/HenCoder Android 开发进阶:自定义 View 1-3 drawText() 文字的绘制
https://rengwuxian.com/ui-1-2/HenCoder Android 开发进阶:自定义 View 1-3 drawText() 文字的绘制![]() https://rengwuxian.com/ui-1-3/HenCoder Android 开发进阶:自定义 View 1-4 Canvas 对绘制的辅助
https://rengwuxian.com/ui-1-3/HenCoder Android 开发进阶:自定义 View 1-4 Canvas 对绘制的辅助![]() https://rengwuxian.com/ui-1-4/HenCoder Android 开发进阶:自定义 View 1-5 绘制顺序
https://rengwuxian.com/ui-1-4/HenCoder Android 开发进阶:自定义 View 1-5 绘制顺序![]() https://rengwuxian.com/ui-1-5/HenCoder Android 自定义 View 1-6:属性动画 Property Animation(上手篇)
https://rengwuxian.com/ui-1-5/HenCoder Android 自定义 View 1-6:属性动画 Property Animation(上手篇)![]() https://rengwuxian.com/ui-1-6/HenCoder Android 自定义 View 1-7:属性动画 Property Animation(进阶篇)
https://rengwuxian.com/ui-1-6/HenCoder Android 自定义 View 1-7:属性动画 Property Animation(进阶篇)![]() https://rengwuxian.com/ui-1-7/
https://rengwuxian.com/ui-1-7/