购物城项目实战(下篇)
重要提示(附完整代码链接)
(下篇)承接(中篇内容),接口文档和阿里图标库已在(上篇)给出,本文所粘贴代码或许存在不完整之处,完整代码请点此查看。
支付页面创建订单并发起预支付
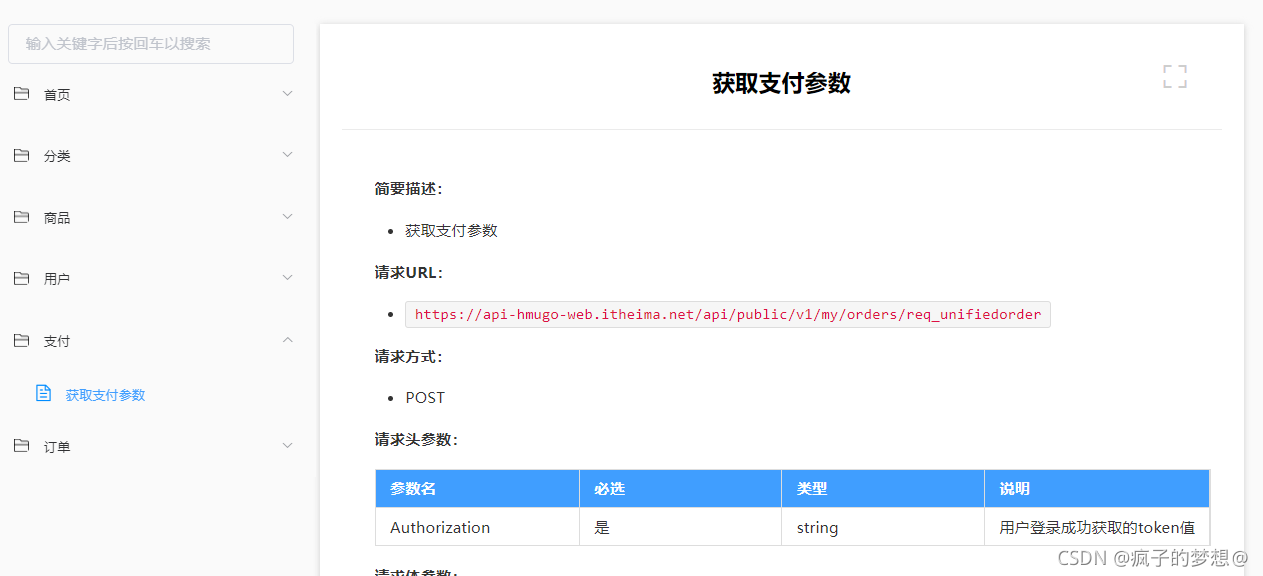
(中篇)里边,我们有了token值,紧接着这里就需要创建订单了,获取订单编号,然后在发起预支付。现在回到pay文件夹下的index.js中进行修改代码,编写如果有token值时的下一步逻辑。这里用到了接口文档如下图所示。接口文档(地址)。
// pages/pay/index.js
// 引入封装好的请求函数
import {
  request
} from "../../request/index.js"
Page({
  /**
   * 封装一个函数,设置商品状态的同时,底部工具栏,总价格,总数量重新计算
   */
  setCart(cart) {
    let allChecked = true;
    //  声明总价格和总数量
    let totalPrice = 0;
    let totalNum = 0;
    cart.forEach(v => {
      if (v.checked) {
        totalPrice += v.num * v.goods_price;
        totalNum += v.num;
      } else {
        allChecked = false;
      }
    })
    //判断数组是否为空
    allChecked = cart.length != 0 ? allChecked : false;
    this.setData({
      cart,
      totalPrice,
      totalNum,
    });
    wx.setStorageSync('cart', cart);
  },

  /**
   * 页面的初始数据
   */
  data: {
    address: {},
    //声明一个变量,购物车数组
    cart: [],
    // 声明一个变量,购物车内容是否全选
    allChecked: false,
    // 定义商品总价格和总数量
    totalPrice: 0,
    totalNum: 0
  },

  /**
   * 生命周期函数--监听页面加载
   */
  onLoad: function (options) {

  },

  /**
   * 生命周期函数--监听页面显示
   */
  onShow: function () {
    //获取缓存中的购物车数据
    let cart = wx.getStorageSync('cart')
    //获取缓存中的收货地址信息
    const address = wx.getStorageSync('address');
    //过滤后的购物车数组(真正被选中的商品)
    cart = cart.filter(v => v.checked);
    //  声明总价格和总数量
    let totalPrice = 0;
    let totalNum = 0;
    cart.forEach(v => {
      totalPrice += v.num * v.goods_price;
      totalNum += v.num;
    })
    this.setData({
      cart,
      totalPrice,
      totalNum,
      address,
    });
  },
  // 点击支付事件
  async handleOrderPay(e) {
    //判断缓存中有无token
    const token = wx.getStorageSync('token');
    //如果不存在
    if (!token) {
      //跳转页面到获取用户登录信息
      wx.navigateTo({
        url: '/pages/auth/index',
      })
      return;
    };
    //否则就是有token值,创建订单
    // console.log('已经有token了');
    // 准备一些必须的请求头参数
    const header = {
      Authorization: wx.getStorageSync('token')
    };
    //准备请求体参数
    const order_price = this.data.totalPrice;
    const consignee_addr = this.data.address.all;
    const cart = this.data.cart;
    let goods = [];
    cart.forEach(v => goods.push({
      goods_id: v.goods_id,
      goods_number: v.num,
      goods_price: v.goods_price
    }))
    const orderParams = {
      order_price,
      consignee_addr,
      goods
    }
    // 发送请求 创建订单,获取订单编号,这个接口,不稳定,所以返回的订单编号可能为空或者其他
    const
      number
     = await request({
      url: "https://api-hmugo-web.itheima.net/api/public/v1/my/orders/create",
      method: "POST",
      data: orderParams,
      header
    });
    //把返回数据中的订单编号存入缓存中,并命名为order_number
    wx.setStorageSync('order_number', number.data.message.order_number);
    // 从缓存中取出
    const order_number=wx.getStorageSync('order_number');
    // 发起预支付接口
    const res = await request({
      url: "https://api-hmugo-web.itheima.net/api/public/v1/my/orders/req_unifiedorder",
      method: "POST",
      data: {order_number},
      header
    })
    // 会返回一堆参数,请见接口文档说明
    console.log(res);
  },

  /**
   * 生命周期函数--监听页面隐藏
   */
  onHide: function () {

  },

  /**
   * 生命周期函数--监听页面卸载
   */
  onUnload: function () {

  },

  /**
   * 页面相关事件处理函数--监听用户下拉动作
   */
  onPullDownRefresh: function () {

  },

  /**
   * 页面上拉触底事件的处理函数
   */
  onReachBottom: function () {

  },

  /**
   * 用户点击右上角分享
   */
  onShareAppMessage: function () {

  }
})
<!--pages/pay/index.wxml-->
<!-- 收货地址容器 -->
<view class="receive_address">
  <view  class="user_info_row">
    <view class="user_info">
      <view> {{address.userName}}</view>
      <view>{{address.all}}</view>
    </view>
    <view class="user_phone">
      {{address.telNumber}}
    </view>
  </view>
</view>

<!-- 购物车具体内容 -->
<view class="cart_content">
  <view class="cart_title">购物车</view>
  <view class="cart_main">
      <view class="cart_item" wx:for="{{cart}}" wx:key="goods_id">
        <!-- 商品图片 -->
        <navigator class="cart_image">
          <image mode="widthFix" src="{{item.goods_small_logo}}">
          </image>
        </navigator>
        <!-- 商品信息 -->
        <view class="cart_info">
          <view class="goods_name">{{item.goods_name}}</view>
          <view class="goods_price_wrap">
            <view class="goods_price">{{item.goods_price}}</view>
            <view class="cart_num_tool">
              <view class="goods_nums">x{{item.num}}</view>
            </view>
          </view>
        </view>
      </view>
  </view>
</view>


<!-- 底部导航栏 -->
<view class="footer_tool">
  <!-- 总价格 -->
  <view class="total_price_wrap">
    <view class="total_price">
      合计:<text class="total_price_number">¥{{totalPrice}}</text>
    </view>
    <view>包含运费</view>
  </view>
  <!-- 支付 -->
  <view class="order_pay_wrap" bindtap="handleOrderPay">支付({{totalNum}})</view>
</view>
效果如下,我们查看返回的一些参数。pay:里边包含了该部分参数。


接下来是根据获取的支付参数,调用小程序内部的API,wx.requestPayment进行调起微信支付。这里先在utils文件夹下的util.js内封装了一个函数如下
// 封装一个函数吊起微信支付接口
/**
 * promise 形式的 小程序的微信支付
 * @param {object} pay 支付所必要的参数
 */
export const requestPayment=(pay)=>{
  return new Promise((resolve,reject)=>{
   wx.requestPayment({
      ...pay,
     success: (result) => {
      resolve(result)
     },
     fail: (err) => {
       reject(err);
     }
   });
  })
}
然后在pay文件夹下的index.js内引入并使用,同时查询下后台 订单状态,查询成功后,则跳转到订单页面。
// pages/pay/index.js
import {
  requestPayment
} from "../../utils/util.js";
// 引入封装好的请求函数
import {request} from "../../request/index.js";
Page({
  // 封装一个函数吊起微信支付接口
  /**
   * 封装一个函数,设置商品状态的同时,底部工具栏,总价格,总数量重新计算
   */
  setCart(cart) {
    let allChecked = true;
    //  声明总价格和总数量
    let totalPrice = 0;
    let totalNum = 0;
    cart.forEach(v => {
      if (v.checked) {
        totalPrice += v.num * v.goods_price;
        totalNum += v.num;
      } else {
        allChecked = false;
      }
    })
    //判断数组是否为空
    allChecked = cart.length != 0 ? allChecked : false;
    this.setData({
      cart,
      totalPrice,
      totalNum,
    });
    wx.setStorageSync('cart', cart);
  },

  /**
   * 页面的初始数据
   */
  data: {
    address: {},
    //声明一个变量,购物车数组
    cart: [],
    // 声明一个变量,购物车内容是否全选
    allChecked: false,
    // 定义商品总价格和总数量
    totalPrice: 0,
    totalNum: 0
  },

  /**
   * 生命周期函数--监听页面加载
   */
  onLoad: function (options) {

  },

  /**
   * 生命周期函数--监听页面显示
   */
  onShow: function () {
    //获取缓存中的购物车数据
    let cart = wx.getStorageSync('cart')
    //获取缓存中的收货地址信息
    const address = wx.getStorageSync('address');
    //过滤后的购物车数组(真正被选中的商品)
    cart = cart.filter(v => v.checked);
    //  声明总价格和总数量
    let totalPrice = 0;
    let totalNum = 0;
    cart.forEach(v => {
      totalPrice += v.num * v.goods_price;
      totalNum += v.num;
    })
    this.setData({
      cart,
      totalPrice,
      totalNum,
      address,
    });
  },
  // 点击支付事件
  async handleOrderPay(e) {
    //判断缓存中有无token
    const token = wx.getStorageSync('token');
    //如果不存在
    if (!token) {
      //跳转页面到获取用户登录信息
      wx.navigateTo({
        url: '/pages/auth/index',
      })
      return;
    };
    //否则就是有token值,创建订单
    // console.log('已经有token了');
    // 准备一些必须的请求头参数
    const header = {
      Authorization: wx.getStorageSync('token')
    };
    //准备请求体参数
    const order_price = this.data.totalPrice;
    const consignee_addr = this.data.address.all;
    const cart = this.data.cart;
    let goods = [];
    cart.forEach(v => goods.push({
      goods_id: v.goods_id,
      goods_number: v.num,
      goods_price: v.goods_price
    }))
    const orderParams = {
      order_price,
      consignee_addr,
      goods
    }
    // 发送请求 创建订单,获取订单编号,这个接口,不稳定,所以返回的订单编号可能为空或者其他
    const
      number = await request({
        url: "https://api-hmugo-web.itheima.net/api/public/v1/my/orders/create",
        method: "POST",
        data: orderParams,
        header
      });
    //把返回数据中的订单编号存入缓存中,并命名为order_number
    wx.setStorageSync('order_number', number.data.message.order_number);
    // 从缓存中取出
    const order_number = wx.getStorageSync('order_number');
    // 发起预支付接口
    const zhifu = await request({
      url: "https://api-hmugo-web.itheima.net/api/public/v1/my/orders/req_unifiedorder",
      method: "POST",
      data: {
        order_number
      },
    });
    console.log(zhifu);
    wx.setStorageSync('pay', zhifu.data.message.pay);
    const {pay} = wx.getStorageSync('pay')
    //调用小程序内置API,吊起支付窗口,这里我们是把此操作进行了一个封装函数操作
    await requestPayment(pay);
// 查询后台订单状态
    await request({ url: "https://api-hmugo-web.itheima.net/api/public/v1/my/orders/chkOrder", 	    method: "POST", data: { order_number } });
      wx.showToast({
        title: '订单支付成功',
        icon: 'success',
        duration: 2000,
      });
    //支付成功后跳转到订单页面
    wx.navigateTo({
      url: '/pages/order/index',
    })
  },

  /**
   * 生命周期函数--监听页面隐藏
   */
  onHide: function () {

  },

  /**
   * 生命周期函数--监听页面卸载
   */
  onUnload: function () {

  },

  /**
   * 页面相关事件处理函数--监听用户下拉动作
   */
  onPullDownRefresh: function () {

  },

  /**
   * 页面上拉触底事件的处理函数
   */
  onReachBottom: function () {

  },

  /**
   * 用户点击右上角分享
   */
  onShareAppMessage: function () {

  }
})
注意:这里因为token值的缘故,再次出现了无效的token值报错。
移除购物车已支付的数据
当订单支付成功后,需要移除购物车中,已经支付了的商品的数据。只需要在跳转到订单页面代码之后,追加下列代码
 //  手动删除缓存中 已经支付了的商品
    let newCart = wx.getStorageSync("cart");
    newCart = newCart.filter(v => !v.checked);
    wx.setStorageSync("cart", newCart);
封装统一的请求头到request中
在request文件夹中的index.js进行封装。
  //发送ajax异步请求的初始次数
 let ajaxTimes = 0;
// params是参数
export const request = (params) => {
  //判断url中是否带有 /my/请求的是私有的路径,带上header token
  let header={...params.header};
  if(params.url.includes("/my/")){
    //拼接header
    header["Authorization"]=wx.getStorageSync('token')
  }
  //每发一次请求就自加
  ajaxTimes++;
  //显示加载中效果
  wx.showLoading({
    title: '页面加载中',
    mask: true
  })
  return new Promise((
    // resolve是请求数据成功的结果,reject是请求失败
    resolve,
    reject
  ) => {
    wx.request({
      // ...params是解构参数
      ...params,
      header:header,
      success: (result) => {
        resolve(result)
      },
      fail: (err) => {
        reject(err);
      },
      //无论成功还是失败都会触发的事件
      complete: () => {
        //每发送完一次请求,就自减一,当为0时,表明请求完毕,关闭加载中提示
        ajaxTimes--;
        if (ajaxTimes === 0) {
          //关闭页面加载中图标
          wx.hideLoading()
        }
      }
    });
  })
}
随后在pay文件夹下的index.js内删掉使用header的地方即可。
登录页面
在点击我的这个图标后,会跳转的个人中心页面,如果没登录的话会出现一个要登录的界面。

login文件夹下的四个文件代码分别为
// pages/login/index.js
Page({
  data: {
    userInfo: {},
    hasUserInfo: false,
    canIUseGetUserProfile: false,
  },
  onLoad() {
    if (wx.getUserProfile) {
      this.setData({
        canIUseGetUserProfile: true
      })
    }
  },
  getUserProfile(e) {
    // 推荐使用wx.getUserProfile获取用户信息,开发者每次通过该接口获取用户个人信息均需用户确认
    // 开发者妥善保管用户快速填写的头像昵称,避免重复弹窗
    wx.getUserProfile({
      desc: '用于完善会员资料', // 声明获取用户个人信息后的用途,后续会展示在弹窗中,请谨慎填写
      success: (res) => {
        this.setData({
          userInfo: res.userInfo,
          hasUserInfo: true,
        })
        const users=res.userInfo;
        wx.setStorageSync("userinfo", users)
        wx.navigateBack({
          delta: 1
        });
      }
    })
  },
})
{
  "usingComponents": {},
  "navigationBarTitleText": "登录"
}
<!--pages/login/index.wxml-->

<button type="primary" plain bindtap="getUserProfile" > 登录 </button>
/* pages/login/index.wxss */
button{
  margin-top: 40rpx;
  width: 70%;
}
最后效果如下
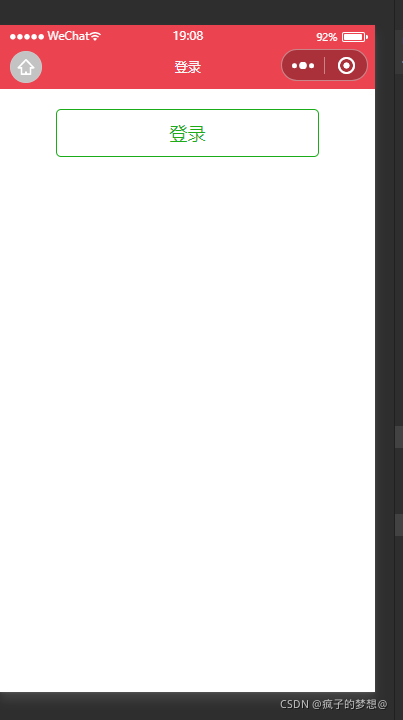
为了测验点击登录按钮后自动返回上一页(我的)页面,需要在user文件夹下的index.wxml增加一个navigator标签。
<!--pages/user/index.wxml-->
<navigator url="/pages/login/index">前往登录</navigator>

随后在该页面点击前往登录,就会跳转到登录页面,登录完成后,返回到我的页面。
个人中心(我的)页面
这里代码如下,比较简单,注意阿里矢量图标库的使用方法,如class="iconfont icon-ding_dan",要先引入名为ding_dan的图标。
// 注意:2021年4月13日后发布的新版本小程序,开发者通过组件调用wx.getUserInfo将不再弹出弹窗,直接返回匿名的用户个人信息,获取加密后的openID、unionID数据的能力不做调整;若开发者需要获取用户的个人信息(头像、昵称、性别与地区),可以通过wx.getUserProfile接口进行获取。
// pages/user/index.js
Page({
  data: {
    userinfo: {},
    // 被收藏的商品的数量
    collectNums: 0
  },
  onShow() {
    // 从缓存中取出用户信息
    const userinfo = wx.getStorageSync("userinfo");
    const collect = wx.getStorageSync("collect") || [];

    this.setData({
      userinfo,
      collectNums: collect.length
    });

  }
})
{
  "usingComponents": {},
  "navigationBarTitleText": "个人中心"
}
<!--pages/user/index.wxml-->

<view class="user_info_wrap">
  <view wx:if="{{userinfo.avatarUrl}}" class="user_img_wrap">
  <!-- 因为编写过程中获取用户信息, -->
    <!-- <image class="user_bg" src="{{userinfo.avatarUrl}}" ></image> -->
    <image class="user_bg" src="https://tse4-mm.cn.bing.net/th/id/OIP-C.14Ruvh-IH1yXvYrC1rRXiAAAAA?w=140&h=150&c=7&r=0&o=5&dpr=1.1&pid=1.7" ></image>
    <view class="user_info">
      <!-- <image class="user_icon" src="{{userinfo.avatarUrl}}"></image> -->
      <image class="user_icon" src="https://tse4-mm.cn.bing.net/th/id/OIP-C.14Ruvh-IH1yXvYrC1rRXiAAAAA?w=140&h=150&c=7&r=0&o=5&dpr=1.1&pid=1.7" ></image>
      <view class="user_name">{{userinfo.nickName}}</view>
    </view>
  </view>
  <view wx:else class="user_btn">
    <navigator url="/pages/login/index" >前往登录</navigator>
  </view>
</view>
<view class="user_content">

  <view class="user_main">
    <!-- 历史足迹 -->
    <view class="history_wrap">
      <navigator>
        <view class="his_num">0</view>
        <view class="his_name">收藏的店铺</view>
      </navigator>
      <navigator url="/pages/collect/index">
        <view class="his_num">{{collectNums}}</view>
        <view class="his_name">收藏的商品</view>
      </navigator>
      <navigator>
        <view class="his_num">0</view>
        <view class="his_name">关注的商品</view>
      </navigator>
      <navigator>
        <view class="his_num">0</view>
        <view class="his_name">我的足迹</view>
      </navigator>
    </view>
    <!-- 我的订单 -->
    <view class="orders_wrap">
      <view class="orders_title">我的订单</view>
      <view class="order_content">
        <navigator url="/pages/order/index?type=1">
        <!-- icon-ding_dan是阿里矢量图标库的使用方法 -->
          <view class="iconfont icon-ding_dan"></view>
          <view class="order_name">全部订单</view>
        </navigator>
        <navigator url="/pages/order/index?type=2">
          <view class="iconfont icon-fukuantongzhi"></view>
          <view class="order_name">待付款</view>
        </navigator>
        <navigator url="/pages/order/index?type=3">
          <view class="iconfont icon-receipt_address"></view>
          <view class="order_name">待收货</view>
        </navigator>
        <navigator>
          <view class="iconfont icon-tuikuantuihuo;"></view>
          <view class="order_name">退款/退货</view>
        </navigator>
      </view>
    </view>
    <!-- 收货地址管理 -->
    <view class="address_wrap">
      收货地址管理
    </view>
    <!-- 应用信息相关 -->
    <view class="app_info_wrap">
      <view class="app_info_item app_info_contact">
        <text>联系客服</text>
        <text>400-618-4000</text>
      </view>
      <navigator url="/pages/feedback/index" class="app_info_item">意见反馈</navigator>
      <view class="app_info_item">关于我们</view>
    </view>
    <!-- 推荐 -->
    <view class="recommend_wrap">
      把应用推荐给其他人
    </view>
  </view>
</view>
/* pages/user/index.wxss */
page {
  background-color: #edece8;
}

.user_info_wrap {
  height: 45vh;
  overflow: hidden;
  background-color: var(--themColor);
  position: relative;
}

.user_info_wrap .user_img_wrap {
  position: relative;
}

.user_info_wrap .user_img_wrap .user_bg {
  height: 50vh;
  /* 高斯模糊 背景图像 */
  filter: blur(10rpx);
}

.user_info_wrap .user_img_wrap .user_info {
  position: absolute;
  left: 50%;
  transform: translateX(-50%);
  top: 20%;
  text-align: center;
}

.user_info_wrap .user_img_wrap .user_info .user_icon {
  width: 150rpx;
  height: 150rpx;
  border-radius: 50%;
}

.user_info_wrap .user_img_wrap .user_info .user_name {
  color: #fff;
  margin-top: 40rpx;
}

.user_info_wrap .user_btn {
  position: absolute;
  left: 50%;
  transform: translateX(-50%);
  top: 40%;
  border: 1rpx solid greenyellow;
  color: greenyellow;
  font-size: 38rpx;
  padding: 30rpx;
  border-radius: 10rpx;
}

.user_content {
  position: relative;
}

.user_content .user_main {
  padding-bottom: 100rpx;
  color: #666;
  position: absolute;
  width: 90%;
  left: 50%;
  transform: translateX(-50%);
  top: -40rpx;
}

.user_content .user_main .history_wrap {
  background-color: #fff;
  display: flex;
}

.user_content .user_main .history_wrap navigator {
  flex: 1;
  text-align: center;
  padding: 10rpx 0;
}

.user_content .user_main .history_wrap navigator .his_num {
  color: var(--themColor);
}

.user_content .user_main .orders_wrap {
  background-color: #fff;
  margin-top: 30rpx;
}

.user_content .user_main .orders_wrap .orders_title {
  padding: 20rpx;
  border-bottom: 1rpx solid #ccc;
}

.user_content .user_main .orders_wrap .order_content {
  display: flex;
}

.user_content .user_main .orders_wrap .order_content navigator {
  padding: 15rpx 0;
  flex: 1;
  text-align: center;
}

.user_content .user_main .orders_wrap .order_content navigator .iconfont {
  color: var(--themColor);
  font-size: 40rpx;
}

.user_content .user_main .address_wrap {
  margin-top: 30rpx;
  background-color: #fff;
  padding: 20rpx;
}

.user_content .user_main .app_info_wrap {
  margin-top: 30rpx;
  background-color: #fff;
}

.user_content .user_main .app_info_wrap .app_info_item {
  padding: 20rpx;
  border-bottom: 1rpx solid #ccc;
}

.user_content .user_main .app_info_wrap .app_info_contact {
  display: flex;
  justify-content: space-between;
}

.user_content .user_main .recommend_wrap {
  margin-top: 30rpx;
  background-color: #fff;
  padding: 20rpx;
}
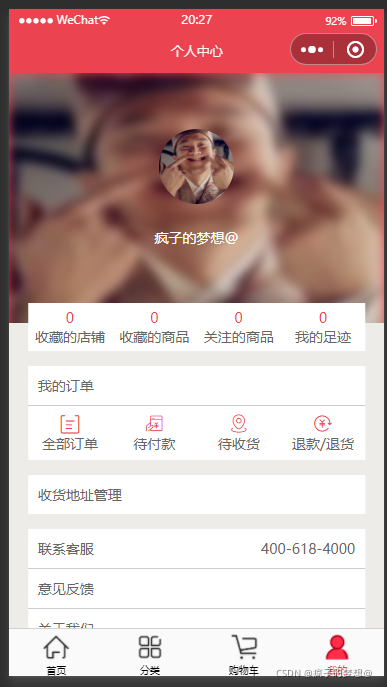
最后效果如下
订单查询实现
在user文件夹中的index.wxml,我们把“全部订单”,“待付款”等超链接,进行页面跳转的时候,同时传递了参数type,这决定了跳转到order文件夹(即订单页面)显示不同的内容。这里我们使用了之前在goods_list中使用过的tabs自定义组件,同理,先在order文件夹下的index.json引入组件,index.js中先写明导航栏的初始数据,然后使用。
// pages/order/index.js

Page({

  /**
   * 页面的初始数据
   */
  data: {
    // tabs导航栏初始数据
    tabs: [{
        id: 0,
        value: '综合',
        isActive: true
      },
      {
        id: 1,
        value: '待付款',
        isActive: false
      },
      {
        id: 2,
        value: '待发货',
        isActive: false
      },
      {
        id: 3,
        value: '退款/退货',
        isActive: false
      }
    ],
  },
  handleTabsItemChange(e) {
    // 1 获取被点击的标题索引
    const { index } = e.detail;
    this.changeTitleByIndex(index);
    // 2 重新发送请求 type=1 index=0
    this.getOrders(index+1);
  },
})
 {
  "usingComponents": {
    "tabs": "../../components/tabs/tabs"
  },
  "navigationBarTitleText": "订单查询"
}
<!--pages/order/index.wxml-->
<tabs tabs="{{tabs}}" bindtabsItemChange="handleTabsItemChange">
  <view class="order_main">
    <view wx:for="{{orders}}" wx:key="order_id" class="order_item">

      <view class="order_no_row">
        <view class="order_no_text">订单编号</view>
        <view class="order_no_value">{{item.order_number}}</view>
      </view>
      <view class="order_price_row">
        <view class="order_price_text">订单价格</view>
        <view class="order_price_value">¥{{item.order_price}}</view>
      </view>
      <view class="order_time_row">
        <view class="order_time_text">订单日期</view>
        <view class="order_time_value">{{item.create_time_cn}}</view>
      </view>

    </view>
  </view>
</tabs>
/* pages/order/index.wxss */
.order_main .order_item {
  padding: 20rpx;
  border-bottom: 1rpx solid #ccc;
  color: #666;
}
.order_main .order_item .order_no_row {
  display: flex;
  padding: 10rpx 0;
  justify-content: space-between;
}
.order_main .order_item .order_price_row {
  display: flex;
  padding: 10rpx 0;
  justify-content: space-between;
}
.order_main .order_item .order_price_row .order_price_value {
  color: var(--themeColor);
  font-size: 32rpx;
}
.order_main .order_item .order_time_row {
  display: flex;
  padding: 10rpx 0;
  justify-content: space-between;
}
最后效果如下

现在我们要实现的功能是,在个人中心页面点击不同的按钮后,如全部订单,待收货等,跳转到order页面(订单)中显示不同的内容,通过传递过来的参数type。
- 页面被打开的时候 onShow函数启动
onShow 不同于onLoad 无法在形参上接收 options参数
判断缓存中有没有token
没有 直接跳转到授权页面
有则 直接往下进行
1.1. 获取url上的参数type
1.2. 根据type来决定页面标题的数组元素 哪个被激活选中
1.3. 根据type 去发送请求获取订单数据
1.4. 渲染页面 - 点击不同的标题 重新发送请求来获取和渲染数据
// pages/order/index.js
/*
1 页面被打开的时候 onShow函数启动
   onShow 不同于onLoad 无法在形参上接收 options参数
   判断缓存中有没有token
    1 没有 直接跳转到授权页面
    2 有 直接往下进行
  1 获取url上的参数type
  2 根据type来决定页面标题的数组元素 哪个被激活选中
  2 根据type 去发送请求获取订单数据
  3 渲染页面
2 点击不同的标题 重新发送请求来获取和渲染数据
 */
import {
  request
} from "../../request/index.js";
Page({

  /**
   * 页面的初始数据
   */
  data: {
    orders: [],
    // tabs导航栏初始数据
    tabs: [{
        id: 0,
        value: '综合',
        isActive: true
      },
      {
        id: 1,
        value: '待付款',
        isActive: false
      },
      {
        id: 2,
        value: '待发货',
        isActive: false
      },
      {
        id: 3,
        value: '退款/退货',
        isActive: false
      }
    ],
  },
  onShow(options) {
    const token = wx.getStorageSync("token");
    if (!token) {
      wx.navigateTo({
        url: '/pages/auth/index'
      });
      return;
    }


    // 1 获取当前的小程序的页面栈-数组 长度最大是10页面
    let pages = getCurrentPages();
    // 2 数组中 索引最大的页面就是当前页面
    let currentPage = pages[pages.length - 1];
    // 3 获取url上的type参数
    const {
      type
    } = currentPage.options;
    // 4 激活选中页面标题 当 type=1 index=0
    this.changeTitleByIndex(type - 1);
    this.getOrders(type);
  },
  // 获取订单列表的方法
  async getOrders(type) {
    const res = await request({
      url: "https://api-hmugo-web.itheima.net/api/public/v1/my/orders/all",
      data: {
        type
      }
    });
    this.setData({
      orders: res.data.message.orders.map(v => ({
        ...v,
        create_time_cn: (new Date(v.create_time * 1000).toLocaleString())
      }))
    })
  },
  // 根据标题索引来激活选中 标题数组
  changeTitleByIndex(index) {
    // 2 修改源数组
    let {
      tabs
    } = this.data;
    tabs.forEach((v, i) => i === index ? v.isActive = true : v.isActive = false);
    // 3 赋值到data中
    this.setData({
      tabs
    })
  },
  handleTabsItemChange(e) {
    // 1 获取被点击的标题索引
    const {
      index
    } = e.detail;
    this.changeTitleByIndex(index);
    // 2 重新发送请求 type=1 index=0
    this.getOrders(index + 1);
  },
})
因为,支付功能的完整实现需要企业微信进行开发,所以我们前边并没有完全实现支付功能,在这里的订单页面,只有显示一堆待付款。效果如下

其他页面为空。

实现商品的收藏功能
在商品的详情页面,有一个收藏按钮,点击后会提示收藏成功,此时在点击个人中心页面,选择收藏的商品点击,则跳转到收藏页面,展示刚才被收藏的商品。实现的原理很简单,点击收藏后,将该商品存入缓存数组中,点击取消收藏后,该商品的信息从缓存数组中删除掉。
现在回到goods_detail页面文件夹,修改里边index.js代码。实现的步骤如下
- 页面加载onShow函数的时候 加载缓存中的商品收藏的数据
- 判断当前商品是不是被收藏
2.1 是 改变页面的图标
2.2 不是的话,无操作 - 点击商品收藏按钮
3.1 判断该商品是否存在于缓存数组中
3.2 已经存在 把该商品删除
3.3 没有存在 把商品添加到收藏数组中 存入到缓存中即可
我们设置了一个检验在商品详情的index.js中,如果用户未登录,那么需要跳转到登录页面进行登录后才可以进行收藏功能。
// pages/goods_detail/index.js
//引入用来发送请求的方法,优化后的
import {
  request
} from "../../request/index.js"
Page({

  /**
   * 页面的初始数据
   */
  data: {
    //请求返回的数据是以对象形式
    goodsObj: {},
    // 商品是否被收藏
    isCollect: false

  },
  //定义要预览的大图信息数组全局变量
  goodsInfo: {},
  /**
   * 生命周期函数--监听页面加载
   */
  onLoad: function (options) {
    //拿到跳转页面时传递过来的商品id
    const {
      goods_id
    } = options;
    this.getGoodsDetail(goods_id);
  },
  /**
   * 获取商品详情数据
   */
  async getGoodsDetail(goods_id) {
    const goodsObj = await request({
      url: "https://api-hmugo-web.itheima.net/api/public/v1/goods/detail",
      data: {
        goods_id
      }
    });
    //请求成功之后给之前定义的预览大图数组赋值
    this.goodsInfo = goodsObj.data.message;
    // 1 获取缓存中的商品收藏的数组
    let collect = wx.getStorageSync("collect") || [];
    // 2 判断当前商品是否被收藏
    let isCollect = collect.some(v => v.goods_id === this.goodsInfo.goods_id);
    this.setData({
      // 优化存储数据,只赋值存储小程序用到的数据
      goodsObj: {
        goods_name: goodsObj.data.message.goods_name,
        goods_price: goodsObj.data.message.goods_price,
        // iphone部分手机不支持webp格式
        // 后台修改
        // 或者自己临时修改 使用replace函数 其中\.webp是找到所有.webp的文件,g表示全选,.jpg表示全部替换为.jpg格式。
        goods_introduce: goodsObj.data.message.goods_introduce.replace(/\.webp/g, '.jpg'),
        pics: goodsObj.data.message.pics
      },
      isCollect
    })
  },
  /**
   * 点击轮播图预览大图事件
   */
  handlePrevewImage(e) {
    console.log('预览');
    //  先构建要预览的图片数组
    const urls = this.goodsInfo.pics.map(v => v.pics_mid)
    // 接受传递过来的图片url
    const current = e.currentTarget.dataset.url
    wx.previewImage({
      current: current,
      urls: urls
    })
  },
  /**
   * 用户商品加入购物车事件
   */
  handleCartAdd(e) {
    //获取缓存的商品数据,并由字符串格式转为数组格式
    let cart = wx.getStorageSync('cart') || [];
    // 判定商品是否已存在购物车数组中
    let index = cart.findIndex(v => v.goods_id === this.goodsInfo.goods_id);
    if (index === -1) {
      //不存在,第一次添加
      this.goodsInfo.num = 1;
      // 给商品增添一个checked的属性,值为true,以便在购物车页面的复选框进行选中
      this.goodsInfo.checked = true;
      cart.push(this.goodsInfo);
    } else {
      //存在
      cart[index].num++;
    }
    //购物车数组更新到缓存中
    wx.setStorageSync("cart", cart);
    //弹窗提示
    wx.showToast({
      title: '添加成功',
      icon: 'success',
      mask: 'true'
    })
  },
  // 点击商品收藏图标事件
  handleCollect() {
    //获取用户登录信息,如果用户登录了才能执行收藏图标事件
    let userinfo = wx.getStorageSync("userinfo");
    if (userinfo) {
      let isCollect = false;
      // 1 获取缓存中的商品收藏数组
      let collect = wx.getStorageSync("collect") || [];
      // 2 判断该商品是否被收藏过
      let index = collect.findIndex(v => v.goods_id === this.goodsInfo.goods_id);
      // 3 当index!=-1表示 已经收藏过
      if (index !== -1) {
        // 能找到 已经收藏过了  在数组中删除该商品
        collect.splice(index, 1);
        isCollect = false;
        wx.showToast({
          title: '取消成功',
          icon: 'success',
          mask: true
        });
      } else {
        // 没有收藏过
        collect.push(this.goodsInfo);
        isCollect = true;
        wx.showToast({
          title: '收藏成功',
          icon: 'success',
          mask: true
        });
      }
      // 4 把数组存入到缓存中
      wx.setStorageSync("collect", collect);
      // 5 修改data中的属性  isCollect
      this.setData({
        isCollect
      })
    }else{
      wx.navigateTo({
        url: '/pages/login/index',
      })
    }
  },

  /**
   * 生命周期函数--监听页面显示
   */
  onShow: function () {

    let pages = getCurrentPages();
    let currentPage = pages[pages.length - 1];
    let options = currentPage.options;
    const {
      goods_id
    } = options;
    this.getGoodsDetail(goods_id);
  },

  /**
   * 生命周期函数--监听页面隐藏
   */
  onHide: function () {

  },
})
给收藏按钮绑定点击事件
<!--pages/goods_detail/index.wxml-->
<view class="detail_swiper">
  <!-- 轮播图内容,bindtap绑定一个预览大图事件 -->
  <swiper autoplay="true" circular="true" indicator-dots="true" bindtap="handlePrevewImage"
    data-url="{{item.pics_mid}}">
    <swiper-item wx:for="{{goodsObj.pics}}" wx:key="pics_id">
      <image mode="widthFix" src="{{item.pics_mid}}"></image>
    </swiper-item>
  </swiper>
</view>
<!-- 商品内容文字 -->
<!-- 商品价格 -->
<view class="goods_price">¥{{goodsObj.goods_price}}</view>
<view class="goods_name_row">
  <!-- 商品名字 -->
  <view class="goods_name">{{goodsObj.goods_name}}</view>
  <!-- 收藏商品 -->
  <view class="goods_collect" bindtap="handleCollect">
    <!-- 这里的收藏图标是引入了阿里图标库的 -->
    <text class="iconfont {{isCollect?'icon-shoucang1':'icon-shoucang'}}"></text>
    <view class="collect_text">收藏</view>
  </view>
</view>

<!-- 图文详情 -->
<view class="goods_info">
  <view class="goods_info_title">图文详情</view>
  <view class="goods_info_content">
    <!-- 富文本渲染 -->
    <rich-text nodes="{{goodsObj.goods_introduce}}"></rich-text>
  </view>
</view>

<!-- 底部导航栏 -->
<view class="btm_tool">
  <!-- 客服 -->
  <view class="tool_item">
    <view class="iconfont icon-kefu"></view>
    <view>客服</view>
    <!-- 增加联系客服功能 ,隐藏在客服的下一层,透明度为0,设置其高和宽与客服部分一致-->
    <button open-type="contact"></button>
  </view>
  <!-- 分享 -->
  <view class="tool_item">
    <view class="iconfont icon-fenxiang"></view>
    <view>分享</view>
    <button open-type="share"></button>
  </view>
  <!-- 购物车 -->
  <!-- switchTab允许跳转tabBar(导航栏)页面 -->
  <navigator open-type="switchTab" url="/pages/cart/index" class="tool_item">
    <view class="tool_item">
      <view class="iconfont icon-gouwuche"></view>
      <view>购物车</view>
    </view>
  </navigator>
  <!-- 加入购物车 -->
  <!-- 增加点击事件,添加商品响应 -->
  <view class="tool_item btn_cart" bindtap="handleCartAdd">
    <view>加入购物车</view>
  </view>
  <!-- 立即购买 -->
  <view class="tool_item btn_buy">
    <view>立即购买</view>
  </view>
</view>
然后在collect文件夹内进行修改代码,
// pages/collect/index.js
Page({
  /**
   * 页面的初始数据
   */
  data: {
    collect:[],
    tabs: [
      {
        id: 0,
        value: "商品收藏",
        isActive: true
      },
      {
        id: 1,
        value: "品牌收藏",
        isActive: false
      },
      {
        id: 2,
        value: "店铺收藏",
        isActive: false
      },
      {
        id: 3,
        value: "浏览器足迹",
        isActive: false
      }
    ]
  },
  onShow(){
    const collect=wx.getStorageSync("collect")||[];
    this.setData({
      collect
    });

  },
  handleTabsItemChange(e) {
    // 1 获取被点击的标题索引
    const { index } = e.detail;
    // 2 修改源数组
    let { tabs } = this.data;
    tabs.forEach((v, i) => i === index ? v.isActive = true : v.isActive = false);
    // 3 赋值到data中
    this.setData({
      tabs
    })
  }
})
{
  "usingComponents": {
    "Tabs":"../../components/tabs/tabs"
  },
  "navigationBarTitleText":"商品收藏"
}
<!--pages/collect/index.wxml-->
<tabs tabs="{{tabs}}" bindtabsItemChange="handleTabsItemChange">

<view class="collect_main">
  <view class="collect_title">
    <text class="collect_tips active">全部</text>
    <text class="collect_tips">正在热卖</text>
    <text class="collect_tips">即将上线</text>
  </view>
  <view class="collect_content">
    <navigator class="goods_item" wx:for="{{collect}}" wx:key="goods_id"
      url="/pages/goods_detail/index?goods_id={{item.goods_id}}">
      <!-- 左侧 图片容器 -->
      <view class="goods_img_wrap">
        <image mode="widthFix"
          src="{{item.goods_small_logo?item.goods_small_logo:'https://ww1.sinaimg.cn/large/007rAy9hgy1g24by9t530j30i20i2glm.jpg'}}">
        </image>
      </view>
      <!-- 右侧 商品容器 -->
      <view class="goods_info_wrap">
        <view class="goods_name">{{item.goods_name}}</view>
        <view class="goods_price">¥{{item.goods_price}}</view>
      </view>
    </navigator>
  </view>
</view>

</tabs>
/* pages/collect/index.wxss */
.collect_main {
  background-color: #f3f4f6;
}
.collect_main .collect_title {
  padding: 40rpx 0;
}
.collect_main .collect_title .collect_tips {
  padding: 15rpx;
  border: 1rpx solid #ccc;
  margin-left: 25rpx;
  background-color: #fff;
}
.collect_main .collect_title .active {
  color: var(--themeColor);
  border-color: currentColor;
}
.collect_main .collect_content .goods_item {
  display: flex;
  border-bottom: 1px solid #ccc;
  background-color: #fff;
}
.collect_main .collect_content .goods_item .goods_img_wrap {
  flex: 2;
  display: flex;
  justify-content: center;
  align-items: center;
}
.collect_main .collect_content .goods_item .goods_img_wrap image {
  width: 70%;
}
.collect_main .collect_content .goods_item .goods_info_wrap {
  flex: 3;
  display: flex;
  flex-direction: column;
  justify-content: space-around;
}
.collect_main .collect_content .goods_item .goods_info_wrap .goods_name {
  display: -webkit-box;
  overflow: hidden;
  -webkit-box-orient: vertical;
  -webkit-line-clamp: 2;
}
.collect_main .collect_content .goods_item .goods_info_wrap .goods_price {
  color: var(--themeColor);
  font-size: 32rpx;
}
最后效果如下


搜索页面功能的实现
搜索页面首先有搜索框,我们之前自定义的一个组件,本质是一个超链接,可以在搜索框里边进行输入关键字搜索。在此页面,search文件夹的内容,我们不使用自定义的组件实现。
注意:这里边有个地方,即 防抖 (防止抖动) 使用定时器经过一段时间没有输入了,在发送请求 ,否则每输入一个字符都会发送一次请求,页面抖动。
- 防抖 一般 输入框中 防止重复输入 重复发送请求
- 节流 一般是用在页面下拉和上拉
- 两种都可以通过定义全局的定时器id实现
// pages/search/index.js
/*
1 输入框绑定 值改变事件 input事件
  1 获取到输入框的值
  2 合法性判断
  3 检验通过 把输入框的值 发送到后台
  4 返回的数据打印到页面上
2 防抖 (防止抖动) 定时器  节流
  0 防抖 一般 输入框中 防止重复输入 重复发送请求
  1 节流 一般是用在页面下拉和上拉
  1 定义全局的定时器id
 */
import { request } from "../../request/index.js";

Page({
  data: {
    goods:[],
    // 取消 按钮 是否显示
    isFocus:false,
    // 输入框的值
    inpValue:""
  },
  TimeId:-1,
  // 输入框的值改变 就会触发的事件
  handleInput(e){
    // 1 获取输入框的值
    const {value}=e.detail;
    // 2 检测合法性
    if(!value.trim()){
      this.setData({
        goods:[],
        isFocus:false
      })
      // 值不合法
      return;
    }
    // 3 准备发送请求获取数据
    this.setData({
      isFocus:true
    })
    clearTimeout(this.TimeId);
    this.TimeId=setTimeout(() => {
      this.qsearch(value);
    }, 1000);
  },
  // 发送请求获取搜索建议 数据
  async qsearch(query){
    const res=await request({url:"https://api-hmugo-web.itheima.net/api/public/v1/goods/qsearch",data:{query}});
    console.log(res);
    this.setData({
      goods:res
    })
  },
  // 点击 取消按钮
  handleCancel(){
    this.setData({
      inpValue:"",
      isFocus:false,
      goods:[]
    })
  }
})
{
  "usingComponents": {},
  "navigationBarTitleText":"搜索中心"
}
<!--pages/search/index.wxml-->
<view class="search_row">
  <input value="{{inpValue}}" placeholder="请输入您要搜索的商品" bindinput="handleInput"> </input>
  <button bindtap="handleCancel" hidden="{{!isFocus}}">取消</button>
</view>
<view class="search_content">
  <navigator url="/pages/goods_detail/index?goods_id={{item.data.message.goods_id}}" class="search_item" wx:for="{{goods.data.message}}" wx:key="goods_id">
    {{item.goods_name}}
  </navigator>
</view>
/* pages/search/index.wxss */
page {
  background-color: #dedede;
  padding: 20rpx;
}
.search_row {
  height: 60rpx;
  display: flex;
}
.search_row input {
  background-color: #fff;
  flex: 1;
  height: 100%;
  padding-left: 30rpx;
}
.search_row button {
  width: 110rpx;
  height: 100%;
  padding: 0;
  margin: 0 10rpx;
  display: flex;
  justify-content: center;
  align-items: center;
  font-size: 26rpx;
}
.search_content {
  margin-top: 30rpx;
}
.search_content .search_item {
  background-color: #fff;
  font-size: 26rpx;
  padding: 15rpx 10rpx;
  border-bottom: 1rpx solid #ccc;
  overflow: hidden;
  white-space: nowrap;
  text-overflow: ellipsis;
}
最后效果如下

意见反馈页面
在小程序的官方开发文档,button按钮有一个open-type开放能力,可以直接掉起意见反馈。这里我们不借用开放能力,自定义一个页面。首先是修改个人中心的代码,给意见反馈部分,增加一个跳转链接功能。
<!--pages/user/index.wxml-->

<view class="user_info_wrap">
  <view wx:if="{{userinfo.avatarUrl}}" class="user_img_wrap">
  <!-- 因为编写过程中获取用户信息的头像,会连接失败,所以用网图代替 -->
    <!-- <image class="user_bg" src="{{userinfo.avatarUrl}}" ></image> -->
    <image class="user_bg" src="https://tse4-mm.cn.bing.net/th/id/OIP-C.14Ruvh-IH1yXvYrC1rRXiAAAAA?w=140&h=150&c=7&r=0&o=5&dpr=1.1&pid=1.7" ></image>
    <view class="user_info">
      <!-- <image class="user_icon" src="{{userinfo.avatarUrl}}"></image> -->
      <image class="user_icon" src="https://tse4-mm.cn.bing.net/th/id/OIP-C.14Ruvh-IH1yXvYrC1rRXiAAAAA?w=140&h=150&c=7&r=0&o=5&dpr=1.1&pid=1.7" ></image>
      <view class="user_name">{{userinfo.nickName}}</view>
    </view>
  </view>
  <view wx:else class="user_btn">
    <navigator url="/pages/login/index" >前往登录</navigator>
  </view>
</view>
<view class="user_content">

  <view class="user_main">
    <!-- 历史足迹 -->
    <view class="history_wrap">
      <navigator>
        <view class="his_num">0</view>
        <view class="his_name">收藏的店铺</view>
      </navigator>
      <navigator url="/pages/collect/index">
        <view class="his_num">{{collectNums}}</view>
        <view class="his_name">收藏的商品</view>
      </navigator>
      <navigator>
        <view class="his_num">0</view>
        <view class="his_name">关注的商品</view>
      </navigator>
      <navigator>
        <view class="his_num">0</view>
        <view class="his_name">我的足迹</view>
      </navigator>
    </view>
    <!-- 我的订单 -->
    <view class="orders_wrap">
      <view class="orders_title">我的订单</view>
      <view class="order_content">
      <!-- 这里使用url跳转时,传递了type参数,点击下边不同链接时,跳转至order页面,但是显示不同内容。 -->
        <navigator url="/pages/order/index?type=1">
        <!-- icon-ding_dan是阿里矢量图标库的使用方法 -->
          <view class="iconfont icon-ding_dan"></view>
          <view class="order_name">全部订单</view>
        </navigator>
        <navigator url="/pages/order/index?type=2">
          <view class="iconfont icon-fukuantongzhi"></view>
          <view class="order_name">待付款</view>
        </navigator>
        <navigator url="/pages/order/index?type=3">
          <view class="iconfont icon-receipt_address"></view>
          <view class="order_name">待收货</view>
        </navigator>
        <navigator>
          <view class="iconfont icon-tuikuantuihuo;"></view>
          <view class="order_name">退款/退货</view>
        </navigator>
      </view>
    </view>
    <!-- 收货地址管理 -->
    <view class="address_wrap">
      收货地址管理
    </view>
    <!-- 应用信息相关 -->
    <view class="app_info_wrap">
      <view class="app_info_item app_info_contact">
        <text>联系客服</text>
        <text>400-618-4000</text>
      </view>
      <navigator url="/pages/feedback/index" class="app_info_item">意见反馈</navigator>
      <view class="app_info_item">关于我们</view>
    </view>
    <!-- 推荐 -->
    <view class="recommend_wrap">
      把应用推荐给其他人
    </view>
  </view>
</view>
接下来是在feedback文件夹下,index.json进行修改代码,包括,页面命名,顶部导航栏组件的引入等准备工作。
{
  "usingComponents": {
    "tabs": "../../components/tabs/tabs"
  },
  "navigationBarTitleText": "意见反馈"
}
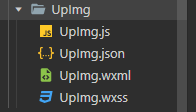
然后为了实现意见反馈页面中能实现添加图片,也能删除图片功能,我们自定义一个组件,在components文件夹下新建UpImg文件夹,然后鼠标右键选择该文件夹,选择新建compinents,然后输入UpImg,微信开发者工具自动帮我们生成以下文件。
然后在该文件夹UpImg下修改里边文件代码
// components/UpImg/UpImg.js
Component({
  /**
   * 组件的属性列表
   */
  properties: {
    src:{
      type:String,
      value:""
    }
  },

  /**
   * 组件的初始数据
   */
  data: {

  },

  /**
   * 组件的方法列表
   */
  methods: {

  }
})
{
  "component": true,
  "usingComponents": {}
}
<!--components/UpImg/UpImg.wxml-->
<view class="up_img_wrap">
  <!-- 图片 -->
  <image src="{{src}}"></image>
  <!-- 表示删除的图标 -->
  <icon type="clear" size="23" color="red">
  </icon>
</view>
/* components/UpImg/UpImg.wxss */
.up_img_wrap{
  width: 90rpx;
  height: 90rpx;
  position: relative;
}
.up_img_wrap image{
  width: 100%;
  height: 100%;
  border-radius: 15rpx;
}
.up_img_wrap icon{
  position: absolute;
  top:-22rpx;
  right: -22rpx;
}
随后回到feedback文件夹中的index.json引入组件UpImg。
{
  "usingComponents": {
    "tabs": "../../components/tabs/tabs",
    "UpImg":"../../components/UpImg/UpImg"
  },
  "navigationBarTitleText": "意见反馈"
}
在index.js内修改代码逻辑
// pages/feedback/index.js
// 一、点击+号按钮的时候,触发点击事件,调用小程序内置的选择图片的API
// 获取到选中的图片路径(数组格式)
// 把图片路径存入到data变量中
// 页面就可以根据图片数组进行显示了
// 二、点击自定义组件的时候,删除当前被点击的图片
// 首先是获取被点击元素的索引
// 获取data中的图片数组
// 根据索引,在数组中删除该图片
// 把数组重新设置回data中
// 三、提交按钮的事件,用户点击提交按钮后
// 获取文本域的内容,进行合法性验证,验证不通过就弹窗提示
//     要先定义一个变量接受文本域内数据,同时给文本域绑定一个输入响应事件
// 验证通过后,就把用户选择的图片上传到专门的图片保存服务器中,然后服务器会返回图片的带url的地址
//      遍历存储图片的数组挨个上传
//      自己在定义一个变量存储返回的图片url地址
// 文本域内容和返回的图片url地址提交到后台服务器中
// 提交成功后,清空当前页面,返回上一页。
Page({
  data: {
    // 引入自定义组件,设置初始数据
    tabs: [{
        id: 0,
        value: "体验问题",
        isActive: true
      },
      {
        id: 1,
        value: "商品、商家投诉",
        isActive: false
      }
    ],
    // 被选中的图片的路径数组
    chooseImgs: [],
    // 接收文本域存储的变量
    textVal: [],
  },
  // 图片储服务器返回的图片的url地址
  UpLoadImgs: [],
  // 顶部导航栏的点击事件
  handleTabsItemChange(e) {
    // 1 获取被点击的标题索引
    const {
      index
    } = e.detail;
    // 2 修改源数组
    let {
      tabs
    } = this.data;
    tabs.forEach((v, i) => i === index ? v.isActive = true : v.isActive = false);
    // 3 赋值到data中
    this.setData({
      tabs
    })
  },
  // 点击+号选择图片事件
  handleChooseImg(e) {
    // 调用内置的API
    wx.chooseImage({
      // 同时选择的图片数量
      count: 9,
      // 图片的格式
      sizeType: ['original', 'compressed'],
      // 图片的来源,相册和照相机
      sourceType: ['album', 'camera'],
      success: (result) => {
        // 打印查看成功后的内容,在result.tempfilepathsZ中存储着我们的图片路径
        // console.log(result);
        this.setData({
          // 图片数组进行拼接,可以使得多次选中图片,旧图片和新图片的数组拼接
          // this.data.chooseImgs是当前存储的旧图片的数组
          chooseImgs: [...this.data.chooseImgs, ...result.tempFilePaths]
        })
      }
    })
  },
  // 点击自定义组件删除图片事件
  handleRemoveImg(e) {
    // 获取被点击组件的索引
    // console.log(e);
    const {
      index
    } = e.currentTarget.dataset.index;
    // 获取data中的图片数组
    let {
      chooseImgs
    } = this.data;
    // 删除元素,要删除的元素的索引和数量
    chooseImgs.splice(index, 1)
    // 填回data中
    this.setData({
      chooseImgs
    })
  },
  // 文本域的输入响应事件
  handleTextInput(e) {
    // console.log(e);
    this.setData({
      textVal: e.detail.value
    })
  },
  // 提交按钮的响应事件
  handleFormSubmit(e) {
    // 获取文本域内容和此时的图片数组
    const {
      textVal,
      chooseImgs
    } = this.data;
    // 验证合法性
    // trim是从字符串中删除开头和结尾的空格和行终止符
    // textVal删除后如果为空,再使用!取反,则执行if中的不合法提示
    var str=textVal.trim;
    if (!str) {
      // 不合法
      wx.showToast({
        title: '您的输入为空!',
        mask: 'true',
        icon: 'error'
      })
      return;
    };
    // 上传图片到专门的图片服务器,使用小程序内置API
    // 上传文件的api不支持多个文件同时上传,所以要遍历存储图片的数组挨个上传
    // 显示正在等待的图片
    wx.showLoading({
      title: "正在上传中",
      mask: true
    });
    // 判断有没有需要上传的图片数组
    if(chooseImgs.length != 0){
      chooseImgs.forEach((v, i) => {
        wx.uploadFile({
          // 要上传的文件路径
          filePath: v,
          // 这里name的名称是和后端沟通确定的
          name: 'image',
          // 图片要上传到哪里
          url: 'https://img.coolcr.cn/api/upload',
          // 顺带的文本内容
          formData: {},
          success: (result) => {
            let url = JSON.parse(result.data).data.url;
            this.UpLoadImgs.push(url);
            // 所有图片都上传完毕才触发的if
            if (i === chooseImgs.length - 1) {
              // 关闭弹窗
              wx.hideLoading();
              // 这里使用log输出 代替我们向后端提交数据
              console.log("把文本的内容和外网的图片数组 提交到后台中");
              // 提交后,重置本页面
              this.setData({
                textVal: "",
                chooseImgs: []
              })
              // 返回上一页
              wx.navigateBack({
                delta: 1
              });
            }
          }
        })
      })}else(
        // 若没有图片上传,只有文本,则执行如下
        wx.hideLoading(),
        console.log('只提交了文本'),
        wx.navigateBack({
          delta: 1
        })
      )
    }
})
在index.wxml中书写结构
<!--pages/feedback/index.wxml-->
<tabs tabs="{{tabs}}" bindtabsItemChange="handleTabsItemChange">
  <view class="fb_main">
    <view class="fb_title">问题的种类</view>
    <view class="fb_tips">
      <text>功能建议</text>
      <text>购买遇到问题</text>
      <text>性能问题</text>
      <text>其他</text>
    </view>
    <view class="fb_content">
    <!-- 文本域标签textarea -->
      <textarea value="{{textVal}}" bindinput="handleTextInput" placeholder="请描述一下您的问题"> </textarea>
      <view class="fb_tool">
      <!-- +号按钮增加一个选择图片事件 -->
        <button bindtap="handleChooseImg">+</button>
        <!-- 渲染选择的图片 -->
        <!-- 当数据是一些简单数据的时候,我们这里的Wx:key要写为*this -->
        <!-- data-index是传递当前点击的图片的索引值 -->
        <view class="up_img_item" wx:for="{{chooseImgs}}" wx:key="*this" bindtap="handleRemoveImg"
          data-index="{{index}}">
          <UpImg src="{{item}}"></UpImg>
        </view>
      </view>
    </view>
    <view class="form_btn_wrap">
      <button bindtap="handleFormSubmit" type="warn">
        <icon type="success_no_circle" size="23" color="white">
        </icon>
        提交
      </button>
    </view>
  </view>
</tabs>
在index.wxss书写样式
/* pages/feedback/index.wxss */
page {
  /* 页面背景颜色 */
  background-color: #eeeeee;
}
.fb_main {
  padding: 20rpx;
  color: #666;
}
.fb_main .fb_tips {
  display: flex;
  flex-wrap: wrap;
}
.fb_main .fb_tips text {
  width: 30%;
  padding: 10rpx;
  text-align: center;
  background-color: #fff;
  margin: 20rpx 10rpx;
}
.fb_main .fb_content {
  background-color: #fff;
  margin-top: 20rpx;
}
.fb_main .fb_content textarea {
  padding: 10rpx;
}
.fb_main .fb_tool {
  display: flex;
  flex-wrap: wrap;
  padding-bottom: 30rpx;
}
.fb_main .fb_tool button {
  margin: 0;
  width: 90rpx;
  height: 90rpx;
  font-size: 60rpx;
  padding: 0;
  display: flex;
  justify-content: center;
  align-items: center;
  margin-left: 20rpx;
  margin-top: 20rpx;
  color: #ccc;
}
.fb_main .fb_tool .up_img_item {
  margin-left: 20rpx;
  margin-top: 20rpx;
}
.fb_main .form_btn_wrap {
  margin-top: 20rpx;
  display: flex;
  justify-content: flex-end;
}
.fb_main .form_btn_wrap button {
  margin: 0;
  width: 30%;
}
最后效果如下


首页中添加商品的跳转链接
现在给首页中,点击相关图片后,实现跳转,首先是轮播图。因为这里后台接口写的商品的地址有修改,比如goods_id为129的商品,他的地址url为 /pages/goods_detail/main?goods_id=129",而我们的文件夹内的文件都是index命名的,所以这里借用了goods_id指定路径。给navigator增加跳转url。同时也给分类一栏增添了url,写死了一个路径url="/pages/category/index"。
<view class="gouwu">
  <!-- 搜索框 -->
  <SearchInput></SearchInput>
  <!-- 轮播图 -->
  <view class="lunbotu">
    <!-- swiper、image等标签一开始设置过了默认的宽度和高度 -->
    <!-- 在swiper标签上开始autoplay自动轮播属性,并显示轮播指示点 和衔接轮播-->
    <swiper autoplay="true" indicator-dots="true" circular="true">
      <!-- 需要给swiper-item进行循环 -->
      <!-- 循环的内容都是从服务器端返回并存入swiperList中获得的 -->
      <swiper-item wx:for="{{swiperList}}" wx:key="goods_id">
      <!-- 给首页的轮播图增添跳转页面功能 -->
      <!--因为这里后台接口写的商品的地址有修改,为 /pages/goods_detail/main?goods_id=129",而我们
      的文件都是index命名的,所以这里借用了goods_id指定路径-->
        <navigator url="/pages/goods_detail/index?goods_id={{item.goods_id}}" >
          <!-- 图片标签增加mode属性widthFix,图片标签的内容的高宽等比例变化 -->
          <image mode="widthFix" src="{{item.image_src}}"></image>
        </navigator>
      </swiper-item>
    </swiper>
  </view>
  <!-- 分类导航 -->
  <view class="fenlei">
    <navigator wx:for="{{cateList}}" wx:key="name" url="/pages/category/index" open-type="switchTab">
      <image mode="widthFix" src="{{item.image_src}}"></image>
    </navigator>
  </view>
  <!-- 楼层 -->
  <view class="louceng">
    <view class="floor_group" wx:for="{{floorList}}" wx:for-item="item1" wx:for-index="index1" wx:key="floor_title">
      <!-- 楼层的标题 -->
      <view class="title">
        <image mode="widthFix" src="{{item1.floor_title.image_src}}"></image>
      </view>
      <!-- 楼层的具体内容 -->
      <view class="list">
        <navigator wx:for="{{item1.product_list}}" wx:for-item="item2" wx:for-index="index2" wx:key="name">
          <image mode="{{index2===0? 'widthFix':'scaleToFill'}}" src="{{item2.image_src}}"></image>
        </navigator>
      </view>
    </view>
  </view>
</view>
最后给首页的具体内容中的图片增添跳转链接,如时尚女装中的图片,点击会跳转到商品列表页。
<view class="gouwu">
  <!-- 搜索框 -->
  <SearchInput></SearchInput>
  <!-- 轮播图 -->
  <view class="lunbotu">
    <!-- swiper、image等标签一开始设置过了默认的宽度和高度 -->
    <!-- 在swiper标签上开始autoplay自动轮播属性,并显示轮播指示点 和衔接轮播-->
    <swiper autoplay="true" indicator-dots="true" circular="true">
      <!-- 需要给swiper-item进行循环 -->
      <!-- 循环的内容都是从服务器端返回并存入swiperList中获得的 -->
      <swiper-item wx:for="{{swiperList}}" wx:key="goods_id">
        <!-- 给首页的轮播图增添跳转页面功能 -->
        <!--因为这里后台接口写的商品的地址有修改,为 /pages/goods_detail/main?goods_id=129",而我们
      的文件都是index命名的,所以这里借用了goods_id指定路径-->
        <navigator url="/pages/goods_detail/index?goods_id={{item.goods_id}}">
          <!-- 图片标签增加mode属性widthFix,图片标签的内容的高宽等比例变化 -->
          <image mode="widthFix" src="{{item.image_src}}"></image>
        </navigator>
      </swiper-item>
    </swiper>
  </view>
  <!-- 分类导航 -->
  <view class="fenlei">
    <!-- 给分类导航添加跳转url -->
    <navigator wx:for="{{cateList}}" wx:key="name" url="/pages/category/index" open-type="switchTab">
      <image mode="widthFix" src="{{item.image_src}}"></image>
    </navigator>
  </view>
  <!-- 楼层 -->
  <view class="louceng">
    <view class="floor_group" wx:for="{{floorList}}" wx:for-item="item1" wx:for-index="index1" wx:key="floor_title">
      <!-- 楼层的标题 -->
      <view class="title">
        <image mode="widthFix" src="{{item1.floor_title.image_src}}"></image>
      </view>
      <!-- 楼层的具体内容 -->
      <view class="list">
      <!-- 点击具体内容里边的图片时 ,跳转到相关页面 -->
        <navigator wx:for="{{item1.product_list}}" wx:for-item="item2" wx:for-index="index2" wx:key="name"
          url="{{item2.navigator_url}}">
          <image mode="{{index2===0? 'widthFix':'scaleToFill'}}" src="{{item2.image_src}}"></image>
        </navigator>
      </view>
    </view>
  </view>
</view>
项目发布
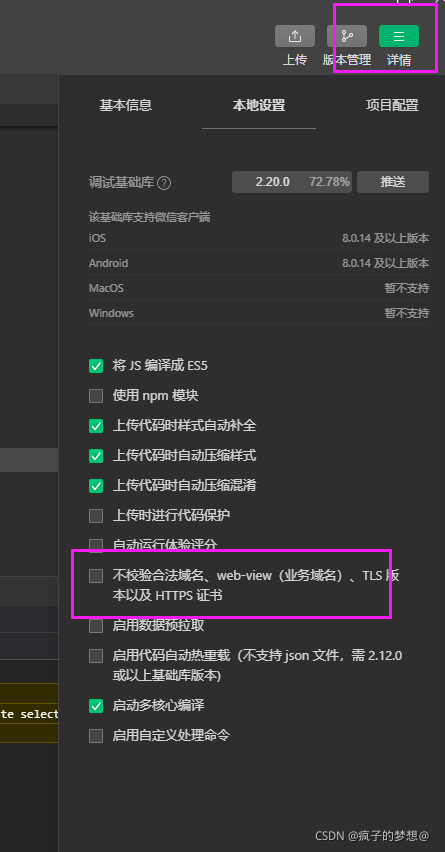
实际应用中,代码写完后,会由企业的相关人员进行测试,这里我们跳过,进入到项目发布步骤。首先,把小程序开发者工具,本地设置中不校验合法域名,进行取消勾选。否则在用户的实际应用时,会造成不安全因素。然后我们把小程序开发中使用的所有外网链接,在小程序云平台,加入到白名单就可以了。
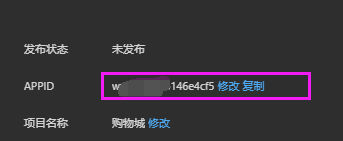
然后这里的APPID要修改为自己的,或者企业的,不能是测试号了
然后确保代码总共不超过2M。
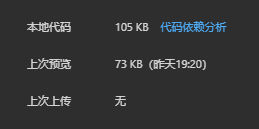
然后点击上传

然后打开微信公众平台,点击版本管理,然后下拉页面,找到开发版本
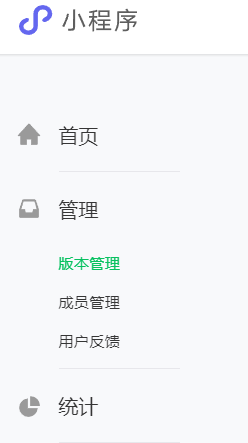

这里如果我们选择提交审核,那么就会提交给微信官方审核,然后正式上线。这里我选择的是体验版,同时,将一些链接url放入白名单,找到开发,开发管理,服务器域名中进行配置。
