1.线性布局(LinearLayout)
常用属性
1.orientation:布局中组件的排列方式(默认为水平方向(horizontal),垂直方向(vertical))
新建一个布局文件:linearLayout.xml
<?xml version="1.0" encoding="utf-8"?>
<LinearLayout xmlns:android="http://schemas.android.com/apk/res/android"
    xmlns:app="http://schemas.android.com/apk/res-auto"
    xmlns:tools="http://schemas.android.com/tools"
    android:layout_width="match_parent"
    android:layout_height="match_parent"
    android:orientation="vertical"
    tools:context=".MainActivity">

<!--    水平(默认)方向的效果-->
    <LinearLayout
        android:layout_width="match_parent"
        android:layout_height="300dp"
        android:orientation="horizontal">
        <Button
            android:text="水平第一个"
            android:layout_width="100dp"
            android:layout_height="100dp"/>
        <Button
            android:text="水平第二个"
            android:layout_width="100dp"
            android:layout_height="100dp"/>
        <Button
            android:text="水平第三个"
            android:layout_width="100dp"
            android:layout_height="100dp"/>
    </LinearLayout>
<!--    垂直方向的效果-->
    <LinearLayout
        android:layout_width="match_parent"
        android:layout_height="wrap_content"
        android:orientation="vertical">
        <Button
            android:text="垂直第一个"
            android:layout_width="100dp"
            android:layout_height="100dp"/>
        <Button
            android:text="垂直第二个"
            android:layout_width="100dp"
            android:layout_height="100dp"/>
        <Button
            android:text="垂直第三个"
            android:layout_width="100dp"
            android:layout_height="100dp"/>
    </LinearLayout>

</LinearLayout>
效果图:
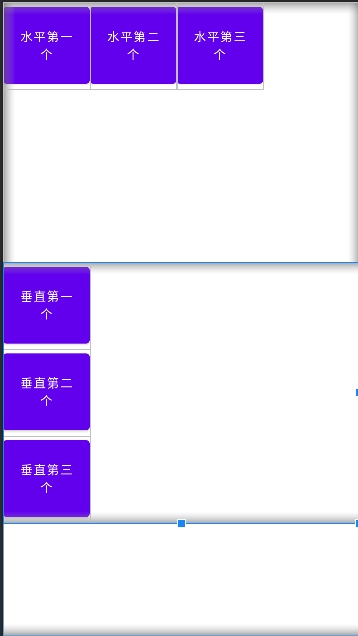
从上图可以看出第一个线性布局采用的是默认的水平方向的排列方式,第二个采用垂直方向的排列方式。
2.gravity:控制组件所包含的子元素的对齐方式,可以多个组合
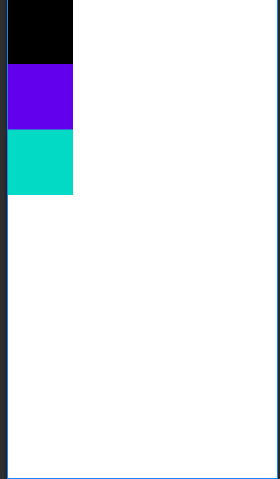
默认情况:
<?xml version="1.0" encoding="utf-8"?>
<LinearLayout xmlns:android="http://schemas.android.com/apk/res/android"
    android:background="@color/white"
    android:orientation="vertical"
    android:layout_width="match_parent"
    android:layout_height="match_parent">
    <LinearLayout
        android:background="@color/black"
        android:layout_width="100dp"
        android:layout_height="100dp"/>
    <LinearLayout
        android:background="@color/purple_500"
        android:layout_width="100dp"
        android:layout_height="100dp"/>
    <LinearLayout
        android:background="@color/teal_200"
        android:layout_width="100dp"
        android:layout_height="100dp"/>

</LinearLayout>
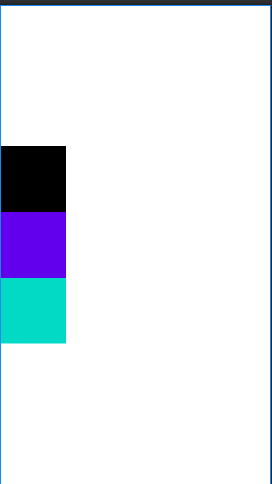
设置gravity属性后:
<?xml version="1.0" encoding="utf-8"?>
<LinearLayout xmlns:android="http://schemas.android.com/apk/res/android"
    android:background="@color/white"
    android:orientation="vertical"
    android:gravity="center_vertical"
    android:layout_width="match_parent"
    android:layout_height="match_parent">
    <LinearLayout
        android:background="@color/black"
        android:layout_width="100dp"
        android:layout_height="100dp"/>
    <LinearLayout
        android:background="@color/purple_500"
        android:layout_width="100dp"
        android:layout_height="100dp"/>
    <LinearLayout
        android:background="@color/teal_200"
        android:layout_width="100dp"
        android:layout_height="100dp"/>

</LinearLayout>
gravity属性设置为center_vertical,组件垂直居中显示。也可以通过 “|”来进行属性的组合
例如:android:gravity=“center_vertical|center_horizontal”:这时就会居中显示
3.layout:gravity:控制组件在父容器中的对齐方式(和gravity不同的是gravity是父容器设置组件在其中的对齐方式,layout:gravity是组件设置自身在父容器中的对齐方式)
4.background:设置一个背景图片或者直接用颜色覆盖
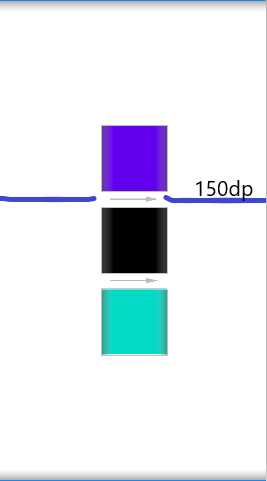
5.divider:设置分割线
6.showDividers:设置分割线所在的位置,none(无),beginning(开始位置),end(结束位置),middle(每两个组件之间)
7.dividerPadding:设置分割线的padding(分割线距离父容器的边距)
分割线可以使用drawable资源,直接在父容器的属性中进行设置。
<LinearLayout xmlns:android="http://schemas.android.com/apk/res/android"
    android:background="@color/white"
    android:orientation="vertical"
    android:gravity="center_vertical|center_horizontal"
    android:divider="@drawable/ic_baseline_arrow_right_alt_24"
    android:showDividers="middle"
    android:dividerPadding="150dp"
    android:layout_width="match_parent"
    android:layout_height="match_parent">
8.layout_weight:权重(进行等比例划分区域)
<?xml version="1.0" encoding="utf-8"?>
<LinearLayout xmlns:android="http://schemas.android.com/apk/res/android"
    android:background="@color/white"
    android:orientation="vertical"
    android:layout_width="match_parent"
    android:layout_height="match_parent">
   <LinearLayout
       android:background="@color/black"
       android:layout_width="match_parent"
       android:layout_height="0dp"
       android:layout_weight="1"/>
    <LinearLayout
        android:background="@color/purple_200"
        android:layout_width="match_parent"
        android:layout_height="0dp"
        android:layout_weight="2"/>
    <LinearLayout
        android:background="@color/teal_700"
        android:layout_width="match_parent"
        android:layout_height="0dp"
        android:layout_weight="3"/>
</LinearLayout>
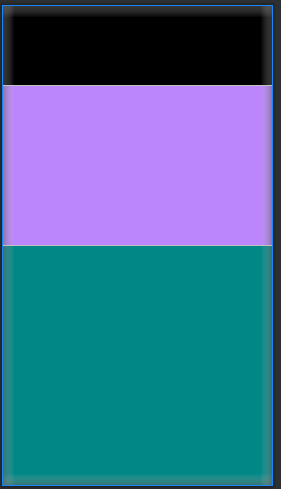
从上图可以看出三个线性布局按照1:2:3的比例均匀的分配了父容器的空间。
,如果不使用0dp的方式,使用match_parent的方式
<?xml version="1.0" encoding="utf-8"?>
<LinearLayout xmlns:android="http://schemas.android.com/apk/res/android"
    android:background="@color/white"
    android:orientation="vertical"
    android:layout_width="match_parent"
    android:layout_height="match_parent">
   <LinearLayout
       android:background="@color/black"
       android:layout_width="match_parent"
       android:layout_height="match_parent"
       android:layout_weight="2"/>
    <LinearLayout
        android:background="@color/purple_200"
        android:layout_width="match_parent"
        android:layout_height="match_parent"
        android:layout_weight="1"/>
    <LinearLayout
        android:background="@color/teal_700"
        android:layout_width="match_parent"
        android:layout_height="match_parent"
        android:layout_weight="1"/>
</LinearLayout>
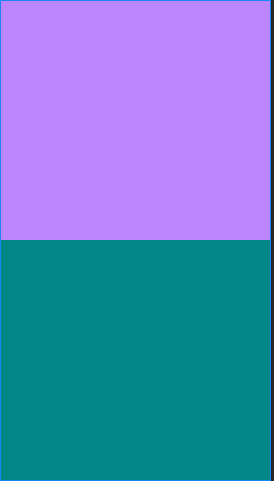
可以发现,权重为2的黑色区域没有分配到空间。
这时就需要计算一下了:
- 三个区域全部是match_parent,但是屏幕只有一个,所以每个区域分配到的屏幕是:
1-3= -2个屏幕- 然后按照每块区域的权重比例进行分配(2:1:1)
- 第一个线性布局分配到的区域是:1-2*(2/4)=0,所以没有显示黑色的区域,剩下两个线性布局也一次计算,分别分配到的区域是1/2,1/2.所以就造成了如上图显示的情况。
2.相对布局(RelativeLayout)
根据父容器定位
- layout_alignParentLeft:左对齐
- layout_alignParentRight:右对齐
- layout_alignParentTop:顶部对齐
- layout_alignParentBottom:底部对齐
- layout_alignHorizontal:水平居中
- layout_alignVertical:垂直居中
- layout_centerInParent:中间位置
<?xml version="1.0" encoding="utf-8"?>
<RelativeLayout xmlns:android="http://schemas.android.com/apk/res/android"
    android:background="@color/white"
    xmlns:app="http://schemas.android.com/apk/res-auto"
    android:orientation="vertical"
    android:layout_width="match_parent"
    android:layout_height="match_parent">
    <RelativeLayout
        android:layout_alignParentLeft="true"
        android:background="#ff0000"
        android:layout_width="200dp"
        android:layout_height="200dp"/>
    <RelativeLayout
        android:layout_alignParentRight="true"
        android:background="#00ff00"
        android:layout_width="200dp"
        android:layout_height="200dp"/>
    <RelativeLayout
        android:layout_centerInParent="true"
        android:background="#0000ff"
        android:layout_width="200dp"
        android:layout_height="200dp"/>
</RelativeLayout>
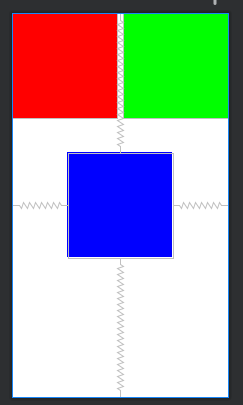
示例图:
根据兄弟组件定位
- layout_toLeftOf:放置于参考组件的左边
- layout_toRightOf:放置于参考组件的右边
- layout_above:放置于参考组件的上方
- layout_below:放置于参开组件的下方
- layout_alignTop:对其与参考组件的上边界
- layout_alignBottom:对其参考组件的下边界
- layout_alignLeft:对齐参考组件的左边界
- layout_alignRight:对齐参考组件的右边界
<?xml version="1.0" encoding="utf-8"?>
<RelativeLayout xmlns:android="http://schemas.android.com/apk/res/android"
   android:background="@color/white"
   xmlns:app="http://schemas.android.com/apk/res-auto"
   android:orientation="vertical"
   android:layout_width="match_parent"
   android:layout_height="match_parent">
   <RelativeLayout
       android:id="@+id/one"
       android:background="#ff0000"
       android:layout_width="200dp"
       android:layout_height="200dp"/>
   <RelativeLayout
       android:id="@+id/two"
       android:layout_below="@id/one"
       android:background="#00ff00"
       android:layout_width="200dp"
       android:layout_height="200dp"/>
   <RelativeLayout
       android:layout_below="@id/one"
       android:layout_toRightOf="@id/two"
       android:id="@+id/three"
       android:background="#0000ff"
       android:layout_width="200dp"
       android:layout_height="200dp"/>
</RelativeLayout>
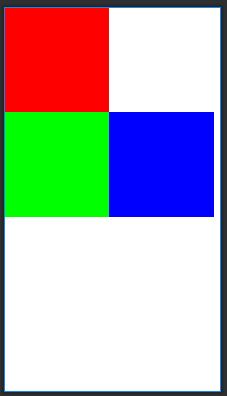
示例图:
3.FrameLayout(帧布局)
FrameLayout是六大布局中最简单的一个,在该布局中放置的所有空间都默认放到屏幕的左上方,帧布局的大小由控件中最大的子控件决定,如果控件一样大的话,同一时刻我们只能看到最上方的控件,虽然FrameLayout会默认将子控件放置于左上方,但是我们也可以通过layout_gravity指定控件的位置。
在FrameLayout中有一个前景图像,这个前景图像永远在帧布局的最上方,是用户可以直接看到的,这个前景图像是不会被子控件覆盖的。
用一个最简单的例子来介绍:
<?xml version="1.0" encoding="utf-8"?>
<!--android:foreground="@drawable/ic_baseline_format_bold_24:设置前景图片(可以是drawable资源)
android:foregroundGravity:设置前景图像显示的位置,这里没有进行设置-->
<FrameLayout xmlns:android="http://schemas.android.com/apk/res/android"
    android:background="@color/white"
    xmlns:app="http://schemas.android.com/apk/res-auto"
    android:orientation="vertical"
    android:layout_width="match_parent"
    android:layout_height="match_parent"
    android:foreground="@drawable/ic_baseline_format_bold_24">

    <FrameLayout
        android:background="#0000ff"
        android:layout_width="200dp"
        android:layout_height="200dp"/>
    <FrameLayout
        android:background="#ff0000"
        android:layout_width="150dp"
        android:layout_height="150dp"/>
    <FrameLayout
        android:background="#00ff00"
        android:layout_width="100dp"
        android:layout_height="100dp"/>

</FrameLayout>
示例图:

从上图可以看出,字母B也就是前景图像并没有受到子控件的影响。而其他三个子控件同通过颜色的区分也能明显看出,每添加一个子控件就会默认放置于父容器的左上方,并且覆盖之前已经添加的子控件。
4.GridLayout(网格布局)
网格布局是Android4.0之后引入的一个布局,在网格布局中我们可以直接自己设置布局的排列方式,可以自定义网格布局有多少列多少行,同时也可以直接设置组件在第几行第几列,也可以设置组件可以横跨几列或者几行。
基础属性
- android:orientation:设置排列方式(水平或者垂直)
- android:layout_gravity:设置对齐方式(left,right,bottom,top,也可以使用“|”进行组合排列)
- android:rowCount:设置行数(一行可以显示多少列)
- android:columCount:设置列数
- android:layout_row:设置组件所在的行
- android:layout_colum:设置组件所在的列
- android:layout_rowSpan:设置组件跨几行
- android:layout_rowSpan:设置组件跨几列
网格布局最简单的例子就是计算器,接下来用网格布局实现一个计算器的界面:
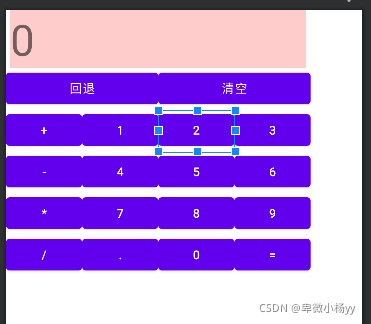
贴下xml代码:
<GridLayout xmlns:android="http://schemas.android.com/apk/res/android"
    xmlns:tools="http://schemas.android.com/tools"
    android:id="@+id/GridLayout1"
    android:layout_width="wrap_content"
    android:layout_height="wrap_content"
    android:columnCount="4"
    android:orientation="horizontal"
    android:rowCount="6" >

    <TextView
        android:layout_columnSpan="4"
        android:layout_gravity="fill"
        android:layout_marginLeft="5dp"
        android:layout_marginRight="5dp"
        android:background="#FFCCCC"
        android:text="0"
        android:textSize="50sp" />

    <Button
        android:layout_columnSpan="2"
        android:layout_gravity="fill"
        android:text="回退" />

    <Button
        android:layout_columnSpan="2"
        android:layout_gravity="fill"
        android:text="清空" />

    <Button android:text="+" />

    <Button android:text="1" />

    <Button android:text="2" />

    <Button android:text="3" />

    <Button android:text="-" />

    <Button android:text="4" />

    <Button android:text="5" />

    <Button android:text="6" />

    <Button android:text="*" />

    <Button android:text="7" />

    <Button android:text="8" />

    <Button android:text="9" />

    <Button android:text="/" />

    <Button
        android:layout_width="wrap_content"
        android:text="." />

    <Button android:text="0" />

    <Button android:text="=" />

</GridLayout>
当设置一个组件横跨几列的时候可能会发现并不会达到预期的效果,这个时候就需要使用:
android:layout_gravity=“fill”,让该组件填充满所占的空间。
在上面可以发现,默认每个组件都是占一行一列,可以通过weight(权重)来进行等比例划分,会让界面看的更加美观。
5.TableLayout(表格布局)
如果我们在TableLayout中直接添加一个控件的话,这个控件就会占满一行,如果想让一行有多个控件的话就需要和TableRow一起使用,这里TableRow组件个数决定了该行的列数。
常用属性
- android:collapseColumns:设置需要被隐藏的列的序号,从0开始
- android:shrinkColumns:设置可以被收缩的列的序号,从0开始(需要前置条件:子控件占满当前行)
- android:stretchColumns:设置运行被拉伸的列的列序号,从0开始(需要当前行有剩余空间)
子控件的设置属性
- android:layout_column:显示在第几列
- android:layout_span:组件可以横跨几列
<?xml version="1.0" encoding="utf-8"?>
<TableLayout xmlns:android="http://schemas.android.com/apk/res/android"
    android:layout_width="match_parent"
    android:layout_height="match_parent">
    <TableRow>
        <Button
            android:layout_height="wrap_content"
            android:layout_width="wrap_content"
            android:text="1"/>
        <Button
            android:layout_height="wrap_content"
            android:layout_width="wrap_content"
            android:text="2"/>
        <Button
            android:layout_height="wrap_content"
            android:layout_width="wrap_content"
            android:text="3"/>
        <Button
            android:layout_height="wrap_content"
            android:layout_width="wrap_content"
            android:text="4"/>
        <Button
            android:layout_height="wrap_content"
            android:layout_width="wrap_content"
            android:text="5"/>
    </TableRow>
    <TableRow>
        <Button
            android:layout_height="wrap_content"
            android:layout_width="wrap_content"
            android:text="6"/>
        <Button
            android:layout_height="wrap_content"
            android:layout_width="wrap_content"
            android:text="7"/>
        <Button
            android:layout_height="wrap_content"
            android:layout_width="wrap_content"
            android:text="8"/>
        <Button
            android:layout_height="wrap_content"
            android:layout_width="wrap_content"
            android:text="9"/>
        <Button
            android:layout_height="wrap_content"
            android:layout_width="wrap_content"
            android:text="10"/>
    </TableRow>

</TableLayout>

collapseColumns:隐藏列
<?xml version="1.0" encoding="utf-8"?>
<TableLayout xmlns:android="http://schemas.android.com/apk/res/android"
    android:layout_width="match_parent"
    android:layout_height="match_parent"
    android:collapseColumns="2">
    <TableRow>
        <Button
            android:layout_height="wrap_content"
            android:layout_width="wrap_content"
            android:text="1"/>
        <Button
            android:layout_height="wrap_content"
            android:layout_width="wrap_content"
            android:text="2"/>
        <Button
            android:layout_height="wrap_content"
            android:layout_width="wrap_content"
            android:text="3"/>
        <Button
            android:layout_height="wrap_content"
            android:layout_width="wrap_content"
            android:text="4"/>
        <Button
            android:layout_height="wrap_content"
            android:layout_width="wrap_content"
            android:text="5"/>
    </TableRow>
    <TableRow>
        <Button
            android:layout_height="wrap_content"
            android:layout_width="wrap_content"
            android:text="6"/>
        <Button
            android:layout_height="wrap_content"
            android:layout_width="wrap_content"
            android:text="7"/>
        <Button
            android:layout_height="wrap_content"
            android:layout_width="wrap_content"
            android:text="8"/>
        <Button
            android:layout_height="wrap_content"
            android:layout_width="wrap_content"
            android:text="9"/>
        <Button
            android:layout_height="wrap_content"
            android:layout_width="wrap_content"
            android:text="10"/>
    </TableRow>

</TableLayout>

可以发现第三列被隐藏了。拉伸和收缩列也是如此进行设置。
当然还有一个AbsoluteLayout(绝对布局),但是这个布局局限性太大,所以一般是不会使用的。