本节通过学习老孟《Flutter实战入门》。
使用Material风格组件需要引用 import ‘package:flutter/material.dart’;
一、MaterialApp
MaterialApp作为顶级容器表示当前App是Material风格的,MaterialApp中设置的样式属性都是全局的,常用的属性,如下:

class MyApp extends StatelessWidget {
  @override
  Widget build(BuildContext context) {
    return MaterialApp(
      title: 'Flutter Demo',
      theme: ThemeData(
        primarySwatch: Colors.blue,
        visualDensity: VisualDensity.adaptivePlatformDensity,
      ),
      home: ExampleWidget(),
    );
  }
}
二、Scaffold
Scaffold是Material组件的布局容器,可用于展示抽屉(Drawer)、通知(Snack Bar)、及底部导航的效果,属性如下:

class _ExampleWidgetState extends State<StatefulWidget> {
  final TextEditingController _controller = new TextEditingController();
  @override
  Widget build(BuildContext context) {
      return Scaffold(
    appBar: AppBar(title: Text('Flutter 实战入门'),),
    body: Container(
      child: Text('body'),
      alignment: Alignment.center,
    ),
    drawer: Drawer(
      child: ListView(
        children: <Widget>[
          DrawerHeader(child: Text('头像'),),
          ListTile(title: Text('我的'),),
          ListTile(title: Text('关于'),),
          ListTile(title: Text('主页'),),
        ],
      ),
    ),
    endDrawer: Drawer(
      child: ListView(
        children: <Widget>[
          DrawerHeader(child: Text('头像(end)'),),
          ListTile(title: Text('我的'),),
          ListTile(title: Text('关于'),),
          ListTile(title: Text('主页'),),
        ],
      ),
    ),
    floatingActionButton: FloatingActionButton(onPressed: () {},child: Text("+"),),
    floatingActionButtonLocation: FloatingActionButtonLocation.endFloat,
    floatingActionButtonAnimator: FloatingActionButtonAnimator.scaling,
    persistentFooterButtons: List.generate(3, (index) {
      return RaisedButton(onPressed: (){},child: Text('persistent'),textColor: Colors.black,);
    }),
    bottomNavigationBar: Row(
      children: <Widget>[
        Expanded(
          child: RaisedButton(onPressed: (){},child: Text('微信'),),
          flex: 1,
        ),
        Expanded(
            child: RaisedButton(onPressed: (){},child: Text('通信录'),),
          flex: 1,
        ),
        Expanded(
            child: RaisedButton(onPressed: (){},child: Text('发现'),),
          flex: 1,
        ),
        Expanded(
          child: RaisedButton(onPressed: (){},child: Text('我'),),
          flex: 1,
        ),
      ],
    ),
    bottomSheet: RaisedButton(onPressed: (){},child: Text('bottomSheet'),),
  );
  }
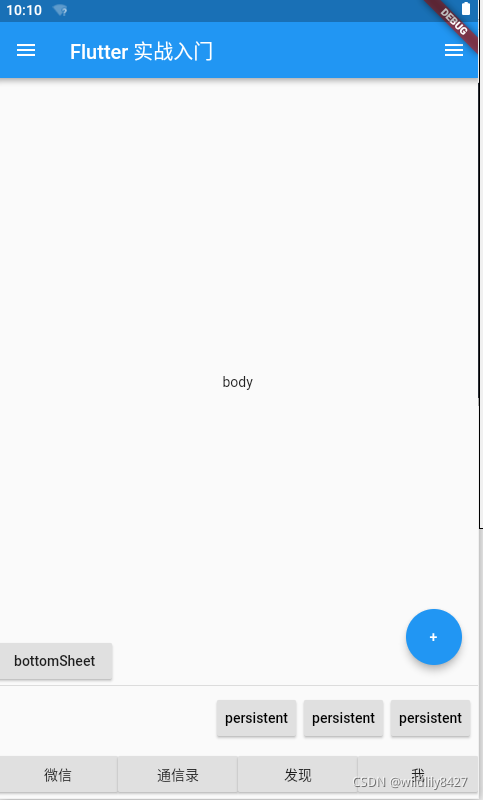
Scaffold未 打开drawable的效果图

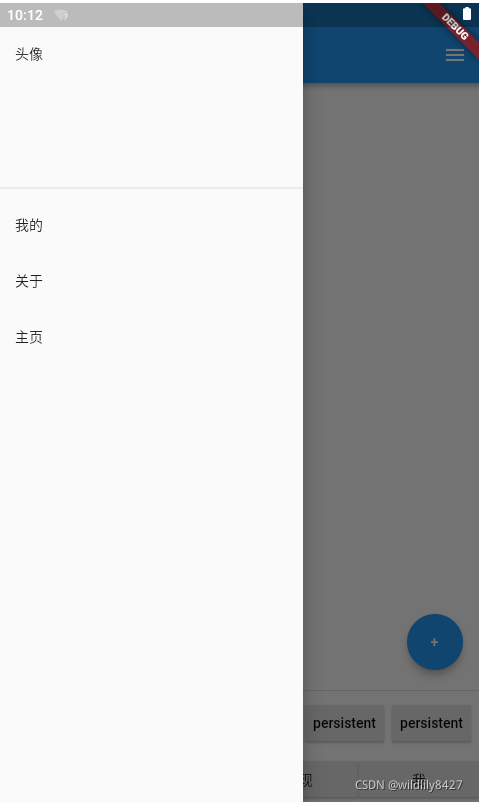
Scaffold打开抽屉的效果

三、AppBar
AppBar显示在App的顶部,属性如下:

//AppBar改动
class _ExampleWidgetState extends State<StatefulWidget> {
  final TextEditingController _controller = new TextEditingController();
  @override
  Widget build(BuildContext context) {
       return Scaffold(
    //AppBar :左侧返回按钮,title右侧有3个图标
    appBar: AppBar(
      leading: IconButton(icon: Icon(Icons.arrow_back), onPressed: (){}),
      title: Text('Flutter 实战入门'),
      actions: <Widget>[
        IconButton(icon: Icon(Icons.add), onPressed: (){}),
        IconButton(icon: Icon(Icons.dashboard), onPressed: (){}),
        IconButton(icon: Icon(Icons.cached),onPressed: (){},),
      ],
    ),
    body: Container(
      child: Text('body'),
      alignment: Alignment.center,
    ),
    drawer: Drawer(
      child: ListView(
        children: <Widget>[
          DrawerHeader(child: Text('头像'),),
          ListTile(title: Text('我的'),),
          ListTile(title: Text('关于'),),
          ListTile(title: Text('主页'),),
        ],
      ),
    ),
    endDrawer: Drawer(
      child: ListView(
        children: <Widget>[
          DrawerHeader(child: Text('头像(end)'),),
          ListTile(title: Text('我的'),),
          ListTile(title: Text('关于'),),
          ListTile(title: Text('主页'),),
        ],
      ),
    ),
    floatingActionButton: FloatingActionButton(onPressed: () {},child: Text("+"),),
    floatingActionButtonLocation: FloatingActionButtonLocation.endFloat,
    floatingActionButtonAnimator: FloatingActionButtonAnimator.scaling,
    persistentFooterButtons: List.generate(3, (index) {
      return RaisedButton(onPressed: (){},child: Text('persistent'),textColor: Colors.black,);
    }),
    bottomNavigationBar: Row(
      children: <Widget>[
        Expanded(
          child: RaisedButton(onPressed: (){},child: Text('微信'),),
          flex: 1,
        ),
        Expanded(
            child: RaisedButton(onPressed: (){},child: Text('通信录'),),
          flex: 1,
        ),
        Expanded(
            child: RaisedButton(onPressed: (){},child: Text('发现'),),
          flex: 1,
        ),
        Expanded(
          child: RaisedButton(onPressed: (){},child: Text('我'),),
          flex: 1,
        ),
      ],
    ),
    bottomSheet: RaisedButton(onPressed: (){},child: Text('bottomSheet'),),
  );
    throw UnimplementedError();
  }
  }
AppBar效果

四、BottomNavigationBar
BottomNavigationBar底部导航栏,属性如下:

//修改bottomBar,有点问题
class _ExampleWidgetState extends State<StatefulWidget> {
  final TextEditingController _controller = new TextEditingController();
  int _selectIndex = 0;
  @override
  Widget build(BuildContext context) {
     return Scaffold(
    //左侧返回按钮,title右侧有3个图标
    appBar: AppBar(
      leading: IconButton(icon: Icon(Icons.arrow_back), onPressed: (){}),
      title: Text('Flutter 实战入门'),
      actions: <Widget>[
        IconButton(icon: Icon(Icons.add), onPressed: (){}),
        IconButton(icon: Icon(Icons.dashboard), onPressed: (){}),
        IconButton(icon: Icon(Icons.cached),onPressed: (){},),
      ],
    ),
    body: Container(
      child: Text('body'),
      alignment: Alignment.center,
    ),
    drawer: Drawer(
      child: ListView(
        children: <Widget>[
          DrawerHeader(child: Text('头像'),),
          ListTile(title: Text('我的'),),
          ListTile(title: Text('关于'),),
          ListTile(title: Text('主页'),),
        ],
      ),
    ),
    endDrawer: Drawer(
      child: ListView(
        children: <Widget>[
          DrawerHeader(child: Text('头像(end)'),),
          ListTile(title: Text('我的'),),
          ListTile(title: Text('关于'),),
          ListTile(title: Text('主页'),),
        ],
      ),
    ),
    floatingActionButton: FloatingActionButton(onPressed: () {},child: Text("+"),),
    floatingActionButtonLocation: FloatingActionButtonLocation.endFloat,
    floatingActionButtonAnimator: FloatingActionButtonAnimator.scaling,
    persistentFooterButtons: List.generate(3, (index) {
      return RaisedButton(onPressed: (){},child: Text('persistent'),textColor: Colors.black,);
    }),
    //修改
    bottomNavigationBar: BottomNavigationBar(
      items: <BottomNavigationBarItem>[
        BottomNavigationBarItem(
          title: Text('微信'),
          icon: Icon(Icons.chat,color: Colors.black,),
          activeIcon: Icon(Icons.chat,color: Colors.green,),
        ),
        BottomNavigationBarItem(
          title: Text('通讯录'),
          icon: Icon(Icons.whatshot,color: Colors.black,),
          activeIcon: Icon(Icons.whatshot,color: Colors.green,),
        ),
        BottomNavigationBarItem(
          title: Text('发现'),
          icon: Icon(Icons.accessible,color: Colors.black,),
          activeIcon: Icon(Icons.accessible,color: Colors.green,),
        ),
        BottomNavigationBarItem(
          title: Text('我'),
          icon: Icon(Icons.access_alarm,color: Colors.black,),
          activeIcon: Icon(Icons.access_alarm,color: Colors.green,),
        ),
      ],
      iconSize: 24,
      currentIndex: _selectIndex,
      onTap: (index) {
        setState(() {
          _selectIndex = index;
        });
      },
      fixedColor: Colors.green,
      type: BottomNavigationBarType.shifting,
    ),
    bottomSheet: RaisedButton(onPressed: (){},child: Text('bottomSheet'),),
  );
    throw UnimplementedError();
  }
  }
有点问题,哪里有问题,请指教。。。。

五、TabBar
Tab是一排水平的标签,可以来回切换。属性如下:

import 'package:flutter/material.dart';
import 'package:flutter/services.dart';
import 'package:path_provider/path_provider.dart';

String _storageDir = '';
void main() {
  runApp(MyApp());
}

class MyApp extends StatelessWidget {
  @override
  Widget build(BuildContext context) {
    return MaterialApp(
      title: 'Flutter Demo',
      theme: ThemeData(
        primarySwatch: Colors.blue,
        visualDensity: VisualDensity.adaptivePlatformDensity,
      ),
      home: ExampleWidget(),
    );
  }
}

// Opens an [AlertDialog] showing what the user typed.

class ExampleWidget extends StatefulWidget {
  ExampleWidget({Key key}) : super(key: key);

  @override
  State<StatefulWidget> createState() {
//    return new _ExampleWidgetState();
  return new _TabBar();
    throw UnimplementedError();
  }
}

class _TabBar extends State<StatefulWidget> {
  final List<String> _tabValues = [
    '语文',
    '英语',
    '数学',
    '物理',
    '化学',
    '生物',
    '政治',
    '地理',
    '历史',
  ];
  TabController _controller;
  @override
  void initState() {
    super.initState();
    _controller = TabController(length: _tabValues.length, vsync: ScrollableState(),);
  }

  @override
  Widget build(BuildContext context) {
    return Scaffold(
      appBar: AppBar(
        title: Text('TabBar'),
        bottom: TabBar(
          tabs: _tabValues.map((f) {
            return Text(f);
          }).toList(),
          controller: _controller,
          indicatorColor: Colors.red,
          indicatorSize: TabBarIndicatorSize.tab,
          isScrollable: true,
          labelColor: Colors.amber,
          unselectedLabelColor: Colors.black,
          indicatorWeight: 5.0,
          unselectedLabelStyle: TextStyle(height: 2),
        ),
      ),
      body: TabBarView(
        controller: _controller,
        children: _tabValues.map((e){
          return Center(
            child: Text(e),
          );
        }).toList(),
      ),
    );
    throw UnimplementedError();
  }
}

六、Drawer
Drawer是抽屉样式的控件,它的子控件钟一般使用ListView,第一个元素一般使用DrawerHeaader,接下来是ListTile.示例见前文 “二、Scaffold”。