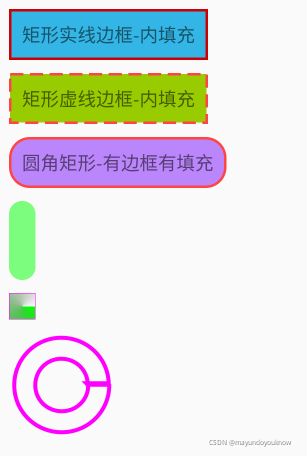
?shape的优势,Android开发中,使用shape可以方便的帮我们画出背景,相对于png图片来说,使用shape可以减少安装包的大小,而且能够更好的适应不同的手机;
1.shape(GradientDrawable)
shape顾名思义就是形状的意思,我们在平时开发的中,应用的频率也很高,该文件是一个xml文件,并放在drawable文件夹下如res/drawable/filename.xml,那么引用方式也很简单,我们一般在控件的background使用,如android:background="@drawable/filename";
shape文件基本结构如下:
<shape xmlns:android="http://schemas.android.com/apk/res/android"
    android:shape="">
    <corners />
    <gradient />
    <padding />
    <size />
    <solid />
    <stroke />
</shape>
1.1<shape>标签下常见属性
<shape xmlns:android="http://schemas.android.com/apk/res/android" android:shape=["rectangle" | "oval" | "line" | "ring"] >
属性说明
<!-- ? shape必须为根元素
xmlns:命名空间
android:shape指定形状类型
? ? rectangle:填充包含视图的矩形,当不写该属性时默认此形状
? ? oval:椭圆形状
? ? line:线形状,此形状需要 <stroke> 元素定义线宽
? ? ring:环形
当android:shape="ring"时,有可选属性
? ? ? ? android:innerRadius:尺寸。环内部(中间的孔)的半径
? ? ? ? android:innerRadiusRatio:浮点型。环内部的半径,以环宽度的比率表示。例如,如果 android:innerRadiusRatio="5",则内半径等于环宽度除以 5。此值被 android:innerRadius 覆盖。默认值为 9。
? ? ? ? android:thickness:环的厚度
? ? ? ? android:thicknessRatio:浮点型。环的厚度,表示为环宽度的比率。例如,如果 android:thicknessRatio="2",则厚度等于环宽度除以 2。此值被 android:innerRadius 覆盖。默认值为 3。
? ? 需要注意的是,如果你使用了上面几个属性绘制一个圆,会发现在控件中并没有效果,我们还需要一个重要属性
? ? ? ? android:useLevel:布尔值。如果这用作 LevelListDrawable,则此值为“true”。这通常应为“false”,否则形状不会显示。
?-->
<shape
? ? xmlns:android="http://schemas.android.com/apk/res/android"
? ? android:shape=["rectangle" | "oval" | "line" | "ring"]? />
1.2<corners>标签下常见属性
<corners
? ? ? ? android:radius="integer"
? ? ? ? android:topLeftRadius="integer"
? ? ? ? android:topRightRadius="integer"
? ? ? ? android:bottomLeftRadius="integer"
? ? ? ? android:bottomRightRadius="integer" />
属性说明
<!--
? ? ? ?corners为形状产生圆角,仅当形状为矩形时使用
? ? ? ? android:radius:尺寸。所有角的半径,以尺寸值或尺寸资源表示。对于每个角,这会被以下属性覆盖。
? ? ? ? android:topLeftRadius:左上角的半径,以尺寸值或尺寸资源表示。
? ? ? ? android:topRightRadius:右上角的半径,以尺寸值或尺寸资源表示。
? ? ? ? android:bottomLeftRadius:左下角的半径,以尺寸值或尺寸资源表示。
? ? ? ? android:bottomRightRadius:右下角的半径,以尺寸值或尺寸资源表示
? ? -->
1.3<gradient>标签下属性说明
?<gradient
? ? ? ? android:angle="integer"
? ? ? ? android:centerX="float"
? ? ? ? android:centerY="float"
? ? ? ? android:centerColor="integer"
? ? ? ? android:endColor="color"
? ? ? ? android:gradientRadius="integer"
? ? ? ? android:startColor="color"
? ? ? ? android:type=["linear" | "radial" | "sweep"]
? ? ? ? android:useLevel=["true" | "false"] />
属性说明
?<!--
? ? ? ? 指定形状的渐变颜色,使用渐变时不要使用solid,否则会被覆盖,看不到效果
? ? ? ? android:angle:整型。渐变的角度(度)。0 为从左到右,90 为从下到上。必须是 45 的倍数。默认值为 0,如果写该值不是45的整数倍,将没有效果。
? ? ? ? android:centerX:浮点型。渐变中心的相对 X 轴位置 (0 - 1.0)。
? ? ? ? android:centerY:浮点型。渐变中心的相对 Y 轴位置 (0 - 1.0)。
? ? ? ? android:centerColor:颜色。起始颜色与结束颜色之间的可选颜色,以十六进制值或颜色资源表示。
? ? ? ? android:endColor:颜色。结束颜色,表示为十六进制值或颜色资源。
? ? ? ? android:gradientRadius:浮点型。渐变的半径。仅在 android:type="radial" 时适用。且radial时必须有该属性,否则无效果
? ? ? ? android:startColor:颜色。起始颜色,表示为十六进制值或颜色资源。
? ? ? ? android:type:要应用的渐变图案的类型。有效值为
? ? ? ? ? ? ? ? ? ? ? "linear" ?线性渐变。这是默认值。
? ? ? ? ? ? ? ? ? ? ? "radial" ?径向渐变。起始颜色为中心颜色。
? ? ? ? ? ? ? ? ? ? ? "sweep" ? 流线型渐变。
? ? ? ? android:useLevel:布尔值。如果这用作 LevelListDrawable,则此值为“true”。
? ? -->
1.4<padding>标签下属性说明
<padding android:left="integer" android:top="integer" android:right="integer" android:bottom="integer" />
属性说明
? <!--
? ? ? ? 要应用到包含视图元素的内边距(这会填充视图内容的位置,而非形状)。
? ? ? ? android:left:尺寸。左内边距,表示为尺寸值或尺寸资源
? ? ? ? android:top:尺寸。上内边距,表示为尺寸值或尺寸资源
? ? ? ? android:right:尺寸。右内边距,表示为尺寸值或尺寸资源
? ? ? ? android:bottom:尺寸。下内边距,表示为尺寸值或尺寸资源
? ? -->
1.5<size>标签下属性说明
<size android:width="integer" android:height="integer" />
属性说明
<!-- 指定形状的大小 注:默认情况下,形状按照此处定义的尺寸按比例缩放至容器视图的大小。在 ImageView 中使用形状时,可通过将 android:scaleType 设置为 "center" 来限制缩放。 -->
1.6<solid>标签下属性说明
<solid android:color="color" />
属性说明
<!--- 用于填充形状的颜色 android:color:颜色。应用于形状的颜色 ->
1.7<stroke>标签下属性说明
<stroke
? ? ? ? android:width="integer"
? ? ? ? android:color="color"
? ? ? ? android:dashWidth="integer"
? ? ? ? android:dashGap="integer" />
属性说明
<!--
        形状的笔划中线。即形状的边框
        android:width:尺寸。线宽,以尺寸值或尺寸资源表示。
        android:color:颜色。线的颜色,表示为十六进制值或颜色资源。
        android:dashGap:尺寸。短划线的间距,以尺寸值或尺寸资源表示。仅在设置了 android:dashWidth 时有效。
        android:dashWidth:尺寸。每个短划线的大小,以尺寸值或尺寸资源表示。仅在设置了 android:dashGap 时有效。
-->在xml文件实现shape和用Java代码实现大同小异,他们命名规则都是相对应的,可以参考官方API文档,Drawable resources ?|? Android Developers,shape标签对应的GradientDrawable类;
2.图层列表layer-list(LayerDrawable )
layer-list顾名思义就是分层的意思,我们在平时开发的中,应用的频率也很高,该文件是一个xml文件,并放在drawable文件夹下如res/drawable/filename.xml,那么引用方式也很简单,我们一般在控件的background使用,如android:background="@drawable/filename";
LayerDrawable 是管理其他可绘制对象阵列的可绘制对象。列表中的每个可绘制对象按照列表的顺序绘制,列表中的最后一个可绘制对象绘于顶部。每个可绘制对象由单一元素内的元素表示。我们需要注意的是layer-list中有item的先后顺序会影响展示效果,不同顺序的效果可能大相径庭,因为,后面的item总是在之前的item之上并覆盖显示;
2.1layer-list文件结构
<layer-list
    xmlns:android="http://schemas.android.com/apk/res/android" >
    <item />
</layer-list>
2.1<layer-list>标签下属性说明
<layer-list xmlns:android="http://schemas.android.com/apk/res/android" >
属性说明
<!-- 必备。这必须是根元素。包含一个或多个 <item> 元素。 xmlns:android:字符串。必备。定义 XML 命名空间,其必须是 "http://schemas.android.com/apk/res/android"。 -->
2.2<item>标签下属性说明
<item
? ? ? ? android:drawable="@[package:]drawable/drawable_resource"
? ? ? ? android:id="@[+][package:]id/resource_name"
? ? ? ? android:top="dimension"
? ? ? ? android:right="dimension"
? ? ? ? android:bottom="dimension"
? ? ? ? android:left="dimension" />
属性说明
?<!--
? ? 定义要放在图层可绘制对象中由其属性定义的位置的可绘制对象。必须是 <selector> 元素的子项。接受子 <bitmap> 元素。
? ? android:drawable:可绘制对象资源。必备。引用可绘制对象资源。
? ? android:id:资源 ID。此可绘制对象的唯一资源 ID。要为此项新建资源 ID,请使用以下形式:"@+id/name"。加号表示应创建为新 ID。可以使用此 ID 检索和修改具有 View.findViewById() 或 Activity.findViewById() 的可绘制对象。
? ? android:top:整型。顶部偏移(像素)。
? ? android:right:整型。右边偏移(像素)。
? ? android:bottom:整型。底部偏移(像素)。
? ? android:left:整型。左边偏移(像素)。
? ? -->
在xml文件实现layer-list和用Java代码实现大同小异,他们命名规则都是相对应的,可以参考官方API文档,Drawable resources ?|? Android Developers,layer-list标签对应的LayerDrawable类;
3.选择器selector
根据控件不同的状态显示不同的背景;
selector顾名思义就是选择器的意思,我们在平时开发的中,应用的频率也很高,该文件是一个xml文件,并放在drawable文件夹下如res/drawable/filename.xml,那么引用方式也很简单,我们一般在控件的background使用,如android:background="@drawable/filename";
3.1selector文件结构
<?xml version="1.0" encoding="utf-8"?>
<selector xmlns:android="http://schemas.android.com/apk/res/android" >
? ? <item />
</selector>
3.1<selector>标签下属性说明
?<selector xmlns:android="http://schemas.android.com/apk/res/android" >
属性说明
<!-- 必备。这必须是根元素。包含一个或多个 <item> 元素。 xmlns:android:字符串。必备。定义 XML 命名空间,其必须是 "http://schemas.android.com/apk/res/android"。 -->
3.2<item>标签下属性说明
<item
? ? ? ? android:drawable="@[package:]drawable/drawable_resource"
? ? ? ? android:state_pressed=["true" | "false"]
? ? ? ? android:state_focused=["true" | "false"]
? ? ? ? android:state_hovered=["true" | "false"]
? ? ? ? android:state_selected=["true" | "false"]
? ? ? ? android:state_checkable=["true" | "false"]
? ? ? ? android:state_checked=["true" | "false"]
? ? ? ? android:state_enabled=["true" | "false"]
? ? ? ? android:state_activated=["true" | "false"]
? ? ? ? android:state_window_focused=["true" | "false"] />
属性说明
<!--
android:drawable:可绘制对象资源。必备。引用可绘制对象资源。
android:state_selected 是否选中 android:state_focused 是否获得焦点 android:state_pressed 是否按压
android:state_enabled 是否设置是否响应事件,指所有事件
...
?-->
在xml文件实现selector和用Java代码实现大同小异,他们命名规则都是相对应的,可以参考官方API文档,Drawable resources ?|? Android Developers,selector标签对应的StateListDrawable类;
4.shape,layer-list,selector使用实践
<?xml version="1.0" encoding="utf-8"?>
<!--选择器-->
<selector xmlns:android="http://schemas.android.com/apk/res/android">
    <!--按下状态显示样式-->
    <item android:state_pressed="true">
        <!--分层-->
        <layer-list>
            <!--分层 第一层-->
            <item android:bottom="8dp">
                <shape>
                    <solid android:color="#ffaaaaaa" />
                </shape>
            </item>
            <!--分层 第二层-->
            <item>
                <shape>
                    <corners android:bottomLeftRadius="4dp"
                        android:bottomRightRadius="4dp"
                        android:topLeftRadius="1dp"
                        android:topRightRadius="1dp" />
                    <solid android:color="#ffaaaaaa" />
                    <padding android:bottom="1dp"
                        android:left="1dp"
                        android:right="1dp"
                        android:top="0dp" />
               </shape>
            </item>
            <!--分层 第三层-->
            <item>
                <shape>
                    <corners android:bottomLeftRadius="3dp"
                        android:bottomRightRadius="3dp"
                        android:topLeftRadius="1dp"
                        android:topRightRadius="1dp" />
                    <solid android:color="@android:color/holo_green_light" />
                </shape>
            </item>
        </layer-list>
    </item>
    <!--正常状态显示样式-->
    <item>
        <layer-list>
            <item android:bottom="8dp">
                <shape>
                    <solid android:color="#ffaaaaaa" />
                </shape>
            </item>
            <item>
                <shape>
                    <corners android:bottomLeftRadius="4dp"
                        android:bottomRightRadius="4dp"
                        android:topLeftRadius="1dp"
                        android:topRightRadius="1dp" />

                    <solid android:color="#ffaaaaaa" />

                    <padding android:bottom="1dp"
                        android:left="1dp"
                        android:right="1dp" android:top="0dp" />
                </shape>
            </item>
            <item>
                <shape>
                    <corners android:bottomLeftRadius="3dp"
                        android:bottomRightRadius="3dp"
                        android:topLeftRadius="1dp" android:topRightRadius="1dp" />
                    <solid android:color="@android:color/holo_blue_light" />
                </shape>
            </item>
        </layer-list>
    </item>
</selector>
4.1shape使用示例

矩形实线边框-内填充(rect_solid_border.xml)
<!--矩形实线边框-内填充-->
<shape xmlns:android="http://schemas.android.com/apk/res/android"
    android:shape="rectangle">
    <stroke android:color="@android:color/holo_red_dark"
        android:width="2dp"/>
    <solid android:color="@android:color/holo_blue_light" />
</shape>
?矩形虚线边框-内填充(rect_dashed_border.xml)
<?xml version="1.0" encoding="utf-8"?>
<!--矩形虚线边框-内填充-->
<shape
    xmlns:android="http://schemas.android.com/apk/res/android"
    android:shape="rectangle">
    <stroke android:color="@android:color/holo_red_light"
        android:width="2dp"
        android:dashGap="5dp"
        android:dashWidth="10dp"/>
    <solid android:color="@android:color/holo_green_light"/>
</shape>
圆角矩形-有边框有填充(rect_rounded_border_and_fill.xml)
<!--圆角矩形-有边框有填充-->
<shape
    xmlns:android="http://schemas.android.com/apk/res/android"
    android:shape="rectangle">
    <stroke android:width="2dp" android:color="@android:color/holo_red_light" />
    <solid android:color="@color/purple_200" />
    <corners android:topLeftRadius="15dp"
        android:topRightRadius="15dp"
        android:bottomLeftRadius="15dp"
        android:bottomRightRadius="15dp" />
</shape>
矩形圆角+左右两边为一个圆弧(rect_rounded_top_bottom_arc.xml)
<?xml version="1.0" encoding="utf-8"?>
<!-- 矩形圆角+左右两边为一个圆弧 -->
<shape xmlns:android="http://schemas.android.com/apk/res/android">
    <size android:width="20dp"
        android:height="60dp" />
    <solid android:color="#8000ff00" />
    <!-- 圆角半径是高度的一般就是一个圆弧了 -->
    <corners android:radius="20dp" />
</shape>
??????矩形内部填充-扫描渐变(rect_gradient_sweep.xml)
<?xml version="1.0" encoding="utf-8"?>
<!-- 矩形内部填充-扫描渐变 -->
<shape
    xmlns:android="http://schemas.android.com/apk/res/android"
    android:shape="rectangle"
    android:useLevel="true">
    <!--如果布局中没有设置View的大小,会size设置的大小为默认值-->
    <size
        android:width="20dp"
        android:height="20dp" />

    <stroke
        android:width="1px"
        android:color="#ffff00ff" />

    <!--调整angle不能实现角度变化
        centerX,centerY是中心点的位置,这里用的是百分比值(0-1)
        在rect中gradientRadius无效-->
    <gradient
        android:angle="0"
        android:centerX="0.5"
        android:centerY="0.5"
        android:startColor="#ff00ff00"
        android:gradientRadius="20dp"
        android:type="sweep" />
</shape>
圆环-仅有边框(ring_border.xml)
<?xml version="1.0" encoding="utf-8"?>
<!-- 圆环-仅有边框 -->
<shape
    xmlns:android="http://schemas.android.com/apk/res/android"
    android:shape="ring"
    android:innerRadius="20dp"
    android:thickness="16dp"
    android:useLevel="false">
    <!--android:useLevel="false"必须是false-->
    <size
        android:width="80dp"
        android:height="80dp" />
    <stroke
        android:width="3dp"
        android:color="#ffff00ff" />
</shape>
5.总结
- 控件把<shape>标签做为背景对应是GradientDrawable类,不是ShapeDrawable;
- GradientDrawable可以通过Java代码实现和<shape>标签一样的定义;
- DrawableInflater负责解析相应的shape,scale等相关xml文件配置,解析成相应的类;
参考:
Drawable resources ?|? Android Developers
Android XML shape 标签使用详解(apk瘦身,减少内存好帮手) - popfisher - 博客园
Android GradientDrawable(shape标签定义) 静态使用和动态使用(圆角,渐变实现) - popfisher - 博客园
Android开发:shape和selector和layer-list的(详细说明)_陈三哥的博客-CSDN博客_android layer-list?????
安卓中常用的shape,selector,layer-list - 可乐鸭头 - 博客园
Android View — Gradient 渐变 - 简书
Android的ShapeDrawable和GradientDrawable源码解析 - 菜鸟学院
Android可绘制对象资源之shape和layer-list使用_Code4Android-CSDN博客
?