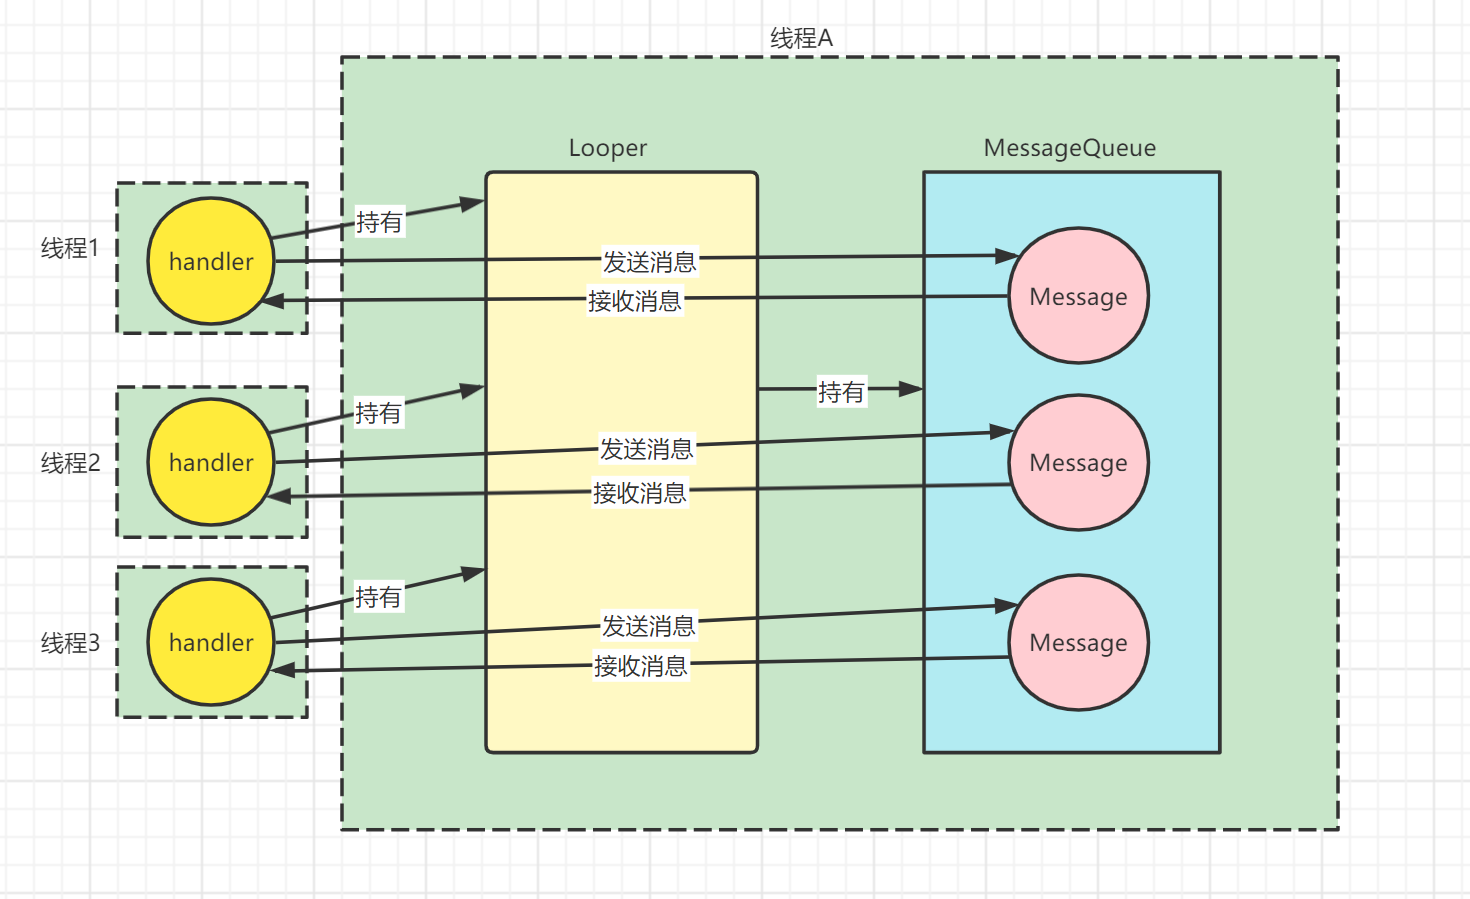
说到Handler,绝大多数人都知道,它就是一个死循环,不断的遍历消息队列,通过handler将消息入队,循环中有消息就取出来消费掉,以实现线程间的通信。
说个题外话,记得有一次面试,面试官问我线程间怎么通信?我当时就很疑惑,线程间本来就是资源共享的,谈何怎么通信,调用线程的方法或者改变线程的变量值就可以实现通信了,只不过需要自己做一些线程同步的处理。对我们来说,Hanlder机制只是安卓SDK封装了一个线程通信的工具罢了,它通过生产者消费者模式处理了多线程同步,当然了它封装的功能很强大
网上关于Handler的源码分析已经有很多了,自己看了源码后,也想做个总结,今天利用时序图和流程图来做一个简单分析,尽量使用简洁易懂的方式来帮助理解
一、Handler源码分析
1.Looper创建及启动轮询
Java程序的入口为main函数,每个App都是一个单独的Java程序,App启动流程涉及到底层dalvik/art虚拟机的fork进程,跨进程通信等,暂不深入探究。如果想要程序一直运行,那么main函数不能结束执行,还记得之前的Java--线程文章么,对于底层OS而言,main函数是一个进程也是线程,也就是我们常说的主线程
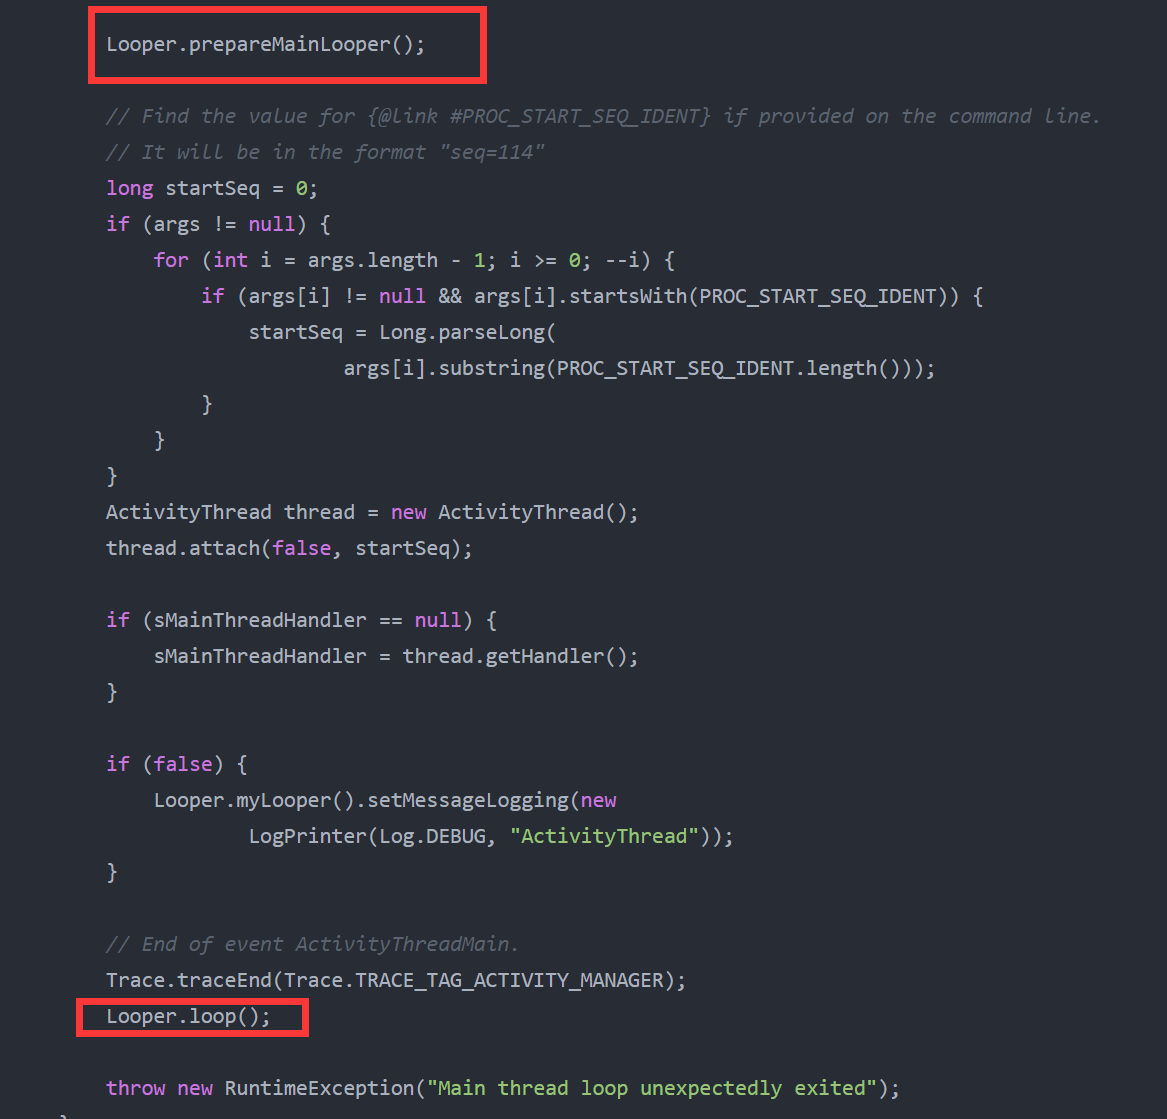
安卓中主线程的入口位于ActivityThread类中的main函数,代码如下,过下即可:
public static void main(String[] args) {
        Trace.traceBegin(Trace.TRACE_TAG_ACTIVITY_MANAGER, "ActivityThreadMain");

        // Install selective syscall interception
        AndroidOs.install();

        // CloseGuard defaults to true and can be quite spammy.  We
        // disable it here, but selectively enable it later (via
        // StrictMode) on debug builds, but using DropBox, not logs.
        CloseGuard.setEnabled(false);

        Environment.initForCurrentUser();

        // Make sure TrustedCertificateStore looks in the right place for CA certificates
        final File configDir = Environment.getUserConfigDirectory(UserHandle.myUserId());
        TrustedCertificateStore.setDefaultUserDirectory(configDir);

        // Call per-process mainline module initialization.
        initializeMainlineModules();

        Process.setArgV0("<pre-initialized>");

        Looper.prepareMainLooper();

        // Find the value for {@link #PROC_START_SEQ_IDENT} if provided on the command line.
        // It will be in the format "seq=114"
        long startSeq = 0;
        if (args != null) {
            for (int i = args.length - 1; i >= 0; --i) {
                if (args[i] != null && args[i].startsWith(PROC_START_SEQ_IDENT)) {
                    startSeq = Long.parseLong(
                            args[i].substring(PROC_START_SEQ_IDENT.length()));
                }
            }
        }
        ActivityThread thread = new ActivityThread();
        thread.attach(false, startSeq);

        if (sMainThreadHandler == null) {
            sMainThreadHandler = thread.getHandler();
        }

        if (false) {
            Looper.myLooper().setMessageLogging(new
                    LogPrinter(Log.DEBUG, "ActivityThread"));
        }

        // End of event ActivityThreadMain.
        Trace.traceEnd(Trace.TRACE_TAG_ACTIVITY_MANAGER);
        Looper.loop();

        throw new RuntimeException("Main thread loop unexpectedly exited");
}main函数中,我们需要关心的只有下面的两个方法:

1.1 Looper.prepareMainLooper方法
main函数中调用Looper.prepareMainLooper方法,做了一些初始化操作:
public static void prepareMainLooper() {
        //初始化操作
        prepare(false);
        ...
}prepareMainLooper方法又调用了prepare方法,其中比较核心的是使用ThreadLocal,保存当前线程的Looper,并在Looper的私有构造方法中,实例化了消息队列:
static final ThreadLocal<Looper> sThreadLocal = new ThreadLocal<Looper>();

    private static void prepare(boolean quitAllowed) {
        //如果一个线程中调用两次prepare,抛出异常
        if (sThreadLocal.get() != null) {
            throw new RuntimeException("Only one Looper may be created per thread");
        }
        //将Looper存入ThreadLocal
        sThreadLocal.set(new Looper(quitAllowed));
    }

    private Looper(boolean quitAllowed) {
        mQueue = new MessageQueue(quitAllowed);
        mThread = Thread.currentThread();
}关于ThreadLocal,Looper中方法基本都是静态的,ThreadLocal对象也是静态的,静态对象本该是线程间共享的,但ThreadLocal内部对线程进行了区分,其set方法可以根据当前线程来存放当前线程的私有工作内存,相应的get方法是获取当前线程存放的私有工作内存,这里相当于将线程和Looper进行了一对一关系的绑定,以便在线程中调用获取当前线程的Looper
我们通过Looper.myLooper方法就可以获取到调用该方法时运行的线程的Looper,主要提供给Looper的loop方法和Handler的空构造方法使用,后续分析中可以看到该方法的调用:
public static @Nullable Looper myLooper() {
        return sThreadLocal.get();
    }
1.1 Looper.loop方法
为了使main函数一直执行,Looper.loop方法会一直轮询,我们查看它的具体代码实现,由于代码太多,我做了简化:
public static void loop() {
        //获取当前线程的Looper
        final Looper me = myLooper();
     ...
        final MessageQueue queue = me.mQueue;
     ...
        for (;;) {
            //阻塞获取Message
            Message msg = queue.next(); // might block
            if (msg == null) {
                // No message indicates that the message queue is quitting.
                return;
            }

      ...
            try {
                //分发消息
                msg.target.dispatchMessage(msg);
                ...
            } catch (Exception exception) {
                ...
                throw exception;
            } finally {
                ...
            }
          ...
        }
}其中queue为MessageQueue对象,即调用了MessageQueue的next方法,next方法的实现也是个轮询,一旦MessageQueue中有消息了并且没有延迟执行,那么返回该队列头的Message给Looper:
//类似链表的头节点
    Message mMessages;

    Message next() {
        ...
        // 轮询获取Message
        for (;;) {
            ...
            synchronized (this) {
                ...
                Message prevMsg = null;
                Message msg = mMessages;
                ...
                if (msg != null) {
                    if (now < msg.when) {
                        // Next message is not ready.  Set a timeout to wake up when it is ready.
                        nextPollTimeoutMillis = (int) Math.min(msg.when - now, Integer.MAX_VALUE);
                    } else {
                        // Got a message.
                        mBlocked = false;
                        if (prevMsg != null) {
                            prevMsg.next = msg.next;
                        } else {
                            mMessages = msg.next;
                        }
                        msg.next = null;
                        if (DEBUG) Log.v(TAG, "Returning message: " + msg);
                        msg.markInUse();
                        // 获取到后,将Message返回
                        return msg;
                    }
                } else {
                    // No more messages.
                    nextPollTimeoutMillis = -1;
                }

                // Looper准备退出了
                // Process the quit message now that all pending messages have been handled.
                if (mQuitting) {
                    dispose();
                    return null;
                }

                ....
            }

            ...
        }
}Looper.loop方法中的msg.target.dispatchMessage(msg)我们回头再来看
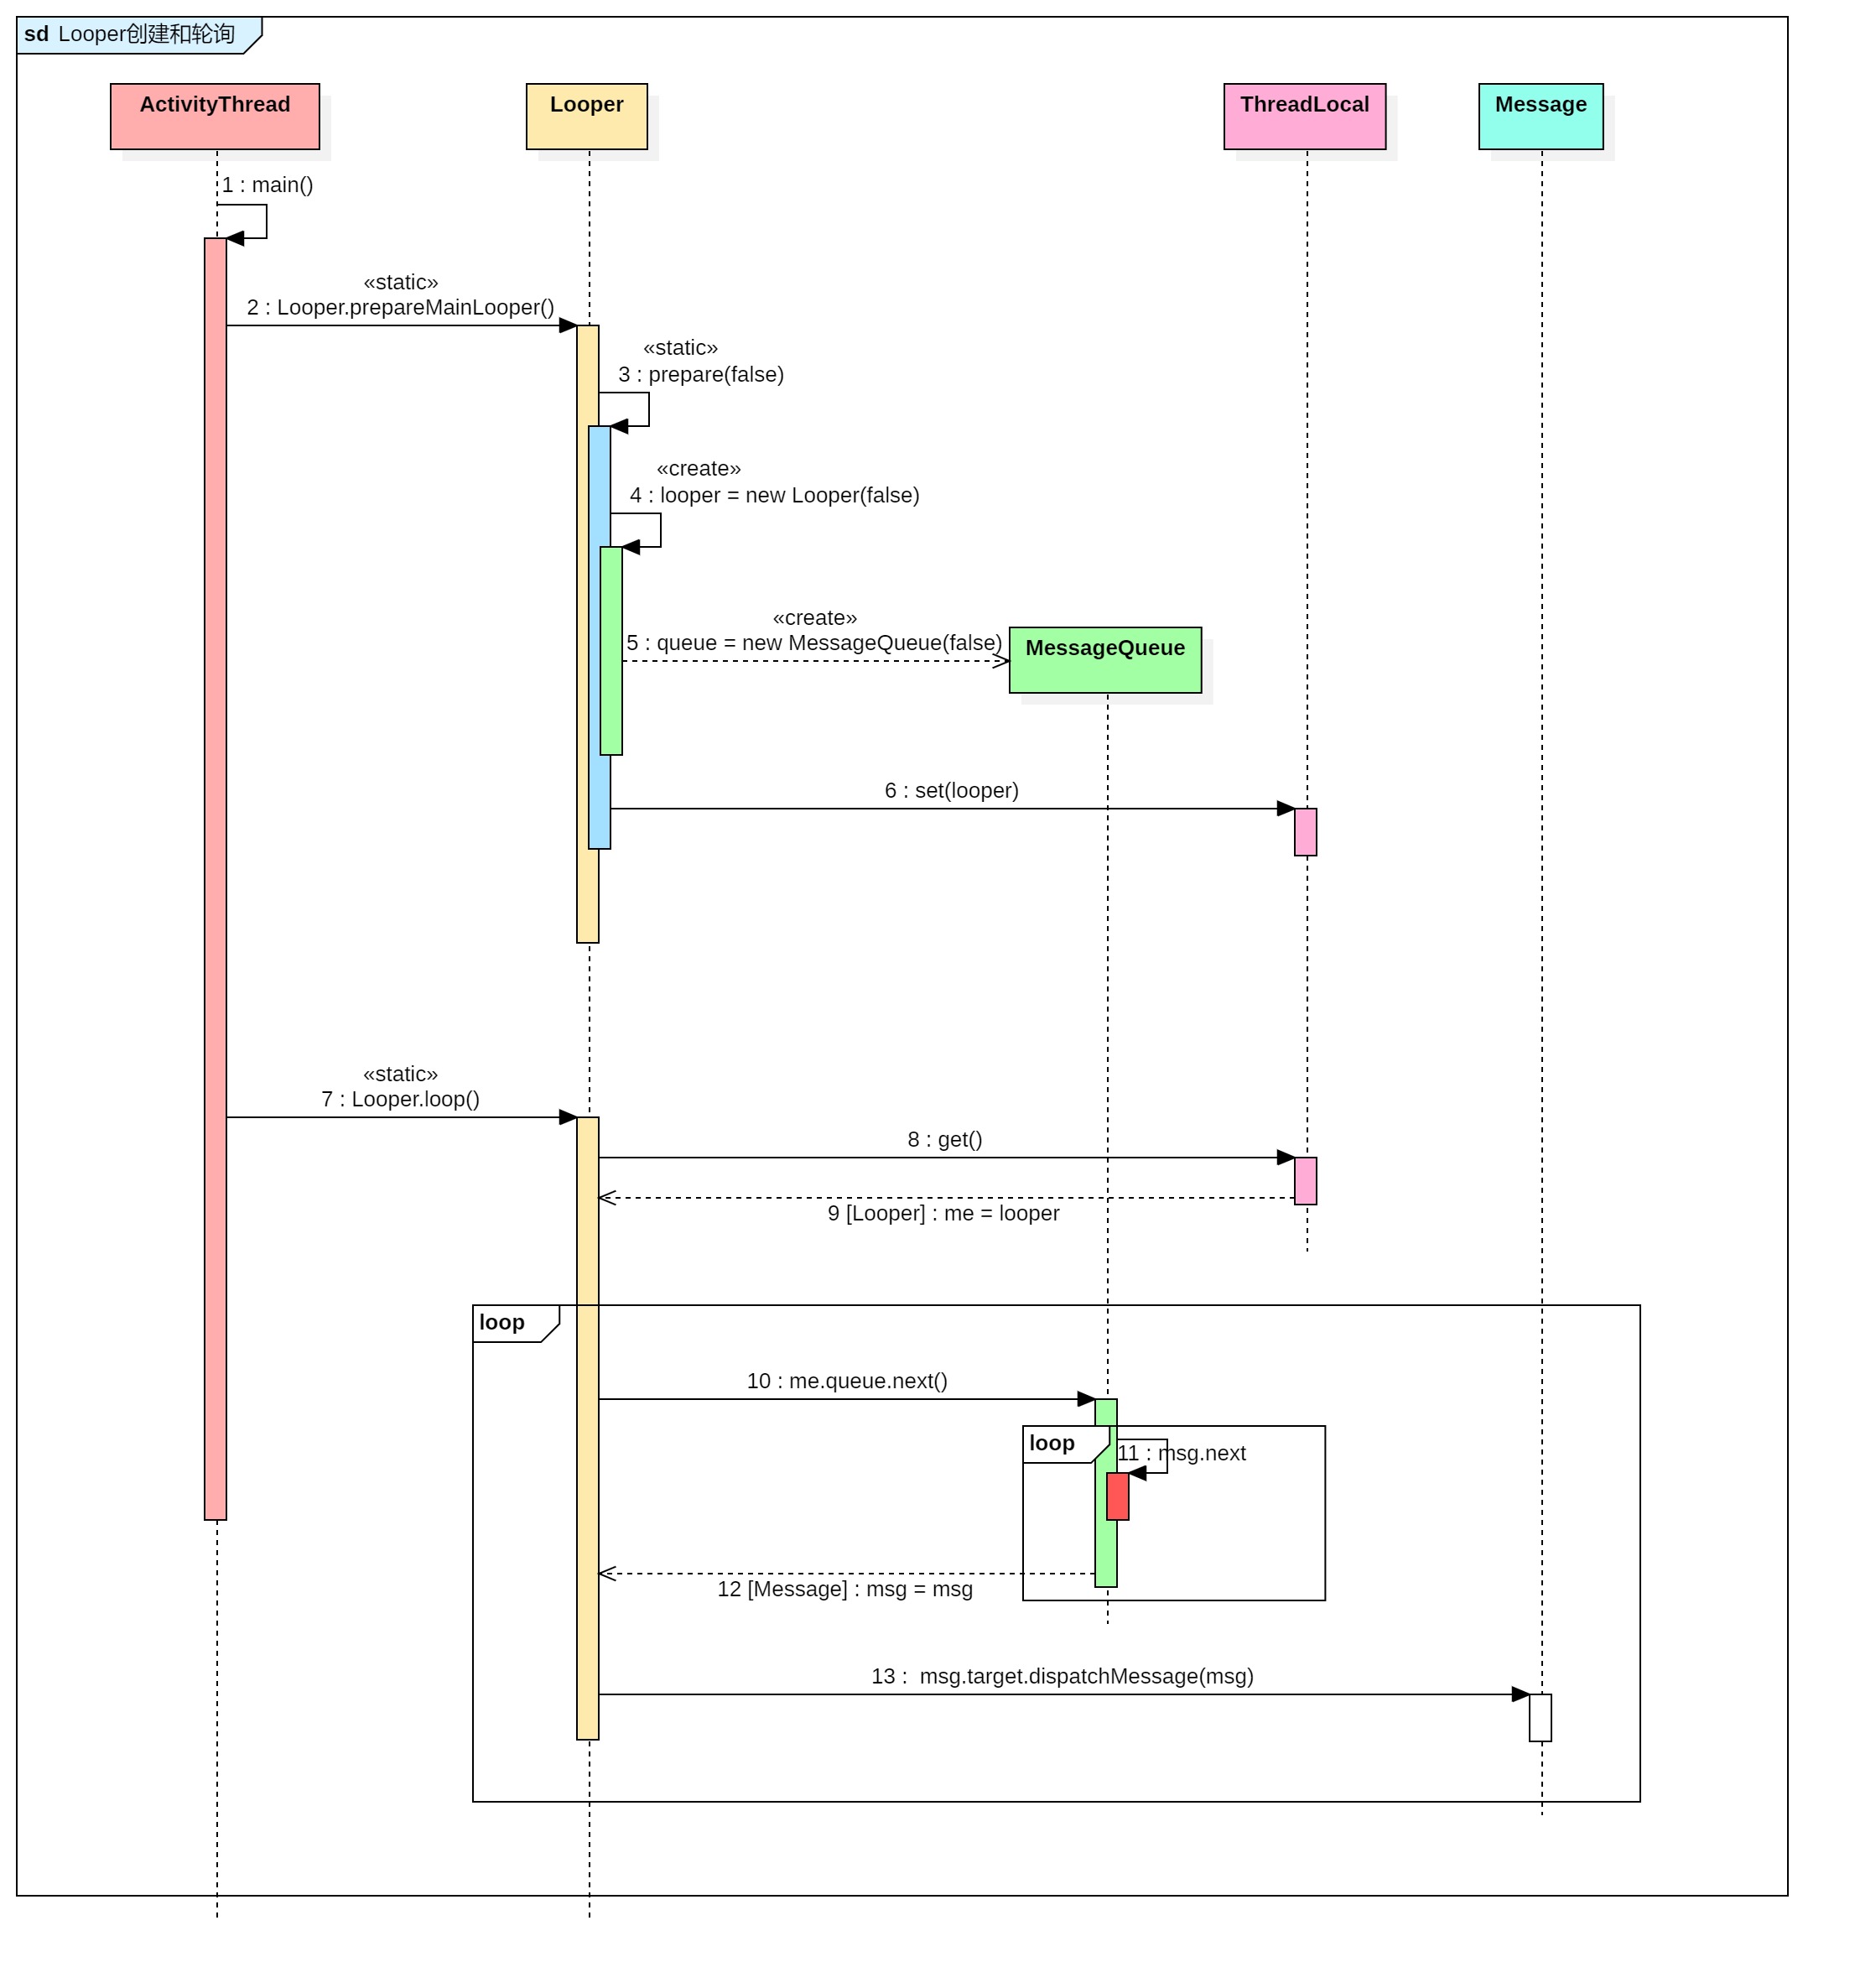
1.3 Looper创建和轮询的时序图
如果你对上面的流程还有不清楚的地方,可以配合时序图来方便理解,或者直接看时序图

流程总结:
1.主线程调用Looper.prepareMainLooper(),最终实例化了Looper对象,构造时又实例化了成员变量MessageQueue,并使用ThreadLocal将Looper和当前线程绑定
2.主线程调用Looper.loop()方法,从ThreadLocal中获取当前线程的Looper,开启轮询,不断从MessageQueue获取Message,获取后调用 msg.target.dispatchMessage(msg),往复轮询操作
2.Handler发送消息与接收消息
我们常常会在Activity中定义一个Handler成员变量(实际上不推荐直接new Handler(),容易内存泄漏),并重写handleMessage方法来接收消息,接下来分析Handler源码
2.1 Handler空构造
空构造函数如下,Activity中是主线程,所以 Looper.myLooper()返回的就是主线程创建的Looper:
@Deprecated
    public Handler() {
        this(null, false);
    }

    public Handler(@Nullable Callback callback, boolean async) {
        if (FIND_POTENTIAL_LEAKS) {
            final Class<? extends Handler> klass = getClass();
            if ((klass.isAnonymousClass() || klass.isMemberClass() || klass.isLocalClass()) &&
                    (klass.getModifiers() & Modifier.STATIC) == 0) {
                Log.w(TAG, "The following Handler class should be static or leaks might occur: " +
                    klass.getCanonicalName());
            }
        }

        mLooper = Looper.myLooper();
        if (mLooper == null) {
            throw new RuntimeException(
                "Can't create handler inside thread " + Thread.currentThread()
                        + " that has not called Looper.prepare()");
        }
        mQueue = mLooper.mQueue;
        mCallback = callback;
        mAsynchronous = async;
    }
2.2 消息入队
MessageQueue也是主线程的消息队列,当别的线程操作这个handler时,就可以把消息往这个MessageQueue中入队,而主线程Looper在不断的轮询这个消息队列
Handler的sendMessage方法的调用链如下:
public final boolean sendMessage(@NonNull Message msg) {
        return sendMessageDelayed(msg, 0);
    }

    public final boolean sendMessageDelayed(@NonNull Message msg, long delayMillis) {
        if (delayMillis < 0) {
            delayMillis = 0;
        }
        return sendMessageAtTime(msg, SystemClock.uptimeMillis() + delayMillis);
    }

    public boolean sendMessageAtTime(@NonNull Message msg, long uptimeMillis) {
        MessageQueue queue = mQueue;
        if (queue == null) {
            RuntimeException e = new RuntimeException(
                    this + " sendMessageAtTime() called with no mQueue");
            Log.w("Looper", e.getMessage(), e);
            return false;
        }
        return enqueueMessage(queue, msg, uptimeMillis);
}我们重点关注enqueueMessage方法,其中将Message的target设置成了当前Handler自己,最后将该msg入队MessageQueue :
private boolean enqueueMessage(@NonNull MessageQueue queue, @NonNull Message msg,
            long uptimeMillis) {
        //将target设置为当前Handler
        msg.target = this;
        msg.workSourceUid = ThreadLocalWorkSource.getUid();

        if (mAsynchronous) {
            msg.setAsynchronous(true);
        }
        return queue.enqueueMessage(msg, uptimeMillis);
    }
至此,就和Looper.loop方法关联起来了,Looper.loop方法最终调用了 msg.target.dispatchMessage(msg),就是调用了Handler的dispatchMessage方法
2.3 Handler dispatchMessage方法handleMessage方法
dispatchMessage方法只是做了转发,最终调用了handleMessage方法,而我们正是重写了该方法
public void dispatchMessage(@NonNull Message msg) {
        if (msg.callback != null) {
            handleCallback(msg);
        } else {
            if (mCallback != null) {
                if (mCallback.handleMessage(msg)) {
                    return;
                }
            }
            handleMessage(msg);
        }
    }
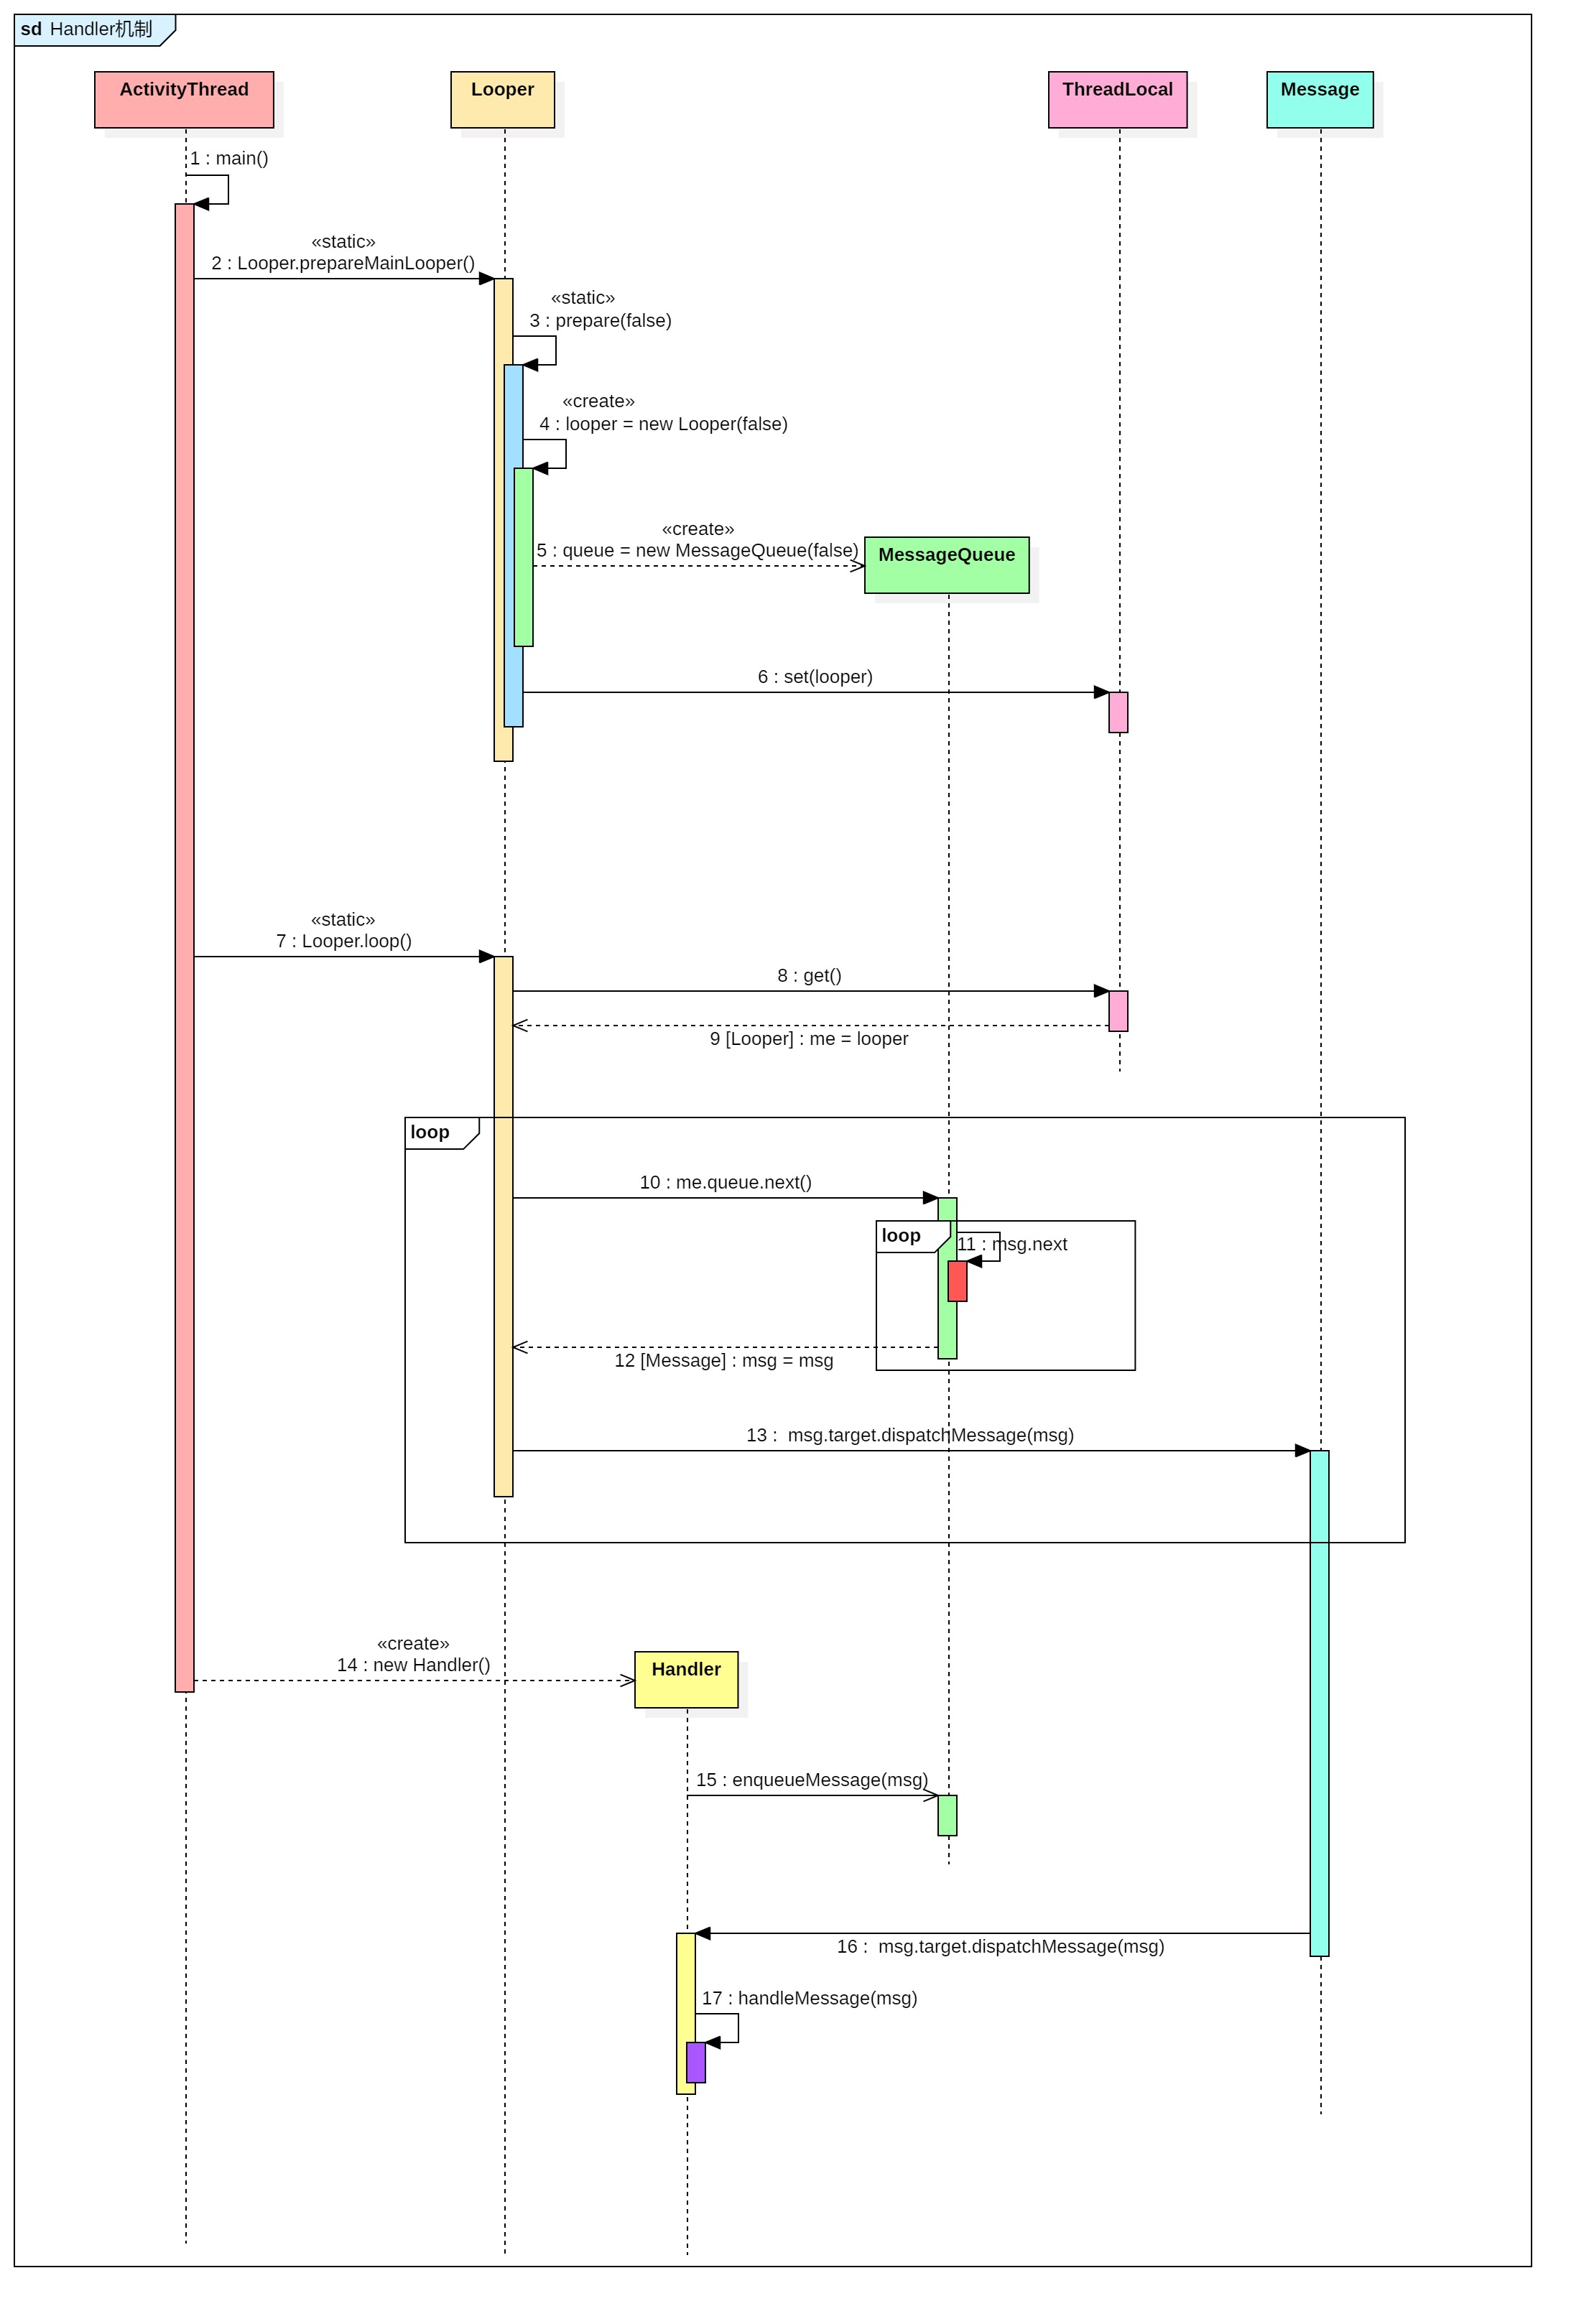
2.4 Handler发送消息与接收消息时序图
在上面的时序图中,增加Handler发送和接收消息,有些调用链就简略掉了:

我们目前只争对主线程进行了分析,但不难理解的是, Handler机制除了主线程外,也可以作为其他线程消息通信的工具,只需要在其他的线程中实例化新的Looper,并且创建对应Looper的Handler就可以实现非主线程的消息通信,十分便利。这套架构的精髓是handler即作为被观察者,又作为观察者

二、手写Handler机制
有了上面的基础后,简单的手写一个Handler机制
1.定义Message类
/**
 * Created by aruba on 2021/11/13.
 */
class Message implements Comparable<Message> {
    public int what;
    public Object msg;
    protected Handler target;
    public int when;

    public Message() {
    }

    public Message(int what, Object msg) {
        this.what = what;
        this.msg = msg;
    }

    @Override
    public int compareTo(Message message) {
        return when - message.when - 1;
    }
}
2.定义Looper
import java.util.PriorityQueue;

/**
 * Created by aruba on 2021/11/13.
 */
public class Looper {
    PriorityQueue<Message> messageQueue;
    static ThreadLocal<Looper> mThreadLocal = new ThreadLocal<>();
    boolean quited = false;

    private Looper() {
        messageQueue = new PriorityQueue<>();
    }

    /**
     * 实例化当前线程Looper
     */
    public synchronized static void prepare() {
        if (mThreadLocal.get() != null) throw new RuntimeException("looper has created");
        mThreadLocal.set(new Looper());
    }

    /**
     * 线程轮询
     */
    public static void loop() {
        //获取当前线程的looper
        Looper looper = mThreadLocal.get();
        if (looper == null) throw new RuntimeException("looper has not created");

        PriorityQueue<Message> queue = looper.messageQueue;
        while (true) {
            synchronized (looper) {
                Message top = queue.poll();
                if (top != null) {//调用handler的handleMessage方法
                    top.target.handleMessage(top);
                }
            }

            if (looper.quited) {//退出
                break;
            }
        }
    }

    /**
     * 消息入队
     *
     * @param msg
     */
    public synchronized void enqueueMessage(Message msg) {
        messageQueue.offer(msg);
    }

    public void quite() {
        quited = true;
        mThreadLocal.remove();
    }
}
3.定义Handler
/**
 * Created by aruba on 2021/11/13.
 */
public class Handler {
    final Looper mLooper;

    public Handler(Looper mLooper) {
        this.mLooper = mLooper;
    }

    public Handler() {
        mLooper = Looper.mThreadLocal.get();
    }

    public void enqueueMessage(Message msg) {
        msg.target = this;
        synchronized (mLooper) {
            mLooper.enqueueMessage(msg);
        }
    }

    public void handleMessage(Message msg) {

    }

}
4.测试方法:
public class TestHanlder {
    public static void main(String[] args) {
        Looper.prepare();

        final Handler handler = new Handler() {
            @Override
            public void handleMessage(Message msg) {
                super.handleMessage(msg);
                System.out.println("what:" + msg.what + " msg:" + msg.msg);
            }
        };

        new Thread(new Runnable() {
            @Override
            public void run() {
                for (int i = 0; i < 10; i++) {
                    handler.enqueueMessage(new Message(i, "hello"));
                }
            }
        }).start();

        Looper.loop();
    }
}
结果:
what:0 msg:hello
what:1 msg:hello
what:2 msg:hello
what:3 msg:hello
what:4 msg:hello
what:5 msg:hello
what:6 msg:hello
what:7 msg:hello
what:8 msg:hello
what:9 msg:hello
Process finished with exit code -1