Konlin注解处理器——简易版ButterKnife实现
1. ButterKnife简介
ButterKnife是一个专注于Android系统的View注入框架,它通过在编译期生成class文件,为开发者自动完成findViewById方法的调用,对注解的View进行实例绑定。
ButterKnife最基本的使用方法分为4步:
1.在build.gradle中添加依赖
	//Java中使用注解处理器不需要添加这个插件
	//kotlin中使用注解处理器需要添加这个插件,否则只能识别java的注解,不能识别kotlin的注解
	//kapt插件能够同时识别kotlin注解和java注解
	apply plugin: 'kotlin-kapt'
	implementation 'com.jakewharton:butterknife:10.1.0'
	//kotlin中,添加注解处理器的依赖写法用annotationProcessor
	//annotationProcessor 'com.jakewharton:butterknife-compiler:10.1.0'
	//kotlin中,添加注解处理器的依赖写法用kapt
	kapt 'com.jakewharton:butterknife-compiler:10.1.0'
2.对Activity中的View添加@BindView注解。
    @BindView(R.id.tv)
    lateinit var tv: TextView
3.在Activity的onCreate方法中调用setContentView之后,调用ButterKnife.bind(this)对所有的添加了注解的View进行实例绑定。
    override fun onCreate(savedInstanceState: Bundle?) {
        super.onCreate(savedInstanceState)
        setContentView(R.layout.activity_recycler_view)
        ButterKnife.bind(this)
    }
4.在Activity中无需调用findViewById方法对View进行赋值,即可直接使用。
tv.text = "Hello World!!!"
本文要实现的功能就是这样一个最基础的简易版ButterKnife。
2. 正文前的说明
- Kotlin提供的
kotlin-android-extensions插件已经提供了很方便的View自动绑定功能,所以使用Kotlin时是没必要使用ButterKnife的(个人观点)。 - 本文的目的是介绍和记录在kotlin中APT(Annotation Processing Tool,注解处理器)的使用方法,以及如何使用KotlinPoet自动生成kotlin代码,以及在这期间自己踩得一些坑,如果只关心代码实现,可以直接跳转到最后一章,或者查看源代码。
- 以下内容纯属个人见解结合网上资料完成。存在错误,实属正常,如有不足,欢迎指正。
3. 自动绑定View的原理
实现View的自动绑定需要3个类之间进行合作。
首先,Activity中提供带绑定的View,同时调用ButterKnife.bind(this)完成绑定。代码见ButterKnife简介中的第三代码段
其次,ButterKnife类中提供静态方法bind(activity:Activity)在该方法中通过反射实例化一个Binding类,同时传入activity作为实例化的参数,这个Binding类与具体传入的Activity类相关(即,一个Activity对应一个Binding类,Binding类的命名规则:ButterKnife_**_Binding,**为Activity的类名)。具体代码如下:
class ButterKnife {
    companion object {
        fun bind(activity: Activity) {
        	//Binding类的类名由具体的Activity的类名确定
            val clazzName = "${activity.javaClass.`package`.name}.ButterKnife_${activity.javaClass.simpleName}_Binding"
            val clazz = Class.forName(clazzName)
            val constructor = clazz.getConstructor(activity.javaClass)
            constructor.newInstance(activity)
        }
    }
}
最后,在Binding类的构造方法中利用activity实例调用findViewById()方法进行View的绑定。具体代码如下:
public class ButterKnife_MainActivity_Binding() {
  public constructor(activity: MainActivity) : this() {
    activity.tv=activity.findViewById(2131230814)
  }
}
说明:
- 为什么ButterKnife的
bind()方法要用反射?因为每个Activity都有自己的Binding类,两者之间只有类名相关,反射调用Binding类的构造方法,在构造方法对View进行赋值,可以为所有的Activity提供统一的绑定View的方式。- 反射不消耗性能么?事实上只是通过反射调用构造方法,并没有反射遍历所有属性并分析注解这种耗时操作,和虚拟机构造一个类的实例差不多。
- 每个Activity对应一个
Binding类,命名还有要求,写代码不是变复杂了?事实上,Binding类是APT工具在编译期使用KotlinPoet自动生成的。ButterKnife类只有一个,并且写在一个单独的Module里,所以在使用时只需要在Activity中对应的View上打注解,然后调用ButterKnife.bind(this)即可。@BindView注解的作用是什么?辅助APT生成对用的Binding类。- 其他注意事项:
View不能是private,且要声明为lateinit var,不然在Binding类中无法赋值。
4. APT的使用
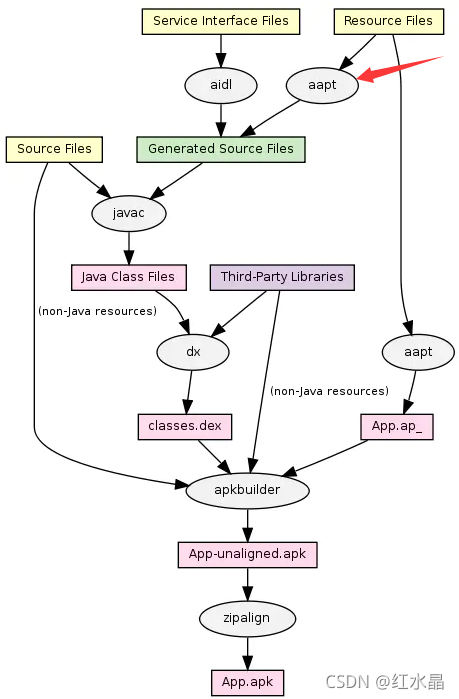
APT,即注解处理器。在Android中,使用gradle将源文件编译打包成Android的APK文件,事实上是执行了gradle插件中的一个个task,这些task负责完成不同的任务。下图(偷来的,点击查看原文)展示了Android的编译打包流程(缺少签名的过程),APT的工作与图中箭头所指的aapt类似(APT和aapt是两个东西),即APT会在task调用javac对源文件进行编译前被调用,根据APT的代码生成Generated Source Files,生成的代码会和其他的Source Files一起被javac编译成class文件,放进最终的apk中。

编写APT需要两个要素:注解和注解处理器,使用方法如下。
-
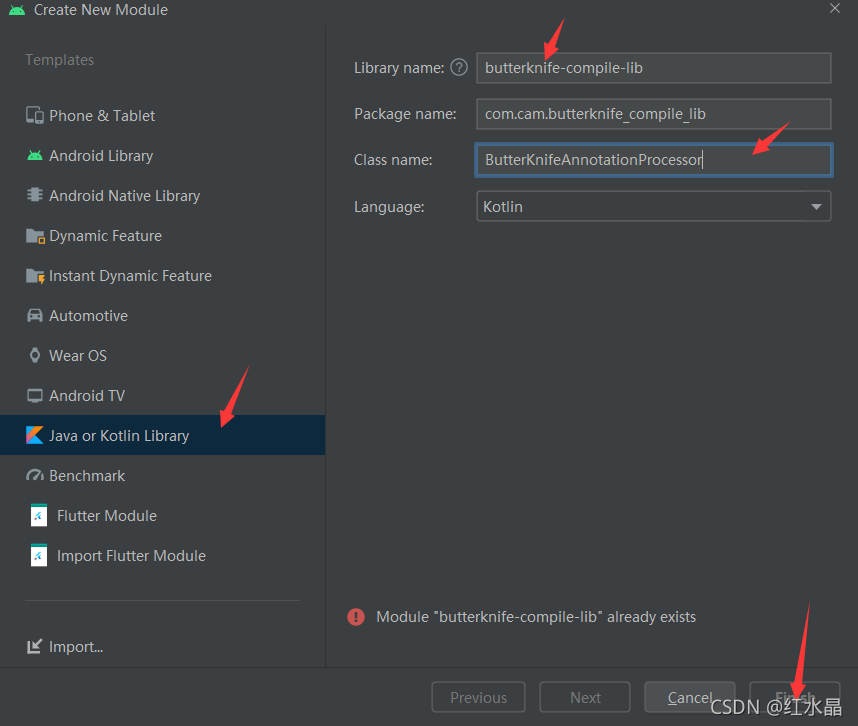
创建注解处理器对应的库:New->Module->Java or Kotlin Libray,填写库名和类名->Finish

说明:Module一定是Java or Kotlin Libiary,否则注解处理器无法生效。事实上,注解处理器确实不算Android Library,因为它是工作在编译期间的。库名和类名可以随意,但是后面会被用到。请忽略图中的报错,因为不想删库重新创建一遍。
-
在butterknife-annotation-lib/src/main目录下创建文件夹 resources/META-INF/services,并在services文件夹下创建文件javax.annotation.processing.Processor。这一步的每一个文件夹和文件的命名都是固定的,不能修改。最后在javax.annotation.processing.Processor文件中写注解处理器对应类的全限定名。本文中是:
com.cam.butterknife_compile_lib.ButterKnifeAnnotationProcessor


说明:此步配置是为了让gradle在编译前将注解处理器(
ButterKnifeAnnotationProcessor)识别出来并执行其中的代码。 -
创建注解类。步骤2类似,创建一个Java or Kotlin Libiary的模块,模块名随意,本文为
butterknife-annotation-lib。在模块中创建BindView注解。
BindView注解的代码为:@Retention(AnnotationRetention.SOURCE) @Target(AnnotationTarget.FIELD) annotation class BindView(val value:Int)说明:
@Retention(AnnotationRetention.SOURCE)说明注解只会存活在源码中,在编译阶段使用。@Target(AnnotationTarget.FIELD)说明注解使用在属性上的。value用来记录View的id。- 将
@BindView注解放在Java or Kotlin Libiary中,是因为注解处理器后面要读取这个注解,Activity也会使用这个注解,如果是Android的Module,注解处理器的类读取注解时会有问题。也可以将@BindView注解放在和注解处理器同一模块,但是那样Activity所在的模块添加依赖时就会很丑陋。
-
添加依赖。
在app模块的build.gradle添加对butterknife-compile-lib模块的依赖(注解处理器模块)、butterknife-annotation-lib模块的依赖(提供注解)、以及声明kapt插件。代码如下:plugins { id 'com.android.application' id 'kotlin-android' id 'kotlin-kapt' }dependencies { implementation project(path: ':butterknife-annotation-lib') kapt project(path: ':butterknife-compile-lib') }说明:注解处理器的依赖必须用
kapt,不能用annotationProcessor,否则无法识别打在Kotlin代码上的注解,只能识别打在Java代码上的注解。使用kapt插件,既能识别打在Java上的注解,也能识别打在Kotlin上的注解。butterknife-compile-lib模块添加对butterknife-annotation-lib模块的依赖,同时把Java的版本改成Java8(因为后面使用KotlinPoet对Java的版本有要求,不是Java8会报错)。为了方便,添加上KotlinPoet依赖(反正后面迟早要添加),代码如下:java { sourceCompatibility = JavaVersion.VERSION_1_8 targetCompatibility = JavaVersion.VERSION_1_8 } dependencies { implementation project(path: ':butterknife-annotation-lib') implementation "com.squareup:kotlinpoet:1.10.2" }最后把
butterknife-annotation-lib模块中的java版本也改成Java8,不改会怎样呢?没试过!懒得试!修改方法相同,不在赘诉。 -
修改注解处理器代码。编写步骤2中创建的
ButterKnifeAnnotationProcessor的代码,使其继承AbstractProcessor并重写其中的方法,代码如下。class ButterKnifeAnnotationProcessor : AbstractProcessor() { lateinit var filer: Filer override fun init(processingEnv: ProcessingEnvironment) { super.init(processingEnv) filer = processingEnv.filer } override fun getSupportedAnnotationTypes(): MutableSet<String> { println("getSupportedAnnotationTypes is running") val x = mutableSetOf(BindView::class.java.canonicalName) return x } override fun getSupportedSourceVersion(): SourceVersion { return SourceVersion.latestSupported() } override fun process(p0: MutableSet<out TypeElement>?, p1: RoundEnvironment?): Boolean { if (p0.isNullOrEmpty() || p1 == null) { return false } println("process is running........") return true } }说明:
init(processingEnv: ProcessingEnvironment)方法是注解处理器在初始化阶段调用的,代码中为filer成员变量赋值,是因为在生成代码时会用到Filer对象,获得Filer对象是常用操作(虽然此处示例并没有用到)。getSupportedAnnotationTypes()方法返回一个集合,集合中包含这个注解处理器包含的注解类对象。如果编译期间代码中没有包含这些注解,则process()方法不会被调用。getSupportedSourceVersion(),固定写法。process()用来处理注解信息的,是注解处理器的核心方法。该方法会被多次调用,因为注解处理器生成的代码 也可能 包含需要处理的注解,如果包含的话,process会被再次调用,此时会被用来处理生成代码上包含的注解。这也是RoundEnvironment命名由来,Round即回合。process()返回true,表明注解被当前注解处理器处理,返回false,表示注解处理器没有处理这个注解,这个注解可能会被其他注解处理器处理。p1 == null表示本回合没有需要处理的注解,返回即可。
-
在MainActivity的布局文件中,将HelloWorld的TextView设置id为tv,在MainActivity中声明控件并打上
@BingView注解,运行项目,运行结果如图所示。

说明:
- 图中1处红框说明,我们的注解处理器被当作gradle的task在执行,而且执行在其他的task之前。
- 图中2处红框说明,我们的注解处理器按预期执行并输出。
- MainActivity中的tv不能使用,因为还没有对其赋值
- 如果代码中没有使用
@BindView注解,则process()方法不会被执行 - 如果使用了annotationProcessor而没有使用kapt导入注解处理器的依赖,则打在Kotlin代码上的
@BindView注解不会触发process()方法,打在Java代码上的@BindView可以触发process()方法。(PS:卡了我一天的bug)
自此,注解处理器相关的内容基本结束,下面将讲诉如何进行代码生成。
5. KotlinPoet的使用
KotlinPoet是类似于JavaPoet的库,主要用于自动生成Kotlin代码,详细使用方法见KotlinPoet官网 。
本文针对KotlinPoet要讲的核心内容是:
KotlinPoet针对Kotlin提供了File级、Class级、Function级、Property级的Spec描述一个kotlin源文件,然后通过Builder模式进行组装。例如:一个描述类的Class级Spec,通过组装一个描述方法的Function级Spec向类中添加方法(包括普通成员方法和构造方法),通过组装描述属性的Property级Spec向类中添加属性,最后将这个Class级Spec组装进描述.kt文件的File级Spec中形成最终的Kotlin源文件。File级Spec提供了
write方法,可以将描述的 .kt文件写进输出流或者APT中的Filer中。
PS:本章以下代码是KotlinPoet的一个示例代码,示例代码与本章主要内容无关,纯粹是用来记录KotlinPoet的使用方法的,跳过不影响全文阅读。KotlinPoet需要添加的依赖见第4章
本章生成的源文件(文件名:KotlinPoem.kt)中包含一个接口(PoemPrinter),3个类(PoemMaker、Poem、KotlinPoem)和一个main方法,KotlinPoem实现了PoemPrinter接口,覆写了printPoem()方法,打印PoemMaker写的Poem(PoemMaker和Poem是KotlinPoem的成员变量),返回打印的字符数。示例包括了如何定义类、实现接口、定义属性、设置修饰符、编写构造方法、属性初始化、获得类名、生成源文件等。
示例代码:
//用于生成示例代码的KotlinPoet代码
package com.cam.ktl

import com.squareup.kotlinpoet.*
import java.io.File

private const val packageName = "com.cam.ktl"
private const val fileName = "KotlinPoem"
private val stringClassName = ClassName("kotlin", "String")
private val intClassName = ClassName("kotlin", "Int")


//class PoemMaker
fun getPoemMakerClass(): TypeSpec {
    val poemMakerConstructor = FunSpec.constructorBuilder()
        .addParameter("name", stringClassName)
        .addParameter("age", intClassName)
        .build()

    return TypeSpec.classBuilder("PoemMaker")
        .primaryConstructor(poemMakerConstructor)
        .addProperty(PropertySpec.builder("name", stringClassName).initializer("name").build())
        .addProperty(PropertySpec.builder("age", intClassName).initializer("age").build())
        .build()
}

//class Poem
fun getPoemClass(): TypeSpec {
    val poemMakerConstructor = FunSpec.constructorBuilder()
        .addParameter("title", stringClassName)
        .addParameter("content", stringClassName)
        .build()

    return TypeSpec.classBuilder("Poem")
        .primaryConstructor(poemMakerConstructor)
        .addProperty(PropertySpec.builder("title", stringClassName).initializer("title").build())
        .addProperty(PropertySpec.builder("content", stringClassName).initializer("content").build())
        .build()
}

//interface PoemPrinter
fun getPoemPrinterInterface(): TypeSpec {
    val printFun = FunSpec.builder("printPoem")
        .returns(intClassName)
        .addModifiers(KModifier.ABSTRACT)
        .build()
    return TypeSpec.interfaceBuilder("PoemPrinter")
        .addFunction(printFun)
        .build()
}

//class KotlinPoem
fun getKotlinPoemClass(): TypeSpec {
    val primaryConstructor = FunSpec.constructorBuilder()
        .addModifiers(KModifier.PRIVATE)
        .build()

    val poemMakerClazzName = ClassName(packageName, "PoemMaker")
    val makerParameterName = ParameterSpec.builder("maker", poemMakerClazzName)
        .defaultValue("PoemMaker(%S, 0)", "")
        .build()

    val poemClazzName = ClassName(packageName, "Poem")
    val poemParameterName = ParameterSpec.builder("poem", poemClazzName)
        .defaultValue("Poem(%S, %S)", "", "")
        .build()

    val secondConstructor = FunSpec.constructorBuilder()
        .addModifiers(KModifier.PUBLIC)
        .addParameter(makerParameterName)
        .addParameter(poemParameterName)
        .callThisConstructor()
        .addCode(
            """
            this.maker = maker
            this.poem = poem
            """.trimIndent()
        )
        .build()

    val printFunc = FunSpec.builder("printPoem")
        .returns(intClassName)
        .addStatement(
            """
            var wordNum = 0
        val title = poem.title
        wordNum += title.length
        println(title)
        val authorInfo = maker.name +" "+ maker.age
        wordNum += authorInfo.length
        println(authorInfo)
        val content = poem.content
        wordNum += content.length
        println(content)
        return wordNum
            """.trimIndent()
        )
        .addModifiers(KModifier.OVERRIDE)
        .build()

    val poemPrinterInterface = ClassName(packageName, "PoemPrinter")
    return TypeSpec.classBuilder("KotlinPoem")
        .primaryConstructor(primaryConstructor)
        .addSuperinterface(poemPrinterInterface)
        .addFunction(secondConstructor)
        .addProperty(
            PropertySpec.builder("maker", poemMakerClazzName).addModifiers(KModifier.LATEINIT)
                .mutable(true)
                .build()
        )
        .addProperty(
            PropertySpec.builder("poem", poemClazzName).addModifiers(KModifier.LATEINIT)
                .mutable(true)
                .build()
        )
        .addFunction(printFunc)
        .build()
}

//方法 main
fun getMainFun(): FunSpec {
    return FunSpec.builder("main")
        .addStatement(
            """
val poemStr = ""${'"'}nothing is all you need""${'"'}
    val poem = KotlinPoem(
        maker = PoemMaker("CAM", 25),
        poem = Poem(
            title = "nothing", content = poemStr
        )
    )
    val wordNum = poem.printPoem()
    println("====We have print ${"\$"}wordNum Characters ====")
        """.trimIndent()
        )
        .build()
}

private fun write(fileSpec: FileSpec) {
    val f = File("./temp")
    fileSpec.writeTo(f)
}

fun main() {
    val fileSpec = FileSpec.builder(packageName, fileName)
        .addType(getPoemMakerClass())
        .addType(getPoemClass())
        .addType(getPoemPrinterInterface())
        .addType(getKotlinPoemClass())
        .addFunction(getMainFun())
        .build()
    write(fileSpec)
}
运行后生成代码:
package com.cam.ktl

import kotlin.Int
import kotlin.String
import kotlin.Unit

public class PoemMaker(
  public val name: String,
  public val age: Int
)

public class Poem(
  public val title: String,
  public val content: String
)

public interface PoemPrinter {
  public fun printPoem(): Int
}

public class KotlinPoem private constructor() : PoemPrinter {
  public lateinit var maker: PoemMaker

  public lateinit var poem: Poem

  public constructor(maker: PoemMaker = PoemMaker("", 0), poem: Poem = Poem("", "")) : this() {
    this.maker = maker
    this.poem = poem
  }

  public override fun printPoem(): Int {
        var wordNum = 0
        val title = poem.title
        wordNum += title.length
        println(title)
        val authorInfo = maker.name +" "+ maker.age
        wordNum += authorInfo.length
        println(authorInfo)
        val content = poem.content
        wordNum += content.length
        println(content)
        return wordNum
  }
}

public fun main(): Unit {
  val poemStr = """nothing is all you need"""
          val poem = KotlinPoem(
              maker = PoemMaker("CAM", 25),
              poem = Poem(
                  title = "nothing", content = poemStr
              )
          )
          val wordNum = poem.printPoem()
          println("====We have print $wordNum Characters ====")
}
生成代码运行结果如下:

6. 实现ButterKnife的最终流程
终于见到了最终Boss,剩下的内容不多了,加油!!!
现在需要做5件事即可完成项目,编写ButterKnife类及bind()静态方法完成绑定、编写注解处理器生成Binding类的代码、重新设置依赖、使用ButterKnife、运行。
-
编写ButterKnife类。通过New->Module->Android Library,创建一个Android的Library模块,命名随意,本文为
butterknife-ib。新建类ButterKnife,代码如下:class ButterKnife { companion object { fun bind(activity: Activity) { val clazzName = "${activity.javaClass.`package`.name}.ButterKnife_${activity.javaClass.simpleName}_Binding" val clazz = Class.forName(clazzName) val constructor = clazz.getConstructor(activity.javaClass) constructor.newInstance(activity) } } } -
重新编写注解处理器的
process()方法,代码如下:override fun process(p0: MutableSet<out TypeElement>?, p1: RoundEnvironment?): Boolean { if (p0.isNullOrEmpty() || p1 == null) { return false } println("process is running........") for (element in p1.rootElements) { val packageName = element.enclosingElement.toString() val className = element.simpleName var needWrite = false val clazzActivity = ClassName.bestGuess("${packageName}.${className}") val constructorFun = FunSpec.constructorBuilder() .addParameter("activity", clazzActivity) .callThisConstructor() for (innerElement in element.enclosedElements) { val annotationElement = innerElement.getAnnotation(BindView::class.java) if (annotationElement != null) { needWrite = true constructorFun.addStatement("activity.${innerElement} =activity.findViewById(${annotationElement.value})") println("$packageName.$className.$innerElement") } } if (needWrite) { val bindClassName = "ButterKnife_${className}_Binding" val classType = TypeSpec.classBuilder(bindClassName) .primaryConstructor(FunSpec.constructorBuilder().build()) .addFunction(constructorFun.build()) .build() val file = FileSpec.builder(packageName, bindClassName) .addType(classType) .build() file.writeTo(filer) } } return true }说明:
- 第6行,
p1.rootElements会获得源文件中所有的类信息(不管是否有待处理的注解), - 第7行,
element.enclosingElement会获得类所在的包的信息(enclosingElement会获得外层元素,类的外层元素即为包) - 第14行,
element.enclosedElements会获得类中的所有元素 - 第15行,尝试从元素中获得待处理注解
- 第16行,如果成功获得待处理注解,则向构造方法中插入findVIewById()的赋值语句,needWrite置为true,表明需要生成文件。
- 第22-32行,组装FileSpec,并源文件写入filer,文件会出现在生成的文件夹,最终参与编译。
- 第6行,
-
添加依赖,向app模块中添加
butterknife_lib的依赖,同时,为了让app模块的build.gradle更少,可以将app模块下的build.gradle中对butterknife-annotation-lib模块的依赖去掉,在butterknife_lib模块中以api的方法添加对butterknife-annotation-lib模块的依赖(PS:implementationh和api的区别及应用场景请自行百度)
具体代码://app模块下的build.gradle依赖 dependencies { //implementation project(path: ':butterknife-annotation-lib') kapt project(path: ':butterknife-compile-lib') implementation project(path: ':butterknife-lib') }//butterknife-lib 模块下的依赖 dependencies { api project(path: ':butterknife-annotation-lib') } -
在app模块下的
MainActivity中的onCreate()方法添加ButterKnife.bind(this),同时可以使用tv:TextView。代码如下:class MainActivity : AppCompatActivity() { @BindView(R.id.tv) lateinit var tv: TextView override fun onCreate(savedInstanceState: Bundle?) { super.onCreate(savedInstanceState) setContentView(R.layout.activity_main) ButterKnife.bind(this) tv.text = "Hello, this is CAM" } } -
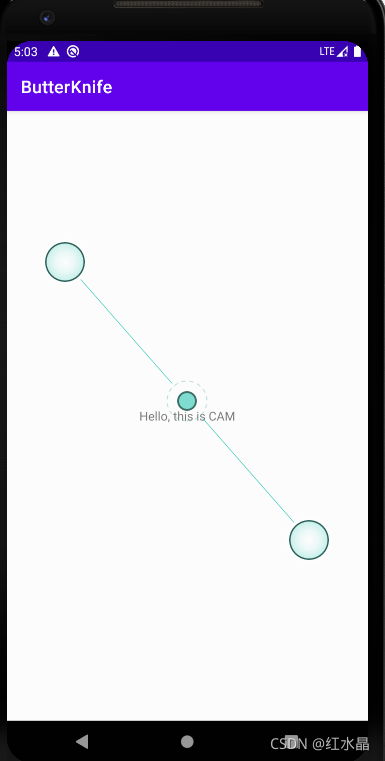
运行!!
在build文件夹下的特定位置生成了我们所需要的类,程序运行结果正常!


7. 参考链接
https://www.jianshu.com/p/019c735050e0
https://square.github.io/kotlinpoet/