| >0.5 | 偏向布局的水平靠右端 |
| <0.5 | 偏向布局的水平靠左端 |
垂直偏移量layout_constraintVertical_bias与上述水平偏移相似,不再赘述。
基线对齐
这个功能主要与layout_constraintBaseline_toBaselineOf这个属性有关,首先要知道什么是基线。基线通俗地来讲就是该组件的水平位置上一条居中的线。
基线未对齐:
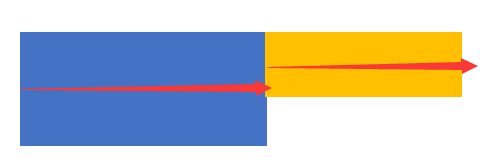
基线对齐:

那么如何使两个组件的基线对齐呢,以下是示例代码
<TextView
android:id="@+id/组件1"
…/>
<TextView
android:id="@+id/组件2"
…
app:layout_constraintLeft_toRightOf="@+id/组件1"
app:layout_constraintBaseline_toBaselineOf="@+id/组件1"/>
实例
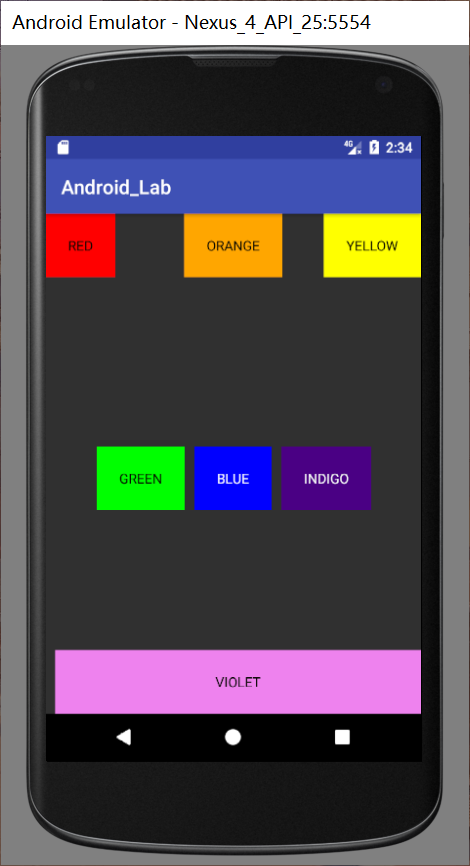
介绍了如上三点的主要内容后,接下来是一个结合了上面三点即居中,偏移,基线实现的小案例,以供参考:
<?xml version="1.0" encoding="utf-8"?><android.support.constraint.ConstraintLayout xmlns:android=“http://schemas.android.com/apk/res/android”
xmlns:app=“http://schemas.android.com/apk/res-auto”
xmlns:tools=“http://schemas.android.com/tools”
android:layout_width=“match_parent”
android:layout_height=“match_parent”>
<TextView
android:id="@+id/red"
android:layout_width=“wrap_content”
android:layout_height=“wrap_content”
android:background="#F00"
android:padding=“23dp”
android:text=“RED”
android:textColor="#050500" />
<TextView
android:id="@+id/org"
android:layout_width=“wrap_content”
android:layout_height=“wrap_content”
android:background="#FFA600"
android:padding=“23dp”
android:text=“ORANGE”
android:textColor="#050500"
app:layout_constraintEnd_toEndOf=“parent”
app:layout_constraintStart_toStartOf=“parent” />
<TextView
android:id="@+id/yellow"
android:layout_width=“wrap_content”
android:layout_height=“wrap_content”
android:background="#FFFF00"
android:padding=“23dp”
android:text=“YELLOW”
android:textColor="#050500"
app:layout_constraintEnd_toEndOf=“parent”
app:layout_constraintHorizontal_bias=“1”
app:layout_constraintStart_toStartOf=“parent” />
<TextView
android:id="@+id/blue"
android:layout_width=“wrap_content”
android:layout_height=“wrap_content”
android:layout_marginTop=“30dp”
android:background="#0000FF"
android:padding=“23dp”
android:text=“BLUE”
android:textColor="#FFFFFF"
app:layout_constraintBottom_toBottomOf=“parent”
app:layout_constraintEnd_toEndOf=“parent”
app:layout_constraintStart_toStartOf=“parent”
app:layout_constraintTop_toTopOf=“parent” />
<TextView
android:id="@+id/green"
android:layout_width=“wrap_content”
android:layout_height=“wrap_content”
android:layout_marginRight=“10dp”
app:layout_constraintBaseline_toBaselineOf="@id/blue"
android:background="#00FF00"
android:padding=“23dp”
android:text=“GREEN”
android:textColor="#050500"
app:layout_constraintBottom_toBottomOf=“parent”
app:layout_constraintEnd_toStartOf="@id/blue"
app:layout_constraintTop_toTopOf=“parent” />
<TextView
android:layout_width=“wrap_content”
android:layout_height=“wrap_content”
android:layout_marginLeft=“10dp”
app:layout_constraintBaseline_toBaselineOf="@id/blue"
android:background="#4A0084"
android:padding=“23dp”
android:text=“INDIGO”
android:textColor="#FFFFFF"
app:layout_constraintBottom_toBottomOf=“parent”
app:layout_constraintStart_toEndOf="@id/blue"
app:layout_constraintTop_toTopOf=“parent” />
<TextView
android:layout_width=“fill_parent”
android:layout_height=“wrap_content”
android:layout_marginLeft=“10dp”
android:layout_marginTop=“30dp”
android:background="#EE82EE"
android:padding=“23dp”
android:text=“VIOLET”
android:textAlignment=“center”
android:textColor="#050500"
app:layout_constraintBottom_toBottomOf=“parent” />
</android.support.constraint.ConstraintLayout>
实现效果:
Guideline
Guideline 顾名思义是一条导航线,它的作用主要是分割布局。在LinearLayout中我们想要分割布局通常是使用设置权重的方式来分割,比如
android:layout_weight=“1”
而Guideline在ConstraintLayout中也能帮助实现这样的分割,首先,先介绍Guideline的一些属性:
| 属性 | 含义 |
| — | — |
| android:orientation | vertical / horizontal |
| layout_constraintGuide | 开始位置 左 / 上 |
| layout_constraintGuide_end | 结束位置 右 / 下 |
| layout_constraintGuide_percent | 距离顶部 / 左边的百分比 |
需要注意的是Guideline是一条在实际运行过程中看不见的线,只是起到一个辅助作用,所以设置Guideline的width和height是没有任何意义的。
若要实现布局的三等分,基本的框架如下:
<View,右边约束分割线1/>
<分割线1,距离左边33%/>
<View,左边约束分割线1,右边约束分割线2/>
<分割线2,距离左边66%/>
<View,左边约束分割线2/>
Group
Group可以把需要进行同样操作的组件归为一组,方便了操作,使代码不会过于繁琐,使用方式也较为简单,只要在constraint_referenced_ids属性中定义要归为一组的组件的id,用逗号隔开就可以实现。
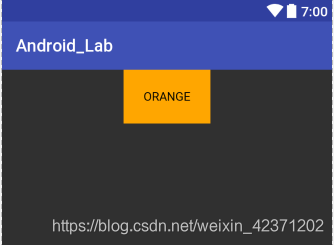
对于上述实例可以将red和yellow两个组件设置成一组,并规定不可见。
<android.support.constraint.Group
android:id="@+id/group"
android:layout_width=“wrap_content”
android:layout_height=“wrap_content”
android:visibility=“invisible”
app:constraint_referenced_ids=“yellow,red”/>
实现效果:
Barrier
Barrier意为屏障,它的主要用途为约束组件的位置。通常在组件的大小不确定的情况下使用。
如以下这种情况:

如图有三个组件A、B、C。其中AB组件的宽度为wrap_content即不确定,此时若要求C处于A、B的右端,如果将C约束在A右端或B右端,都是不合理的,A或B的宽度一旦改变,C就有可能不处于A、B的右端。这时候Barrier就派上用场了。要实现上面的效果可以用以下的方式:
<TextView
android:id="@+id/A"
android:layout_width=“wrap_content”
android:layout_height=“wrap_content” />
<TextView
android:id="@+id/B"
android:layout_width=“wrap_content”
android:layout_height=“wrap_content”
app:layout_constraintTop_toBottomOf="@+id/A" />
<android.support.constraint.Barrier
android:id="@+id/barrier"
android:layout_width=“wrap_content”
android:layout_height=“wrap_content”
app:barrierDirection=“right”
app:constraint_referenced_ids=“A,B” />
<TextView
android:id="@+id/C"
android:layout_width=“wrap_content”
android:layout_height=“wrap_content”
app:layout_constraintLeft_toRightOf="@+id/barrier" />
其中app:barrierDirection的值除了right还有left,start,end,bottom,top。app:constraint_referenced_ids为Barrier引用的组件id名,本例中设置的barrier在A,B的右边,所以
app:barrierDirection=“right”
app:constraint_referenced_ids=“A,B”
===================================================================================
前文我们已经介绍了ConstraintLayout的基本属性及属性的应用方法,相信大家已经能初步掌握ConstraintLayout的基本使用了,接下来将介绍如何利用ConstraintLayout制作动画。
① 创建两个不同的布局
② 每个布局设置不同的约束
③ 利用动画框架来进行两种约束之间的切换。
以下将依靠实例说明使用方式
1.创建动画的初始布局——activity_main.xml
<?xml version="1.0" encoding="utf-8"?><android.support.constraint.ConstraintLayout xmlns:android=“http://schemas.android.com/apk/res/android”
xmlns:app=“http://schemas.android.com/apk/res-auto”
xmlns:tools=“http://schemas.android.com/tools”
android:id="@+id/animation"
android:layout_width=“match_parent”
android:layout_height=“match_parent”
tools:context=“cn.edu.fjnu.cl.animation.MainActivity”>
<TextView
android:id="@+id/tv_score"
android:layout_width=“wrap_content”
android:layout_height=“wrap_content”
android:layout_marginTop=“8dp”
android:text=“评分:9.4分”
app:layout_constraintStart_toStartOf="@+id/tv_name"
app:layout_constraintTop_toBottomOf="@+id/tv_name" />
<TextView
android:id="@+id/tv_name"
android:layout_width=“wrap_content”
android:layout_height=“wrap_content”
android:layout_marginLeft=“20dp”
android:layout_marginTop=“8dp”
android:text=“千与千寻”
android:textColor="#282828"
android:textSize=“20sp”
app:layout_constraintStart_toEndOf="@+id/iv_poster"
app:layout_constraintTop_toTopOf="@+id/iv_poster" />
<ImageView
android:id="@+id/iv_poster"
android:layout_width=“120dp”
android:layout_height=“160dp”
android:layout_marginLeft=“20dp”
android:layout_marginTop=“20dp”
android:scaleType=“centerCrop”
app:layout_constraintStart_toStartOf=“parent”
app:layout_constraintTop_toTopOf=“parent”
app:srcCompat="@drawable/poster" />
</android.support.constraint.ConstraintLayout>
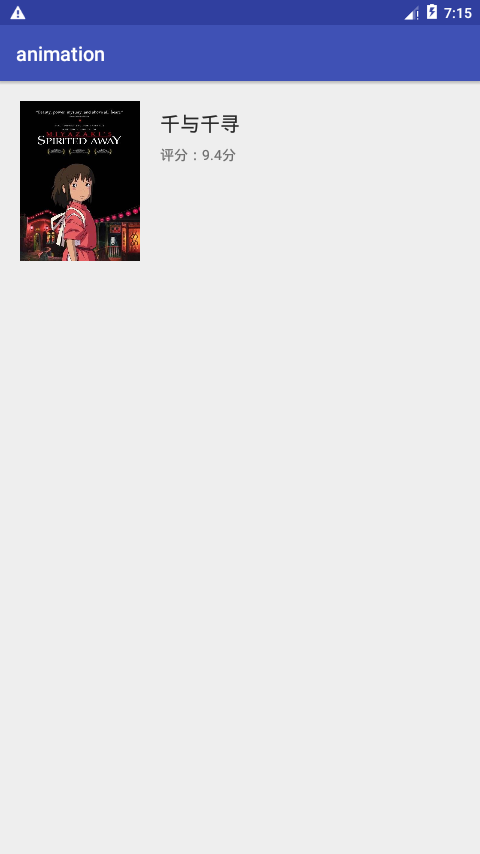
布局效果如下
2.创建动画变动后的布局——animation_layout.xml
<?xml version="1.0" encoding="utf-8"?><android.support.constraint.ConstraintLayout xmlns:android=“http://schemas.android.com/apk/res/android”
xmlns:app=“http://schemas.android.com/apk/res-auto”
xmlns:tools=“http://schemas.android.com/tools”
android:id="@+id/animation"
android:layout_width=“match_parent”
android:layout_height=“match_parent”
tools:context=“cn.edu.fjnu.cl.animation.MainActivity”>
<TextView
android:id="@+id/tv_score"
android:layout_width=“wrap_content”
android:layout_height=“wrap_content”
android:layout_marginLeft=“52dp”
android:text=“评分:9.4分”
app:layout_constraintBottom_toBottomOf="@+id/tv_name"
app:layout_constraintStart_toEndOf="@+id/tv_name"
app:layout_constraintTop_toTopOf="@+id/tv_name" />
<TextView
android:id="@+id/tv_name"
android:layout_width=“wrap_content”
android:layout_height=“wrap_content”
android:layout_marginLeft=“20dp”
android:layout_marginTop=“20dp”
android:text=“千与千寻”
android:textColor="#282828"
android:textSize=“20sp”
app:layout_constraintStart_toStartOf=“parent”
app:layout_constraintTop_toTopOf=“parent” />
<ImageView
android:id="@+id/iv_poster"
android:layout_width=“0dp”
android:layout_height=“0dp”
android:layout_marginTop=“65dp”
android:scaleType=“centerCrop”
app:layout_constraintBottom_toBottomOf=“parent”
app:layout_constraintEnd_toEndOf=“parent”
app:layout_constraintStart_toStartOf=“parent”
app:layout_constraintTop_toTopOf=“parent”
app:srcCompat="@drawable/poster" />
</android.support.constraint.ConstraintLayout>
布局效果如下
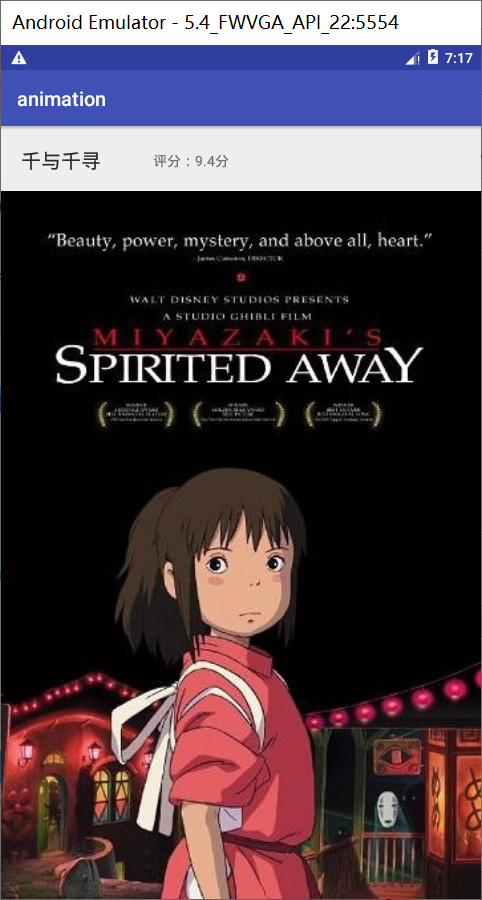
3.利用Android的TransitionManager结合ConstraintSet实现动画效果
package cn.edu.fjnu.cl.animation;
import android.support.constraint.ConstraintLayout;
import android.support.constraint.ConstraintSet;
import android.support.v7.app.AppCompatActivity;
import android.os.Bundle;
import android.transition.TransitionManager;
public class MainActivity extends AppCompatActivity {
private ConstraintLayout mConstraintLayout;
private boolean mIsDetail;
@Override
protected void onCreate(Bundle savedInstanceState) {
super.onCreate(savedInstanceState);
setContentView(R.layout.activity_main);
mConstraintLayout = (android.support.constraint.ConstraintLayout)findViewById(R.id.animation);
ConstraintSet constraintSet1 = new ConstraintSet();
ConstraintSet constraintSet2 = new ConstraintSet();
constraintSet2.clone(this, R.layout.animation_layout);
constraintSet1.clone(mConstraintLayout);
findViewById(R.id.iv_poster).setOnClickListener(v -> {
TransitionManager.beginDelayedTransition(mConstraintLayout);
if (!mIsDetail) {
constraintSet2.applyTo(mConstraintLayout);
mIsDetail = true;
} else {
constraintSet1.applyTo(mConstraintLayout);
mIsDetail = false;
}
});
}
}
其中ConstraintSet是一个约束集合,保存了布局上所有元素的约束,因为我们需要在两个布局之间执行动画,所以我们需要创建两个约束集合的对象。
ConstraintSet constraintSet1 = new ConstraintSet
《Android学习笔记总结+最新移动架构视频+大厂安卓面试真题+项目实战源码讲义》
【docs.qq.com/doc/DSkNLaERkbnFoS0ZF】 完整内容开源分享
();
ConstraintSet constraintSet2 = new ConstraintSet();
创建完约束集对象后设置每个约束集对应的约束,即将当前布局的约束应用到constraintSet1中,将目标布局的约束应用到constraintSet2中。
constraintSet2.clone(this, R.layout.animation_layout);
constraintSet1.clone(mConstraintLayout);
动画的执行过程