Android(12)Preference(三)抽象管理
问题发生背景:
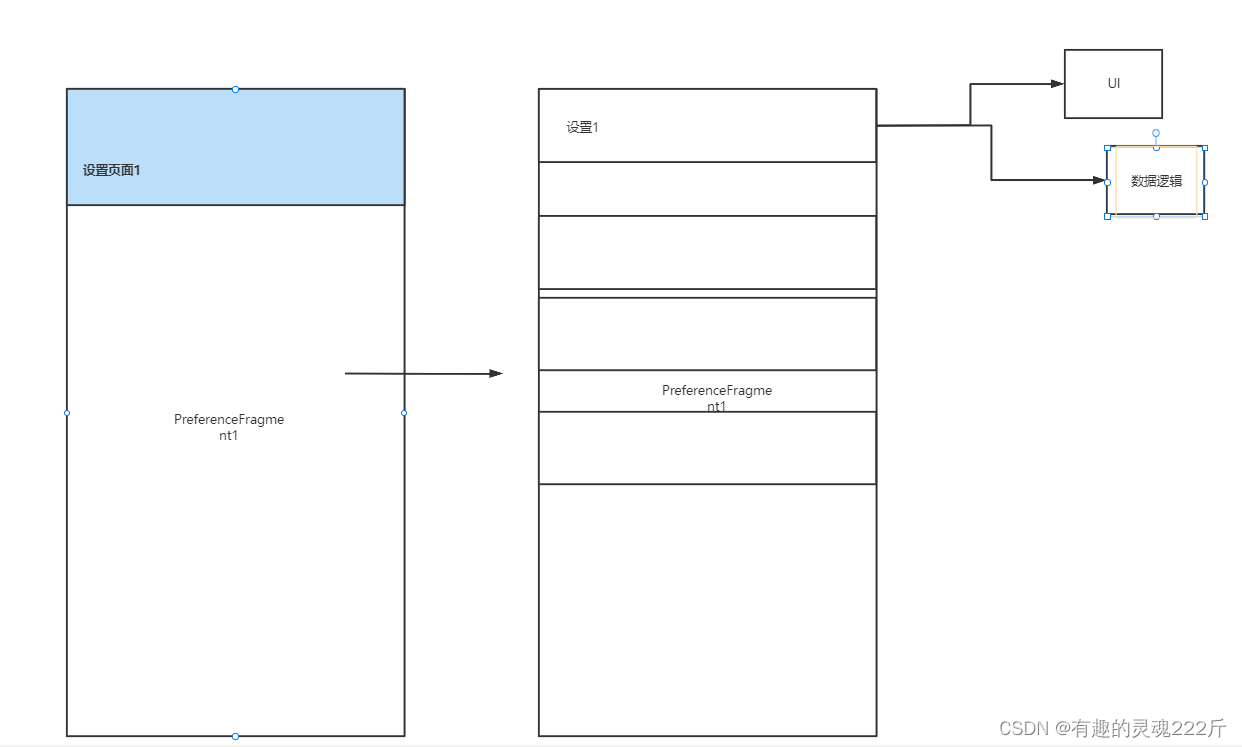
假如我们现在有一个设置页面,虽然我们可以通过获取Preference实例去set一些Click、Change监听,但是当我们的业务逻辑增加并且复杂的时候,会发现我们每次都要先去找到一个实例才能去设置,这个时候就需要分离UI逻辑和数据逻辑了,比如我希望点击的时候只是通过传过来的key判断UI的变化,是跳转到下一个设置页面还是弹出一个对话框等;点击Switch改变值的时候通过key判断,意思就是把原来的点击处理一票子逻辑拆分成俩部分方便管理。

开始抽象,准备动手!
-
先抽象出一个
PreferenceFragmentCompat容器的Activity。- 有对应页面的标题
- 统一风格的背景和
Toobar
abstract class BaseSettingsActivity: AppCompatActivity() { // 根Fragment名字 abstract val hostFragmentName: String protected val activityLayoutRes = R.layout.activity_main var hostFragment: BaseSettingsFragment? = null // Toolbar相关 protected var actionBar: ActionBar? = null protected lateinit var toolBar: Toolbar protected var collapsingToolbarLayout: CollapsingToolbarLayout? = null protected var appBarLayout: AppBarLayout? = null override fun onCreate(savedInstanceState: Bundle?) { super.onCreate(savedInstanceState) setContentView(activityLayoutRes) // 设置协调布局和toolbar toolBar = findViewById(R.id.toolbar) setSupportActionBar(toolBar) actionBar = supportActionBar actionBar?.let { it.setDisplayHomeAsUpEnabled(true) it.setHomeButtonEnabled(true) it.setDisplayShowTitleEnabled(true) } toolBar.apply { setNavigationOnClickListener { finishAndRemoveTask() } } collapsingToolbarLayout = findViewById(R.id.collapsing_toolbar) appBarLayout = findViewById(R.id.appbar_layout) collapsingToolbarLayout?.let { it.title = title } val fragment = supportFragmentManager.fragmentFactory.instantiate( this.classLoader, hostFragmentName ) hostFragment = fragment as BaseSettingsFragment supportFragmentManager .beginTransaction() .replace( R.id.setting_fragment_container, fragment ).commit() } } -
再抽象出一个
PreferenceFragmentCompat:- 处理UI交互
- 处理数据逻辑
abstract class BaseSettingsFragment: PreferenceFragmentCompat() { // 设置布局资源id abstract val xmlRes: Int // 这个页面上可见的Preference的key val preferenceKeys = mutableListOf<String>() /** * 处理UI相关的逻辑 * * @param preference Preference * @param prefKey String * @return Boolean 是否消费 */ abstract fun handleInteractionLogic(preference: Preference, prefKey: String): Boolean /** * 处理数据相关逻辑 * * @param preference Preference * @param prefKey String */ abstract fun handleDataLogic(preference: Preference, prefKey: String) override fun onCreatePreferences(savedInstanceState: Bundle?, rootKey: String?) { setPreferencesFromResource(xmlRes, rootKey) } override fun onPreferenceTreeClick(preference: Preference): Boolean { return handleInteractionLogic(preference, preference.key) } } -
搞一个自己的
Preference:- 在
attr.xml中定义自己的属性
<resources> <attr name="myPreferenceStyle" format="reference"/> <declare-styleable name="MyPreference"> <attr name="myPfTitleTextColor" format="color"/> <attr name="myPfTitleTextSize" format="dimension"/> </declare-styleable> </resources>- 在
theme.xml定义一个style指定myPreferenceStyle,记得<applicatiopn/>的themme要指定为我们的哟
<resources xmlns:tools="http://schemas.android.com/tools"> <!-- Base application theme. --> <style name="Theme.MyApplication" parent="Theme.AppCompat.DayNight.NoActionBar"> <!-- Primary brand color. --> <item name="colorPrimary">@color/purple_500</item> <item name="colorPrimaryVariant">@color/purple_700</item> <item name="colorOnPrimary">@color/white</item> <!-- Secondary brand color. --> <item name="colorSecondary">@color/teal_200</item> <item name="colorSecondaryVariant">@color/teal_700</item> <item name="colorOnSecondary">@color/black</item> <!-- Status bar color. --> <item name="android:statusBarColor" tools:targetApi="l">?attr/colorPrimaryVariant</item> <!-- Customize your theme here. --> <item name="myPreferenceStyle">@style/MyPreferenceStyle</item> </style> // _----------------------- // 这里就可以统一设置自己定义的属性拉 <style name="MyPreferenceStyle"> <item name="myPfTitleTextColor">#FF4081</item> <item name="myPfTitleTextSize">20sp</item> </style> <style name="CollapsingToolbarTitle.Collapsed" parent="@android:style/TextAppearance.DeviceDefault.Widget.ActionBar.Title"> <item name="android:textSize">22sp</item> <item name="android:textColor">#FF4081</item> </style> <style name="CollapsingToolbarTitle.Expanded" parent="CollapsingToolbarTitle.Collapsed"> <item name="android:textSize">36sp</item> <item name="android:textColor">#536DFE</item> </style> </resources> - 在
-
代码里使用属性:
class MyPreference(
    context: Context,
    attributeSet: AttributeSet,
    defStyleAttr: Int = R.attr.myPreferenceStyle
): Preference(context, attributeSet, defStyleAttr) {

    val hostFragment by lazy {
        context.takeIf { it is BaseSettingsActivity }?.let {
            (it as BaseSettingsActivity).hostFragment
        }
    }

    private  var titleTextColor = 0
    private  var titleTextSize = 0f

    init {
        widgetLayoutResource = R.layout.my_widget
        context.obtainStyledAttributes(
            attributeSet,
            R.styleable.MyPreference, defStyleAttr, 0
        ).apply {
            titleTextColor =
                getColor(R.styleable.MyPreference_myPfTitleTextColor, Color.BLACK)
            titleTextSize =
                getDimension(R.styleable.MyPreference_myPfTitleTextSize, 10f)
            recycle()
        }
        hostFragment.takeIf { it is BaseSettingsFragment }?.preferenceKeys?.add(key)
    }

    override fun onBindViewHolder(holder: PreferenceViewHolder) {
        super.onBindViewHolder(holder)
        with(holder) {
            findViewById(android.R.id.title).takeIf { it is TextView }?.let {
                (it as TextView).setTextColor(titleTextColor)
                it.textSize = titleTextSize
            }
        }
        holder.findViewById(R.id.switchWidget).takeIf { it is Switch }?.let {
            (it as Switch).setOnCheckedChangeListener { buttonView, isChecked ->
                hostFragment?.handleDataLogic(this, key)
            }
        }
    }
}
使用
在搞完通用的之后了,就可以使用了:
class MyActivity: BaseSettingsActivity() {
    override val hostFragmentName: String
        get() = MyFragemnt::class.java.name

    class MyFragemnt: BaseSettingsFragment() {
        override val xmlRes: Int
            get() = R.xml.settings

        /**
         * 处理 UI
         *
         * @param preference Preference
         * @param prefKey String
         * @return Boolean
         */
        override fun handleInteractionLogic(preference: Preference, prefKey: String): Boolean {
            TODO("Not yet implemented")
        }

        /**
         * 处理 数据
         *
         * @param preference Preference
         * @param prefKey String
         */
        override fun handleDataLogic(preference: Preference, prefKey: String) {
            TODO("Not yet implemented")
        }
    }
}