1 Bitmap类解读
1.1 Bitmap简介
Bitmap(位图)本质上就是一张图片的内容在内存中的表达形式。它将图片的内容看做是由存储数据的有限个像素点组成;每个像素点存储该像素点位置的ARGB值。Android可以将所有的图片资源的内容以Bitmap对象的形式加载到内存中,再通过ImageView的setImageBitmap(Bitmap b)方法即可展示该Bitmap对象所表示的图片内容。
为什么不直接通过XML引用资源,还要使用bitmap?
如果是需要展示项目中的图片资源文件,我们只需要调用ImageView的setImageResource(int id)方法并传入该图片资源的id(一般为R.drawable.xxx)即可。但是如果是需要展示手机本地的某张图片或者网络上的某个图片资源,我们就需要使用一些通用的图形API了,因此会涉及Bitmap。
1.2?Bitmap关键类
Bitmap关键类主要有:Bitmap、BitmapDrawable和Bitmapfactory。
@1 Bitmap <==> BitmapDrawable
Bitmap代表位图,BitmapDrawable封装的就是一个Bitmap对象。Bitmap转换成BitmapDrawable对象 和 BitmapDrawable转换成Bitmap 的方法如下:
//通过Bitmap对象 来获取 BitmapDrawable对象
BitmapDrawable bitmapDrawable = new BitmapDrawable(null,bitmap1);
//通过BitmapDrawable对象 来获取 Bitmap对象
Bitmap bitmap2 = bitmapDrawable.getBitmap();
@2 Bitmap常用方法如下所示:
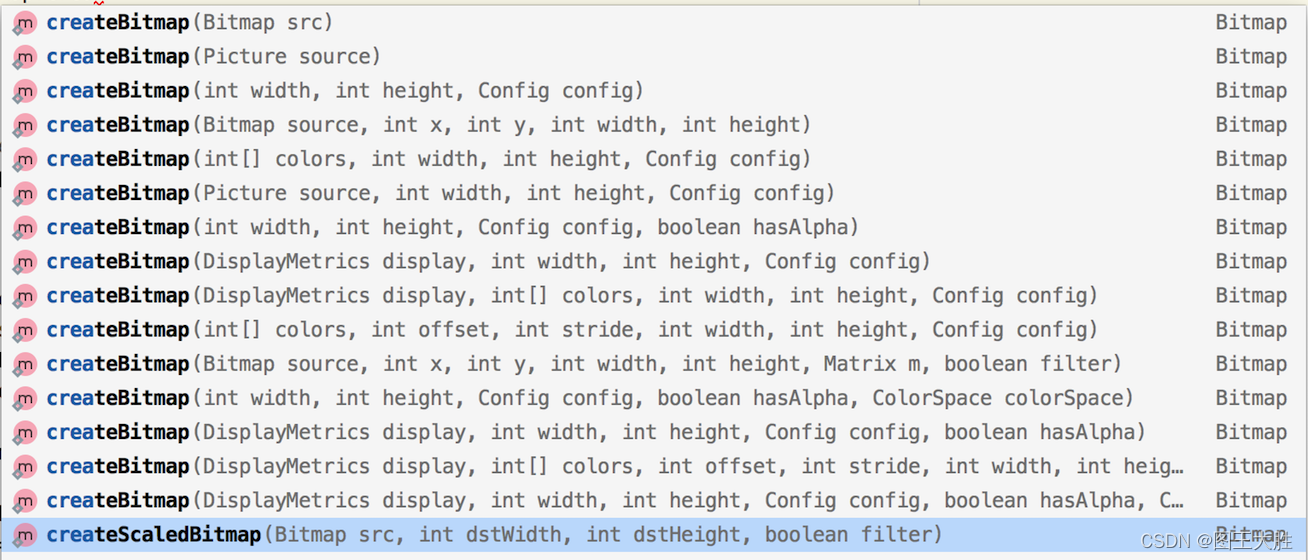
Bitmap是静态类,最常用的就是Bitmap的createBitmap方法,关于该方法android提供有:

关于创建Bitmap对象的方法集详细解读参照官方文档:Android Bitmap.createBitmap 方法集合
关于回收Bitmap对象的方法主要有2个关键方法,如下所示:
boolean isRecycled(); //判断是否回收?
void?recycle(); //回收
@3 BitmapFactory常用方法如下所示:
BitmapFactory的decode系列静态方法也是用于创建Bitmap对象的,关于该方法android提供有:

?关于BitmapFactory获取Bitmap对象的方法集参照官方文档:Android BitmapFactory方法集合
@4 实战总结(查看assets目录下的图片查看器)
这里以一个案例形式展示,关键代码如下所示:
public class MainActivity extends AppCompatActivity {
    private static String TAG = "MainActivity";
    private Button btn_next;
    private ImageView imageView;
    private String[] images;
    private int currentImageIndex = 0;

    @Override
    protected void onCreate(Bundle savedInstanceState) {
        super.onCreate(savedInstanceState);
        setContentView(R.layout.activity_main);
        btn_next = findViewById(R.id.btn_next);
        imageView = findViewById(R.id.imageView);

        try {
            images = getAssets().list("");
        } catch (IOException e) {
            e.printStackTrace();
        }

        btn_next.setOnClickListener(new View.OnClickListener() {
            @Override
            public void onClick(View v) {
                //数组越界处理,过界归零
                if (currentImageIndex >= images.length) {
                    currentImageIndex = 0;
                }

                //1 如果该索引无效,一直找到下一个有效的Index索引
                while(!(images[currentImageIndex].endsWith(".png") || images[currentImageIndex].endsWith(".PNG"))){
                    currentImageIndex++;
                    if(currentImageIndex>=images.length){
                        currentImageIndex = 0;
                    }
                }

                InputStream assetFiles = null;
                try {
                    //2 打开资源对应输入流
                    assetFiles = getAssets().open(images[currentImageIndex++]);
                } catch (IOException e) {
                    e.printStackTrace();
                }
                //3 获取BitmapDrawable并做回收处理
                BitmapDrawable bitmapDrawable = (BitmapDrawable) imageView.getDrawable();
                if (bitmapDrawable != null && !bitmapDrawable.getBitmap().isRecycled()) {
                    bitmapDrawable.getBitmap().recycle();
                }
                //4 改变imageView显示图片
                imageView.setImageBitmap(BitmapFactory.decodeStream(assetFiles));
            }
        });
    }
}
注意:
- 经测试,如果目录下有5张图片,但images.length为7,且index为1-5时有效,6,7时无效。
- 在判定是否为图片格式,这里仅考虑png格式,其他格式可根据需要酌情添加。
@5 关于Bitmap、BitmapDrawable和Bitmapfactory更多解读,查看官方文档如下:
1.3?使用Bitmap时防止OOM的有效方法
@1 高效压缩图片:均基于公式:Bitmap所占内存 = 长度?x 宽度 x 一个像素点占用的字节数。
- 改变宽高:可以通过Bitmap.Options选项来合理调整采样率,采样率越大,图片越小,失真越严重,因此要找到合适的采样率。也可以通过缩放的方式来设置。
- 改变像素:可以通过图片质量参数quality在保持像素数量的前提下改变图片的位深及透明度等,来达到压缩图片的目的。也可以通过编码方式来设置。
@2 使用缓存技术:常用缓存策略有LruCache(内存缓存,其中LRU是Least Recently Used的缩写)和DiskLruCache(存储缓存)。
- LRU是最近最少使用算法,核心思想是当缓存快满时,会淘汰近期最少使用的缓存目标。DiskLruCache用于实现存储设备缓存,即磁盘缓存,核心思想是通过将缓存对象写入文件系统从而实现缓存效果。
@3 及时回收:
- 如果APP中引用了大量的Bitmap对象,又不需要同时显示所有图片,可以将暂时不用到的Bitmap对象 及时回收掉
- 对于一些明确知道图片使用情况的场景可以使用完就执行recycle操作
- 帧动画,加载一张,画一张,释放一张!使用时加载,不显示时直接置null或recycle。
2 ImageDecoder类解读
ImageDecoder不仅可以解码JPEG、PNG等静态图片,还可以解码GIF、WEBP等动画图片。
@1 ImageDecoder常用方法如下所示:

可以看到主要分为两类,也是解码图片的两个关键步骤:
- 第一步,createSource系列方法,来创建Source。
- 第二步,decodeXXX系列方法,通过Source来获取Bitmap对象/Drawable对象(注意:这里可以传入一个监听器 OnHeaderDecodedListener 来获得解码图片的信息)。
@2 实战总结(同上,依然是查看assets目录下的图片查看器)
这里以ImageDecoder的方式来编写代码,关键代码如下所示:
public class MainActivity extends AppCompatActivity {
    private static String TAG = "MainActivity";
    private Button btn_next;
    private ImageView imageView;
    private String[] images;
    private int currentImageIndex = 0;

    @Override
    protected void onCreate(Bundle savedInstanceState) {
        super.onCreate(savedInstanceState);
        setContentView(R.layout.activity_main);
        btn_next = findViewById(R.id.btn_next);
        imageView = findViewById(R.id.imageView);

        try {
            images = getAssets().list("");
        } catch (IOException e) {
            e.printStackTrace();
        }

        btn_next.setOnClickListener(new View.OnClickListener() {
            @Override
            public void onClick(View v) {
                //数组越界处理,过界归零
                if (currentImageIndex >= images.length) {
                    currentImageIndex = 0;
                }

                //判定是否为图片格式,这里仅考虑png和gif格式,其他格式可根据需要添加
                //如果该索引无效,一直找到下一个有效的Index索引
                while(!(images[currentImageIndex].endsWith(".png")
                        || images[currentImageIndex].endsWith(".PNG")
                        || images[currentImageIndex].endsWith(".gif")
                        || images[currentImageIndex].endsWith(".GIF")
                )){
                    currentImageIndex++;
                    if(currentImageIndex>=images.length){
                        currentImageIndex = 0;
                    }
                }
                //关键步骤1 ImageDecoder创建Source
                ImageDecoder.Source src = ImageDecoder.createSource(getAssets(),images[currentImageIndex++]);
                Drawable drawable = null;
                try {
                    //关键步骤2 ImageDecoder通过Source获取drawable
                    drawable = ImageDecoder.decodeDrawable(src, new ImageDecoder.OnHeaderDecodedListener() {
                        @Override
                        public void onHeaderDecoded(@NonNull ImageDecoder decoder, @NonNull ImageDecoder.ImageInfo info, @NonNull ImageDecoder.Source source) {
                            //监听后 可以根据需求获取解码图片的信息
                            Log.d(TAG, "onHeaderDecoded process");
                        }
                    });
                    imageView.setImageDrawable(drawable);
                    //如果是动态图片的显示,直接调用start方法来播放动画
                    if(drawable instanceof AnimatedImageDrawable){
                        ((AnimatedImageDrawable) drawable).start();
                    }
                }catch (IOException e){
                    e.printStackTrace();
                }
            }
        });
    }
}
说明:与上一个相同功能的demo相比,ImageDecoder这里支持了动态图片的显示,同时在代码编写上会更简洁些。
@3 关于ImageDecoder更多解读,查看官方文档:Android ImageDecoder类详细解读