背景
在Flutter开发中需要用到视频播放的功能,Flutter对视频播放的支持并不是很友好所以Google提供了TextureLayer让Flutter端能够使用原生端的渲染,这样我们原生端很多优秀的视频播放组件能够在Flutter程序上使用了
Texture的创建
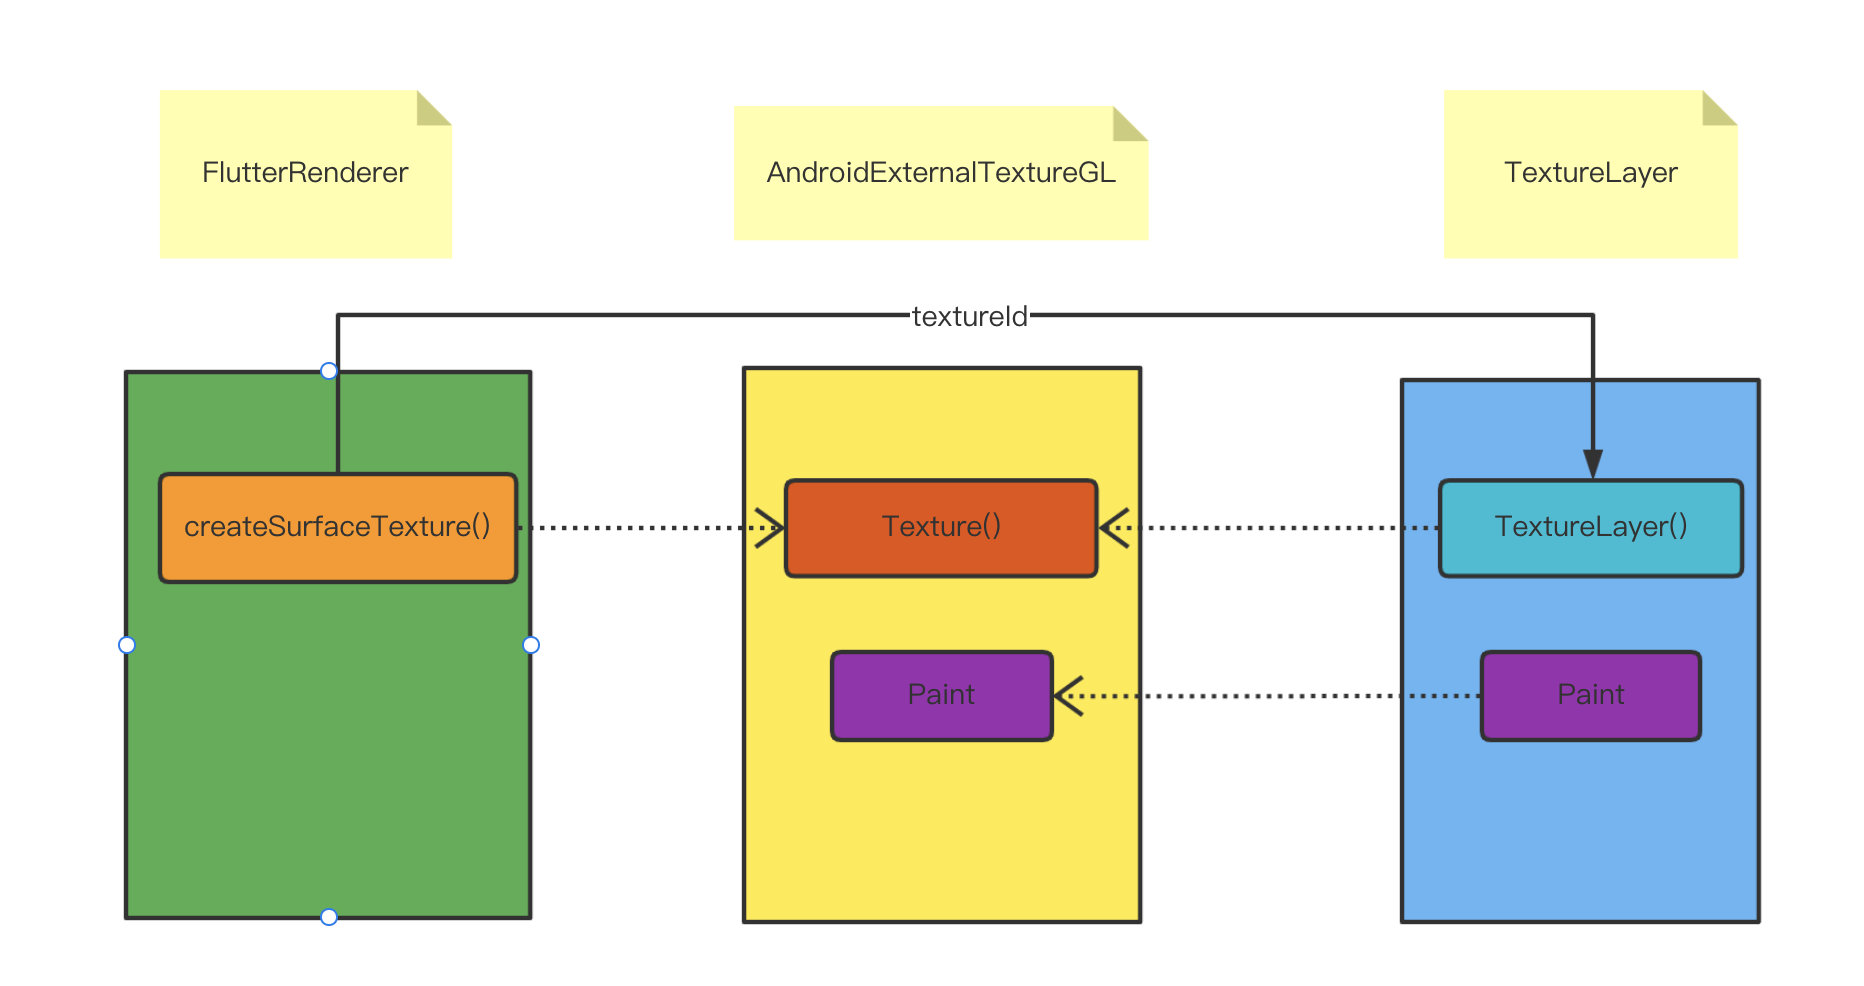
Texture是Platform端创建的,创建是会生成一个textureId,textureId可以映射获取到Texture
- Androaid端FlutterRenderer创建SurfaceTexture
  @Override
  public SurfaceTextureEntry createSurfaceTexture() {
    Log.v(TAG, "Creating a SurfaceTexture.");
    //创建SurfaceTexture
    final SurfaceTexture surfaceTexture = new SurfaceTexture(0);
    surfaceTexture.detachFromGLContext();
    final SurfaceTextureRegistryEntry entry =
        new SurfaceTextureRegistryEntry(nextTextureId.getAndIncrement(), surfaceTexture);
    Log.v(TAG, "New SurfaceTexture ID: " + entry.id());
    // 映射 textureId/entry.id() 和 SurfaceTexture的关系
    registerTexture(entry.id(), entry.textureWrapper());
    return entry;
  }
- Flutter Engine中 platform_view_android_jni_impl.cc
static void RegisterTexture(JNIEnv* env,
                            jobject jcaller,
                            jlong shell_holder,
                            jlong texture_id,
                            jobject surface_texture) {
  ANDROID_SHELL_HOLDER->GetPlatformView()->RegisterExternalTexture(
      static_cast<int64_t>(texture_id),                        //
      fml::jni::JavaObjectWeakGlobalRef(env, surface_texture)  //
  );
}
- android_shell_holder.cc
fml::WeakPtr<PlatformViewAndroid> AndroidShellHolder::GetPlatformView() {
  FML_DCHECK(platform_view_);
  return platform_view_;
}
- platform_view_android.cc
void PlatformViewAndroid::RegisterExternalTexture(
    int64_t texture_id,
    const fml::jni::JavaObjectWeakGlobalRef& surface_texture) {
    //AndroidExternalTextureGL 即 Texture
  RegisterTexture(std::make_shared<AndroidExternalTextureGL>(
      texture_id, surface_texture, std::move(jni_facade_)));
}
- platform_view.cc
void PlatformView::RegisterTexture(std::shared_ptr<flutter::Texture> texture) {
  delegate_.OnPlatformViewRegisterTexture(std::move(texture));
}
- shell.cc
// |PlatformView::Delegate|
void Shell::OnPlatformViewRegisterTexture(
    std::shared_ptr<flutter::Texture> texture) {
  FML_DCHECK(is_setup_);
  FML_DCHECK(task_runners_.GetPlatformTaskRunner()->RunsTasksOnCurrentThread());

  task_runners_.GetRasterTaskRunner()->PostTask(
      [rasterizer = rasterizer_->GetWeakPtr(), texture] {
        if (rasterizer) {
          if (auto* registry = rasterizer->GetTextureRegistry()) {
            registry->RegisterTexture(texture);
          }
        }
      });
}
- texture.cc
void TextureRegistry::RegisterTexture(std::shared_ptr<Texture> texture) {
  if (!texture) {
    return;
  }
  mapping_[texture->Id()] = texture;
}
通过上述流程Flutter Engine层最终会把SurfaceTexture存到mapping_中
Texture的获取
Texture的获取是在Flutter端,通过textureId获取到mapping_中保存的Texture并且创建出一个TextureLayer映射到Flutter framework层
- Flutter端TextureLayer
  @override
  void addToScene(ui.SceneBuilder builder, [ Offset layerOffset = Offset.zero ]) {
    final Rect shiftedRect = layerOffset == Offset.zero ? rect : rect.shift(layerOffset);
    builder.addTexture(
      textureId,
      offset: shiftedRect.topLeft,
      width: shiftedRect.width,
      height: shiftedRect.height,
      freeze: freeze,
      filterQuality: filterQuality,
    );
  }
- SceneBuilder
  void _addTexture(double dx, double dy, double width, double height, int textureId, bool freeze,
      int filterQuality) native 'SceneBuilder_addTexture'; // 调用Engine中的方法
- scene_builder.cc
void SceneBuilder::addTexture(double dx,
                              double dy,
                              double width,
                              double height,
                              int64_t textureId,
                              bool freeze,
                              int filterQualityIndex) {
  auto sampling = ImageFilter::SamplingFromIndex(filterQualityIndex);
  auto layer = std::make_unique<flutter::TextureLayer>(
      SkPoint::Make(dx, dy), SkSize::Make(width, height), textureId, freeze,
      sampling);
  AddLayer(std::move(layer));
}
- texture_layer.cc
//GPU线程绘制时会调用该方法
void TextureLayer::Paint(PaintContext& context) const {
  TRACE_EVENT0("flutter", "TextureLayer::Paint");
  FML_DCHECK(needs_painting(context));

//获取texture_registry中注册好的texture
  std::shared_ptr<Texture> texture =
      context.texture_registry.GetTexture(texture_id_);
  if (!texture) {
    TRACE_EVENT_INSTANT0("flutter", "null texture");
    return;
  }
  texture->Paint(*context.leaf_nodes_canvas, paint_bounds(), freeze_,
                 context.gr_context, sampling_);
}

Texture的使用
Texture是封装的TextureLayer,通过上述流程分析后再来使用TextureLayer就比较简单了,可以通过MethodChannel的方式让Platform端创建一个Texture,最终返回一个textureId到Flutter端,Flutter端通过textureId的映射获取到Flutter Engine层创建好的Texture并包装成一个TextureLayer返回到Flutter framework层。
- 创建MethodChannel
- 创建SurfaceTexture
- 获取textureId创建Texture
以下是以获取摄像头预览为例:
- Android 端示例代码
import android.Manifest;
import android.content.Context;
import android.content.pm.PackageManager;
import android.graphics.SurfaceTexture;
import android.hardware.camera2.CameraAccessException;
import android.hardware.camera2.CameraCaptureSession;
import android.hardware.camera2.CameraDevice;
import android.hardware.camera2.CameraManager;
import android.hardware.camera2.CaptureRequest;
import android.os.Handler;
import android.util.Log;
import android.view.Surface;


import androidx.annotation.NonNull;
import androidx.core.app.ActivityCompat;

import java.util.Arrays;

import io.flutter.embedding.android.FlutterActivity;
import io.flutter.embedding.engine.FlutterEngine;
import io.flutter.plugin.common.MethodChannel;
import io.flutter.view.TextureRegistry;

public class MainActivity extends FlutterActivity {
    public static final String TAG = "MainActivity";
    MethodChannel channel;
    private Handler backgroundHandler;

    @Override
    public void configureFlutterEngine(@NonNull FlutterEngine flutterEngine) {
        super.configureFlutterEngine(flutterEngine);
        backgroundHandler = new Handler();
        channel = new MethodChannel(flutterEngine.getDartExecutor()
                .getBinaryMessenger(), "flutter/texture/channel");

        channel.setMethodCallHandler((call, result) -> {
            switch (call.method) {
                case "createTexture":
                    createTexture(flutterEngine,result);
                    break;
            }
        });
    }

    private void createTexture(FlutterEngine flutterEngine,MethodChannel.Result result) {
        CameraManager cameraManager = (CameraManager) getSystemService(Context.CAMERA_SERVICE);
        if (ActivityCompat.checkSelfPermission(this, Manifest.permission.CAMERA) != PackageManager.PERMISSION_GRANTED) {
            result.success(-1);
            ActivityCompat.requestPermissions(this,new String[]{Manifest.permission.CAMERA},1);
            return;
        }
        TextureRegistry.SurfaceTextureEntry entry =
                flutterEngine.getRenderer().createSurfaceTexture();
        SurfaceTexture surfaceTexture = entry.surfaceTexture();
        Surface surface = new Surface(surfaceTexture);
        try {
            cameraManager.openCamera(
                    "0",
                    new CameraDevice.StateCallback() {
                        @Override
                        public void onOpened(@NonNull CameraDevice device) {
                            result.success(entry.id());
                            CaptureRequest.Builder previewRequestBuilder = null;
                            try {
                                previewRequestBuilder = device.createCaptureRequest(CameraDevice.TEMPLATE_PREVIEW);
                                previewRequestBuilder.addTarget(surface);
                                startPreview(result,device,surface,previewRequestBuilder,backgroundHandler);
                            } catch (CameraAccessException e) {
                                e.printStackTrace();
                            }

                        }

                        @Override
                        public void onDisconnected(@NonNull CameraDevice camera) {

                        }

                        @Override
                        public void onError(@NonNull CameraDevice cameraDevice, int errorCode) {
                            Log.i(TAG, "open | onError");
                            result.success(-1);
                        }
                    },
                    backgroundHandler);
        } catch (CameraAccessException e) {
            e.printStackTrace();
        }


    }

    private void startPreview(MethodChannel.Result result,CameraDevice device, Surface surface, CaptureRequest.Builder previewRequestBuilder, Handler backgroundHandler) {
        try {
            device.createCaptureSession(Arrays.asList(surface), new CameraCaptureSession.StateCallback() {
                @Override
                public void onConfigured(@NonNull CameraCaptureSession session) {
                    Log.i(TAG, "startPreview");
                    try {
                        session.setRepeatingRequest(previewRequestBuilder.build(),null,backgroundHandler );
                    } catch (CameraAccessException e) {
                        e.printStackTrace();
                    }
                }

                @Override
                public void onConfigureFailed(@NonNull CameraCaptureSession session) {
                    Log.i(TAG, "startPreview Failed");
                }
            },backgroundHandler);
        } catch (CameraAccessException e) {
            e.printStackTrace();
        }
    }
}
- Flutter端示例代码
import 'package:flutter/material.dart';
import 'package:flutter/services.dart';

MethodChannel methodChannel = MethodChannel('flutter/texture/channel');

void main() {
  runApp(MyApp());
}

class MyApp extends StatelessWidget {
  // This widget is the root of your application.
  @override
  Widget build(BuildContext context) {
    return MaterialApp(
      title: 'Flutter Demo',
      theme: ThemeData(
        primarySwatch: Colors.blue,
      ),
      home: MyHomePage(title: 'Flutter Demo Home Page'),
    );
  }
}

class MyHomePage extends StatefulWidget {
  MyHomePage({Key? key, required this.title}) : super(key: key);

  final String title;
  @override
  _MyHomePageState createState() => _MyHomePageState();
}

class _MyHomePageState extends State<MyHomePage> {
  int _counter = 0;
  int textureId = -1;

  Future<void> _createTexture() async {
    print('textureId = $textureId');
    if (textureId < 0) {
      methodChannel.invokeMethod('createTexture').then((value) {
        textureId = value;
        setState(() {
          print('textureId ==== $textureId');
        });
      });
    }

  }

  @override
  Widget build(BuildContext context) {

    return Scaffold(
      appBar: AppBar(
        title: Text(widget.title),
      ),
      body: Center(
        child: Column(
          mainAxisAlignment: MainAxisAlignment.center,
          children: <Widget>[
            if (textureId > -1)
              Container(
                width: 300,
                height: 400,
                child: Texture(
                  textureId: textureId,
                ),
              )
          ],
        ),
      ),
      floatingActionButton: FloatingActionButton(
        onPressed: _createTexture,
        tooltip: 'createTexture',
        child: Icon(Icons.add),
      ),
    );
  }
}
上述代码在Android并未创建View,而是创建了SurfaceTexture与camera绑定后通过Texture的形式在Flutter端显示
Texture和PlatformView的区别
PlatformView是Flutter中嵌套Platform中的View,如:TextView。它们的区别在Texture是渲染层的东西,而PlatformView本质是一个View它拥有View所有的属性。
总结
本文通过源码分析以及简单的摄像头预览示例讲解了Flutter外接纹理的原理和使用方式,希望能够帮助部分刚接触Flutter开发的同学加深对Flutter外接纹理的认识。