UIGestureRecognizer(手势识别器)
手势识别在 iOS 中非常重要,他极大地提高了移动设备的使用便捷性。
iOS 系统在 3.2 以后,他提供了六种常用的手势(UIGestureRecognizer 的子类),开发者可以直接使用他们进行手势操作。
- UIPanGestureRecognizer(拖动)
- UIPinchGestureRecognizer(捏合)
- UIRotationGestureRecognizer(旋转)
- UITapGestureRecognizer(点按)
- UILongPressGestureRecognizer(长按)
- ?UISwipeGestureRecognizer(轻扫)
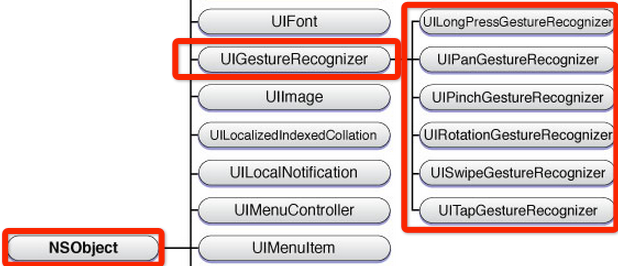
另外,可以通过继承 UIGestureRecognizer 类,实现自定义手势(手势识别器类)。
UIGestureRecognizer 的继承关系:

手势状态
手势状态枚举
typedef NS_ENUM(NSInteger, UIGestureRecognizerState) {
     UIGestureRecognizerStatePossible,   // 尚未识别是何种手势操作(但可能已经触发了触摸事件),默认状态
     UIGestureRecognizerStateBegan,      // 手势已经开始,此时已经被识别,但是这个过程中可能发生变化,手势操作尚未完成
     UIGestureRecognizerStateChanged,    // 手势状态发生转变
     UIGestureRecognizerStateEnded,      // 手势识别操作完成(此时已经松开手指)
     UIGestureRecognizerStateCancelled,  // 手势被取消,恢复到默认状态
     UIGestureRecognizerStateFailed,     // 手势识别失败,恢复到默认状态
     UIGestureRecognizerStateRecognized = UIGestureRecognizerStateEnded // 手势识别完成,同UIGestureRecognizerStateEnded
 };
在六种手势识别中,只有一种手势是离散型手势,就是 UITapGestureRecognizer(点按)。
离散型手势的特点:一旦识别就无法取消,而且只会调用一次手势操作事件(初始化手势时指定的回调方法)。
其他五种手势都是连续型手势。
连续型手势的特点:会多次调用手势操作事件,而且在连续手势识别后可以取消手势。
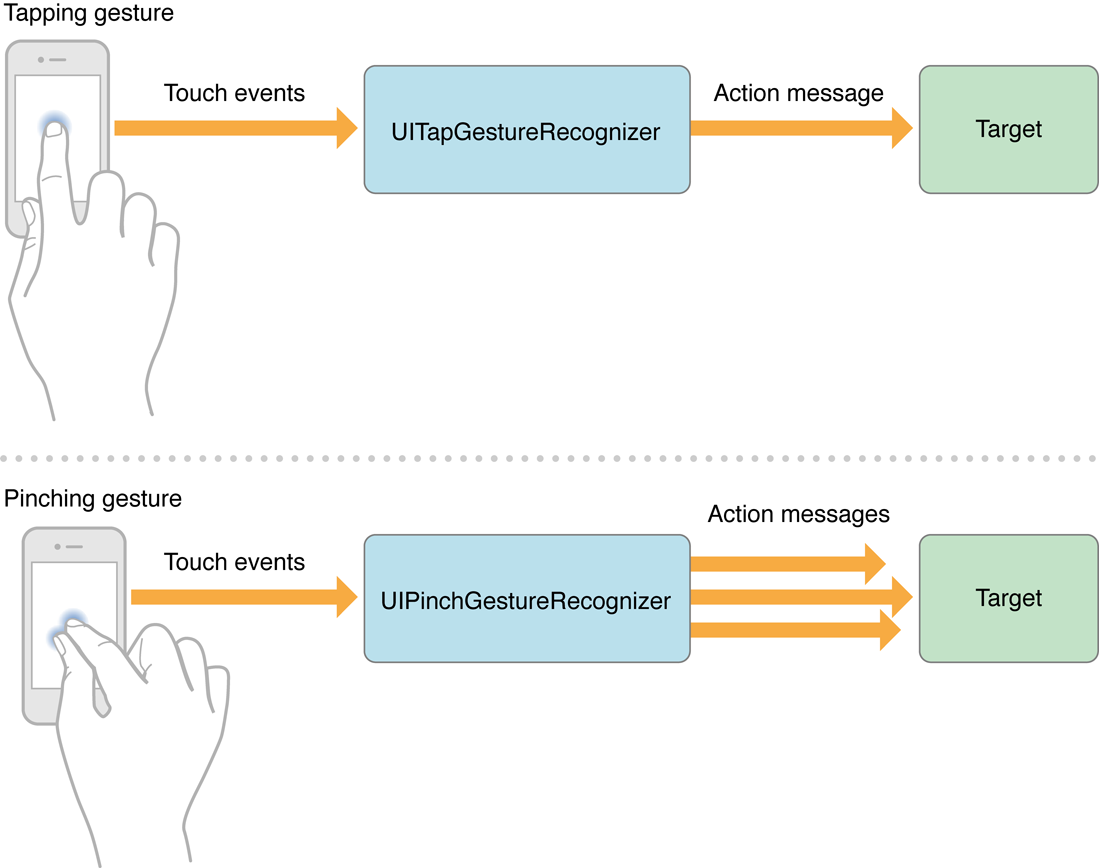
从下图可以看出两者调用操作事件的次数是不同的:

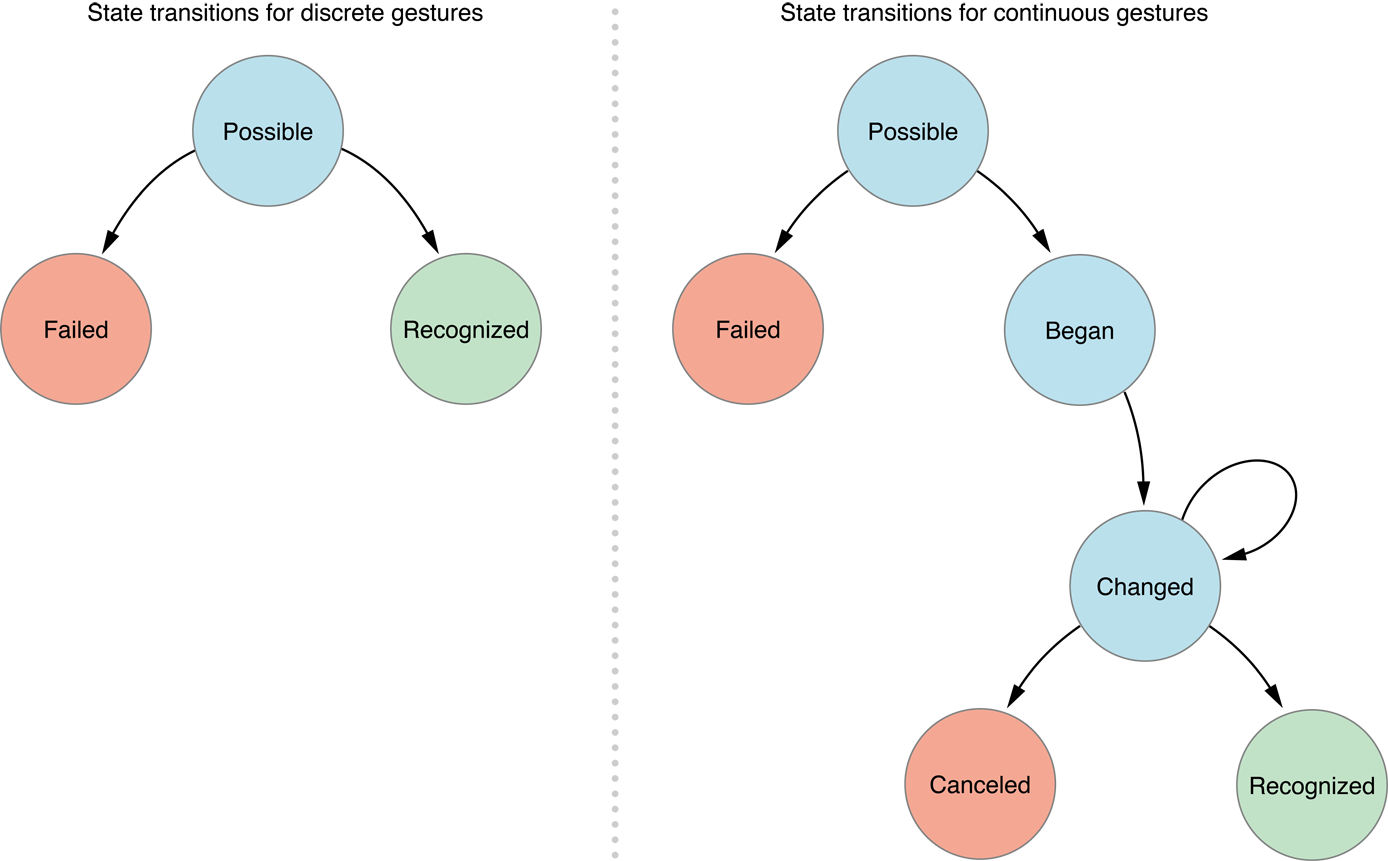
对于离散型手势 UITapGestureRecgnizer 要么被识别,要么失败,点按(假设点按次数设置为1,并且没有添加长按手势)下去一次不松开则此时什么也不会发生,松开手指立即识别并调用操作事件,并且状态为3(已完成)。
但是连续型手势要复杂一些,就拿旋转手势来说,如果两个手指点下去不做任何操作,此时并不能识别手势(因为我们还没旋转)但是其实已经触发了触摸开始事件,此时处于状态0;如果此时旋转会被识别,也就会调用对应的操作事件,同时状态变成1(手势开始),但是状态1只有一瞬间;紧接着状态变为2(因为我们的旋转需要持续一会),并且重复调用操作事件(如果在事件中打印状态会重复打印2);松开手指,此时状态变为3,并调用1次操作事件。
连续手势发生状态转换是由于触摸事件中的移动事件造成的,苹果官方的分析图也说明了这一点:

使用手势步骤
使用手势很简单,分为三步:
- 创建手势识别器对象实例。创建时,指定一个回调方法,当手势开始,改变、或结束时,执行回调方法。
- 设置手势识别器对象实例的相关属性(可选)。
- 添加到需要识别的 View 中。每个手势只对应一个 View,当屏幕触摸在 View 的边界内时,如果手势和预定的一样,那就会执行回调方法。
注意:一个手势只能对应一个 View,但是一个 View 可以有多个手势。
1.点按手势(UITapGestureRecognizer)
//创建手势对象
UITapGestureRecognizer *tapGesture = [[UITapGestureRecognizer alloc] initWithTarget:self action:@selector(tapClick:)];

//设置相关属性
//点击次数(默认1)
tap.numberOfTapsRequired = 1;
//手指的个数(默认1)
tap.numberOfTouchesRequired = 1;

//添加到视图
[testView addGestureRecognizer:tap];
关联方法
- (void)tapClick:(UITapGestureRecognizer *)tap{
    NSLog(@"轻点手势响应!");
}
2.长按手势(UILongPressGestureRecognizer)
//创建手势对象
UILongPressGestureRecognizer *longPressGesture = [[UILongPressGestureRecognizer alloc] initWithTarget:self action:@selector(longPressClick:)];

//设置相关属性
//用几个手指触屏,默认1
longPress.numberOfTouchesRequired = 1;
//设置最短长按时间,单位为秒(默认0.5)
longPress.minimumPressDuration = 1;
//设置手势识别期间所允许的手势可移动范围
longPress.allowableMovement = 10;

//添加到视图
[testView addGestureRecognizer:longPress];
关联方法
- (void)longPressClick:(UILongPressGestureRecognizer *)press {
    //state属性是所有手势父类提供的方法,用于记录手势的状态
    if (press.state == UIGestureRecognizerStateBegan) {
        NSLog(@"长按手势开始响应!");
    } else if (press.state == UIGestureRecognizerStateChanged) {
        NSLog(@"长按手势状态发生改变!");
    } else {
        NSLog(@"长按手势结束!");
    }
}
3.轻扫手势(UISwipeGestureRecognizer)
//创建手势对象(左扫)
UISwipeGestureRecognizer *leftSwipe = [[UISwipeGestureRecognizer alloc] initWithTarget:self action:@selector(swipeGestureClick:)];

//设置相关属性
//设置轻扫的方向
leftSwipe.direction = UISwipeGestureRecognizerDirectionLeft;

//添加到视图
[testView addGestureRecognizer:leftSwipe];

//右扫
UISwipeGestureRecognizer *rightSwipe = [[UISwipeGestureRecognizer alloc] initWithTarget:self action:@selector(swipeGestureClick:)];

rightSwipe.direction = UISwipeGestureRecognizerDirectionRight;

[testView addGestureRecognizer:rightSwipe];
关联方法
-(void)swipeClick:(UISwipeGestureRecognizer *)swpie{
    //如果是左扫
    if (swpie.direction == UISwipeGestureRecognizerDirectionLeft ) {
        self.view.backgroundColor = [UIColor redColor];
        NSLog(@"左扫!");
    } else {
        self.view.backgroundColor = [UIColor greenColor];
        NSLog(@"右扫!");
    }
}
4.平移手势(UIPanGestureRecognizer)
//创建手势对象
UIPanGestureRecognizer *panGesture = [[UIPanGestureRecognizer alloc] initWithTarget:self action:@selector(panGestureClick:)];

//添加到视图
[testView addGestureRecognizer:pan];
关联方法
- (void)panClick:(UIPanGestureRecognizer *)pan {
    NSLog(@"响应!!");
    //通过pan手势,能够获取到pan.view在self.view上的偏移量
    CGPoint point = [pan translationInView:self.view];
    NSLog(@"x=%.2lf y=%.2lf",point.x,point.y);
    //改变中心点坐标(原来的中心点+偏移量=当前的中心点)
    CGPoint newCenter = CGPointMake(pan.view.center.x + point.x, pan.view.center.y + point.y);
	//CGPointZero<==>CGPointMake(0,0)

    //限制拖动范围
    newCenter.y = MAX(pan.view.frame.size.height/2, newCenter.y);
    newCenter.y = MIN(self.view.frame.size.height - pan.view.frame.size.height/2,  newCenter.y);
    newCenter.x = MAX(pan.view.frame.size.width/2, newCenter.x);
    newCenter.x = MIN(self.view.frame.size.width - pan.view.frame.size.width/2, newCenter.x);
    pan.view.center = newCenter;

    //每次调用之后,需要重置手势的偏移量,否则偏移量会自动累加
    [pan setTranslation:CGPointZero inView:self.view];
}
5.捏合手势(UIPinchGestureRecognizer)
//创建手势对象
UIPinchGestureRecognizer *pinchGesture = [[UIPinchGestureRecognizer alloc] initWithTarget:self action:@selector(pichGestureClick:)];

//添加到视图
[imageView addGestureRecognizer:pinch];
关联方法
- (void)pichClick:(UIPinchGestureRecognizer *)pinch {
    //缩放的系数
    NSLog(@"%.2lf", pinch.scale);
    //固定写法
    pinch.view.transform = CGAffineTransformScale(pinch.view.transform, pinch.scale, pinch.scale);
    //重置缩放系数(否则系数会累加)
    pinch.scale = 1.0;
}
6.旋转手势(UIRotationGestureRecognizer)
//创建手势对象
UIRotationGestureRecognizer *rotationGesture = [[UIRotationGestureRecognizer alloc] initWithTarget:self action:@selector(rotationGestureClick:)];

//添加到视图
[imageView addGestureRecognizer:rotation];
关联方法
- (void)rotationClick:(UIRotationGestureRecognizer *)rotation {
    //rotation.rotation 手势旋转的角度
    rotation.view.transform = CGAffineTransformRotate(rotation.view.transform, rotation.rotation);
    //重置角度
    rotation.rotation = 0;
}