Android开发学习总结day1-2
perface
In this article I will show you about button ,EditText and ImageView
for this is the second article of the series I will not write as such detailed as the first but more detailed than other similiar article
Button
if we see the code we will find that button enxtends TextView which means we can use almost every attribute inTextView

example code
在这里插入代码片
background problem
if your version is new you will find that you can’t change the background in button
resolve
we can add Bridge in theme.xml to resolve this problem
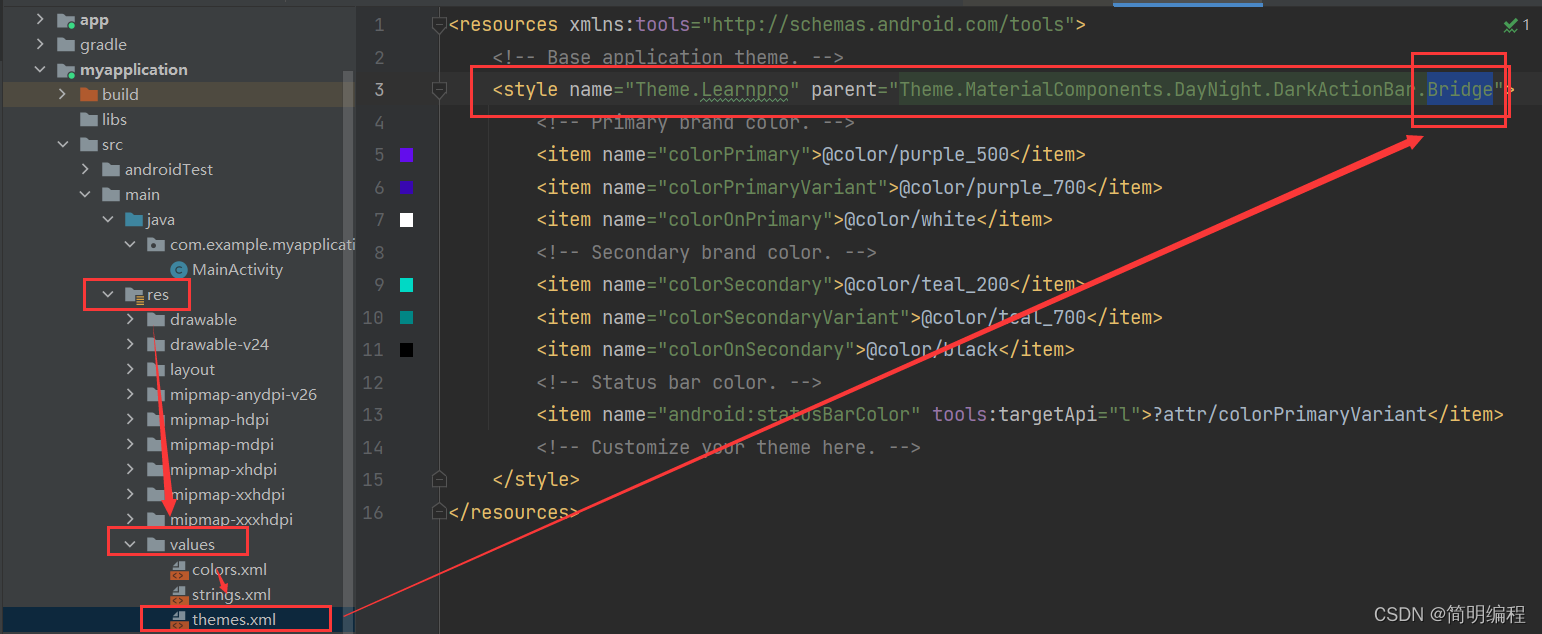
background image
background image is in the background so you can do it like this

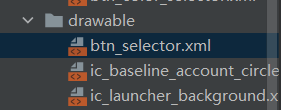


then wirte the code in the btn_selector.xml
<item android:drawable="@drawable/ic_baseline_account_circle_24" android:state_pressed="true"></item>
then you just need to use btn_selector.xml in the activity_main.xml
<Button
        android:text="button"
        android:textColor="@color/black"
        android:background="@drawable/btn_selector"
        android:textSize="20sp"
        android:textStyle="italic"
        android:layout_width="150dp"
        android:layout_height="150dp">
    </Button>
if you click the button you will find:
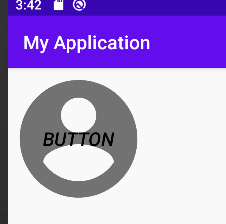
backgroundTint
same as background
Button Event
first you should get button
private final String TAG = "btn!";
Button btn1 = findViewById(R.id.btn1);

ClickEvent
when you click the button it will happened
by the way there have two ways to set
1.use Listener
        btn1.setOnClickListener(new View.OnClickListener() {
            @Override
            public void onClick(View view) {
                Log.e(TAG, "onClick: happened");
            }
        });
lambda
btn1.setOnClickListener(view -> Log.e(TAG, "onClick: happened"));
2.NO Listener

    public void clickEvent(View view) {
        Log.e(TAG, "clickEvent: clickEvent");
    }
LongClickEvent
when you press and hold the button it will happened
1.use Listener
        btn1.setOnLongClickListener(new View.OnLongClickListener() {
            @Override
            public boolean onLongClick(View view) {
                Log.e(TAG, "onLongClick:happened");
                return false;
            }
        });
lambda
        btn1.setOnLongClickListener(view -> {
            Log.e(TAG, "onLongClick:happened");
            return false;
        });
TouchEvent
when you touch the button it will happened
1. use Listener
        btn1.setOnTouchListener(new View.OnTouchListener() {
            @Override
            public boolean onTouch(View view, MotionEvent motionEvent) {
                Log.e(TAG, "onTouch:happened");
                return false;
            }
        });
lambda
        btn1.setOnTouchListener((view, motionEvent) -> {
            Log.e(TAG, "onTouch:happened");
            return false;
        });
EditText
    <EditText
        android:id="@+id/text1"
        android:hint="please enter your name"
        android:background="@color/teal_200"
        android:padding="10dp"
        android:textColor="@color/purple_500"
        android:inputType="text"
        android:drawablePadding="10dp"
        android:layout_width="260dp"
        android:drawableLeft="@drawable/btn_selector"
        android:layout_marginLeft="20dp"
        android:layout_height="60dp">
    </EditText>
Attributes
| AttriName | explain | example |
|---|---|---|
| id | the name of the controller and you can get the controller by it’s id | android:id="@+id/text1" |
| hint | the text which can show by default in the controller | android:hint=“please enter your name” |
| background | the background of the controller you can set it with color or images | android:background="@color/teal_200" |
| padding | the padding of the controller which means that the controller will have inner width | android:padding=“10dp” |
| textColor | the text color of the text in the controller | android:textColor="@color/purple_500" |
| inputType | you can set the type that users must enter the right type or they can’t enter anything | android:inputType=“text” |
| drawablePadding | if you find your drawable images are close to your words you can set this attribute to make a fitness design | android:drawablePadding=“10dp” |
| layout_width | the basic attribute which can set the width of the controller | android:layout_width=“260dp” |
| layout_marginLeft | that means your controller will have a outside width away to other controllers ,what’s more you can set top/bottom/right | android:layout_marginLeft=“20dp” |
| drawableLeft | you can set this attribute to make sure you drawable images is in the left side,what’s more you can set top/bottom/right | android:drawableLeft="@drawable/btn_selector" |
| the basic attribute which can set the width of the controller | android:layout_height=“60dp” |
show result
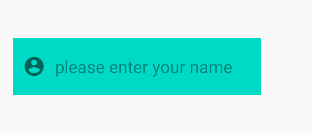
Event
we always need to get the users enter
//get edittext
        EditText viewById = findViewById(R.id.text1);
        Log.e(TAG,"EditText:"+ viewById);
// get button
        Button btn1 = findViewById(R.id.btn1);
// user click
        btn1.setOnClickListener(view ->{
        // get user enter
            String userInput = viewById.getText().toString();
            Log.e(TAG, "user enter => "+userInput );
//            Log.e(TAG, "onClick: happened")
        } );
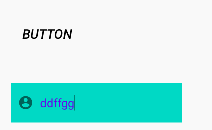
as you can see there have a button and a EditText and I write an event which if users enter something and than click the button we will get the users’ enter!

ImageView
    <ImageView
        android:src="@drawable/btn_selector"
        android:scaleType="fitCenter"
        android:layout_width="150dp"
        android:layout_height="150dp"></ImageView>
show result

Attributes
| AttriName | explain | example |
|---|---|---|
| src | you can set the images by src | android:src="@drawable/btn_selector" |
| scaleType | I suggest you to use “fitXY” or “fitCenter” | android:scaleType=“fitCenter” |
some not necessary scaleType
<attr name="scaleType">
            <!-- Scale using the image matrix when drawing. See
                 {@link android.widget.ImageView#setImageMatrix(Matrix)}. -->
            <enum name="matrix" value="0" />
            <!-- Scale the image using {@link android.graphics.Matrix.ScaleToFit#START}. -->
            <enum name="fitStart" value="2" />
            <!-- Scale the image using {@link android.graphics.Matrix.ScaleToFit#END}. -->
            <enum name="fitEnd" value="4" />
            <!-- Center the image in the view, but perform no scaling. -->
            <enum name="center" value="5" />
            <!-- Scale the image uniformly (maintain the image's aspect ratio) so both dimensions
                 (width and height) of the image will be equal to or larger than the corresponding
                 dimension of the view (minus padding). The image is then centered in the view. -->
            <enum name="centerCrop" value="6" />
            <!-- Scale the image uniformly (maintain the image's aspect ratio) so that both
                 dimensions (width and height) of the image will be equal to or less than the
                 corresponding dimension of the view (minus padding). The image is then centered in
                 the view. -->
            <enum name="centerInside" value="7" />
        </attr>