前言
Hilt 是Google
最新的依赖注入框架,其是基于Dagger研发,但它不同于Dagger。对于Android开发者来说,Hilt可以说专门为Android
打造,提供了一种将Dagger依赖项注入到Android应用程序的标准方法,而且创建了一组标准的组件和作用域,这些组件会自动集成到Android应用程序的各个生命周期中,以简化开发者的上手难度。
引入Hilt
dependencies {
    ...
    // hilt 依赖导入
    implementation "com.google.dagger:hilt-android:2.28-alpha"
    annotationProcessor "com.google.dagger:hilt-android-compiler:2.28-alpha"
    ...
}
 buildscript {
     ...
     dependencies {
         ...
         classpath 'com.google.dagger:hilt-android-gradle-plugin:2.28-alpha'// 导入gradle-plugin 字节码插庄
         // NOTE: Do not place your application dependencies here; they belong
         // in the individual module build.gradle files
     }
 }
注解
- @HiltAndroidApp: 用于Application ,触发Hilt的代码生成,包括适用于应用程序的基类,可以使用依赖注入,应用程序容器是应用程序的父容器,这意味着其他容器可以访问其提供的依赖项。
- @AndroidEntryPoint: 其会创建一个依赖容器,该容器遵循Android类的生命周期
- @Inject: 用来注入的字段,其类型不能为Private,如果要告诉 Hilt 如何提供相应类型的实例,需要将 @Inject 添加到要注入的类的构造函数中。Hilt有关如何提供不同类型的实例的信息也称为绑定。
Hilt的简单用法
具体逻辑还是根据上一篇的送快递逻辑:上一篇
首先Application用到 @HiltAndroidApp
// hilt 基本上都要 用 Application来辅助
@HiltAndroidApp
public class App extends Application {
}
创建两个需要送的物品
//物品1
public class tools {}
//物品2
public class Student {}
在创建两个它们的包裹
@InstallIn(ApplicationComponent.class)
@Module
public class toolsModule {

    @Provides // 暴露对象
    @Singleton//上方是ApplicationComponent用这个注解,作用是保持全局单例
    public tools getTools(){
        return new tools();
    }
}
ActivityComponent.class 能注入到Activity,不能注入到Application
ApplicationComponent.class 能注入到Activity, 能注入到Application
@InstallIn(ActivityComponent.class)
@Module
public class StudentModel {

    @Provides // 暴露对象
    @ActivityScoped//上方是ActivityComponent用这个注解,作用是保持局部单例
    public Student getStudent(){
        return new Student();
    }
}
在Activity1中使用
   @Inject
    Student student;

    @Inject
    Student student1;

    @Inject
    tools tools;

    @Inject
    tools tools1;
     @Override
    protected void onCreate(Bundle savedInstanceState) {
      ...
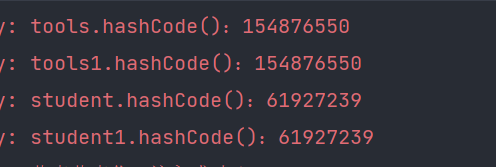
       Log.e(TAG, "tools.hashCode():"+tools.hashCode());
        Log.e(TAG, "tools1.hashCode():"+tools1.hashCode());

        Log.e(TAG, "student.hashCode():"+student.hashCode());
        Log.e(TAG, "student1.hashCode():"+student1.hashCode());
    }
打印结果为:

跳转到Activity2中
@AndroidEntryPoint // 我是被注解的 被注入的
public class MainActivity2 extends BaseActivity {
    @Inject
    Student student2;
    @Inject
    Student student3;
    @Inject
    tools tools2;
    @Inject
    tools tools3;
    @Override
    protected void onCreate(Bundle savedInstanceState) {
        super.onCreate(savedInstanceState);
        setContentView(R.layout.activity_main2);

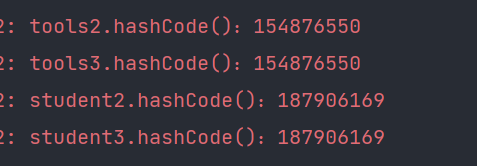
        Log.e(TAG, "tools2.hashCode():"+tools2.hashCode());
        Log.e(TAG, "tools3.hashCode():"+tools3.hashCode());

        Log.e(TAG, "student2.hashCode():"+student2.hashCode());
        Log.e(TAG, "student3.hashCode():"+student3.hashCode());

    }
}
打印结果为:

会发现tool是全局单例,而student是局部单例
注入绑定接口
先定义一个简单的接口
// 接口
public interface TestInterface {
    void method();
}
接口实现类
// 接口的实现类
public class TestClassImpl implements TestInterface {

    @Inject
    TestClassImpl() {}

    @Override
    public void method() {
        Log.e("MainActivity", "恭喜恭喜你,注入成功√");
    }
}
这也得创建一个Module
@InstallIn(ActivityComponent.class)
@Module
public abstract class TestInterfaceModule {
    @Binds //        接口              与         实现类   的注入工作
    public abstract TestInterface bindTestClass(TestClassImpl testClass);
}
在Activity中使用
@AndroidEntryPoint // 我是被注解的 被注入的
public class MainActivity extends BaseActivity {

    @Inject
    TestInterface testInterface;

    @Override
    protected void onCreate(Bundle savedInstanceState) {

        ...
        testInterface.method();

    }
}
打印结果:
