编译环境:
   - android 版本 - android-10.0.0_r41
   - 架构 - aosp_x86_64-eng
   - 内核分支:android-goldfish-4.14-gchips
编译资源
参考视频教程:https://b23.tv/BV1sm4y1S7RE
编译流程
前提条件:已编译好android源码
- 本文选择了 android-10.0.0_r41分支的android 源码。可通过下面连接参考支持的机型的分支:
https://source.android.google.cn/setup/start/build-numbers#source-code-tags-and-builds
2. 确认模拟器内核版本(在android 源码目录下)
??source build/envsetup.sh
??lunch aosp_x86_64-eng
??emulator
如上图 kernel version : 4.14.112+… 确认内核版本是4.14的
下载android 模拟器内核源码
参考:https://source.android.google.cn/setup/build/building-kernels-deprecated
1.创建内核文件夹 (android-kernel)
??mkdir android-kernel
2. cd android -kernel
3. 下载内核
??git clone https://aosp.tuna.tsinghua.edu.cn/kernel/goldfish.git
4. cd goldfish
5. 查看远程分支情况
??git branch -a6. 切换分支 (根据前面确定了模拟器的内核是4.14版本)
git checkout remotes/origin/android-goldfish-4.14-gchips
配置编译内核环境
在goldfish 目录下执行下面命令:
- export ARCH=x86_64
- export SUBARCH=x86_64
- export CROSS_COMPILE=x86_64-linux-android-
- export PATH=aosp-10.0.0_r41(android源码目录)/prebuilts/gcc/linux-x86/x86/x86_64-linux-android-4.9/bin:$PATH
编译内核
make x86_64_ranchu_defconfig
make -j8
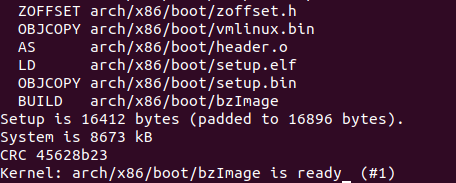
编译成功后生成 bzImage,如下图:
运行内核
回到android 源码目录执行如下命令:
- source build/envsetup.sh
- lunch aosp_x86_64-eng
- emulator -kernel 内核地址/goldfish/arch/x86/boot/bzImage
问题集锦
- error: Cannot generate ORC metadata for CONFIG_UNWINDER_ORC=y, please install libelf-dev, libelf-devel or elfutils-libelf-devel
sudo apt-get install libelf-dev
- fatal error: openssl/bio.h: No such file or directory
21 | #include <openssl/bio.h>
sudo apt-get install libssl-dev
- scripts/Kconfig.include:35: compiler ‘x86-linux-android-gcc’ not found
这个问题是因为andriod 11源码/prebuilts/gcc/linux-x86/x86/x86_64-linux-android-4.9/bin中没有x86-linux-android-gcc 这个文件。但是android10源码中有,所以我的解决方法是将为android10编译。
- error New address family defined, please update secclass_map
解决方法:
- 在内核目录下/goldfish/scripts/selinux/genheaders/genheaders.c 和/goldfish/scripts/selinux/mdp/mdp.c 删除下面引用:
??#include <sys/socket.h>- 在内核目录下/goldfish/security/selinux/include/classmap.h中添加下面引用:
??#include <linux/socket.h>


