什么是编译时技术?代码运行到手机上需要以下3个过程

编译时技术,就是在编译期间,生成一些业务代码,最终一起打包成dex文件运行在手机上,类似的框架像ARouter、ButterKnife等等
1 注解
1.1 注解基础知识
对于注解,我们常见的就是Override注解,我们在自定义注解的时候,也要像Override一样,声明元注解(Target和Retention)
@Target(ElementType.METHOD)
@Retention(RetentionPolicy.SOURCE)
public @interface Override {
}
(1)Target:注解的作用域,这个METHOD指的是方法,只能放在方法上,像Override注解都是放在方法上,意思就是重写方法;除此之外,还有TYPE(放在类、解接口、枚举上),FIELD(放在属性参数上)
(2)Retention:注解的生命周期,例如SOURCE(源码期),在编译成class文件之后,该注解就没有了,因此只存在源码期;除此之外还有CLASS(编译期)、RUNTIME(运行期),编译时技术,用到的就是编译期的注解
1.2 自定义注解
熟悉使用ButterKnife的伙伴,应该了解,像findViewById、setOnClickListener等操作,都是通过注解一行代码代替,减少了很多样板代码的调用
 @BindView(R.id.tv1)
 TextView tv1;
那么接下来,就会利用编译时技术,亲手打造一个“黄油刀”,就先拿@BindView来实现,通常是放在属性变量是,那么先自定义注解
@Target(ElementType.FIELD) //放在属性变量
@Retention(RetentionPolicy.CLASS) //编译时期
public @interface BindView {
	int value();
}
该注解用于修饰属性变量,并且在编译期生效,其中有一个参数为int类型
2 注解处理器
我们使用了注解,那么怎么能够使得注解生效,那么就需要注解处理器来干活了,通常我们在使用一个框架的时候,需要使用 annotationProcessor 来导入,通常这种仓库就是用来进行注解处理的,也就是APT技术(注解处理工具)
我们前面写的注解只是声明了一个标记,注解处理器真正要干活,那么还需要注册一个服务 auto-service,那么在编译期这个服务会开启,扫描全部的代码查看哪个地方标准了@BindView注解,那么会生成相应的代码
注册auto-service服务 👇🏻

annotationProcessor 'com.google.auto.service:auto-service:1.0-rc4'
compileOnly 'com.google.auto.service:auto-service:1.0-rc3'
2.1 AbstractProcessor
Googlet提供的AbstractProcessor,能够使得一个类变为注解处理器,使用@AutoService注解标记这个类是注解处理器
@AutoService(Processor.class)
public class AnnotationCompiler extends AbstractProcessor {
    //代码文件生成
    private Filer filer;

    @Override
    public synchronized void init(ProcessingEnvironment processingEnv) {
        super.init(processingEnv);

        logger("init processor");
        filer = processingEnv.getFiler();
    }

    /**
     * 注解处理器支持的Java版本
     * @return
     */
    @Override
    public SourceVersion getSupportedSourceVersion() {
        return processingEnv.getSourceVersion();
    }

    /**
     * 注解处理器支持的注解类型 @BindView
     * @return
     */
    @Override
    public Set<String> getSupportedAnnotationTypes() {
        Set<String> set = new HashSet<>();
        set.add(BindView.class.getCanonicalName());
        return set;
    }

    @Override
    public boolean process(Set<? extends TypeElement> set, RoundEnvironment roundEnvironment) {
        return false;
    }


    private void logger(String content){
        Messager messager = processingEnv.getMessager();
        messager.printMessage(Diagnostic.Kind.NOTE,content);
    }
}
其中,有一些工具类需要使用
(1)Filer:代码文件生成,用于输出自定义的代码;
(2)Messager:在注解处理器中,不能断点调试,也不能打普通的Log日志,可以通过Messager来打印日志输出
(3)getSupportedSourceVersion:注解处理器支持的Java版本,例如1.8/11等等,这里通过ProcessingEnvironment来动态获取
(4)getSupportedAnnotationTypes:注解处理器支持的注解类型,这里就是我们自定义的注解,当前注解处理器只关注支持的注解类型
2.2 Element(Java结构化)
我们前期的准备工作完成之后,就可以着手对应的业务处理,注解处理工作都是在process方法内进行。
@Override
public boolean process(Set<? extends TypeElement> set, RoundEnvironment roundEnvironment) {
    //拿到被标准@BindView的节点
    Set<? extends Element> elements = roundEnvironment.getElementsAnnotatedWith(BindView.class);

    return false;
}
如果想要知道,工程当中有哪些被标准了我们的注解,可以通过getElementsAnnotatedWith来获取,最终得到了一个Element集合;
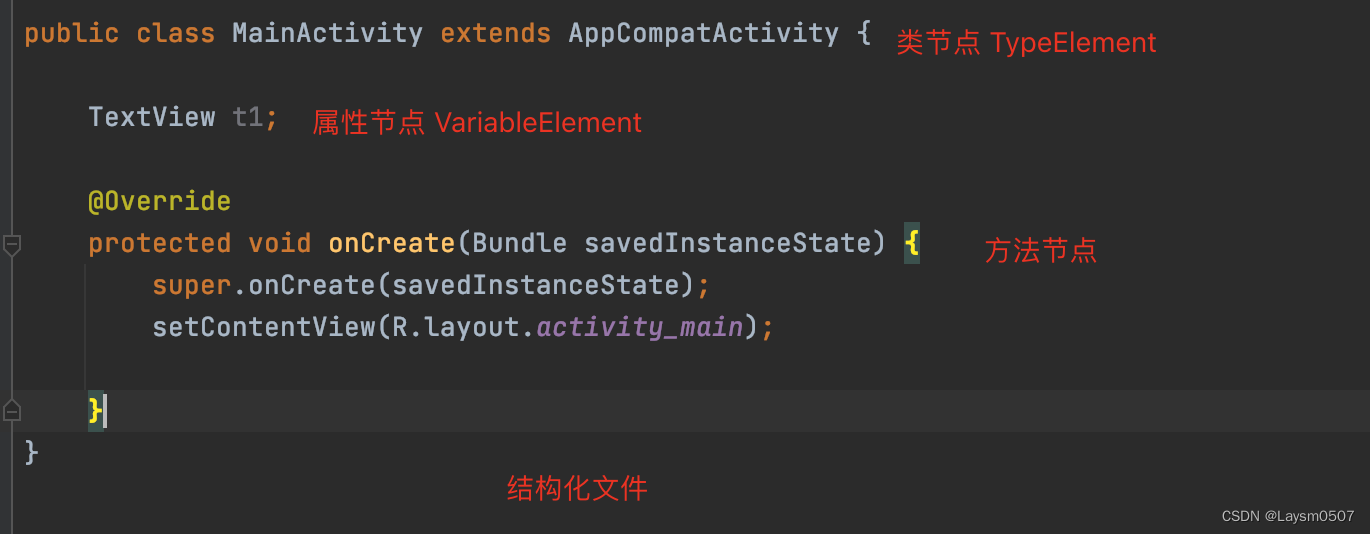
什么Element?Element可以看做是节点,其实所有的Java文件,例如MainActivity.java文件就是一个java结构化文件,其中有类、方法、属性等,都对应各自的节点

(1)TypeElement:类节点
(2)ExecutableElement:方法节点
(3)VariableElement:成员变量的节点
这三类节点的父类都是Element,通过getElementsAnnotatedWith得到的是一个Element集合,并没有声明明确的类型,是因为注解可能放在任意的位置上,我们可以根据Element的类型,来做响应的处理。
通过getElementsAnnotatedWith获取@BindView注解使用的全部节点,这里有一点需要区分,节点分布在不同的Activity,像MainActivity使用了BindView,TwoActivity也使用了BindView,需要做到每个界面与节点一一对应
@Override
public boolean process(Set<? extends TypeElement> set, RoundEnvironment roundEnvironment) {
    //拿到被标准@BindView的节点
    Map<TypeElement,ElementType> map = processElementType(roundEnvironment);

    return false;
}
这里创建一个Map集合,Key代表每个Activity,都是一个类,就是TypeElement,Value代表这个Activity所有的节点的集合,当然是区分类型的,有的是成员变量的集合,有的是方法的集合
public class ElementType {

    private List<VariableElement> variableElementList;
    private List<ExecutableElement> executableElements;

    public List<ExecutableElement> getExecutableElements() {
        return executableElements;
    }

    public void setExecutableElements(List<ExecutableElement> executableElements) {
        this.executableElements = executableElements;
    }

    public void setVariableElementList(List<VariableElement> variableElementList){
        this.variableElementList = variableElementList;
    }
    public List<VariableElement> getVariableElementList() {
        return variableElementList;
    }
}
private Map<TypeElement, ElementType> processElementType(RoundEnvironment roundEnvironment) {

    Map<TypeElement, ElementType> map = new HashMap<>();
    Set<? extends Element> elements = roundEnvironment.getElementsAnnotatedWith(BindView.class);
    for (Element element : elements) {
        //BindView标注的是成员变量
        VariableElement variableElement = (VariableElement) element;
        //获取当前节点的所在的类
        TypeElement typeElement = (TypeElement) variableElement.getEnclosingElement();
        if(map.containsKey(typeElement)){
            ElementType elementType = map.get(typeElement);
            if(elementType.getVariableElementList() == null){
                List<VariableElement> variableElementList = new ArrayList<>();
                variableElementList.add(variableElement);
                elementType.setVariableElementList(variableElementList);
            }else {
                elementType.getVariableElementList().add(variableElement);
            }
        }else {
            ElementType elementType = new ElementType();
            List<VariableElement> variableElementList = new ArrayList<>();
            variableElementList.add(variableElement);
            elementType.setVariableElementList(variableElementList);
            map.put(typeElement,elementType);
        }
    }

    return map;
}
将所有的注解按照类分组之后,就可以根据实际的业务需求处理注解,当
@Override
    public boolean process(Set<? extends TypeElement> set, RoundEnvironment roundEnvironment) {
        //拿到被标准@BindView的节点
        Map<TypeElement, ElementType> map = processElementType(roundEnvironment);
        Writer writer = null;
        if (map.size() > 0) {
            Iterator<TypeElement> iterator = map.keySet().iterator();
            while (iterator.hasNext()) {
                //类节点 MainActivity TwoActivity
                TypeElement typeElement = iterator.next();
                //获取当前类全部的成员变量节点
                List<VariableElement> variableElementList = map.get(typeElement).getVariableElementList();
                //获取当前类的类名
                String clazzName = typeElement.getSimpleName().toString();
                //获取包名
                String packageName = getPackageName(typeElement);
                //文件名
                String fileName = clazzName + "$$ViewBinder";
                try {
                    //在这个包路径下,生成这个类
                    JavaFileObject fileObject = filer.createSourceFile(packageName + "." + fileName);
                    writer = fileObject.openWriter();
                    //写入代码
                    StringBuffer stringBuffer = getCustomeCode(packageName, fileName, variableElementList, clazzName);
                    writer.write(stringBuffer.toString());
                } catch (IOException e) {
                    e.printStackTrace();
                }finally {
                    try {
                        writer.close();
                    } catch (IOException e) {
                        e.printStackTrace();
                    }
                }
            }
        }

        return false;
    }
(1)如何获取当前类的包名?通过ProcessingEnvironment提供的getElementUtils工具获取,最终获取到的是一个包节点PackageElement
/**
 * 获取包名
 *
 * @param typeElement
 */
private String getPackageName(TypeElement typeElement) {
    //获取包节点
    PackageElement packageElement = processingEnv.getElementUtils().getPackageOf(typeElement);
    return packageElement.getQualifiedName().toString();
}
(2)如何创建一个类文件?通过Filer的createSourceFile方法,传入这个类的全类名,可以选择放在某个文件夹下,统一管理
JavaFileObject fileObject = filer.createSourceFile(packageName + "." + fileName);
2.3 Writer
在对所有的注解依赖节点分组之后,就需要重新生成一个与BindView相关的文件,这个文件中的代码,目前先使用Writer,其实无论是Java还是Kotlin,都有一个面向对象的代码生成类,JavaPoet或者KotlinPoet,在之后路由框架中会着重介绍,目前就暂时使用Writer写入代码
package com.des.demo02;

public class MainActivity$$ViewBinder {

    public MainActivity$$ViewBinder(com.des.demo02.MainActivity target){
        target.t1 = target.findViewById(R.id.tv1);
    }
}
其实剩下的问题,就是我需要什么代码,我事先先写出来一个模板,接着把这个模板格式直接套进去即可
private StringBuffer getCustomeCode(String packageName, String fileName, List<VariableElement> variableElementList, String clazzName) {
   StringBuffer stringBuffer = new StringBuffer();

   stringBuffer.append("package " + packageName);
   stringBuffer.append("public class " + fileName + "{");
   stringBuffer.append("public " + fileName + "(" + packageName + "." + clazzName + " target){");

   //写大括号内部的代码
   for (VariableElement element : variableElementList) {

       //获取注解中的值
       int resId = element.getAnnotation(BindView.class).value();
       //获取成员变量的名字
       String simpleName = element.getSimpleName().toString();
       stringBuffer.append("target."+simpleName+" = target.findViewById("+resId+");");
   }
   stringBuffer.append("}\n}");

   return stringBuffer;
}
像这里就是需要自己手动导包,如果使用JavaPoet就会自动导包,更具备面向对象的编程思路。
package com.tal.demo02;

public class MainActivity$$ViewBinder {
    public MainActivity$$ViewBinder(com.tal.demo02.MainActivity target) {
        target.t1 = target.findViewById(2131231174);
    }
}
这就是最终自动生成的代码,当前这也只是方法,需要做统一的初始化管理
public class MyButterKnife {

    public static void bind(Object activity){

        //获取类名
        String name = activity.getClass().getName();
        String bindName = name+"$$ViewBinder";
        try {
            Class<?> aClass = Class.forName(bindName);
            Constructor<?> declaredConstructor = aClass.getConstructor(activity.getClass());
            declaredConstructor.newInstance(activity);
        } catch (Exception e) {
            e.printStackTrace();
        }
    }
}
其实就是通过反射来获取MainActivity$$ViewBinder实例,并调用MainActivity$$ViewBinder的构造方法,最终将TextView给实例化
public class MainActivity extends AppCompatActivity {

    @BindView(R.id.tv1)
    TextView t1;

    @Override
    protected void onCreate(Bundle savedInstanceState) {
        super.onCreate(savedInstanceState);
        setContentView(R.layout.activity_main);

        MyButterKnife.bind(this);

        t1.setText(1233333+"");
    }
}
最终的呈现就是这样,不再使用findViewById就能直接实例化对象,节省了很多代码,其实这个技术并不负责,而是在于你对于一些API,以及属性是否了解,对于注解是否了解,这才是关键所在。
