本文约5.01千字,新手阅读需要6分钟,复习需要3分钟 【收藏随时查阅不再迷路】
👉关于作者
众所周知,人生是一个漫长的流程,不断克服困难,不断反思前进的过程。在这个过程中会产生很多对于人生的质疑和思考,于是我决定将自己的思考,经验和故事全部分享出来,以此寻找共鸣 !!!
专注于Android/Unity和各种游戏开发技巧,以及各种资源分享(网站、工具、素材、源码、游戏等)
有什么需要欢迎私我,交流群让学习不再孤单。

👉前提
这是小空坚持写的Android新手向系列,欢迎品尝。
大佬(×)
新手(√)
👉实践过程
Chip控件是标签,她和ChipGroup结合使用可以实现流式布局。原来实现流式布局都需要我们自定义,现在Android官方默认提供了控件,实现起来更方便了。
她俩都属于material兼容包里的内容,截止目前2022年2月最新的Android Studio开发工具,material包都是默认导入的,如果你属于老项目,那么去build.gradle中导入吧
😜前提使用条件
保障项目引入了material兼容包。
应用style中主题需要是MaterialComponents相关主题,仅这个前提就导致了该控件使用次数降低。
😜效果实例
<?xml version="1.0" encoding="utf-8"?>
<LinearLayout xmlns:android="http://schemas.android.com/apk/res/android"
    android:layout_width="match_parent"
    android:layout_height="match_parent"
    android:orientation="vertical">
    <com.google.android.material.chip.Chip
        android:layout_width="wrap_content"
        android:layout_height="wrap_content"
        android:text="默认Chip" />
    <com.google.android.material.chip.Chip
        style="@style/Widget.MaterialComponents.Chip.Filter"
        android:layout_width="wrap_content"
        android:layout_height="wrap_content"
        android:text="Chip-内置Filter样式" />
    <com.google.android.material.chip.Chip
        style="@style/Widget.MaterialComponents.Chip.Entry"
        android:layout_width="wrap_content"
        android:layout_height="wrap_content"
        android:text="Chip-内置Entry样式" />
    <com.google.android.material.chip.Chip
        style="@style/Widget.MaterialComponents.Chip.Choice"
        android:layout_width="wrap_content"
        android:layout_height="wrap_content"
        android:text="Chip-内置Choice样式" />
</LinearLayout>

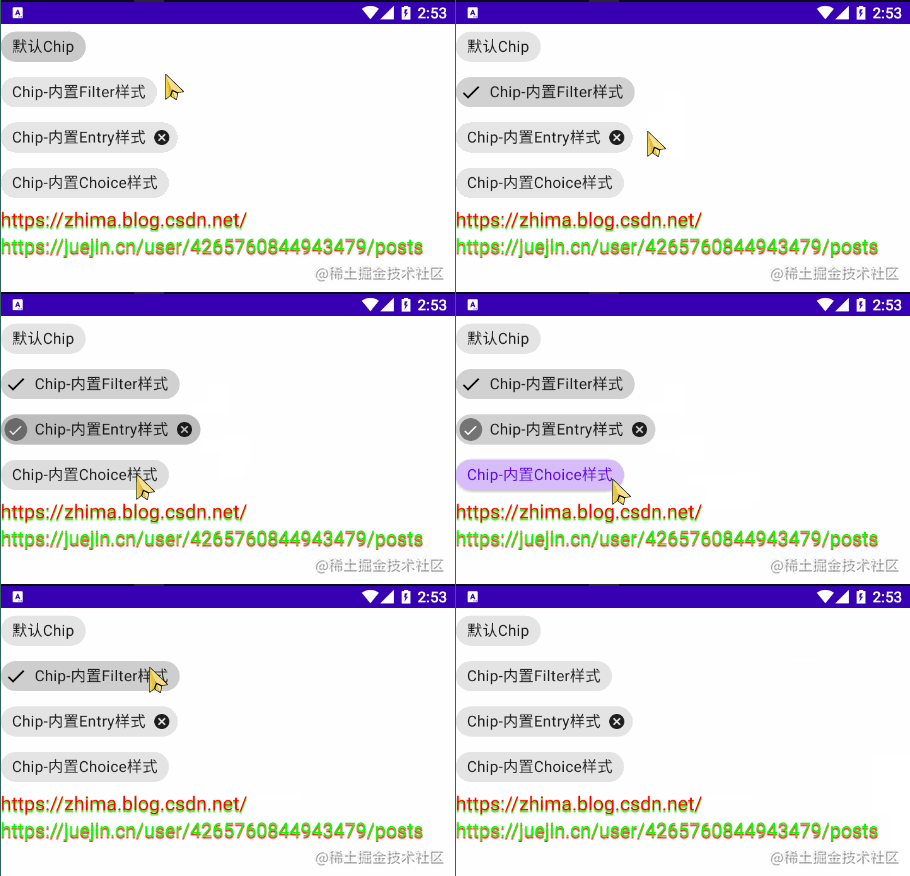
官方为我们提供了四个样式:
- 默认是Action样式,只是普通标签,无任何特殊效果。
- 内置Filter样式,具有选中效果,前方有选中图标展示
- 内置Entry样式,具有选中效果,末尾一直显示删除图表,点击有选中图标展示
- 内置Choice样式,具有选中效果,前后无图标,有选中颜色变化效果
😜基本属性
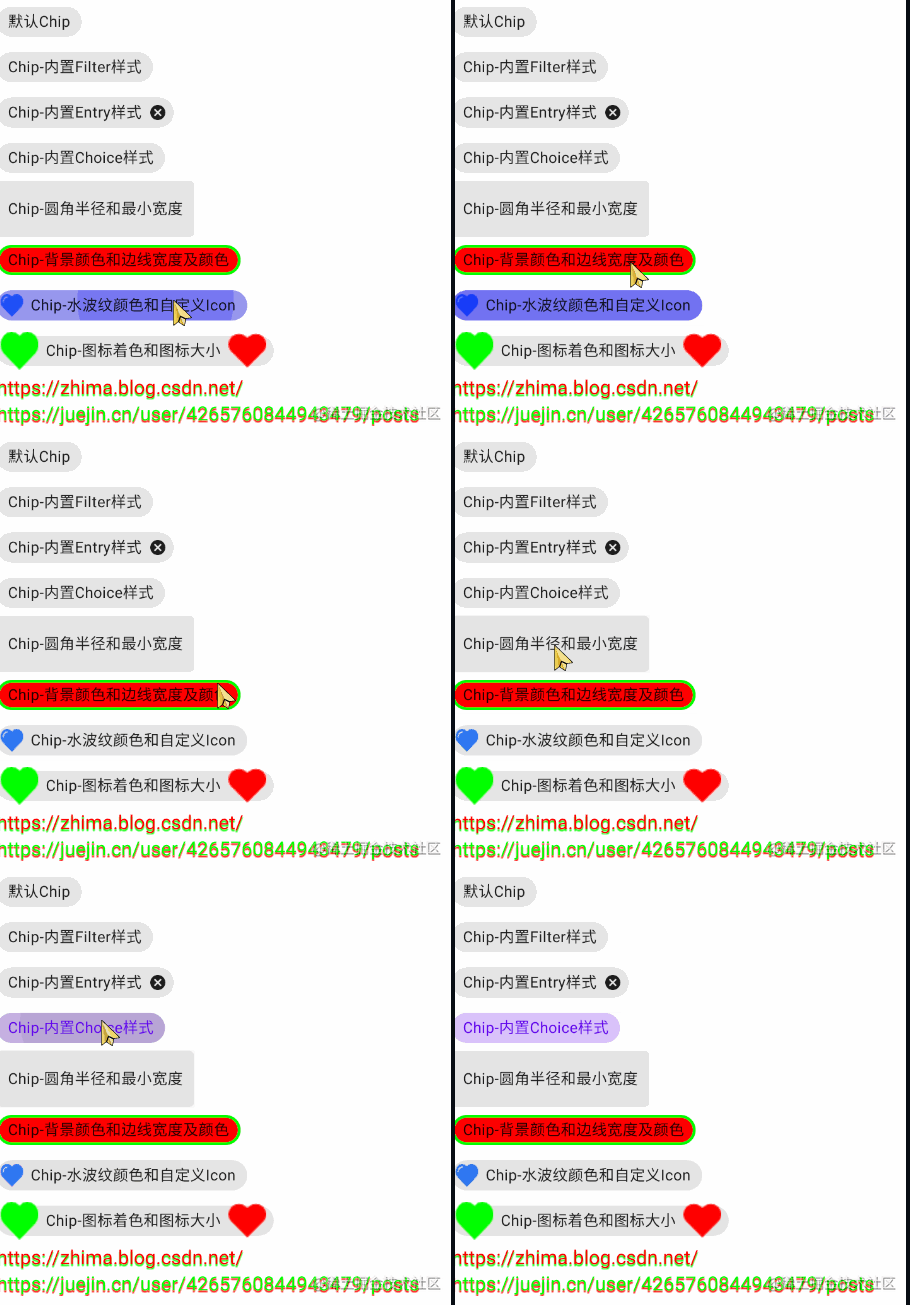
【app:chipCornerRadius】:设置圆角半径,从直角到圆角
【app:chipMinHeight】:设置最小高度
【app:chipBackgroundColor】:设置背景颜色
【app:chipStrokeWidth】:设置边线宽度
【app:chipStrokeColor】:设置边线颜色,需要chipStrokeWidth大于0
【app:rippleColor】:水波纹颜色,就是点击的瞬间那个动效颜色
【app:chipIconVisible】:设置前面的图标是否展示,控制的是app:chipIcon属性的ICON
【app:chipIcon】:设置文字前面的图标
【app:closeIcon】:设置文字后面的图标,需要app:closeIconVisible属性为true,默认false
【app:closeIconSize】:设置文字后面图标的大小
【app:chipIconSize】:设置文字前面图标的大小
【app:closeIconTint】:设置文字后面图标的前置着色
【app:chipIconTint】:设置文字前面图标的前置着色
<com.google.android.material.chip.Chip
    android:layout_width="wrap_content"
    android:layout_height="wrap_content"
    android:text="Chip-圆角半径和最小宽度"
    app:chipCornerRadius="6dp"
    app:chipMinHeight="60dp" />
<com.google.android.material.chip.Chip
    android:layout_width="wrap_content"
    android:layout_height="wrap_content"
    android:text="Chip-背景颜色和边线宽度及颜色"
    app:chipBackgroundColor="#ff0000"
    app:chipStrokeColor="#00ff00"
    app:chipStrokeWidth="3dp" />
<com.google.android.material.chip.Chip
    android:layout_width="wrap_content"
    android:layout_height="wrap_content"
    android:text="Chip-水波纹颜色和自定义Icon"
    app:chipIcon="@drawable/icon_xin"
    app:chipIconVisible="true"
    app:rippleColor="#0000ff" />
<com.google.android.material.chip.Chip
    android:layout_width="wrap_content"
    android:layout_height="wrap_content"
    android:text="Chip-图标着色和图标大小"
    app:chipIcon="@drawable/icon_xin"
    app:chipIconSize="40dp"
    app:chipIconTint="#00ff00"
    app:closeIcon="@drawable/icon_xinsui"
    app:closeIconSize="40dp"
    app:closeIconTint="#ff0000"
    app:closeIconVisible="true" />

👉其他
📢作者:小空和小芝中的小空
📢转载说明-务必注明来源:https://zhima.blog.csdn.net/
📢这位道友请留步??,我观你气度不凡,谈吐间隐隐有王者霸气💚,日后定有一番大作为📝!!!旁边有点赞👍收藏🌟今日传你,点了吧,未来你成功??,我分文不取,若不成功??,也好回来找我。
温馨提示:点击下方卡片获取更多意想不到的资源。

