Android插件化实践
插件中方法调用实践
双亲委托加载机制
1.加载流程
首先检测这个类是否已经被加载,如果已经加载了,直接获取并返回;如果没有被加载,parent不为null,则调用parent的loadClass进行加载,依此递归,如果找到了或者加载了就返回了,如果既没找到也加载不了,才自己去加载。这个过程就是双亲委托加载机制。
这种方式加载类的优点:
- 避免重复加载。当父加载已经加载了该类的时候,就没有必要子ClassLoader再加载一次。
- 安全性考虑,防止核心API库被随意篡改
2.为什么DexClassLoader的parent不传入BaseDexClassLoader?
跟加载流程有关,我们传入parent的目的是为了优化,让它递归查找,从而不重复加载;而系统根本就没用到BaseDexClassLoader去加载,所以parent传BaseDexClassLoader和传null是差不多的。
宿主调用插件流程
1.怎样把插件的dex文件放到宿主的dexElements数组里面?
关键思路:
- 数组的dexElements > dexElementsField > DexPathList对象 > pathList的Field > BaseDexClassLoader对象 > 宿主和插件的类加载器
- 插件的dexElements
- 合并宿主的dexElements和插件的dexElements
- 将合并的dexElements赋值到宿主的dexElements
加载插件实例
1.被调用插件的构建
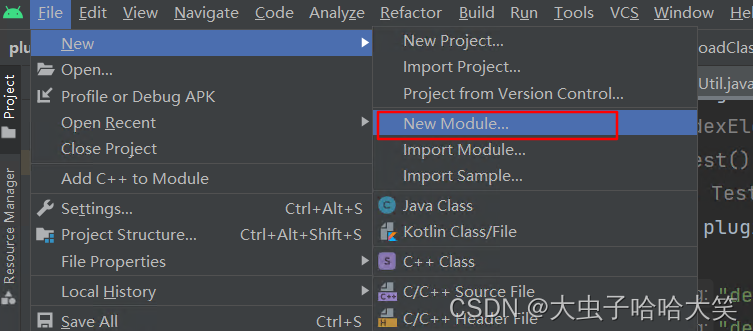
添加新的Module
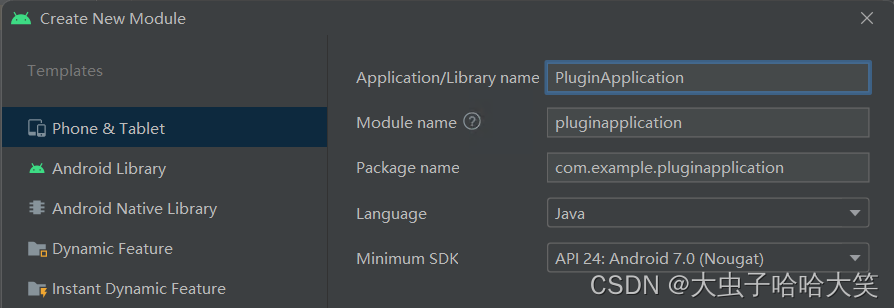
模板选择左边第一个
新建用于测试的Test类
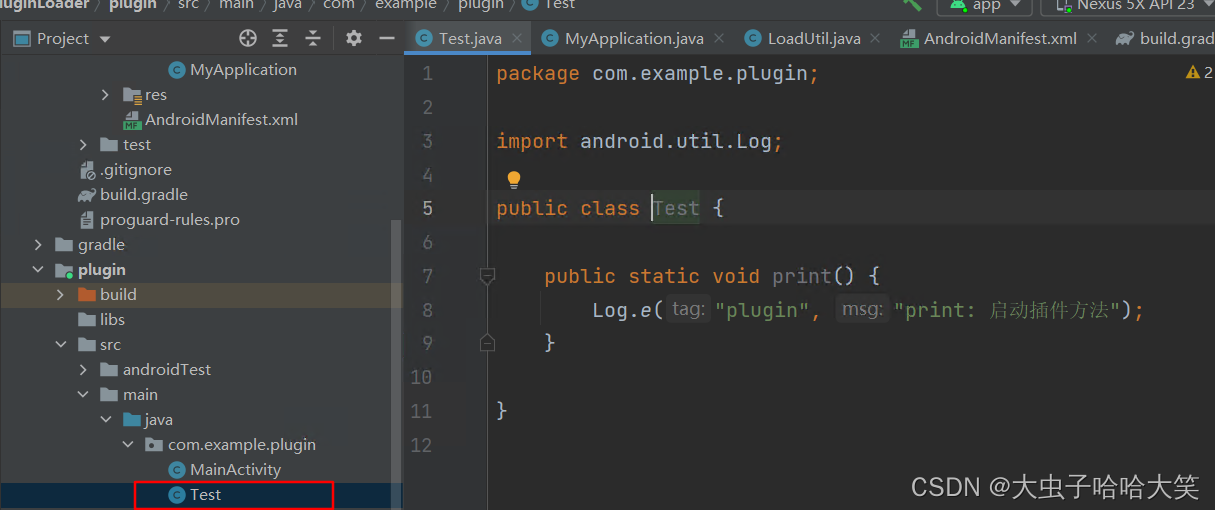
Test类的代码具体如下:
package com.example.plugin;

import android.util.Log;

public class Test {
    public static void print() {
        Log.e("plugin", "print: 启动插件方法");
    }
}
编译生成plugin-debug.apk文件:
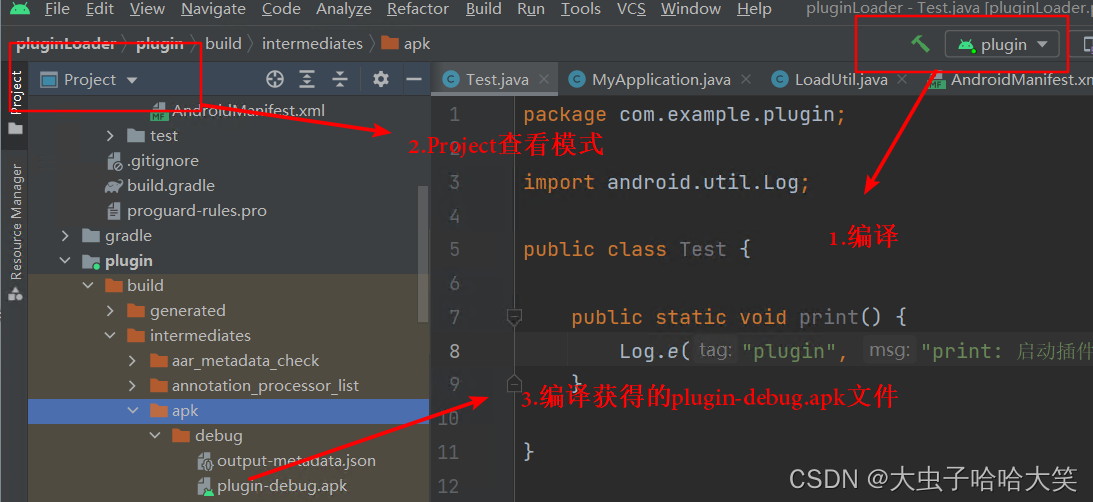
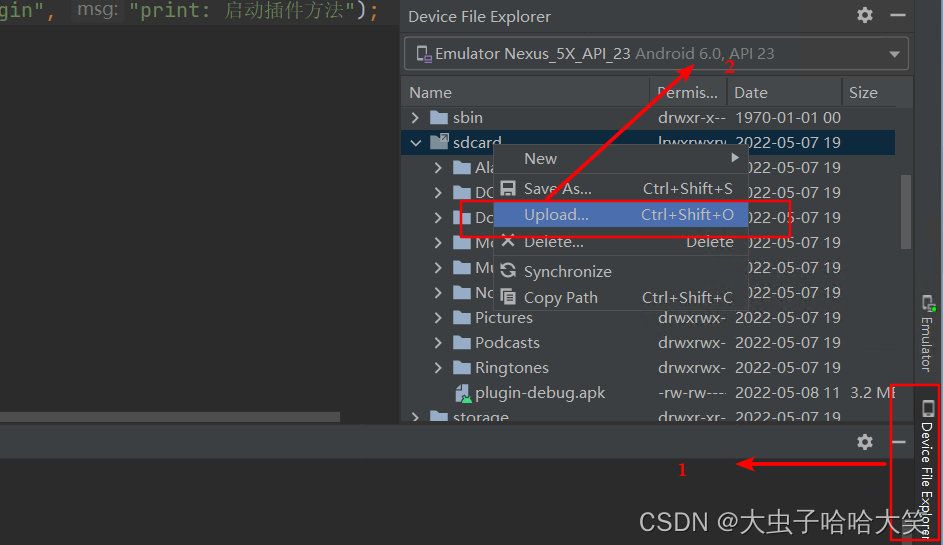
将生成的apk文件上传到sdcard根目录中:
2.在宿主应用程序中调用插件
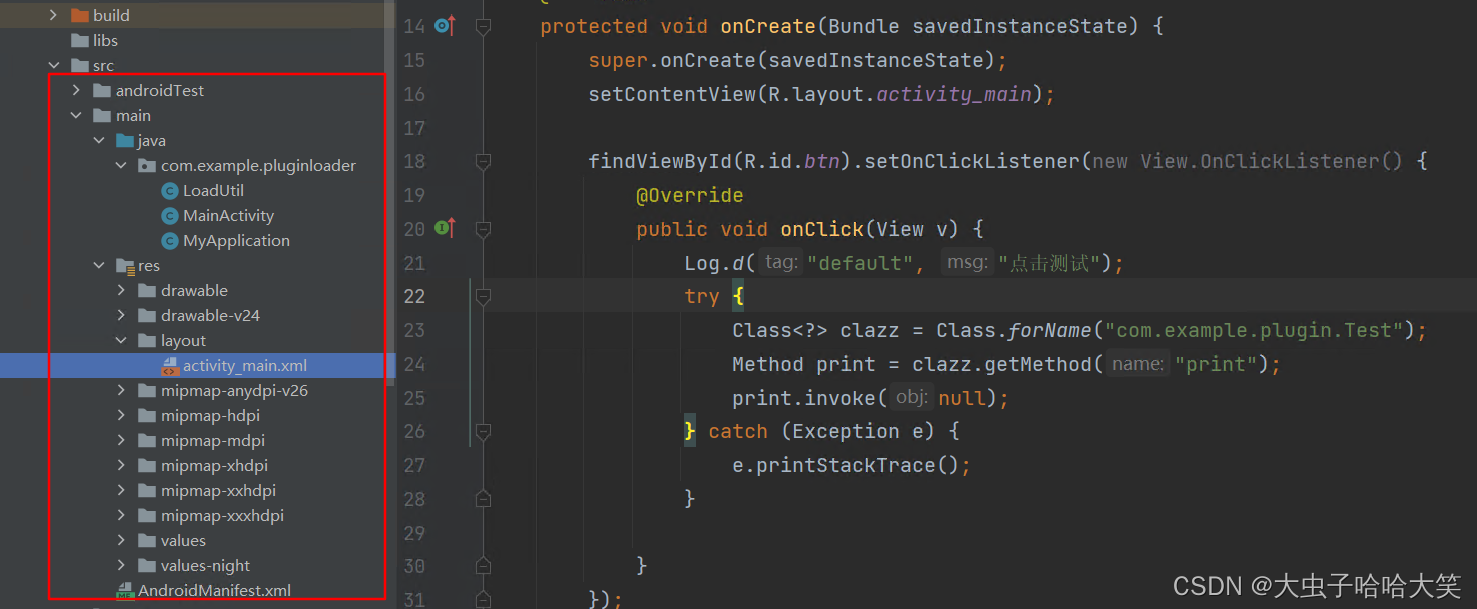
实例目录结构:
测试界面构建:
src/main/res/layout/activity_main.xml
<?xml version="1.0" encoding="utf-8"?>
<androidx.constraintlayout.widget.ConstraintLayout xmlns:android="http://schemas.android.com/apk/res/android"
    xmlns:app="http://schemas.android.com/apk/res-auto"
    xmlns:tools="http://schemas.android.com/tools"
    android:layout_width="match_parent"
    android:layout_height="match_parent"
    tools:context=".MainActivity">
    <Button
        android:id="@+id/btn"
        android:layout_width="wrap_content"
        android:layout_height="wrap_content"
        android:layout_marginTop="124dp"
        android:text="app按钮"
        app:layout_constraintEnd_toEndOf="parent"
        app:layout_constraintStart_toStartOf="parent"
        app:layout_constraintTop_toTopOf="parent" />

</androidx.constraintlayout.widget.ConstraintLayout>
MainActivity.java文件中添加按钮监听事件,并尝试使用反射调用插件中的类及方法
src/main/java/com/example/pluginloader/MainActivity.java
package com.example.pluginloader;

import androidx.appcompat.app.AppCompatActivity;

import android.os.Bundle;
import android.util.Log;
import android.view.View;

import java.lang.reflect.Method;

public class MainActivity extends AppCompatActivity {

    @Override
    protected void onCreate(Bundle savedInstanceState) {
        super.onCreate(savedInstanceState);
        setContentView(R.layout.activity_main);

        findViewById(R.id.btn).setOnClickListener(new View.OnClickListener() {
            @Override
            public void onClick(View v) {
                Log.d("default", "点击测试");
                try {
                    Class<?> clazz = Class.forName("com.example.plugin.Test");
                    Method print = clazz.getMethod("print");
                    print.invoke(null);
                } catch (Exception e) {
                    e.printStackTrace();
                }

            }
        });
    }
}
插件加载工具类的编写:
package com.example.pluginloader;

import android.content.Context;
import android.util.Log;

import java.lang.reflect.Array;
import java.lang.reflect.Field;

import dalvik.system.DexClassLoader;

public class LoadUtil {

    private static final String apkPath = "/sdcard/plugin-debug.apk";

    public static void loadClass(Context context) {
        Log.d("default", "开始合并");

        // 宿主的dexElements > dexElementsField
        // DexPathList对象 > pathList的Field > BaseDexClassLoader对象
        // 宿主和插件的类加载器
        try {
            Class<?> dexPathListClass = Class.forName("dalvik.system.DexPathList");
            Field dexElementsField = dexPathListClass.getDeclaredField("dexElements");
            dexElementsField.setAccessible(true);

            Class<?> classLoaderClass = Class.forName("dalvik.system.BaseDexClassLoader");
            Field pathListField = classLoaderClass.getDeclaredField("pathList");
            pathListField.setAccessible(true);

            // 1,获取宿主的类加载器
            ClassLoader pathClassLoader = context.getClassLoader();
            Object hostPathList = pathListField.get(pathClassLoader);
            // 目的:dexElements的对象
            Object[] hostDexElements = (Object[]) dexElementsField.get(hostPathList);

            // 2.插件,类加载器
            // 版本 --7.0之后
            ClassLoader pluginClassLoader = new DexClassLoader(apkPath,
                    context.getCacheDir().getAbsolutePath(), null, pathClassLoader);
            Object pluginPathList = pathListField.get(pluginClassLoader);
            // 目的:dexElements的对象
            // new Test().print();
            // 静态的:Test.print();
            Object[] pluginDexElements = (Object[]) dexElementsField.get(pluginPathList);

            Log.i("default", String.valueOf(pluginPathList));
            Log.i("default", String.valueOf(pluginDexElements.length));

            // 合并
            Object[] newElements = (Object[]) Array.newInstance(hostDexElements.getClass().getComponentType(),
                    hostDexElements.length + pluginDexElements.length);
            System.arraycopy(hostDexElements, 0, newElements, 0, hostDexElements.length);
            System.arraycopy(pluginDexElements, 0, newElements, hostDexElements.length, pluginDexElements.length);

            // 赋值到宿主的dexElements
            // hostDexElements = newElements
            dexElementsField.set(hostPathList, newElements);

            Log.d("default", "合并dex完成");

        } catch (Exception e) {
            Log.d("default", "发生异常");
            e.printStackTrace();
        }
    }
}
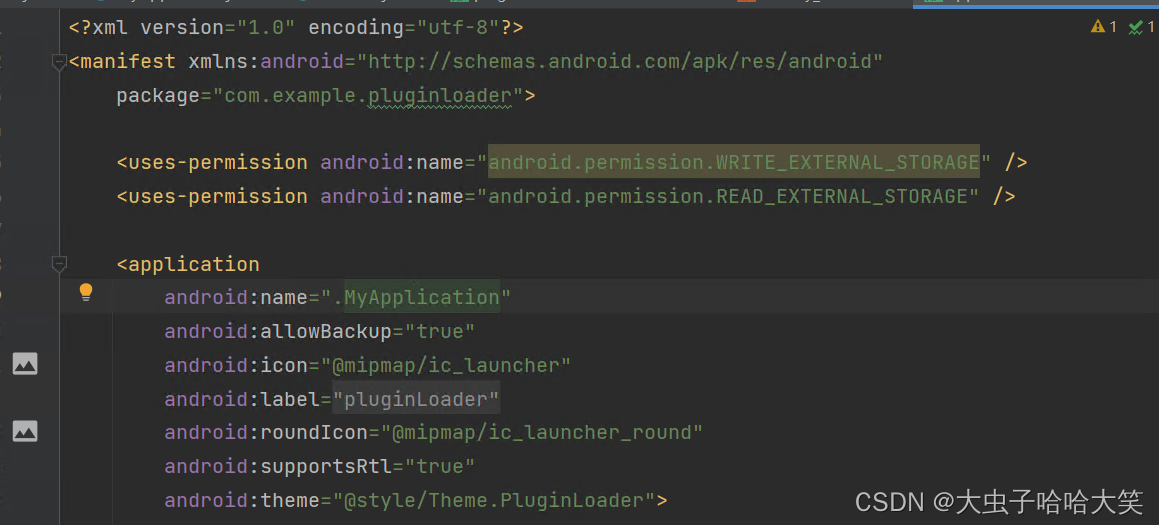
Application类的编写,将该类添加到AndroidManifest.xml文件中,添加外存读取权限
src/main/AndroidManifest.xml
<?xml version="1.0" encoding="utf-8"?>
<manifest xmlns:android="http://schemas.android.com/apk/res/android"
    package="com.example.pluginloader">

    <uses-permission android:name="android.permission.WRITE_EXTERNAL_STORAGE" />
    <uses-permission android:name="android.permission.READ_EXTERNAL_STORAGE" />

    <application
        android:name=".MyApplication"
        android:allowBackup="true"
        android:icon="@mipmap/ic_launcher"
        android:label="@string/app_name"
        android:roundIcon="@mipmap/ic_launcher_round"
        android:supportsRtl="true"
        android:theme="@style/Theme.PluginLoader">
        <activity
            android:name=".MainActivity"
            android:exported="true">
            <intent-filter>
                <action android:name="android.intent.action.MAIN" />

                <category android:name="android.intent.category.LAUNCHER" />
            </intent-filter>
        </activity>
    </application>

</manifest>
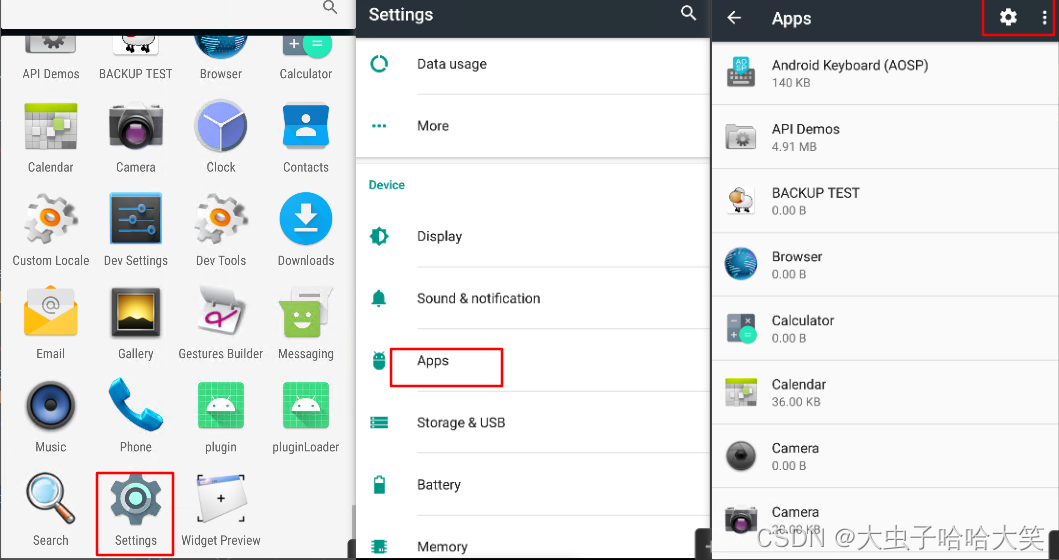
在 Android7.0 模拟器上打开相应的权限:
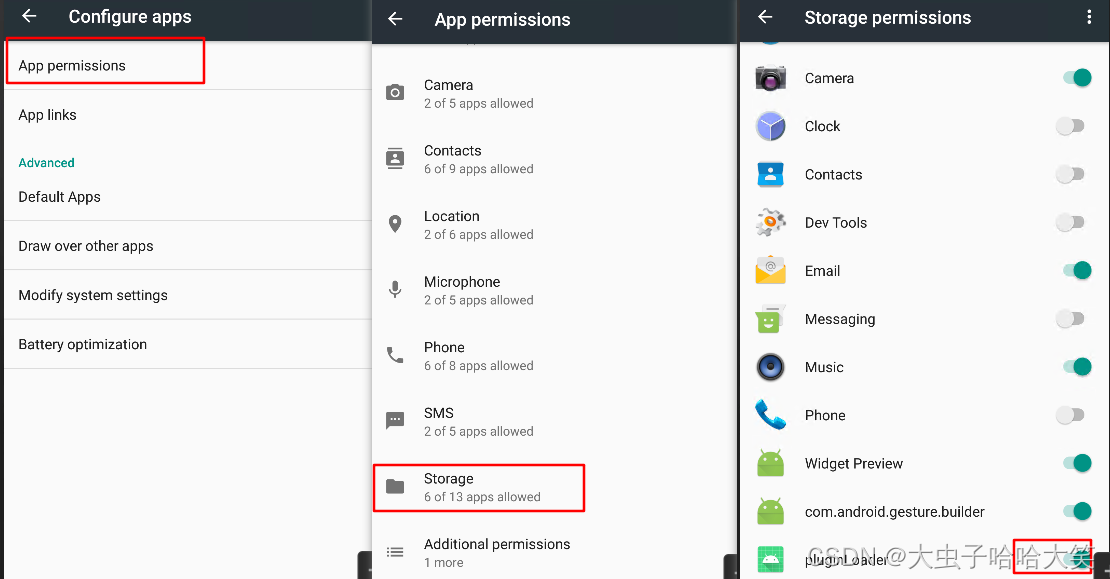
完成上述步骤后,在Android Studio中启动app,并通过日志输出来判断插件是否调用成功

插件中Activity调用实践
由于宿主应用中在启动Activity的过程中,AMS会检查Activity是否已经在AndroidManifest.xml中进行了注册,因此直接调用插件中的Activity会失败。要想实现插件中Activity的使用,需要结合Activity启动流程+反射机制进行Hook。
Hook即"钩子",能够通过动态代理等技术改变代码的正常执行流程。查找Hook点的原则为:
- 尽量静态变量或者单例对象。
- 尽量Hook public的对象和方法。
Activity启动流程
Activity启动流程示意图如下:
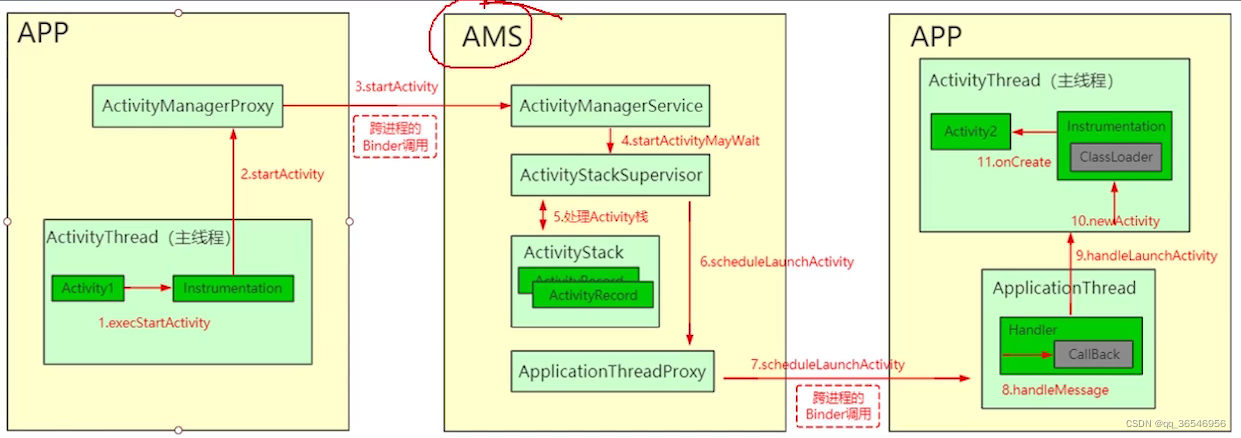
通过动态代理和反射实现Hook Activity的思路:

参考说明
插件调用内容来源:https://www.bilibili.com/video/BV1Ng411K7YP?p=130
