1. 历史
上次写过一遍关于Hilt的使用偏,里面详细介绍了Hilt历史和应用,链接对应如下:
如果没有对Hilt的使用有些了解,那就先入门看看,谢谢。
2. Component
Component和Scope的英文名分别是组件和范围的意思,第一次见到这个两个注解的时候,还是有些不清楚的。下面慢慢说,Hilt-Android中存在8个Component和对应的8个Scope,先来聊一聊这个8个Component,分别为:
| 序列 | 名称 | 创建时间 | 销毁时间 |
|---|---|---|---|
| 1 | SingletonComponent | Application#onCreate() | Application#onDestroy() |
| 2 | ActivityRetainedComponent | Activity#onCreate() | Activity#onDestroy() |
| 3 | ViewModelComponent | ViewModel created | ViewModel destroyed |
| 4 | ActivityComponent | Activity#onCreate() | Activity#onDestroy() |
| 5 | FragmentComponent | Fragment#onAttach() | Fragment#onDestroy() |
| 6 | ViewComponent | View#super() | View destroyed |
| 7 | ViewWithFragmentComponent | View#super() | View destroyed |
| 8 | ServiceComponent | Service#onCreate() | Service#onDestroy() |
下面我们用一个例子,来说明一下Component的含义:
定义一个AppData的数据类:
class AppData
定义一下我们的Module类型:
@Module
@InstallIn(SingletonComponent::class)
object AppDataModule {

    @Provides
    fun provideAppData() : AppData = AppData()

}
可以看出,我们的Module是被SingletonComponent所修饰的,通过查表,我们发现凡是被SingletonComponent修饰的,其生命周期是在Application的生命周期内的,意思是伴随着整个App出生到死去(暂时不考虑多线程),那么我们可以在App的任意位置使用注入技术,获取到AppData实例。现在我们定义两个Activity,分别为:AppUIOne和AppUITwo,代码分别为:
AppUIOne.kt
@AndroidEntryPoint
class AppUIOne : AppCompatActivity() {

    @Inject
    @JvmField
    var mAppData : AppData? = null

    override fun onCreate(savedInstanceState: Bundle?) {
        super.onCreate(savedInstanceState)
        setContentView(R.layout.app_ui_one_layout)

        Log.d("TAG","first page : $mAppData")
    }


    fun nextPage(v : View) {
        startActivity(Intent(this, AppUITwo::class.java))
    }
}
剩下的AppUITwo为:
@AndroidEntryPoint
class AppUITwo : AppCompatActivity(){

    @Inject
    @JvmField
    var mAppData : AppData? = null

    override fun onCreate(savedInstanceState: Bundle?) {
        super.onCreate(savedInstanceState)

        Log.d("TAG","second page : $mAppData")

    }

}
代码都很类似,只是在Activity中注入了AppData实例,我们可以看一下结果:

我们可以看到,注入成功了。
知道了SingletonComponent,我们可以照葫芦画瓢,再写一个比较常见的ActivityComponent样例;
定义我们的数据类:ActivityData:
class ActivityData constructor(private val info : String) {

    constructor() : this("${System.currentTimeMillis()}_data")

    override fun toString(): String {
        return "ActivityData(info='$info')"
    }

}
此时,再去定义一下我们的Module:
@Module
@InstallIn(ActivityComponent::class)
object ActivityInstallModule {

    @Provides
    fun provideActivityData() : ActivityData = ActivityData()

}
然后定义一下我们的ActivityComponentUI :
class ActivityComponentUI : AppCompatActivity(){

    @Inject
    @JvmField
    var appData : AppData? = null

    @Inject
    @JvmField
    var mActivityData : ActivityData? = null

    @Inject
    @JvmField
    var mActivityData2 : ActivityData? = null


    override fun onCreate(savedInstanceState: Bundle?) {
        super.onCreate(savedInstanceState)
        setContentView(View(this))

       Log.d("TAG","--show the activityData------>>\n$appData--->>\n$mActivityData\n---->>$mActivityData2")

    }
}
输入一下结果:

可以看得到,我们的AppData和两个ActivityData都被赋值了,说明Hilt起作用了。
我们已经看到了Component的效果,下面我来解释一下Component的实际作用。Hilt是基于Dagger2的,现在应用于Android设备上,Android的组件有着本身的生命周期,那么通过Component组件来界定我们注入的组件的生命周期,什么意思呢?我们举个简单的例子:
@Module
@InstallIn(ActivityComponent::class)
object ActivityInstallModule {

    @Provides
    fun provideActivityData() : ActivityData = ActivityData()

}
现在ActivityData是被限定在ActivityComponent中的,那么意味着目标Acticity的被注入对象var mActivityData : ActivityData?=null 是在Activity的onCreate方法中被创建,在调用onDestory之前,mActivityData被销毁,是和Activity共用同一个生命周期,伴随着Activity同生共死。又由于组件的生命周期的长度存在着包含关系,比如App的生命周期包含于Activity的生命周期,Activity的生命周期包含于在Activity内的Fragment的生命周期,所以对应的Component存在着继承关系,继承图为:

对于这个继承有什么用呢?其实上面的代码中已经说明了问题,我们可以在Activity中使用SingleComponent组件中提供的注入对象,同样,在含有Fragment的Activity中,Fragment中不仅可以获取到SingleComponent提供的注入对象,同时也可以获取到ActivityComponent提供的注入对象,当然也可以获取到由FragmentComponent提供的注入对象,但是不能获取由ViewWithFragmentComoponent。因为继承是不可逆的。
3. scope
把我们的Component了解完,现在来说说Scope逻辑了。明面上的范围是什么意思呢?还是以例子说明吧。
我们记得上面appData的例子,再来重温一下打印结果:

我们发现两个AppData的打印结果是不一样的,一个是8b035bd,一个是5b704d8,不同的toString()表明两个是不同的对象。如果我们需要在所有的Activity中获取的AppData都是同一个对象,换句话的意思是我们需要整个App中只存在一个AppData实例,那么全局单例应该怎么生成呢?其实也很简单,只需要添加一个@Singleton注解:
@Module
@InstallIn(SingletonComponent::class)
object AppDataModule {

    @Provides
    @Singleton
    fun provideAppData() : AppData = AppData()

}
在provideAppData上面添加一个@Singleton注解,然后我们再次运行代码:

我们可以看到,first page和second page中对应的AppData都是指向了同一个地址,说明了AppData在两个Activity中只保存了一个对象。
我们在ActivityInstallModule中添加另外一个Scope注解ActivityScoped:
@Module
@InstallIn(ActivityComponent::class)
object ActivityInstallModule {

    @Provides
    @ActivityScoped
    fun provideActivityData() : ActivityData = ActivityData()

}
然后同时再在Activity中获取ActivityData数据:
@AndroidEntryPoint
class ActivityComponentUI : AppCompatActivity(){

    @Inject
    @JvmField
    var mActivityData : ActivityData? = null

    @Inject
    @JvmField
    var mActivityData2 : ActivityData? = null


    override fun onCreate(savedInstanceState: Bundle?) {
        super.onCreate(savedInstanceState)
        setContentView(View(this))

        Log.d("TAG","--show the activityData--->>\n$mActivityData---->>\n$mActivityData2")
    }
}
然后我们看一下输出结果:

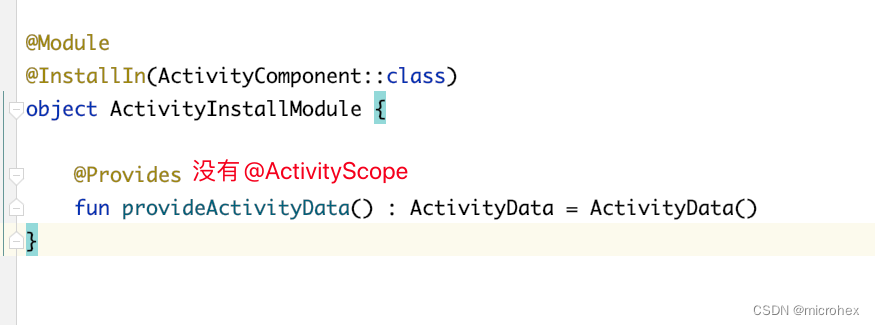
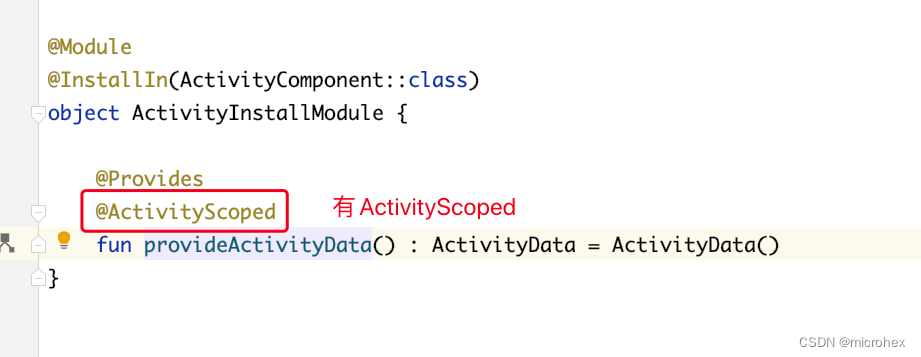
发现二者是指向的是同一个对象,这样说的不死很清楚?我们把图整理对比一下:
| module | 结果 |
|---|---|
 |  |
 |  |
我们发现,添加ActivityScoped的区别就是Activity中被注入的对象是否为同一个,换句话说是在Component的生命周期范围内,如果被注入的对象添加了Scope注解,那么它将在生命周期范围内只会生成一个唯一对象。
如果SingletonComponent组件中添加了Singleton注解,那么App整个生命周期内只存在一个对象;
如果ActivityComponent组件中添加了ActivityScoped注解,那么在每一个Activity生命周期范围内只存在一个对象。
这就是Scope的本质意义!!!
当然了,Scope也不是随便写的,每一个Component对应唯一一个Scope,不能写错,也没有继承的概念,只能一一对应,如果写错,编译时就会直接报错。那么有哪些,可以看一下这个表:
| Component | Scope |
|---|---|
| SingletonComponent | @Singleton |
| ActivityRetainedComponent | @ActivityRetainedScoped |
| ViewModelComponent | @ViewModelScoped |
| ActivityComponent | @ActivityScoped |
| FragmentComponent | @FragmentScoped |
| ViewComponent | @ViewScoped |
| ViewWithFragmentComponent | @ViewScoped |
| ServiceComponent | @ServiceScoped |
4. 总结
Component组件的意义:绑定了被注入对象的生命周期;
Scope组件的意义:定义了被注入对象在生命周期内是否唯一。
大概过程我们走了一遍,不知道自己有没有将清楚呢。最后,上一张官方的原图:

然后大家可以上上一下官方网站,然后可以聊聊你的理解和认识。
官方网站:
