目录
一、完成的功能
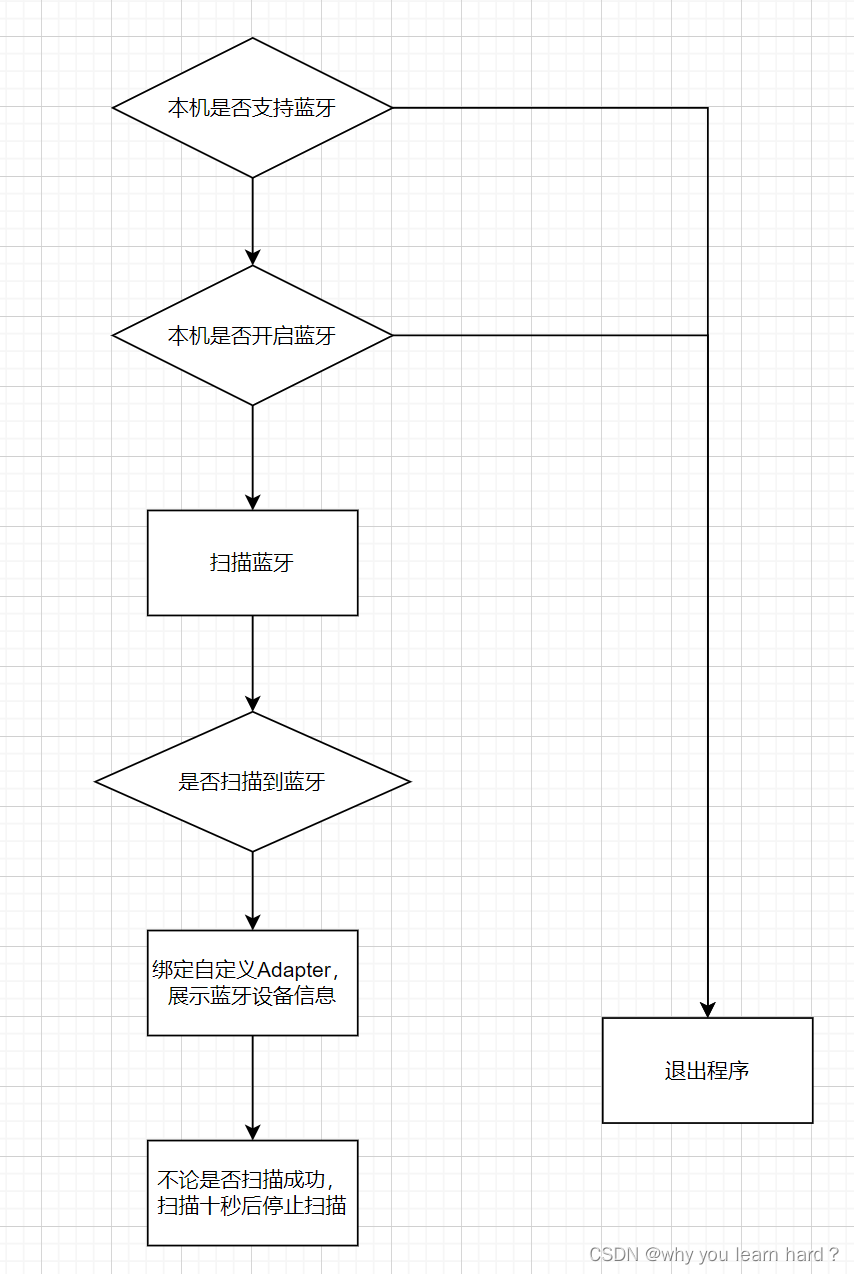
①、扫描蓝牙
②、以listView的方式展示蓝牙信息(借助重写的ForBleAdapter来描绘)
③、携带数据(蓝牙name和address)跳转到E1BleTemperatureNodeActivity页面
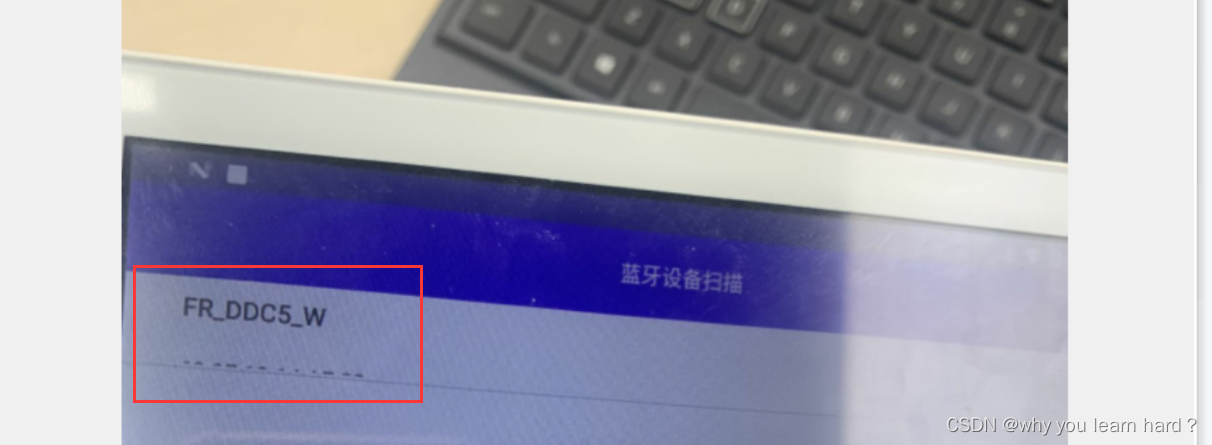
二、 预期效果

三、 代码分析
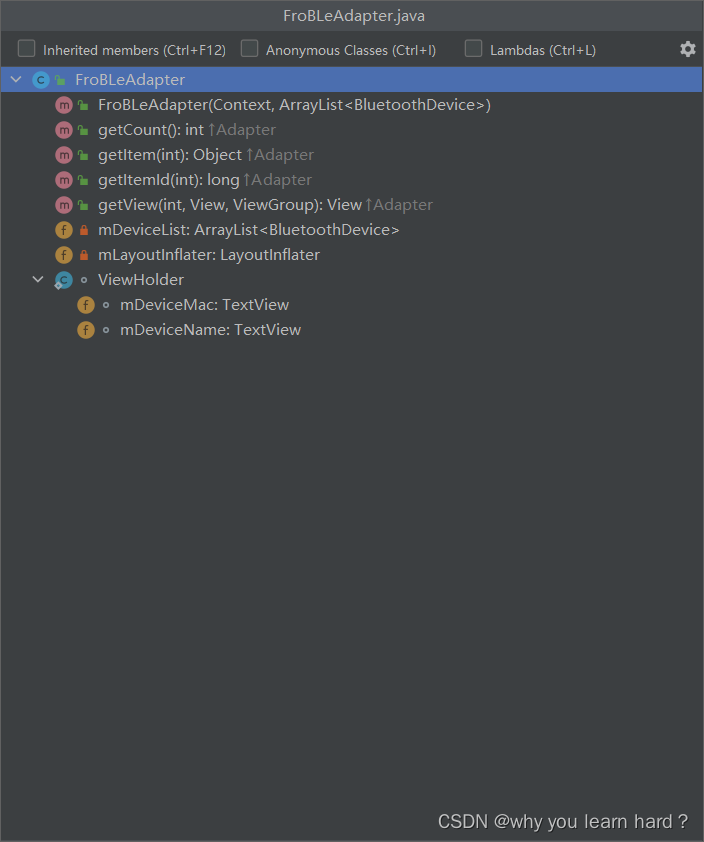
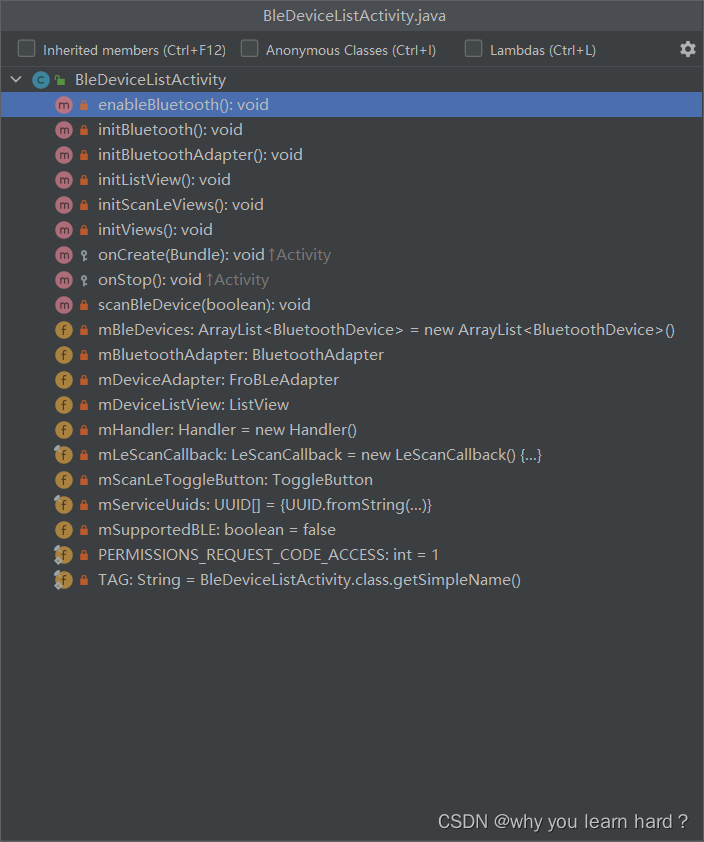
在这两个文件中,BleDeviceListActivity为主要代码,ForBleAdapter只是一个自定义的工具类供BleDeviceListActivity调用。
(1)、FroBleAdapter
大都是继承BaseAdapter后需要重新的方法。

下面这个为一个实验:照着复现一边就明白FroBleAdapter的作用了。
/**
 * BLE蓝牙设备适配器
 * 我们这个类不包含搜索蓝牙,连接蓝牙的具体功能模块,只是用来自定义描绘蓝牙展示页面的类
 * @author ylt
 */

public class FroBLeAdapter extends BaseAdapter {

    private ArrayList<BluetoothDevice> mDeviceList;
    //  LayoutInflater本身是一股抽象类,我们不能直接通过new的方式去获得他的实例
//    实例化LayoutInflater有三种方法
//    1.LayoutInflater inflater=(LayoutInflater)context.getSystemService(Context.LAYOUT_INFLATER_SERVICE);
//    2.LayoutInflater inflater =LayoutInflater.from(context)
//    3.在内部调用getLayoutInflater()方法
//    很明显我们采取的是第二种,传入this作为上下文对象

    private LayoutInflater mLayoutInflater;

    //    该自定义Adapter需要传入蓝牙搜索到的设备对象List,然后我们需要自定义getView方法,这样才能去描绘自定义的View块
    public FroBLeAdapter(Context context, ArrayList<BluetoothDevice> devices) {
        mDeviceList = devices;
//        我们在使用Toast,启动Activity,启动Service,,创建View等操作时,都会涉及到Context引用
//
        mLayoutInflater = LayoutInflater.from(context);
    }

    //    ViewHolder自定义类。
    static class ViewHolder {
        TextView mDeviceName;
        TextView mDeviceMac;
    }

    //    adapter先从getCount里面确定数量,然后循环执行getView方法将条目一个一个绘制出来,
    //    因此首先得重写getCount和getView方法
    @Override
    public int getCount() {
        return mDeviceList.size();
    }


    @Override
    public View getView(int position, View convertView, ViewGroup parent) { //convert转换
        // TODO Auto-generated method stub
        View view = null;
        //为什么使用final?
        // 防止他被意外改变,相当于设定好了后就别再改变了。
        final ViewHolder viewHolder;
        //判断是否存在可重复使用的view,不存在则创建
        if (convertView == null) {
            //加载我们自定义的布局
            view = mLayoutInflater.inflate(android.R.layout.simple_expandable_list_item_2, parent, false);

//            viewHolder是我们自定义的类,包含DeviceName和DeviceMac地址两个对象
//            android.R.layout.simple_expandable_list_item_2:这个是系统自带的布局,每个Item下面有两个子Item,就和QQ消息框,第一行展示昵称,第二行显示一些聊天内容
            viewHolder = new ViewHolder();
            viewHolder.mDeviceName = (TextView) view.findViewById(android.R.id.text1);
            viewHolder.mDeviceMac = (TextView) view.findViewById(android.R.id.text2);

//            这里的setTag相当于给当前的View对象分配一个身份证,
//            下次找的时候直接就可以通view.getTag()方法获取对象的身份证,就可以判断是哪个对象
//            你分配的身份证可以说字符串、数字等所以类型,在这里我们选择将一个打包好的对象作为Tag,其实是想借助Tag传递数据。
            view.setTag(viewHolder);
        } else {
            view = convertView;
            viewHolder = (ViewHolder) view.getTag();
        }
//        mDeviceList是所有蓝牙设备的集合
//        我们根据用户点击的位置坐标然后就可以在Bluetooth设备数组中找到对应的对象
//        然后就可以调用Bluetooth对象的方法将名字和ip取出来用作展示
        viewHolder.mDeviceName.setText(mDeviceList.get(position).getName());
        viewHolder.mDeviceMac.setText(mDeviceList.get(position).getAddress());

//        返回描绘好的view对象
        return view;
    }


    //    而getItem和getItemId是用户使用过程中执行一些点击事件的时候才会用到
    @Override
    public Object getItem(int position) {
        // TODO Auto-generated method stub
        return mDeviceList.get(position);
    }

    @Override
    public long getItemId(int position) {
        // TODO Auto-generated method stub
        return position;
    }


}
(2)?、BleDeviceListView
包含的方法注意为了实现以下目的:
? ? ? ? 一、扫描蓝牙。
? ? ? ? 二、描绘ListView页面?
? ? ? ? 三、设置点击事件,实现页面跳转
 ?①蓝牙扫描连接

?用到的API:
BluetoothManager:管理本机一切蓝牙服务。
//调用系统服务获取本机的BluetoothManager实例,该实例用于后面构造BluetoothAdapter适配器实例
BluetoothManager bluetoothManager = (BluetoothManager) getSystemService(Context.BLUETOOTH_SERVICE);
BluetoothAdapter:本机蓝牙适配器。由他弹出开启蓝牙的提示框,由他调用扫描蓝牙的方法:startLeScan()和停止扫描的方法:stopLeScan()。
注意:给这两个传入的LeScanCallback对象必须是同一个,不能直接new两个匿名类,这样会发生你点停止扫描后依然再扫描的情况。
//        BluetoothManager.getAdapter()方法获取此设备的默认BLUETOOTH适配器
//        private BluetoothAdapter mBluetoothAdapter;
        this.mBluetoothAdapter = bluetoothManager.getAdapter();
LeScanCallback:蓝牙搜索回调对象。调用startLeScan和stopLeScan的时候传入该回调对象。一般需要我们重写onLeScan()方法和stopLeScan()方法。
而且必须注意
BluetoothAdapter.LeScanCallback ?|? Android Developers (google.cn)
BluetoothDevice:相当于搜索到的蓝牙设备的实例化对象。
 private void initBluetooth() {
        initBluetoothAdapter();
        enableBluetooth();
    }

    /**
     * 初始化蓝牙适配器
     */
    private void initBluetoothAdapter() {
        BluetoothManager bluetoothManager = (BluetoothManager) getSystemService(Context.BLUETOOTH_SERVICE);
//        BluetoothManager.getAdapter()方法获取此设备的默认BLUETOOTH适配器
//        private BluetoothAdapter mBluetoothAdapter;
        this.mBluetoothAdapter = bluetoothManager.getAdapter();
        if (mBluetoothAdapter == null) {
            Toast.makeText(this, "设备不支持蓝牙功能", Toast.LENGTH_LONG).show();
        } else {
            mSupportedBLE = true;
        }
    }

    /**
     * 判断系统蓝牙是否启用,如果支持蓝牙就跳转到打开蓝牙的权限页面
     */
    private void enableBluetooth() {
        if (mSupportedBLE) {
//            BluetoothAdapter代表了移动设备的本地蓝牙适配器,通过该蓝牙适配器可以对蓝牙进行基本操作
//            ACTION_SCAN_MODE_ENABLE为开启蓝牙
            Intent intent = new Intent(BluetoothAdapter.ACTION_REQUEST_ENABLE);
//            startActivity()是页面跳转的函数
            startActivity(intent);
        }
//        用户点击Yes,安卓系统会启动蓝牙功能。若蓝牙可以启动成功,onActivityResult()方法会返回RESULT_OK;若蓝牙启动失败则返回RESULT_CANCELED
    }

    /**
     * 扫描蓝牙设备
     *
     * @param scan
     */
    private void scanBleDevice(boolean scan) {
        if (scan) { //如果scan为true:就是可以scan
            //Toast的makeText是this,
            Toast.makeText(this, "开始BLE设备扫描", Toast.LENGTH_LONG).show();
            if (mSupportedBLE) {
//                mHandler是Handler类对象,postDelayed方法是创建多线程消息的函数
//                下面这个函数相当于设置一个时延:每10秒就把ToggleButton关闭
//                检索关键词:Handle和looper
                this.mHandler.postDelayed(new Runnable() {
                    @Override
                    public void run() {
//                      ToggleButton的boolean参数传入true则打开按钮(check the button),false to uncheck it
                        mScanLeToggleButton.setChecked(false);
                    }
                }, 10000);  //搜索时长为10s

                mBleDevices.clear();
//              notifyDataSetChanged可以理解为刷新。如果适配器的内容改变时需要强制getView来刷新每个Item的内容,可以实现动态的刷新列表的功能。
//              这个就是设置触发,让ListView和Adapter绑定以后可以自动刷新列表内容
                mDeviceAdapter.notifyDataSetChanged();
//                startLeScan方法和stopLeScan方法必须使用同一个对象mLeScanCallBack,否则会调用stopLeScan时候仍然在扫描
//                关于startLeScan的构造有两种:startLeScan(LeScanCallback)或startLeScan(UUID[], LeScanCallback)
//                很明显我们这是第二种,传入包含蓝牙Services的UUID数组和LeScanCallback回调对象
                mBluetoothAdapter.startLeScan(mServiceUuids, mLeScanCallback);
            }
        } else {
            Toast.makeText(this, "停止BLE设备扫描", Toast.LENGTH_LONG).show();
            if (mSupportedBLE) {
                mBluetoothAdapter.stopLeScan(mLeScanCallback);
            }
        }
    }

    /**
     * BLE设备扫描响应回调接口
     */
    private final LeScanCallback mLeScanCallback = new LeScanCallback() {
        @Override
        public void onLeScan(BluetoothDevice device, int rssi, byte[] scanRecord) {
            Log.e(TAG, "扫描到大赛蓝牙设备" + device.getName());
//            mBleDevices是ArrayList<BluetoothDevice>对象
            if (!mBleDevices.contains(device)) {
                mBleDevices.add(device);
//             mDeviceAdapter的类型是FroBLeAdapter,对于安卓开发一些页面的时候需要和Adapter适配器打交道
//                虽然安卓自带了一些ArrayAdapter,但是往往无法满足我们的要求,所以往往需要我们自定义Adapter类,而自定义的类需要继承BaseAdapter来满足我们的特殊要求
//                首先我们通过重写getView()方法,通过LayoutInflater方法映射一个自定义的Layout布局xml加载或者从***View中创建,
                mDeviceAdapter.notifyDataSetChanged();
//                notifyDataSetChanged通过一个外部的方法控制如果适配器的内容改变时需要强制getView来刷新每个Item的内容,可以实现动态的刷新列表的功能
            }
        }
    };
?②页面描绘以及设置监听事件。
初始化控件,以及设置开始扫描的点击事件。
  /**
     * 控件初始化接口
     * BleDeviceListActivity是一个控件,用在主页面展示的一小部分,而非整张页面
     */
    private void initViews() {
        initScanLeViews();
        initListView();
        initBluetooth();
    }

    /**
     * 初始化BLE设备扫描控制控件:第一步调用
     */
    private void initScanLeViews() {
//		这个就是点击扫描后下划线点亮的那个按钮
        this.mScanLeToggleButton = (ToggleButton) findViewById(R.id.scanBluetoothBtn);
//        设置监听,如果点击了ToggleButton则传入isChecked为true
        this.mScanLeToggleButton.setOnCheckedChangeListener(new OnCheckedChangeListener() {
            @Override
            public void onCheckedChanged(CompoundButton buttonView, boolean isChecked) {
                scanBleDevice(isChecked);
            }
        });
    }
?将自定义的FroBleAdapter对象ViewList绑定,展示扫描到的蓝牙设备的name和address,并且设置监听事件,点击每个蓝牙Item后跳转到E1BleTemperatureNodeActivity(跳转时携带数据:所选定的蓝牙外设的name和address)。
    private void initListView() {
//        mDeviceListView是ListView对象
        this.mDeviceListView = (ListView) findViewById(R.id.bleDeviceListView);
//      传入的context对象是this,通常我们在类与方法之间传递的就是activity context。
//        目的就是让两个页面建立联系,搭一根线而已,而非孤立的,而this是Activity的实例,扩展了Context,其生命周期是Activity创建到销毁
//        使用this,说明当前类是context的子类,他代表当前的子类,换句话说就是:Activity.this
//        this的context代表当前Activity的上下文,Activity销毁他就销毁
        this.mDeviceAdapter = new FroBLeAdapter(this, mBleDevices);
        this.mDeviceListView.setAdapter(this.mDeviceAdapter);

//        给ListView设置监听事件
        this.mDeviceListView.setOnItemClickListener(new OnItemClickListener() {
            @Override
            public void onItemClick(AdapterView<?> parent, View view, int position, long id) {
                Intent intent = new Intent(BleDeviceListActivity.this, E1BleTemperatureNodeActivity.class);
                intent.putExtra("name", mBleDevices.get(position).getName());
                intent.putExtra("address", mBleDevices.get(position).getAddress());
                startActivity(intent);  //由第83行代码可知,会启动E1BleTemperatureNodeActivity页面
            }
        });
    }
资源回收?
   /**
     * stop回调时停止扫描,这个方法会自动调用,不用我们显式调用,那为什么会调用这个方法呢?
     * 试想一个应用场景:一个人正在看视频,然后有一个电话打进来,这时候如果要去打电话,那么视频总不能继续放吧,这个时候就要停止视频播放。
     * 所以需要我们把视频播放占用的资源释放掉。因此需要我们重写onStop()方法
     * 也就是说当我们跳转到下一个页面的时候,onStop会自动调用,停止蓝牙搜索,因为蓝牙搜索是一个很耗电的工作。
     *
     * @Override protected void onStop() {
     * super.onStop();
     * //   在这里写停止时候的自定义操作
     * }
     */
    @Override
    protected void onStop() {
        super.onStop();
//        停止扫描的话只需给scanBleDevice传入false,在scanBleDevice中便会调用 mBluetoothAdapter.stopLeScan(mLeScanCallback);进行扫描停止。省的我们再重新写了
        scanBleDevice(false);
    }