1. 前言
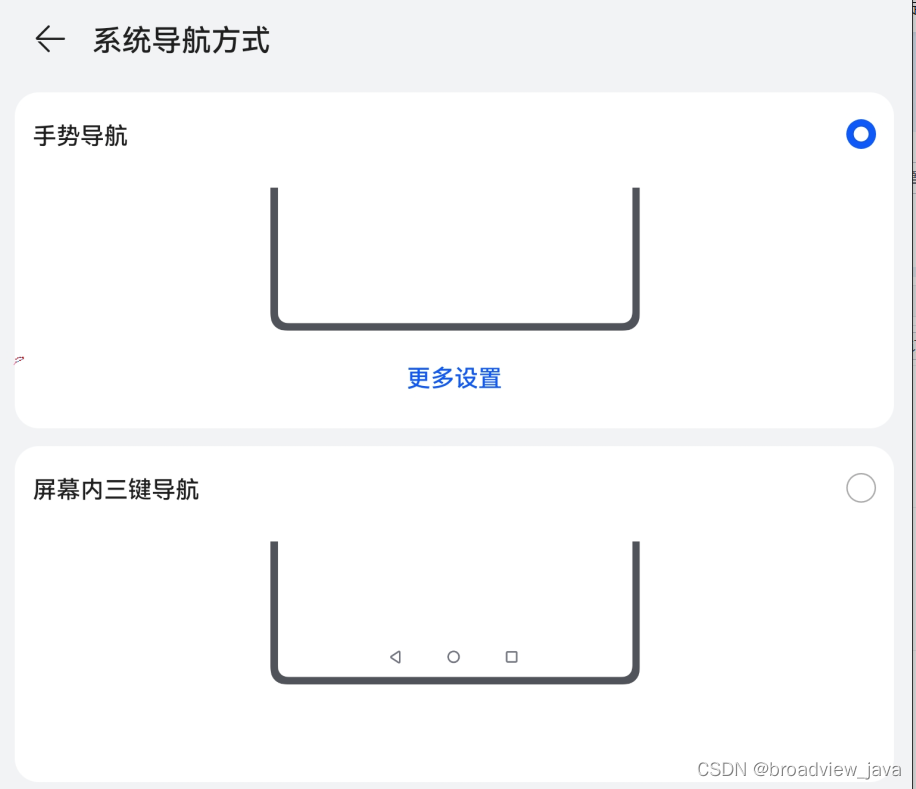
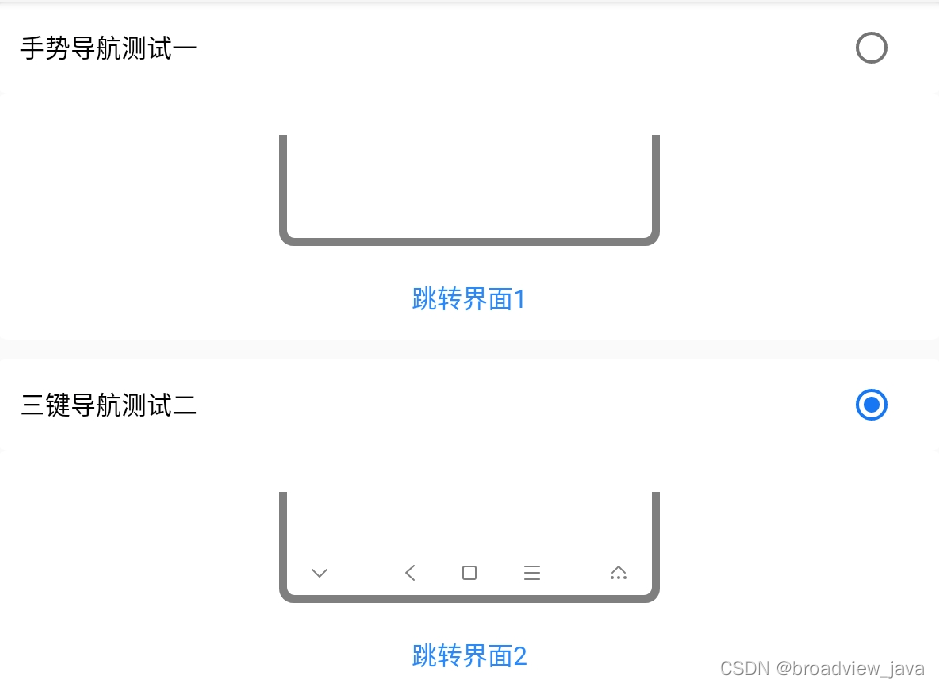
????????近期看见XX款平板上, 设置中手势导航和虚拟三键导航的切换选项,觉得效果做的非常好,然后想在源码中倒腾一下,仿照写一个效果图出来,本篇文章在android11 Settings源码中做的功能,主要是做的UI效果图,具体逻辑可以根据项目需要去实现,也是对自定义Preference的一个总结。
2. 原机效果图

3. 实现步骤
3.1 UI效果图,见5实现效果图
????????从上到下第一个Preference有点类似于设置模块中的RadioButtonPreference, 左边是一个标题,右侧是一个RadioButton, 在android11上面没有这种Preference直接拿来用,所以需要稍微改动下。
????????第二个Preference 的UI布局:上面是一个导航样式图片,下面是一个文本演示,点击会跳转到另一个演示动画效果的界面。在设置中也没有现成的Preference,所以这个也需要自定义
3.2 UI布局代码
? ? ? ? 第一个Preference的 layout 布局图, 里面的颜色,字体大小属性值都可以自己去适配
#1. layout布局文件: navigation_title_preference.xml


<?xml version="1.0" encoding="utf-8"?>
<RelativeLayout xmlns:android="http://schemas.android.com/apk/res/android"
    android:layout_width="match_parent" android:layout_height="58dp"
    android:background="@drawable/navigation_preference_bg">

    <TextView
        android:id="@+id/navigation_type_title"
        android:layout_width="wrap_content"
        android:layout_height="wrap_content"
        android:layout_alignParentLeft="true"
        android:layout_marginLeft="16dp"
        android:layout_centerInParent="true"
        android:textSize="16sp"
        android:textColor="#FF000000"/>

    <RadioButton
        android:id="@android:id/checkbox"
        android:layout_width="wrap_content"
        android:layout_height="wrap_content"
        android:layout_alignParentRight="true"
        android:layout_marginRight="30dp"
        android:layout_centerInParent="true"
        android:focusable="false"
        android:clickable="false"/>

</RelativeLayout>


#2.drawable navigation_preference_bg


<?xml version="1.0" encoding="utf-8"?>
<selector xmlns:android="http://schemas.android.com/apk/res/android">
    <item android:state_pressed="false"      android:drawable="@drawable/navi_pressed_false"/>
    <item android:state_pressed="true"
android:drawable="@drawable/navi_pressed_true"/>
</selector>


#3. drawable  navi_pressed_false

<?xml version="1.0" encoding="utf-8"?>
<shape xmlns:android="http://schemas.android.com/apk/res/android"
    android:shape="rectangle">
    <solid android:color="@color/search_bar_background" />
    <corners android:radius="9dp" />
</shape>


#4. drawable  navi_pressed_true

<?xml version="1.0" encoding="utf-8"?>
<shape xmlns:android="http://schemas.android.com/apk/res/android"
    android:shape="rectangle">
    <solid android:color="#1a000000" />
    <corners android:radius="9dp" />
</shape>
????????第二个Preference的 layout 布局图:
#layout 布局文件:navigation_preference.xml

<?xml version="1.0" encoding="utf-8"?>
<RelativeLayout xmlns:android="http://schemas.android.com/apk/res/android"
    android:layout_width="match_parent" android:layout_height="155dp"
    android:background="@drawable/navigation_preference_bg">
    <RelativeLayout
        android:layout_width="match_parent"
        android:layout_height="wrap_content">

        <ImageView
            android:id="@+id/navigation_type_icon"
            android:layout_marginTop="26dp"
            android:layout_width="240dp"
            android:layout_height="70dp"
            android:layout_centerHorizontal="true"/>

        <TextView
            android:id="@+id/demonstration_effect"
            android:layout_width="90dp"
            android:layout_height="34dp"
            android:layout_below="@id/navigation_type_icon"
            android:layout_marginTop="16dp"
            android:layout_marginBottom="9dp"
            android:background="@drawable/navigation_preference_bg"
            android:gravity="center"
            android:layout_centerHorizontal="true"
            android:textColor="#268AFF"
            android:textSize="16sp"/>
    </RelativeLayout>

</RelativeLayout>
? ? ? ? ? ?第三,两个Preference需要用到的属性:自定义标题,自定义图片,自定义文本的属性,需要前期声明, 这样子可以在xml文件直接配置 preference:navigationTitle? ? preference:naviDrawable? preference:naviDetail 的值。
  #第一个Preference的title属性
  <declare-styleable name="NavigationTitlePreference">
        <attr name="navigationTitle" format="string" />
    </declare-styleable>

  #第二个Preference的图片和文本的属性
    <declare-styleable name="NavigationPreference">
        <attr name="naviDrawable" format="reference" />
        <attr name="naviDetail" format="string" />
    </declare-styleable>
3.3 自定义Preference 代码
? ? ? ? 第一个Preference类似于源生的RadioButtonPreference控件,只是布局不一样,通过继承相同的父类CheckBoxPreference,可以实现自定义的Preference,代码如下:
public class NavigationTitlePreference extends CheckBoxPreference {

    //Preference的点击事件自定义接口
    public interface OnClickListener {
        void onNaviPrefernceClicked(NavigationTitlePreference emiter);
    }

    private OnClickListener mNaviTitleOnClickListener;

    public void setNaviTitleOnClickListener(OnClickListener onClickListener) {
        mNaviTitleOnClickListener = onClickListener;
    }

    private TextView mTextView;
    private String mNavigationTitle;

    public NavigationTitlePreference(Context context, AttributeSet attrs, int defStyle) {
        super(context, attrs, defStyle);

        TypedArray attributes = context.obtainStyledAttributes(attrs, R.styleable.NavigationTitlePreference, 0, 0);
        // if these are already set that means they were set dynamically and don't need
        // to be loaded from xml
        mNavigationTitle = (mNavigationTitle == null) ?
                attributes.getString(R.styleable.NavigationTitlePreference_navigationTitle) : mNavigationTitle;
        setLayoutResource(R.layout.navigation_title_preference);
        attributes.recycle();
    }

    public NavigationTitlePreference(Context context, AttributeSet attrs) {
        this(context, attrs, TypedArrayUtils.getAttr(context,
                androidx.preference.R.attr.preferenceStyle,
                android.R.attr.preferenceStyle));
    }

    public NavigationTitlePreference(Context context) {
        this(context, null);
    }

    @Override
    public void onBindViewHolder(PreferenceViewHolder view) {
        super.onBindViewHolder(view);
        mTextView = (TextView)view.findViewById(R.id.navigation_type_title);
        mTextView.setText(mNavigationTitle);
    }

    @Override
    protected void onClick() {
        if (null != mNaviTitleOnClickListener) {
            mNaviTitleOnClickListener.onNaviPrefernceClicked(this);
        }
    }
}
,? ? ? ? ?代码解读:
???????? 1. 自定义类是继承于CheckBoxPreference,它里面已经对按钮(比如 RadioButton,? SwitchButton)已经做了事件处理,我们只需要设置按钮的id为:android:id="@android:id/checkbox" 即可, 父类代码如下:
# CheckBoxPreference.java

@Override
    protected void onBindView(View view) {
        super.onBindView(view);

        View checkboxView = view.findViewById(com.android.internal.R.id.checkbox);
        if (checkboxView != null && checkboxView instanceof Checkable) {
            ((Checkable) checkboxView).setChecked(mChecked);
        }
        .......
    }
? ? ? ? 2.? 点击Preference的事件自定义接口
? ????????????????? public interface OnClickListener {
? ? ? ? ????????????????void onNaviPrefernceClicked(NavigationTitlePreference emiter);
? ????????????????? }
? ?????????第二个Preference的代码,继承Preference,? 组成元素为 一张图片和一个文本,点击文本会跳转到相应的动画演示界面, 不需要图片点击事件, 不需要整个Preference的点击事件
public class NavigationPreference extends Preference {

    private TextView mTextView;
    private ImageView mImageView;
    private int mNavigationDrawable;
    private String mNavigationDetail;


    public NavigationPreference(Context context, AttributeSet attrs) {
        super(context, attrs);
        init(context, attrs);
    }

    public NavigationPreference(Context context) {
        super(context);
        init(context, null);
    }

    private void init(Context context, AttributeSet attrs) {

        TypedArray attributes = context.obtainStyledAttributes(attrs, R.styleable.NavigationPreference, 0, 0);

        // if these are already set that means they were set dynamically and don't need
        // to be loaded from xml
        mNavigationDrawable = (mNavigationDrawable == 0) ?
                attributes.getResourceId(R.styleable.NavigationPreference_naviDrawable, 0) : mNavigationDrawable;

        mNavigationDetail = (mNavigationDetail == null) ?
                attributes.getString(R.styleable.NavigationPreference_naviDetail) : mNavigationDetail;

        setLayoutResource(R.layout.navigation_preference);

        attributes.recycle();
    }


    @Override
    public void onBindViewHolder(PreferenceViewHolder view) {
        super.onBindViewHolder(view);
        mTextView = (TextView)view.findViewById(R.id.demonstration_effect);
        mTextView.setText(mNavigationDetail);
        mTextView.setOnClickListener(new View.OnClickListener() {
            @Override
            public void onClick(View v) {
                if (getIntent() != null) {
                    Context context = getContext();
                    context.startActivity(getIntent());
                }
            }
        });

        mImageView = (ImageView)view.findViewById(R.id.navigation_type_icon);
        mImageView.setImageResource(mNavigationDrawable);
        //点击整个Preference时,无响应事件的关键代码
        view.itemView.setClickable(false);
    }
}
? ? ? ? 代码解读:
? ? ? ? 1.? 点击整个自定义Preference时,无响应事件的关键代码
? ? ? ? ? ? view.itemView.setClickable(false);? ?//设置为不可点击
? ? ? ? ? ? 为什么呢?原理如下:
? ? ? ? ? ? ?在?super.onBindViewHolder(view)中
 public void onBindViewHolder(PreferenceViewHolder holder) {
        View itemView = holder.itemView;
        Integer summaryTextColor = null;

        //设置 itemView 的点击事件
        itemView.setOnClickListener(mClickListener);

        .............
}
? ? ? ? ? ??
? ? ? ? ?当点击后,会执行父类Preference.java 中的 performClick方法时,直接return了。
 protected void performClick(View view) {
        performClick();
}

 public void performClick() {
        //当设置不可点击,或者不可选择的时候,就直接return了。

        if (!isEnabled() || !isSelectable()) {
            return;
        }

        onClick();

        if (mOnClickListener != null && mOnClickListener.onPreferenceClick(this)) {
            return;
        }

        PreferenceManager preferenceManager = getPreferenceManager();
        if (preferenceManager != null) {
            PreferenceManager.OnPreferenceTreeClickListener listener = preferenceManager
                    .getOnPreferenceTreeClickListener();
            if (listener != null && listener.onPreferenceTreeClick(this)) {
                return;
            }
        }

        if (mIntent != null) {
            Context context = getContext();
            context.startActivity(mIntent);
        }
    }
? ? ? ? 2.? 点击文本的响应代码:
? ? ? ? ? ??@Override
? ? ? ? ? ? public void onClick(View v) {
? ? ? ? ? ? ? ? if (getIntent() != null) {
? ? ? ? ? ? ? ? ? ? Context context = getContext();
? ? ? ? ? ? ? ? ? ? context.startActivity(getIntent());
? ? ? ? ? ? ? ? }
? ? ? ?? ? } //这里的intent是通过 xml文件配置的intent参数,从而跳转到目标界面, 如下:
?<Preference
? ? ? ? android:key="xxxx"
? ? ? ? android:title="xxxxx">
        // 举个例子 通过配置intent参数,跳转到指定的界面
? ? ? ? <intent android:action="android.credentials.INSTALL_AS_USER"
? ? ? ? ? ? ? ? android:targetPackage="com.android.certinstaller"
? ? ? ? ? ? ? ? android:targetClass="com.android.certinstaller.CertInstallerMain">
? ? ? ? ? ? ? ?<extra android:name="install_as_uid" android:value="1010" />
? ? ? ? </intent>
?</Preference>
4. 设置界面代码
? ? ? ? 自定义的Preference代码完成后,接下来就开始写界面加载的xml文件了
? ? ? ? ?布局文件:navigation_type_settings.xml
<?xml version="1.0" encoding="utf-8"?>
<PreferenceScreen xmlns:android="http://schemas.android.com/apk/res/android"
    xmlns:preference="http://schemas.android.com/apk/res-auto"
    android:key="gesture_system_navigation_type"
    android:title="@string/system_navigation_title">

    <com.android.settings.gestures.NavigationTitlePreference
        android:key="gesture_navi"
        //自定义的title
        preference:navigationTitle="@string/system_gesture_navigation_title"/>

    <com.android.settings.gestures.NavigationPreference
        android:key="gesture_navi_drawable"
       //自定义的图片
        preference:naviDrawable="@drawable/ic_gesture_navigation"
       //自定义文本
        preference:naviDetail="@string/demonstration_effect">
        <intent
            android:action="android.intent.action.MAIN"
            android:targetPackage="com.android.settings"
            android:targetClass="com.android.settings.Settings$GestureNaviSettingsActivity"/>
    </com.android.settings.gestures.NavigationPreference>


    <com.android.settings.gestures.NavigationTitlePreference
        android:key="virtual_navi"
        preference:navigationTitle="@string/system_virtual_navigation_title"/>

    <com.android.settings.gestures.NavigationPreference
        android:key="virtual_navi_drawable"
        preference:naviDrawable="@drawable/ic_virtual_navigation"
        preference:naviDetail="@string/demonstration_effect">
        <intent
            android:action="android.intent.action.MAIN"
            android:targetPackage="com.android.settings"
            android:targetClass="com.android.settings.Settings$VirtualNaviSettingsActivity"/>
    </com.android.settings.gestures.NavigationPreference>


</PreferenceScreen>
? ?界面加载菜单代码:
public class NavigationTypeSettings extends SettingsPreferenceFragment implements
        NavigationTitlePreference.OnClickListener{

    private static final String KEY_GESTURE = "gesture_navi";
    private static final String KEY_VIRTUAL = "virtual_navi";

    private NavigationTitlePreference mGestureNaviPref;
    private NavigationTitlePreference mVirtualNaviPref;


    @Override
    public void onCreate(Bundle icicle) {
        super.onCreate(icicle);
        //加载界面
        addPreferencesFromResource(R.xml.navigation_type_settings);


        PreferenceScreen root = getPreferenceScreen();
        mGestureNaviPref = (NavigationTitlePreference)root.findPreference(KEY_GESTURE);
        mVirtualNaviPref = (NavigationTitlePreference)root.findPreference(KEY_VIRTUAL);
        //自定义Preference的监听事件
        mGestureNaviPref.setNaviTitleOnClickListener(this);
        mVirtualNaviPref.setNaviTitleOnClickListener(this);
    }


   //点击Preference的回调方法处理
   @Override
   public void onNaviPrefernceClicked(NavigationTitlePreference emiter) {
        ..........
   }
5. 自定义Preference效果图

6. 总结
? ? ? ? 本篇文章是对自定义Preference的一个小结,只写了UI界面和点击响应事件,具体的逻辑看项目需求,只是一个抛砖引玉的Demo,设置模块已经有比较成熟的Preference控件,当有自定义的Preference的需求,根据情况继承类似的Preference去造轮子。对于UI事件的处理,本文中有响应整个Preference的事件处理,也有只需要响应其中一个子控件的事件处理,关键还是要多看和理解源码,面向对象编程继承和多态的灵活应用, 后续在工作项目中再多多总结吧。
????????