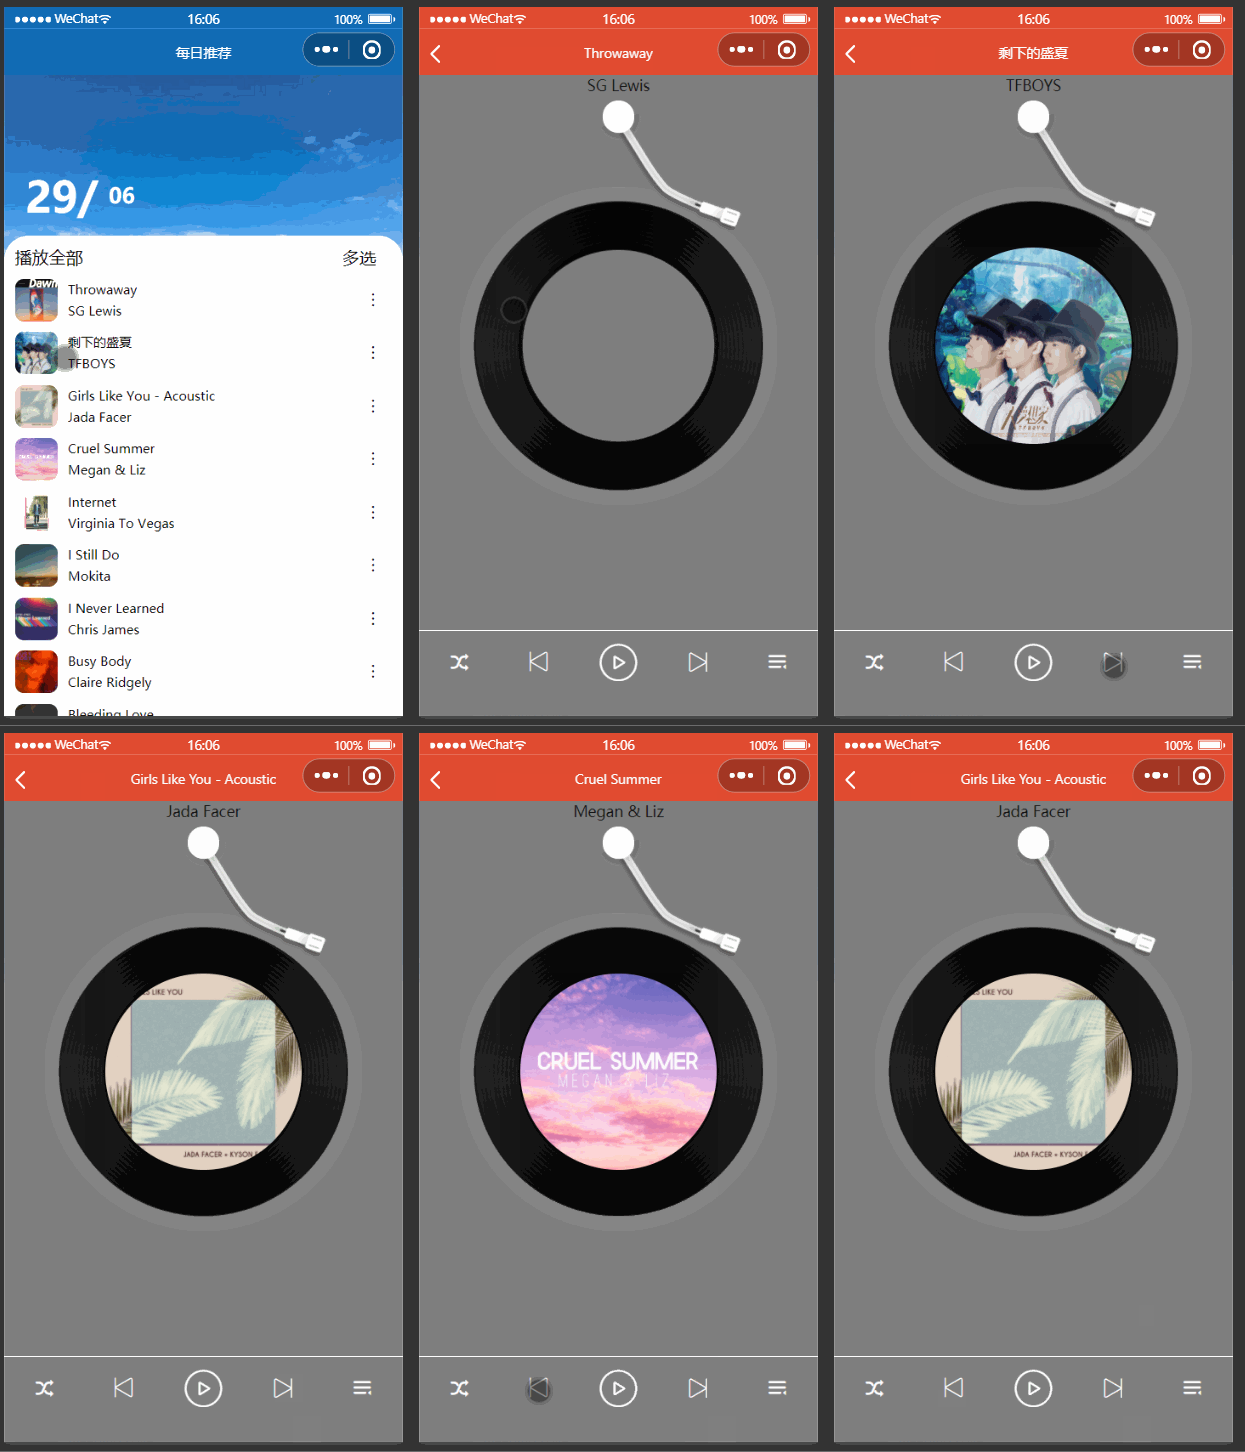
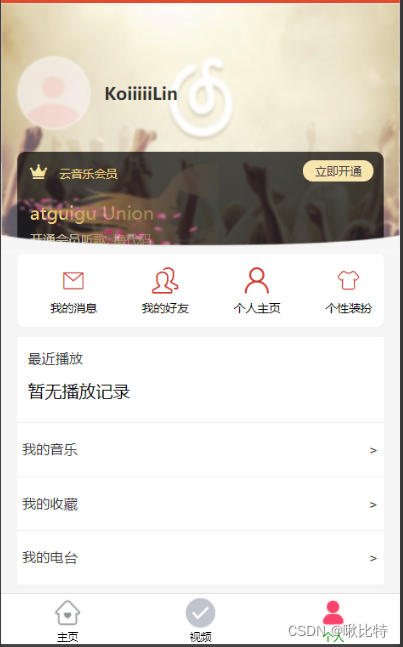
文章目录
前言
参考文档
微信官方文档:https://developers.weixin.qq.com/miniprogram/dev/api/route/EventChannel.html
视频教程
尚硅谷微信小程序开发:https://www.bilibili.com/video/BV12K411A7A2?p=1&vd_source=4c39d5508943c58ce334d714f68f2df7
源代码地址
正文
如何解决网易云登录接口网络拥挤登录失败
- 下载NeteaseCloudMusicApi,npm i NeteaseCloudMusicApi
- 在终端打开它,并执行 npm i
- 执行node app
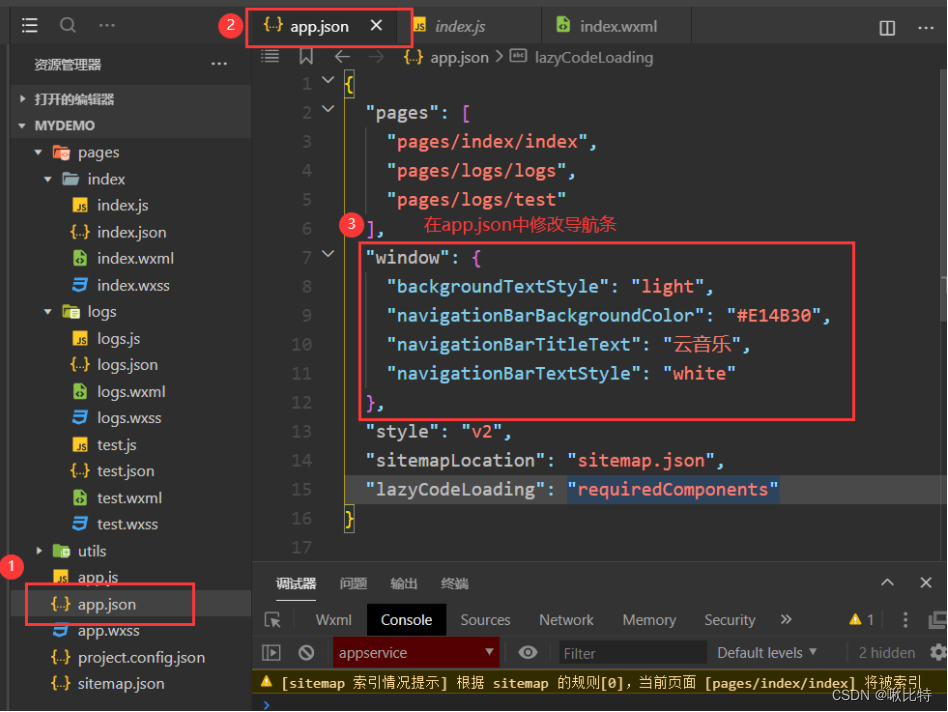
窗口配置

轮播图实现
官方API文档:https://developers.weixin.qq.com/miniprogram/dev/component/swiper.html
  <swiper
   class="banners"
   indicator-dots
   indicator-active-color="ivory"
   indicator-active-color="#d43c33"
   autoplay
  >
    <swiper-item>
      <image src="../../static/images/nvsheng.jpg" alt="" />
    </swiper-item>
    <swiper-item>
      <image src="../../static/images/nvsheng.jpg" alt="" />
    </swiper-item>
    <swiper-item>
      <image src="../../static/images/nvsheng.jpg" alt="" />
    </swiper-item>
    <swiper-item>
      <image src="../../static/images/nvsheng.jpg" alt="" />
    </swiper-item>
  </swiper>

与后端交互
封装请求操作
上面已经实现了静态页面的搭建,现在我们通过请求接口获取到轮播图。为了方便后续请求接口操作,我们将这部分代码进行封装(封装在utils/utils.js中),与vue类似,返回的是一个promise对象,但是是export出去的,因此不能使用解构赋值。
const publicRequest =(url,data={},methods='GET')=>{
  return new Promise((resolve,reject)=>{
    wx.request({
      url: url,
      data:data,
      methods:methods,
      success:(res)=> {
        console.log("请求成功!",res)
        resolve(res.data)
      },
      fail:(err)=>{
        console.log("请求失败",err)
        reject(err)
      }
    })
  })
}
请求banners
    let result = await util.publicRequest("http://localhost:3000/banner", {
      type: 2
    })
修改轮播图
通过接口我们获取到了轮播图的图片,接下来我们对轮播图进行修改,使用wx:for来循环输出
<swiper
 class="banners"
 indicator-dots
 indicator-active-color="ivory"
 indicator-active-color="#d43c33"
 autoplay
>
    <swiper-item wx:for="{{banner}}" wx:key="item.index">
        <image src="{{item.pic}}" alt="" />
    </swiper-item>

</swiper>

图标导航区域

 <!-- 图标导航区域 -->
    <view class="navContainer">
        <view class="navItem">
            <text class="iconfont icon-meirituijian"></text>
            <text>每日推荐</text>
        </view>
        <view class="navItem">
            <text class="iconfont icon-gedan1"></text>
            <text class="">歌单</text>
        </view>
        <view class="navItem">
            <text class="iconfont icon-icon-ranking"></text>
            <text class="" >排行榜</text>
        </view>
        <view class="navItem">
            <text class="iconfont icon-diantai"></text>
            <text class="">电台</text>
        </view>
        <view class="navItem">
            <text class="iconfont icon-zhiboguankanliangbofangsheyingshexiangjixianxing"></text>
            <text class="">直播</text>
        </view>
    </view>
推荐歌单
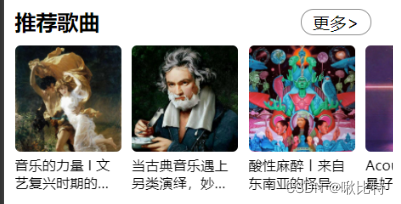
观察网易云音乐的推荐歌单部分,网易云音乐的这部分内容是类似于轮播图可以左右滑动的,这边我们使用scroll-view来实现。请求后端接口数据与轮播图一样就不赘述了,这边注意歌单的名字可能过长导致会出现重叠,因此我们需要对文本的溢出状态进行处理。
   <!-- 推荐歌曲 -->
    <view class="recommandSongContainer">
        <view
         class="title-more"
         selectable="false"
         space="false"
         decode="false"
        >
            <text class="title" selectable="false" space="false" decode="false">推荐歌曲</text>
            <text class="more">更多></text>
        </view>
        <!-- 具体歌单 -->
        <scroll-view
         class="recommandBox"
         scroll-x
         scroll-y="false"
         upper-threshold="50"
         lower-threshold="50"
         scroll-top="0"
         scroll-left="0"
         scroll-into-view=""
         scroll-with-animation="false"
         enable-back-to-top="false"
         bindscrolltoupper=""
         bindscrolltolower=""
         bindscroll=""
         enable-flex
        >
            <view
             class="scrollItem"
             hover-class="none"
             hover-stop-propagation="false"
             wx:for="{{scrollList}}"
            >
                <image class="" src="{{item.picUrl}}" />
                <text class="" selectable="false" space="false" decode="false">{{item.name}}</text>
            </view>
        </scroll-view>
    </view>
单行文本溢出效果
white-space: nowrap;
overflow: hidden;
text-overflow: ellipsis;
display: block;
多行文本溢出省略号效果
overflow: hidden;
  display: -webkit-box;
  text-overflow: ellipsis;//超出省略号
  -webkit-box-orient: vertical;
  -webkit-line-clamp: 2;//控制显示的行数
排行榜
移动端的网易云音乐中,各个排行榜是可以左右滑动的,单个的排行榜上下可滑动,我们使用scroll-view来实现。与之前的图标导航类似。
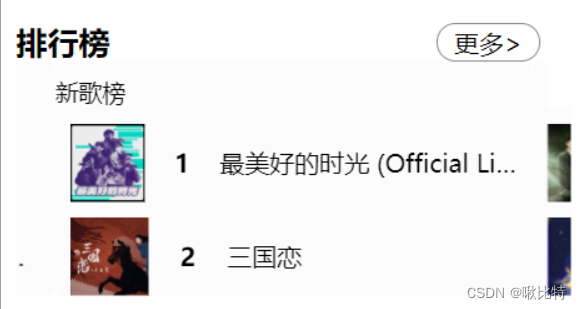
  <!-- 排行榜区域 -->
    <view class="topList">
        <view
         class="title-more"
         selectable="false"
         space="false"
         decode="false"
        >
            <text class="title" selectable="false" space="false" decode="false">排行榜</text>
            <text class="more">更多></text>
        </view>
        <!-- 内容主体区域 -->
        <swiper class="topList-body" circular   previous-margin="50rpx" next-margin="50rpx">
            <swiper-item class="topListItem" wx:for="{{topList}}">
                <view class="list-title">{{item.name}}</view>
                <view class="item-detail" wx:for="{{item.tracks}}" wx:for-index="idx" wx:for-item="itemName" wx:key="id">
                    <image src="{{itemName.al.picUrl}}" />
                    <text class="count">{{idx+1}}</text>
                    <text class="musicName">{{itemName.name}}</text>
                </view>
            </swiper-item>
        </swiper>
    </view>
 let resultArr = []
    while (index < 5) {
      let topLists = await util.publicRequest("http://localhost:3000/top/list", {
        idx: index++
      })
      let topListItem = {
        name: topLists.playlist.name,
        tracks: topLists.playlist.tracks.slice(0, 3)
      }
      resultArr.push(topListItem)
    }
    this.setData({
      topList: resultArr
    })
个人中心
拖动事件
微信小程序通过三个事件共同作用实现了触摸滑动事件,即 bingtouchstart、bindtouchmove 和 bindtouchend 事件。如果对js移动端点击事件touchstart和touchend不太熟悉的,可以看一下这篇博客。(https://blog.csdn.net/paopaosama/article/details/82380524)
实现效果
TIP 小程序中背景图片background-image无法加载本地图片,只能加载网络图片或者是base64图片,可以使用
,然后使用z-index将图片置于底层从而实现背景图片的效果
登录
事件委托
- 什么是事件委托
- 将子元素的事件委托给父元素
- 事件委托的好处
- 减少绑定的次数
- 后期新添加的元素也可享用之前委托的事件
- 事件委托的原理
- 冒泡
- 触发事件的是谁
- 子元素->冒泡到父元素上寻找绑定的事件
- 如何找到触发事件的对象
- event.target:指向的元素可能是绑定事件的元素,也有可能不是绑定事件的元素
- currentTarget与target的区别
- currentTarget要求绑定事件的元素一定是触发事件的元素
- target绑定事件的元素不一定是触发事件的原色。
不理解的话可以看下这篇博客:https://blog.csdn.net/weixin_50580285/article/details/117374798
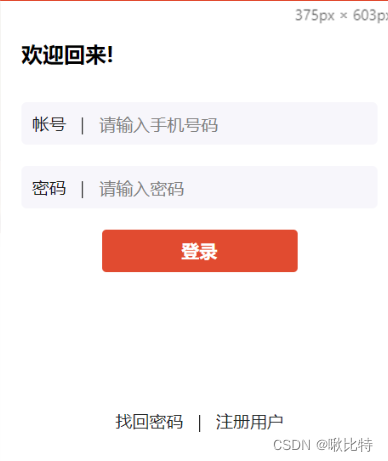
我们要实现简单的用户登录效果,这边使用到的接口地址是:/login/cellphone
调用例子:/login/cellphone?phone=xxx&password=yyy
在登录时候要对手机号进行验证,判断手机号是否输入正确。
  // 验证手机号规则
  phoneNumberRule(str) {
    var reg = /^(13[0-9]|14[01456879]|15[0-35-9]|16[2567]|17[0-8]|18[0-9]|19[0-35-9])\d{8}$/
    if (reg.test(str)) {
        return true
    } else {
        return false
    }
},
完成登录后使用wx.setStorageSync对用户信息进行缓存,完整的登录代码如下所示。
 async formSubmit(e) {
    let form_data = e.detail.value
    // 验证手机号
    if(!form_data.phone){
      wx.showToast({
        title: "手机号不能为空!",
        icon: 'none',
        duration: 2000//持续的时间
      })
      return
    }else if(!this.phoneNumberRule(form_data.phone)){
      wx.showToast({
        title: "请输入正确的手机号码!",
        icon: 'none',
        duration: 2000//持续的时间
      })
      return
    }else if(!form_data.password){
      wx.showToast({
        title: "密码不能为空!",
        icon: 'none',
        duration: 2000//持续的时间
      })
      return
    }
    let res = await util.publicRequest("http://localhost:3000/login/cellphone",form_data)
    // 登录失败返回
    if(res.code == 400){
      wx.showToast({
        title: "手机号错误",
        icon: 'none',
        duration: 2000//持续的时间
      })
      return
    }
    if (res.code != 200){
      wx.showToast({
        title: res.msg,
        icon: 'none',
        duration: 2000//持续的时间
      })
      return
    }
    // 登录成功操作,返回上一级
    // 缓存用户信息
    wx.setStorageSync('userInfo', JSON.stringify(res.profile))
    wx.showToast({
      title: "登录成功",
      icon: 'success',
      duration: 1000//持续的时间
    })

    setTimeout(()=>{
      wx.reLaunch({
        url: '/pages/personal/personal'
      })
    },1000)


  },
缓存cookies
后续在获取信息时,需要登录,因此我们需要将cookies信息进行缓存。这里修改util.js中封装的请求函数。添加请求头,因为只有在登录时才缓存cookies,所以添加判断的isLogin
const publicRequest =(url,data={},methods='GET')=>{
  return new Promise((resolve,reject)=>{
    wx.request({
      url: url,
      data:data,
      methods:methods,
      header:{
        cookie:wx.getStorageSync('cookies')?wx.getStorageSync('cookies').find(item => item.indexOf('MUSIC_U') !== -1):''
      },
      success:(res)=> {
        if(data.isLogin){
          wx.setStorage({
            data: res.cookies,
            key: 'cookies',
          })
        }
        console.log("请求成功!",res)
        resolve(res.data)
      },
      fail:(err)=>{
        console.log("请求失败",err)
        reject(err)
      }
    })
  })
}
注册
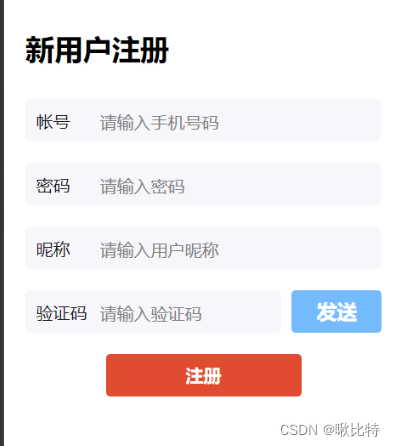
搭建静态注册页面
发送验证码
点击发送按钮,向输入的手机号码发送短信验证码,发送按钮文字发生改变进行倒计时,倒计时结束后显示重新发送
// 发送验证码
  async sendCode(){
    var phone = this.data.phone
    if(phone == ''){
      wx.showToast({
        title: "手机号码不能为空",
        icon: 'none',
        duration: 2000//持续的时间
      })
      return
    }
    let res = await util.publicRequest("http://localhost:3000/captcha/sent",{
      phone:this.data.phone
    })
    let t = 10;
    var time = setInterval(() => {
        t--;
        let str = ''
        if (t == 0) {
          str = '重新发送'
          clearInterval(time)
        }else{
          str = t+'s重新发送'
        }
        this.setData({
          btnData:str
        })
    }, 1000);
  }
验证提交表单
登录成功跳转个人中心页,并类似于用户登录将用户信息缓存渲染。
async formSubmit(e) {
    let form_data = e.detail.value
    // 验证手机号
    if(!form_data.phone){
      wx.showToast({
        title: "手机号不能为空!",
        icon: 'none',
        duration: 2000//持续的时间
      })
      return
    }else if(!this.phoneNumberRule(form_data.phone)){
      wx.showToast({
        title: "请输入正确的手机号码!",
        icon: 'none',
        duration: 2000//持续的时间
      })
      return
    }else if(!form_data.password){
      wx.showToast({
        title: "密码不能为空!",
        icon: 'none',
        duration: 2000//持续的时间
      })
      return
    }else if (!form_data.captcha){
      wx.showToast({
        title: "验证码不能为空",
        icon: 'none',
        duration: 2000//持续的时间
      })
      return
    }else if(!form_data.nickname){
      wx.showToast({
        title: "用户昵称不能为空",
        icon: 'none',
        duration: 2000//持续的时间
      })
      return
    }

    let res_captcha = await util.publicRequest("http://localhost:3000/captcha/verify",{
      captcha:form_data.captcha,
      phone:form_data.phone
    })
    if(res_captcha.code != 200){
      wx.showToast({
        title: "验证码不正确",
        icon: 'none',
        duration: 2000//持续的时间
      })
      return
    }
    let res = await util.publicRequest("http://localhost:3000/register/cellphone",form_data)
    console.log(res)
    if(res.code == 200){
 // 注册成功操作,返回上一级
    // 缓存用户信息
    wx.setStorageSync('userInfo', JSON.stringify(res.profile))
    wx.showToast({
      title: "注册成功",
      icon: 'success',
      duration: 1000//持续的时间
    })

    setTimeout(()=>{
      wx.reLaunch({
        url: '/pages/personal/personal'
      })
    },1000)
        return
    }
    wx.showToast({
      title: res.msg,
      icon: 'none',
      duration: 2000//持续的时间
    })


  },
视频
绘制头部导航区域
弹性盒子
scroll-view

获取视频标签列表
  async getVideoList(){
    let data = await util.publicRequest("http://localhost:3000/video/group/list")
    this.setData({
      videoList:data.data.splice(0,14)
    })
  },
渲染导航区域
<scroll-view class="navScroll" scroll-x enable-flex>
    <view class="navItem " hover-class="none" hover-stop-propagation="false" wx:for="{{videoList}}" wx:key="item.index">
        <view class="navContent {{navId==item.id?'active':''}}" bindtap='clickTab' id="{{item.id}}">{{item.name}}</view>
    </view>
</scroll-view>
绑定点击事件
clickTab(e){
    var navId =e.currentTarget.id
    this.setData({
      navId:navId-0
    })
}
TIP:非number数据转成number数据 位移运算:data>>>0 右移0位会将非number数据强制转换成number 减0:
data-0 字符串减0 成整数
通过cookie获取视频数据
视频数据需要调用两个接口,一个是获取对应的分类下的视频列表,另一个是通过ID获取视频的播放地址,具体代码如下。
  async getVideoList(){
    let data = await util.publicRequest("http://localhost:3000/video/group/list")
    this.setData({
      videoList:data.data.splice(0,14),
      // navId:this.data.videoList[0].id-0
    })
    this.setData({
      navId:this.data.videoList[0].id-0
    })
    // 默认展示
    this.getVideo(this.data.videoList[0].id)
  },
  async getVideoUrl(id){
    let videoUrl = await util.publicRequest("http://localhost:3000/video/url",{id:id})
    return videoUrl.urls[0].url
  }
  ,
  async getVideo(id){
    let video = await util.publicRequest("http://localhost:3000/video/group",{id:id})
    // 关闭加载提示框
    wx.hideLoading()
    if(video.msg == '需要登录'){
      wx.showToast({
        title: '请先登录',
        icon: 'none',
        duration: 2000//持续的时间
      })
      setTimeout(()=>{
        wx.navigateTo({
          url: '../login/login',
        })
      },1000)
    }else{
      let index = 0
      // 请求分类下的视频
      let videos = video.datas.map(item =>{
        item.id = index++;
        this.getVideoUrl(item.data.vid).then(res=>{
          item['videoUrl'] = res;
        })
        // let videoUrl = await util.publicRequest("http://localhost:3000/video/url",{id:item.data.vid})
        return item;
      })
      this.setData({
        video:videos
      })

    }

  },
点击tab可以进行切换,需要修改之前的clickTab函数。
  clickTab(e){
    var navId =e.currentTarget.id
    this.setData({
      navId:navId-0,
      video:[]
    })
    wx.showLoading({
      title: '加载中',
    })
    this.getVideo(navId)
  },
每日推荐
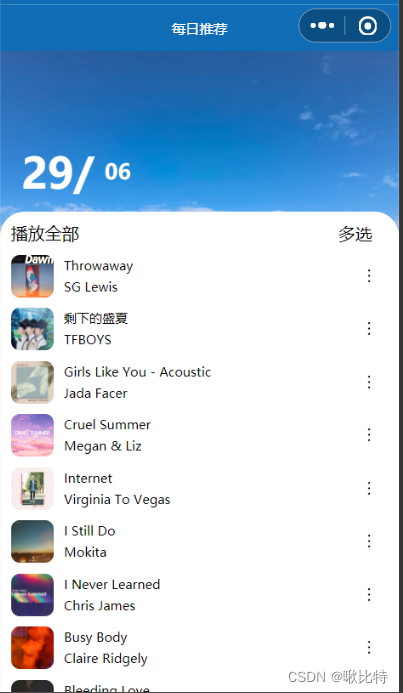
页面搭建
动态渲染日期
获取系统时间
当只需要简单的获取年月日之类的时候,直接利用Date()函数就行
var month=new Date().getFullYear()// 示例
console.log(new Date().getFullYear())// 年
console.log(new Date().getMonth()+1)// 月 注意+1
console.log(new Date().getDate())// 日
console.log(new Date().getHours())//小时
console.log(new Date().getMinutes())// 分钟
console.log(new Date().getSeconds())// 秒
console.log(new Date().getDay())//星期几
小程序的较多地方都需要时间戳的时候,可以封装一个函数来专门获取时间戳
function formatTime(date) {
  var year = date.getFullYear()
  var month = date.getMonth() + 1
  var day = date.getDate()
  var hour = date.getHours()
  var minute = date.getMinutes()
  var second = date.getSeconds()

  return [year, month, day].map(formatNumber).join('/')
}


function formatNumber(n) {
  n = n.toString()
  return n[1] ? n : '0' + n
}
渲染日期
getTime(){
    var date = new Date()
    this.setData({
      month:(date.getMonth()+1).toString().padStart(2,'0'),
      day:date.getDate().toString().padStart(2,'0')
    })
  },
获取歌曲列表
 async getSongList(){
    let songs = await util.publicRequest("http://localhost:3000/recommend/songs")
    if(songs.code == 200){
       this.setData({
         songList:songs.data.dailySongs
       })
    }
  },
将歌曲列表渲染到wxml文件中就基本实现我们要的效果了。
歌曲详情
静态页面搭建
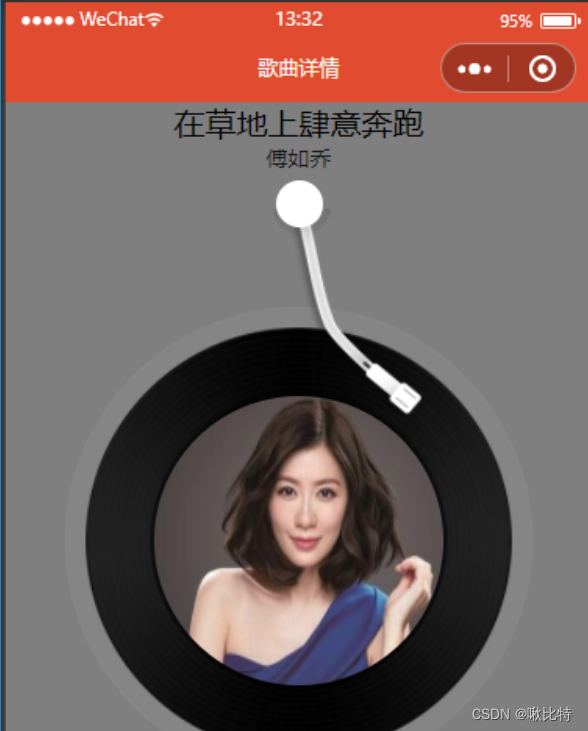
摇杆动画
在音乐暂停播放时,摇杆应该抬起。为摇杆添加旋转动画。
transform: rotate(-20deg);
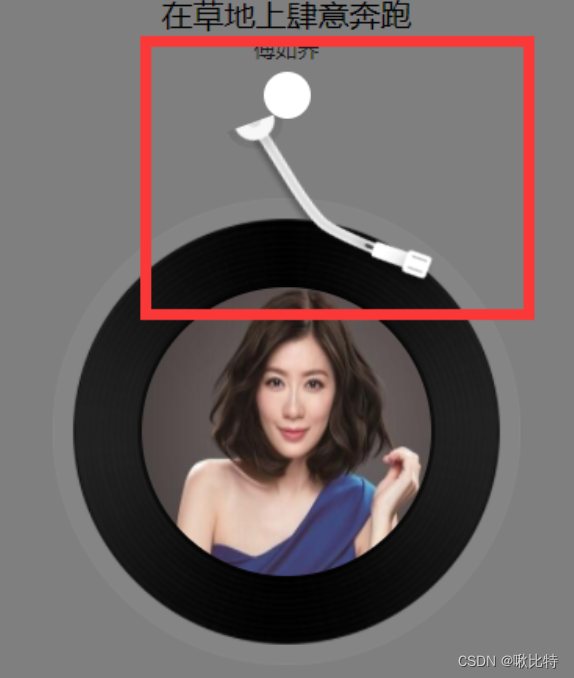
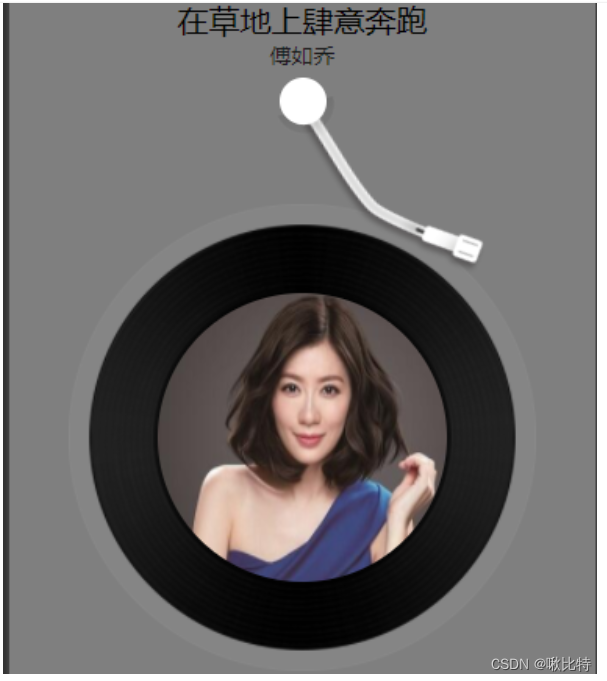
但是发现效果不尽如人意,摇杆与底座发生了分离。这是由于默认的旋转中心在正中心(50% 50%)处,为了达到我们要的效果,我们需要重新设置旋转的中心,这样就可以达到我们要的效果。
transform-origin:40rpx 0 ;
磁盘动画
这样我们就可以实现磁盘的转动了
.disc-container-play{
  animation: rotate1 5s linear infinite;
}
@keyframes rotate1 {
  from{
    transform: rotate(0deg);
  }
  to {
      /*变换 transform;旋转 rotate */
      transform: rotate(360deg);
  }
}
路由跳转传参
在每日推荐页面使用自定义的属性来传递歌曲的详细信息
  go2songDetail(e){
    // 获取自定义的参数
    let song = e.currentTarget.dataset.song;
    wx.navigateTo({
      url: '../songDetail/songDetail?song='+JSON.stringify(song),
    })
  },
在歌曲详情页面中,onLoad函数的option中可以获取到传递过来的参数。如果在转JSON的过程中出现如下错误。这是由于原生小程序中路由传参,对参数的长度有限制,如果参数长度过长会自动截取

由于我们最终只是需要歌曲的ID因此在传参的时候,我们只需要传递一个musicId 就行。在歌曲详情页面中的onload函数,可以通过options获取到路由跳转传递的参数。
歌曲的详细信息
了解完路由跳转如何传递参数之后,接下来获取并渲染歌曲的详细信息,这边要用到的是/song/detail这个接口。观察返回来的数据,发现网易云的这个接口中,并没有歌曲的播放地址,我们还需要使用到/song/url来获取音乐url.
获取歌曲详情
  async getSongDetail(){
    let res = await util.publicRequest("http://localhost:3000/song/detail",{
      ids:this.data.ids
    })
    this.setData({
      musicInfo:res.songs[0],
      musicUrlId:res.privileges[0].id
    })
    wx.setNavigationBarTitle({
      title: res.songs[0].name
    })
  },
获取歌曲播放地址
  async getSongUrl(){
    let res = await util.publicRequest("http://localhost:3000/song/url",{
      id:this.data.musicUrlId
    })
    return res.data[0]
  },
实现歌曲播放
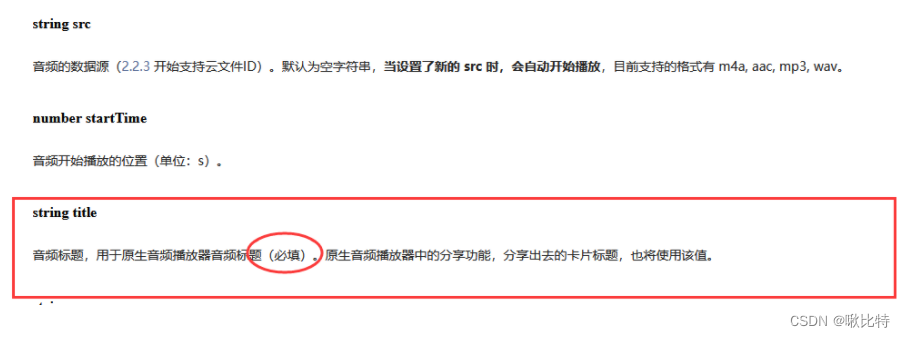
要实现背景音乐播放需要声明一个全局唯一的背景音频管理器wx.getBackgroundAudioManager(),需要给音频管理器传递一个src以及title,这样音乐就能正常播放了。
  this.getSongUrl().then(item=>{
    this.bgAudioManager.src = item.url
  })
  this.bgAudioManager.title = this.data.musicInfo.name
解决系统任务栏控制播放状态显示不一致
如果用户操作系统的控制音乐播放/暂停的按钮,页面播放状态没有发生改变,从而导致播放状态不一致,这边需要使用到几个监听事件,监听音乐的播放和暂停。
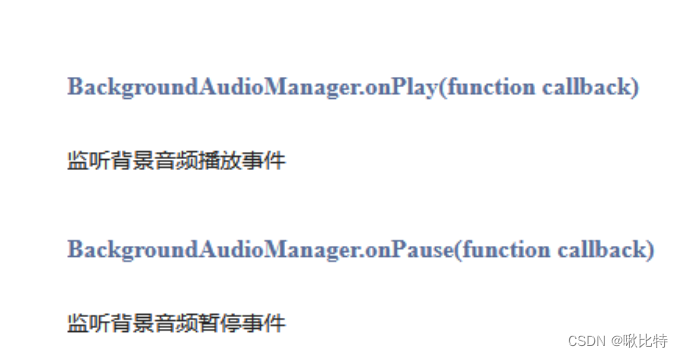
this.bgAudioManager.onPlay(()=>{
  this.changePlayState(true)//封装的修改音乐状态的函数
})
this.bgAudioManager.onPause(()=>{
  this.changePlayState(false)
})
在真机上进行调试的时候,会有一个小窗口,当点击小窗口的关闭按钮时也应该修改音乐的播放状态,将音乐停止播放,需要用到的是
BackgroundAudioManager.onStop(function callback)来监听音乐的停止事件。
    this.bgAudioManager.onStop(()=>{
      this.changePlayState(false)
    })
getApp解决销毁音乐播放状态的问题
音乐播放时如果返回到每日推荐页面,然后重新点击原来播放的音乐,isPlay被重置为false,这会导致系统的播放状态与页面的播放状态不一致。
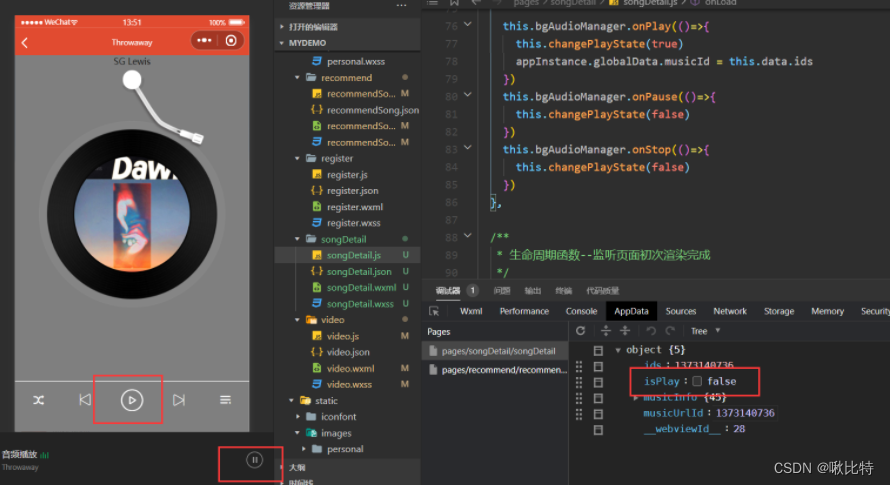
解决方法
设置两个全局变量musicId和isPlay,在onload函数中判断App.js定义的全局变量中的musicId与页面中的musicId是否相同来控制页面中歌曲的播放状态。注意:每次在修改页面中的isPlay的同时也要修改全局变量中的isPlay。
全局变量的获取方法:
// 获取全局实例
const appInstance = getApp()
// 获取全局变量
appInstance.globalData.musicId = this.data.ids
 //  判断当前页面音乐是否在播放
  if(appInstance.globalData.isPlay && appInstance.globalData.musicId==musicId){
    // 如果是播放的歌曲ID相同,则修改为true
    this.setData({
      isPlay:true
    })
  }
切换上一首/下一首
定义事件相关
分类
- 标准DOM事件
- 自定义事件
标准DOM事件
- 举例:click,input…
- 事件名固定,事件由浏览器触发
自定义事件
- 绑定事件
事件名
事件的回调
订阅方:PubSub.subscribe() 接收数据 - 触发事件
事件名
提供事件参数对象,等同于原生事件的event对象
发布方:PubSub.publish() 提供数据
页面通信交流
-
小程序使用npm包
-
初始化package.json
npm init -y -
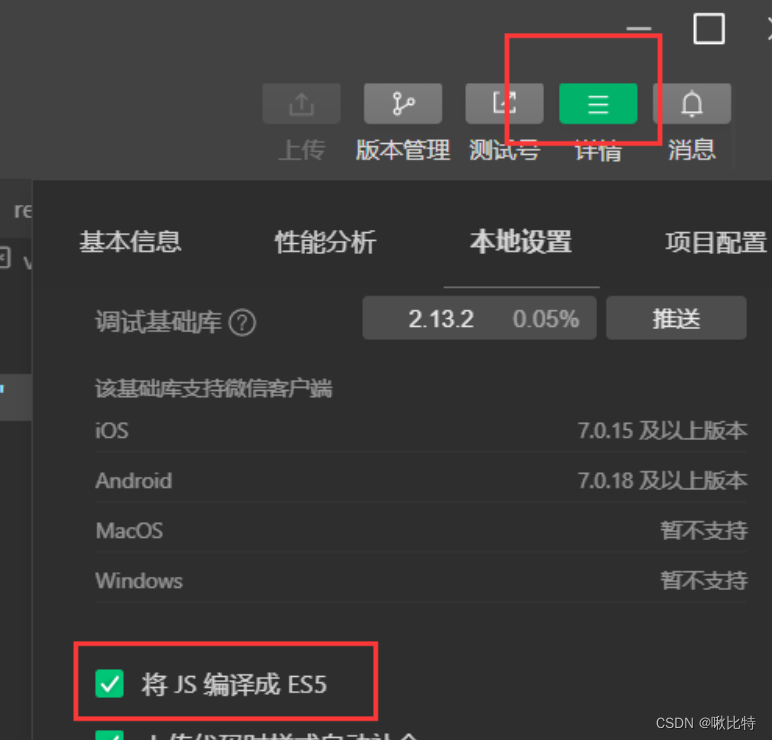
勾选允许使用npm
-
下载npm包----pubsub-js
npm install pubsub-js
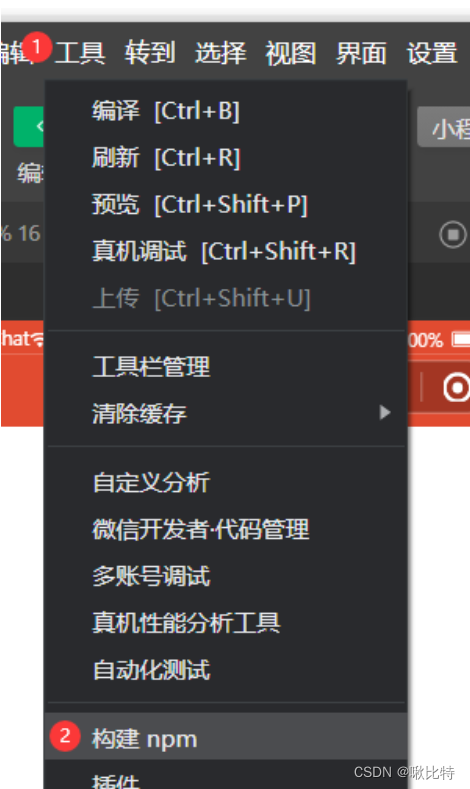
在页面中导入包的时候,如果出现如下报错:

可以使用工具-构建npm将mode_modules中的内容添加到程序中的包,这样引入PubSub就不会报错了。
切换歌曲功能实现
使用PubSub进行页面通信
在上面一节的介绍中,我们对自定义事件的发布者和订阅者有了简单的了解。这一节中我们将使用PubSub来实现页面的通信。首先我们需要分清楚每日推荐和歌曲详情两个页面哪一个是订阅者,哪一个是发布者,发布者和订阅者哪一个应该先呢?答案是显而易见的,必须要先有发布者然后才能有订阅者,对应到我们的需求中,必须在歌曲详情页面中点击上一首/下一首的切歌才会和每日推荐页面进行通信。因此,我们需要在songDetail.js获取到是上一首还是下一首,然后将对应的类型传递给recommendSong.js获取到上一首/下一首歌曲的id并 传递给songDetail页面。
    // 在songDetail中点击上一首/下一首触发handleSwitch函数
    let type = event.currentTarget.id//存放操作类型
    PubSub.publish('switchType',type)//传递操作类型
// 在recommendSong中获取到传递过来的type
PubSub.subscribe('switchType',(msg,data)=>{
      // es6解构赋值,获取歌曲列表和初始化的下标值
      let {songList,index } = this.data
      if(data === 'pre'){
        index-=1
      }else{
        index +=1
      }
      // 判断Index的界限
      if(index===-1){
        index = songList.length-1
      }else if (index >=songList.length){
        index = 0
      }
      // 更新下标
      this.setData({
        index
      })
      // 传递歌曲ID
      let musicId = songList[index].id
      // 将获取的Music的id值发送歌曲详情页面
      PubSub.publish("musicID",musicId)
    })
// 在songDetail的handleSwitch函数中获取传递过来的musicID
PubSub.subscribe("musicID",(msg,data)=>{
      // 获取下一首歌曲的id
      let musicId = data
      //更新musicId
      this.setData({
        ids:musicId
      })
      // 获取歌曲详情
      this.getSongDetail()
      PubSub.unsubscribe("musicID")
    })
