????????由于公司产品的复杂性,连带着项目也跟着复杂起来,这时候也接触到了android的build 变体的使用。在这里记录一下这个过程,最初查看关于这一块的资料是在android的官网上看得,地址如下:配置 build 变体 ?|? Android 开发者 ?|? Android Developers
????????首先,我们公司是有多种产品的,每一种产品的类型有相同的也有不同的,而且种类很多,每一种产品下面还会继续细分不同的特性,例如有产品1、产品2、产品3....产品n,然后产品1可能会存在特性1、特性2......特性N,每个产品之间可能有相同部分,但是不相同的地方比较多,所以每一个产品可以作为一个单独的工程来实现,相同部分就抽成一个库进行依赖到项目中来,而每个产品下的特性则可以使用变体的方式来区分,当然不是说所有的特性都使用变体,如果特性增多,这个工程也会变得非常庞大的,还是要斟酌着使用。
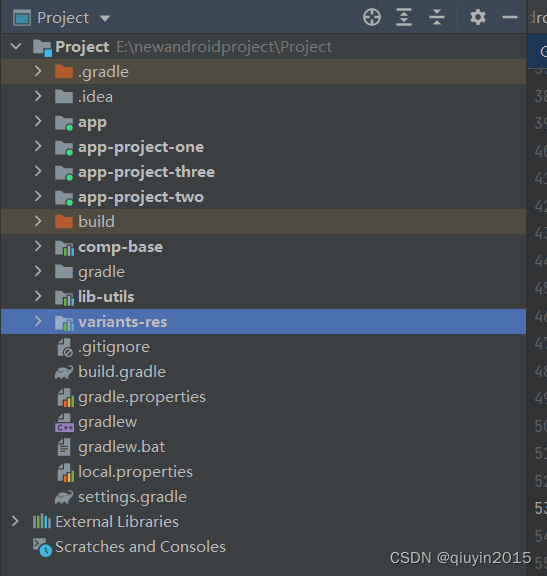
? ? ? ? 针对上面所说的类型搭建项目,如下图所示:
? 接着,在公司的项目中,我主要使用到了以下几方面来划分产品与特性:
- build配置
????????当创建新模块时,Android Studio 会自动为您创建“debug”build 类型和“release”build 类型。虽然“debug”build 类型没有出现在 build 配置文件中,但 Android Studio 会使用?debuggable true?配置它,在项目app目录下的build.gradle中进行配置,配置的例子如下:
android {
    defaultConfig {

    }
    signingConfigs {
	  release {
	            storeFile file(appStoreFile)
                storePassword 'appStorePassword'
                keyAlias 'appKeyAlias'
                keyPassword 'appKeyPassword'
	        }

	  debug {

	            storeFile file(appStoreFile)
                storePassword 'appStorePassword'
                keyAlias 'appKeyAlias'
                keyPassword 'appKeyPassword'
	        }
    	}

    buildTypes {
        release {
            minifyEnabled true
            proguardFiles getDefaultProguardFile('proguard-android.txt'), 'proguard-rules.pro'
        }

        debug {
               // 配置debug版本的签名
               signingConfig signingConfigs.debug

	            // 是否开启代码混淆,默认false
	            minifyEnabled false

	            // 是否应该生成可调试的apk
	            debuggable true

	            // 混淆规则配置文件
	            proguardFiles getDefaultProguardFile('proguard-android.txt'), 'proguard-rules.pro'
	            // 自定义buildType
	            buildConfigField 'String', 'BASE_URL', '"http://api-debug.**/"'
        }

        /**
         * The `initWith` property allows you to copy configurations from other build types,
         * then configure only the settings you want to change. This one copies the debug build
         * type, and then changes the manifest placeholder and application ID.
         */
        staging {
            initWith debug
            applicationIdSuffix ".debugStaging"
        }
    }
}
一般buildType中,我们会配置项目所需要使用到的环境变量,如测试环境地址和正式环境地址等,这个环境变量可以在代码中使用的,并且在编译打包的时候可以确定对应的值,?可以通过buildConfigField 关键字来进行配置,编译过后,我们可以通过BuildConfig.BASE_URL方式在代码中调用,如下图所示:

?获取到的值,就是在build.gradle中对应build type下配置的值。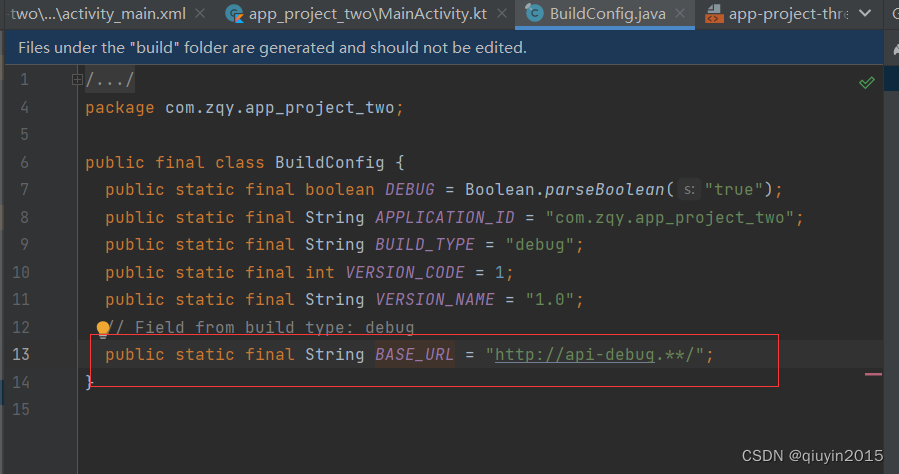
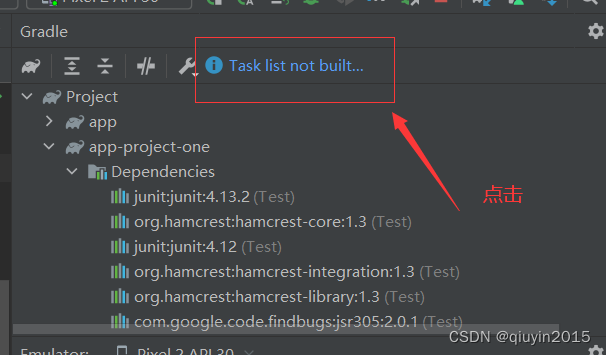
配置完成后,sync同步一下,在gradle模块中可以看到配置的变化,当然如果点击Gradle出现Task list not build,没有Task出现,如下图?
?
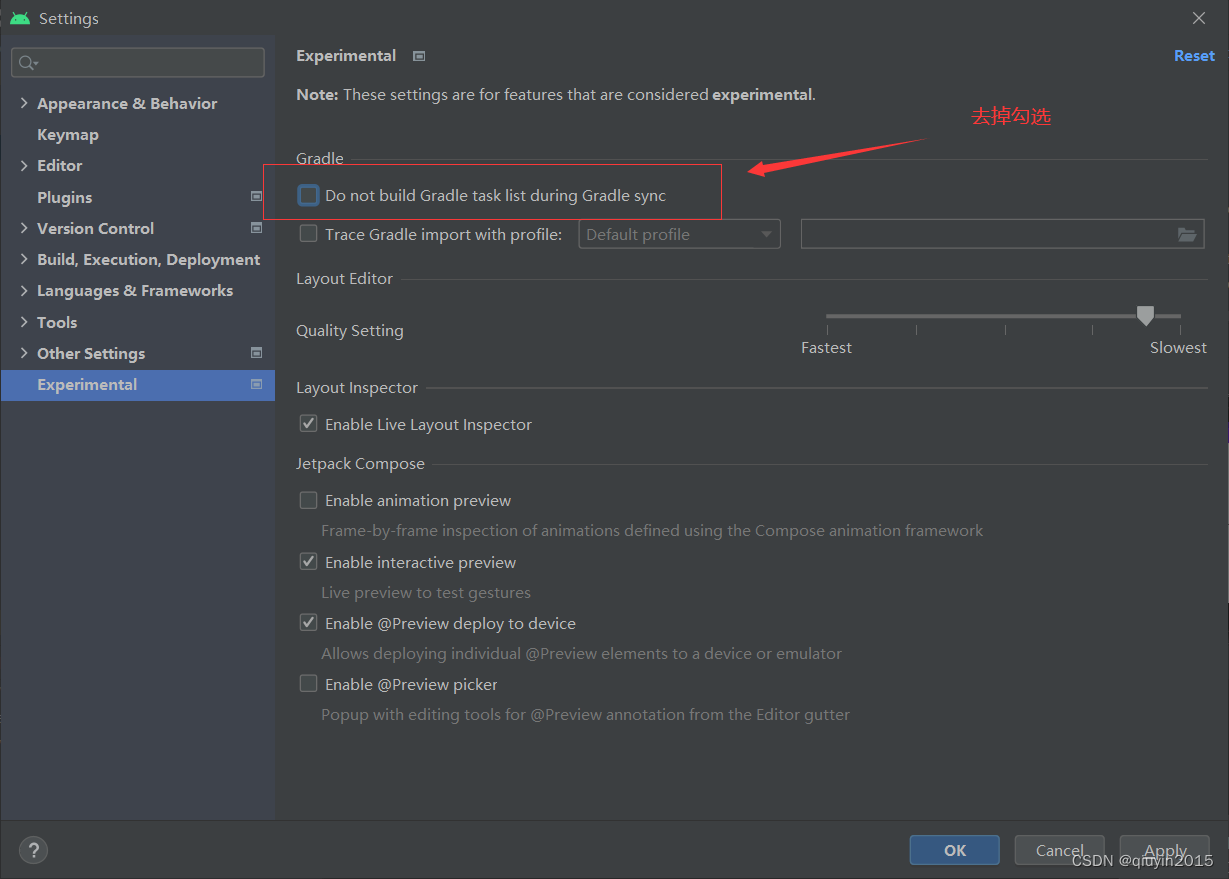
?这是由于新版本的android studio默认设置了不同步task,我们可以点击Task list not build,去掉不同步的勾选,如下图:
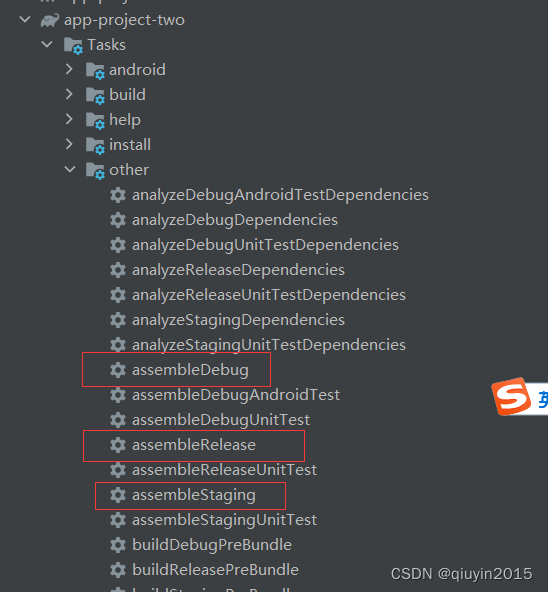
?同步一下工程即可。我们可以在Gradle的Task-other看到这个变化,如下图:
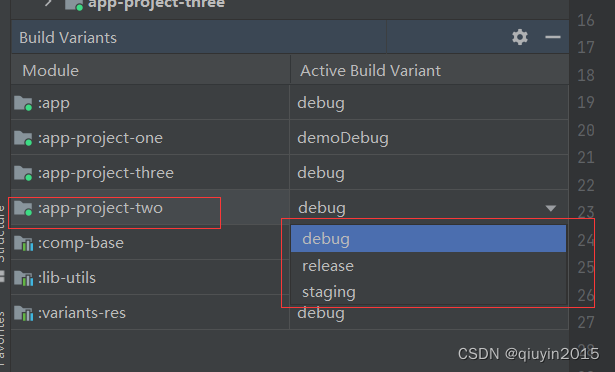
也可以通过build variants切换当前工程的build type,切换到release下,那么buildConfig中的值也会跟着变化,如下图所示:
2.配置产品变种
????????如果我们的产品有多种特性类型,产品总体是一样,只有部分不一样,我们可以通过配置变体要区分特性与类型,例如,音箱项目分为蓝牙音箱、wifi音箱、蓝牙wifi音箱(只是举个例子),基本主体是一样的,只有连接方式不同,并且需要分别打不同的包,我们可以在app目录下的build.gradle配置type维度的变体,如下配置:
flavorDimensions "type"
productFlavors {
bluetooth {
// Assigns this product flavor to the "version" flavor dimension.
// If you are using only one dimension, this property is optional,
// and the plugin automatically assigns all the module's flavors to
// that dimension.
dimension "type"
// 这里配置apk的包名,配置之后的包名是com.zqy.app_project_one.bluetooth
// 不需要修改包名直接不配置即可
applicationIdSuffix ".bluetooth"
versionNameSuffix "-bluetooth"
}
wifi {
dimension "type"
// 这里配置apk的包名,配置之后的包名是com.zqy.app_project_one.wifi
applicationIdSuffix ".wifi"
versionNameSuffix "-wifi"
}
bluetoothandwifi{
dimension "type"
// 这里配置apk的包名,配置之后的包名是com.zqy.app_project_one.bluetoothandwifi
applicationIdSuffix ".bluetoothandwifi"
versionNameSuffix "-bluetoothandwifi"
}
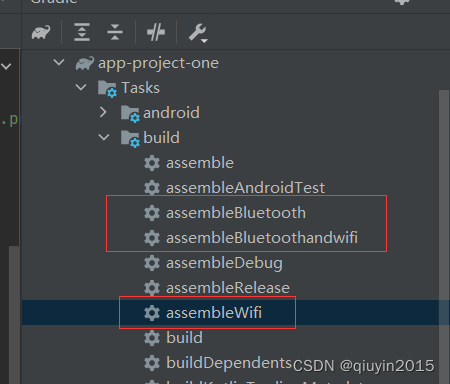
}同步之后,可以在Gradle看到变体已经构建出来了:
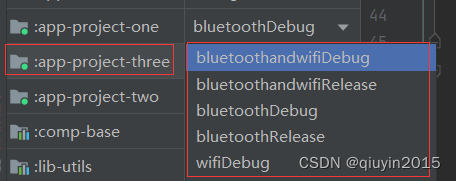
?同样也可以通过build variants切换和查看当前工程的变体,如下:
?如果特性仅有打包的包名不一样,这样配置之后打出来的包就会带上对应变体设置的后缀名,但是如果代码也不一样的话,这就需要我们创建对应的变体模块来实现不一样的地方。
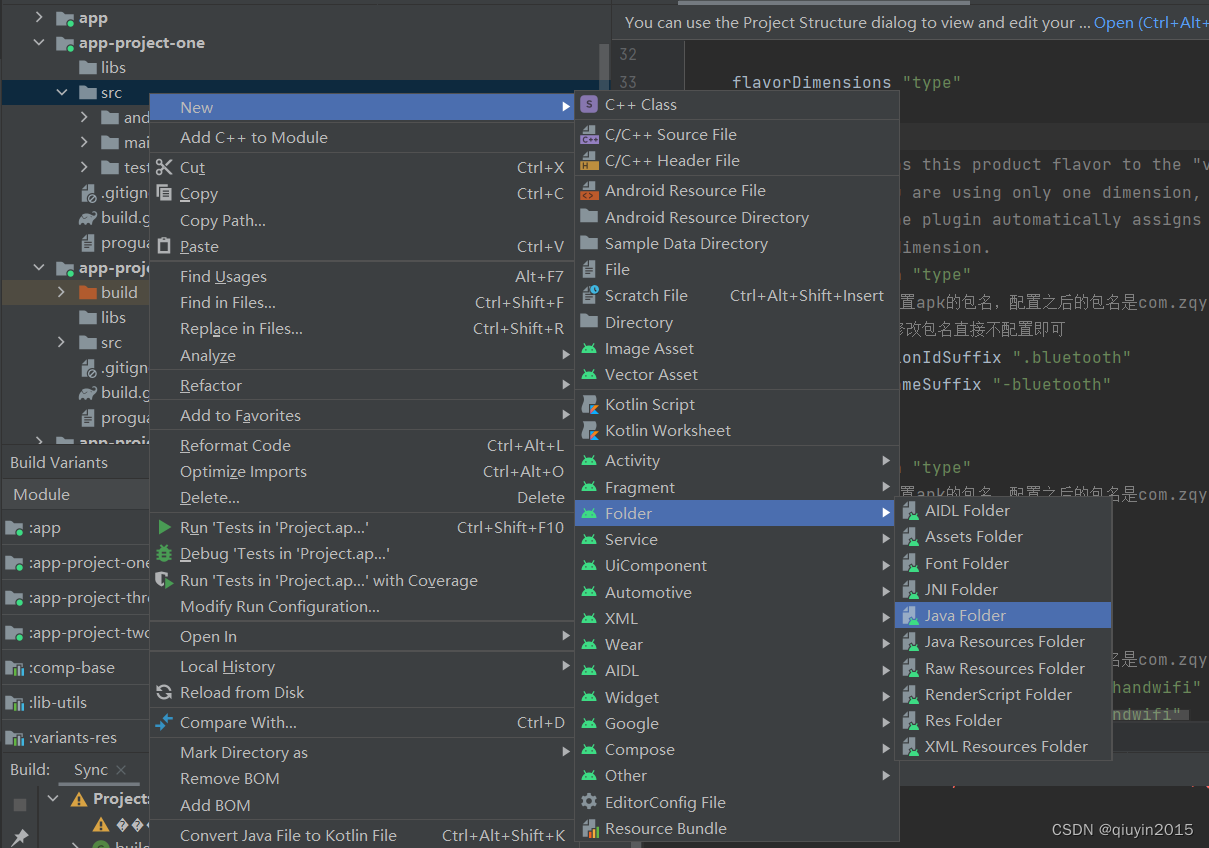
? ? ? ? 首先,我们可以右键项目,new一个java folder,选择需要创建的变体模块,如下:
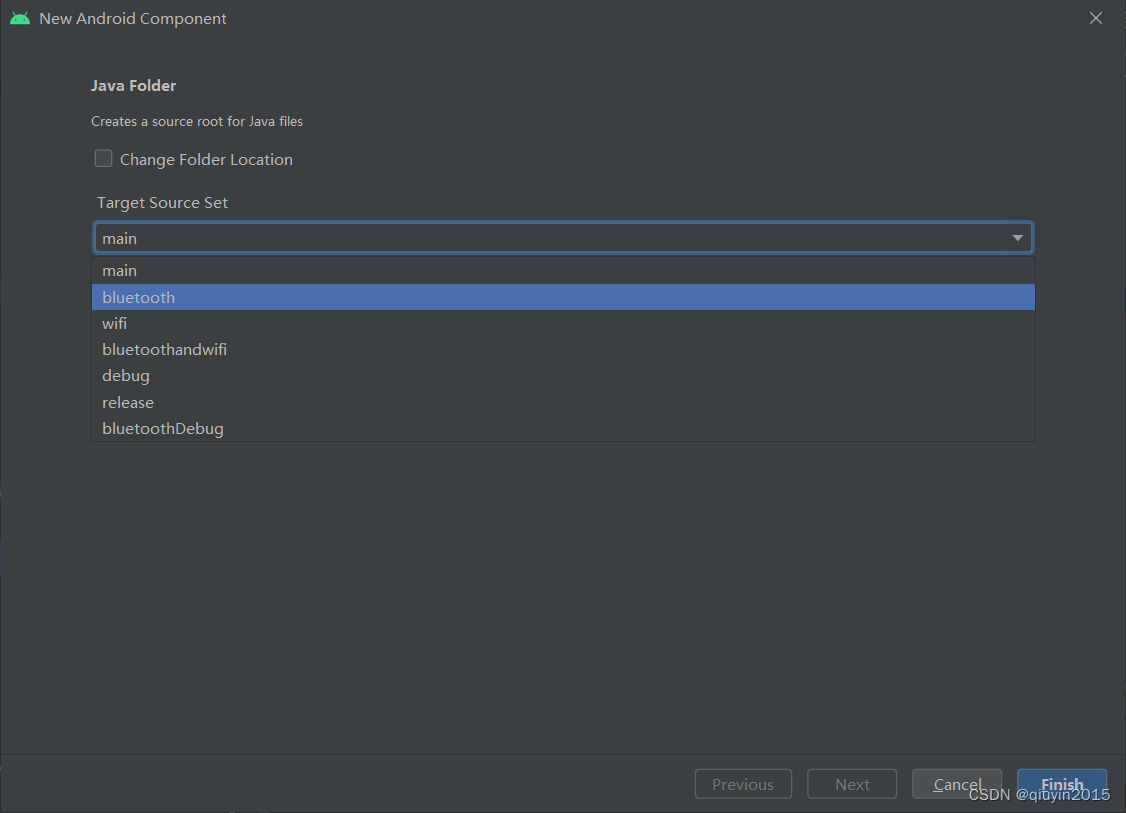
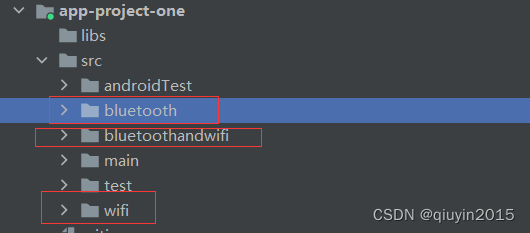
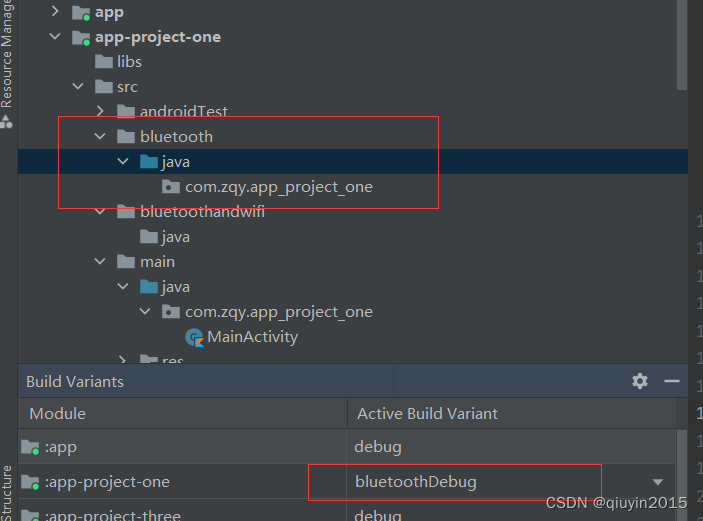
创建之后,模块下面是什么都没有的,我们还需要创建目录,由于我当前项目是处于blueTooth变体模块,如下:
所以可以直接项目右键选择package,输入包名即可,如下:?
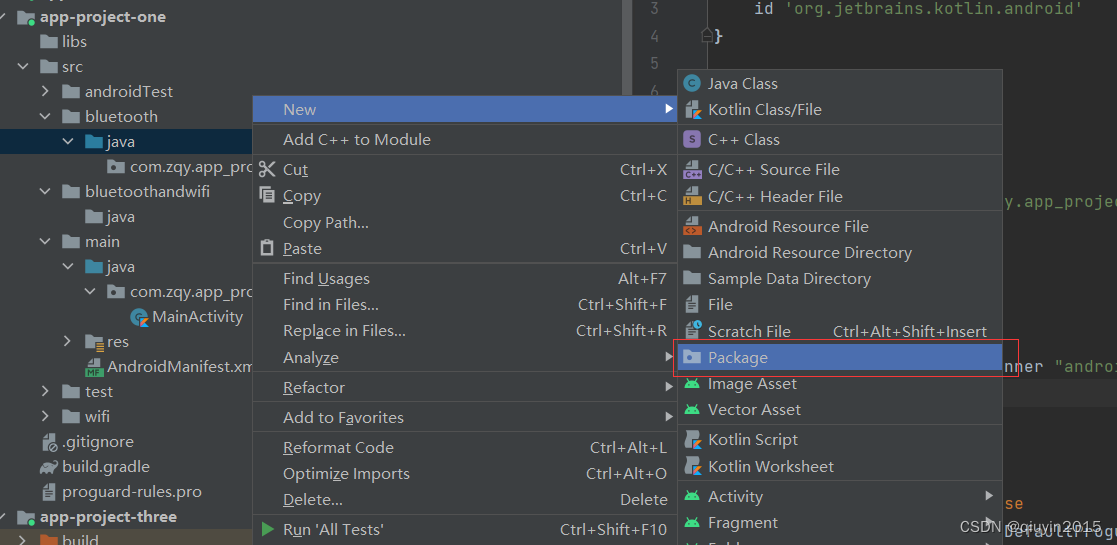
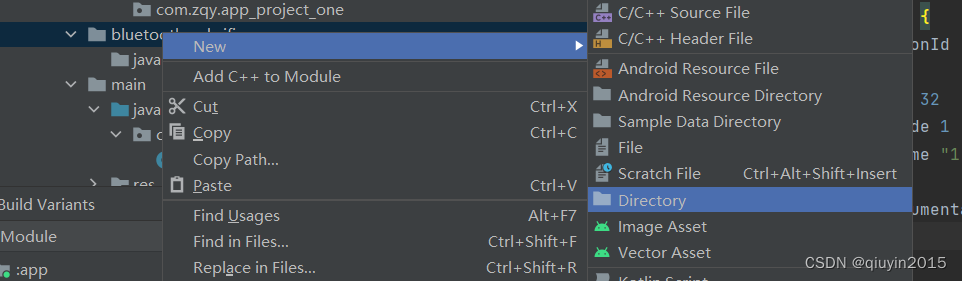
?如果当前工程不是处于想要创建变体的模式,则创建目录的时候,是没有package的选择的,只有Directory,如下:
?????????注意:main模块是所有变体都能访问到,变体模块下的代码是只有当前工程处于该变体模式下才能访问。
针对变体,一般我们有可能需要由以下的配置:
- 每个变体app的启动入口不一样
????????每一个变体创建相同路径的MainActivity类,删除main目录下的MainActivity,统一通过main目录下的清单文件作为入口,这里创建demo和full两个变体,以这两个作为例子
app的build.gradle配置
flavorDimensions "version"
    productFlavors {
        demo {
            // Assigns this product flavor to the "version" flavor dimension.
            // If you are using only one dimension, this property is optional,
            // and the plugin automatically assigns all the module's flavors to
            // that dimension.
            dimension "version"
            //  这里配置apk的包名,配置之后的包名是com.zqy.app_project_one.bluetooth
            // 不需要修改包名直接不配置即可
            applicationIdSuffix ".demo"
            versionNameSuffix "-demo"
        }
        full {
            dimension "version"
            //  这里配置apk的包名,配置之后的包名是com.zqy.app_project_one.wifi
            applicationIdSuffix ".full"
            versionNameSuffix "-full"
        }
}- 将main模块下的MainActivity与activity_main.xml删除
- 变体模块下新增MainActivity与activity_main.xml
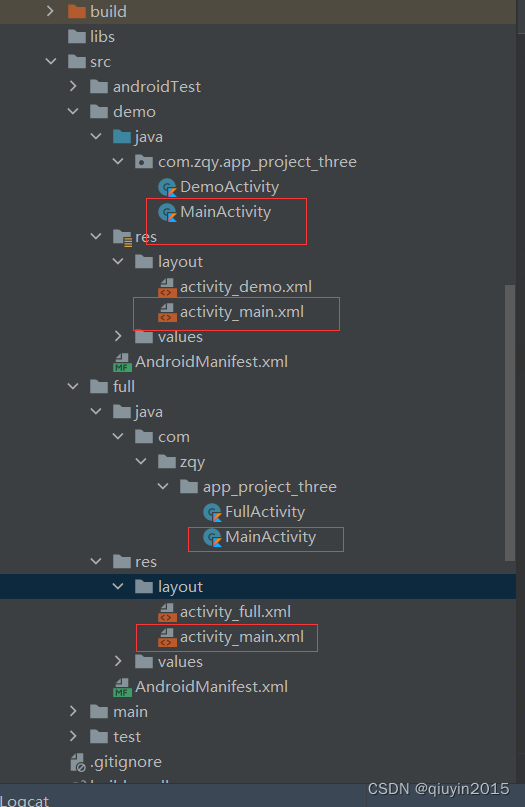
?
- 在main模块的清单文件设置程序的入口
<application
        android:allowBackup="true"
        android:icon="@mipmap/ic_launcher"
        android:label="@string/app_name"
        android:roundIcon="@mipmap/ic_launcher_round"
        android:supportsRtl="true"
        android:theme="@style/Theme.Project">
        <activity
            android:name=".MainActivity"
            android:exported="true">
            <intent-filter>
                <action android:name="android.intent.action.MAIN" />

                <category android:name="android.intent.category.LAUNCHER" />
            </intent-filter>
        </activity>
    </application>
?通过build variants切换当前工程的build type,直接运行项目的代码,就可以调用对应变体下的MainActivity,当前是什么变体模式,就会使用变体目录下相同路径的类。
- 更改默认源代码集配置
????????如果您的源代码未按照 Gradle 要求的默认源代码集文件结构进行组织(如上文关于创建源代码集的部分中所述),您可以使用?sourceSets?代码块更改 Gradle 为源代码集的每个组件收集文件的位置。sourceSets?代码块必须位于?android?代码块中。您无需改变源代码文件的位置,只需向 Gradle 提供相对于模块级?build.gradle?文件的路径,Gradle 应该会在该路径下找到每个源代码集组件的文件 。
 sourceSets{
        main{
            java.srcDirs = ['src/main/java']

            // If you list multiple directories, Gradle uses all of them to collect
            // sources. Because Gradle gives these directories equal priority, if
            // you define the same resource in more than one directory, you get an
            // error when merging resources. The default directory is 'src/main/res'.
            res.srcDirs = ['src/main/res']

            // Note: You should avoid specifying a directory which is a parent to one
            // or more other directories you specify. For example, avoid the following:
            // res.srcDirs = ['other/res1', 'other/res1/layouts', 'other/res1/strings']
            // You should specify either only the root 'other/res1' directory, or only the
            // nested 'other/res1/layouts' and 'other/res1/strings' directories.

            // For each source set, you can specify only one Android manifest.
            // By default, Android Studio creates a manifest for your main source
            // set in the src/main/ directory.
            manifest.srcFile 'src/main/AndroidManifest.xml'
        }

        full{
            java.srcDirs = ['src/full/java']

            // If you list multiple directories, Gradle uses all of them to collect
            // sources. Because Gradle gives these directories equal priority, if
            // you define the same resource in more than one directory, you get an
            // error when merging resources. The default directory is 'src/main/res'.
            res.srcDirs = ['src/full/res']

            // Note: You should avoid specifying a directory which is a parent to one
            // or more other directories you specify. For example, avoid the following:
            // res.srcDirs = ['other/res1', 'other/res1/layouts', 'other/res1/strings']
            // You should specify either only the root 'other/res1' directory, or only the
            // nested 'other/res1/layouts' and 'other/res1/strings' directories.

            // For each source set, you can specify only one Android manifest.
            // By default, Android Studio creates a manifest for your main source
            // set in the src/main/ directory.
            manifest.srcFile 'src/full/AndroidManifest.xml'
        }

        demo{
            java.srcDirs = ['src/demo/java']

            // If you list multiple directories, Gradle uses all of them to collect
            // sources. Because Gradle gives these directories equal priority, if
            // you define the same resource in more than one directory, you get an
            // error when merging resources. The default directory is 'src/main/res'.
            res.srcDirs = ['src/demo/res']

            // Note: You should avoid specifying a directory which is a parent to one
            // or more other directories you specify. For example, avoid the following:
            // res.srcDirs = ['other/res1', 'other/res1/layouts', 'other/res1/strings']
            // You should specify either only the root 'other/res1' directory, or only the
            // nested 'other/res1/layouts' and 'other/res1/strings' directories.

            // For each source set, you can specify only one Android manifest.
            // By default, Android Studio creates a manifest for your main source
            // set in the src/main/ directory.
            manifest.srcFile 'src/demo/AndroidManifest.xml'
        }
}- 库的build type不随主工程的build type变化而变化
????????有时候,我们项目主工程可能涉及到build type的新增,而主工程依赖了库工程,但是库工程并不需要新增这个build type类型,例如:主工程的build type如下:
 buildTypes {
        release {
            minifyEnabled false
            proguardFiles getDefaultProguardFile('proguard-android-optimize.txt'), 'proguard-rules.pro'
        }

        debug {
            minifyEnabled false
            debuggable true
            proguardFiles getDefaultProguardFile('proguard-android.txt'), 'proguard-rules.pro'

        }


        staging {
            initWith debug
            applicationIdSuffix ".debugStaging"
        }
依赖的库工程的build type配置如下:
  buildTypes {
        release {
            minifyEnabled false
            proguardFiles getDefaultProguardFile('proguard-android-optimize.txt'), 'proguard-rules.pro'
        }
    }
?这时候如果当前工程为debug或release类型编译工程是不会有问题的,这是因为不管是工程还是库,android studio在创建这些工程和库的时候都会默认创建debug或release类型,但是一旦当前工程切换到staging 类型,此时编译运行工程,就会出现以下问题:
* What went wrong:
Could not determine the dependencies of task ':app-project-two:compileStagingJavaWithJavac'.
> Could not resolve all task dependencies for configuration ':app-project-two:stagingCompileClasspath'.
? ?> Could not resolve project :variants-res.
? ? ?Required by:
? ? ? ? ?project :app-project-two
? ? ? > No matching variant of project :variants-res was found. The consumer was configured to find an API of a component, preferably optimized for Android, as well as attribute 'com.android.build.api.attributes.BuildTypeAttr' with value 'staging', attribute 'org.jetbrains.kotlin.platform.type' with value 'androidJvm' but:
? ? ? ? ? - Variant 'debugApiElements' capability Project:variants-res:unspecified declares an API of a component, as well as attribute 'org.jetbrains.kotlin.platform.type' with value 'androidJvm':
? ? ? ? ? ? ? - Incompatible because this component declares a component, as well as attribute 'com.android.build.api.attributes.BuildTypeAttr' with value 'debug' and the consumer needed a component, as well as attribute 'com.android.build.api.attributes.BuildTypeAttr' with value 'staging'
? ? ? ? ? ? ? - Other compatible attribute:
? ? ? ? ? ? ? ? ? - Doesn't say anything about its target Java environment (preferred optimized for Android)
? ? ? ? ? - Variant 'debugRuntimeElements' capability Project:variants-res:unspecified declares a runtime of a component, as well as attribute 'org.jetbrains.kotlin.platform.type' with value 'androidJvm':
? ? ? ? ? ? ? - Incompatible because this component declares a component, as well as attribute 'com.android.build.api.attributes.BuildTypeAttr' with value 'debug' and the consumer needed a component, as well as attribute 'com.android.build.api.attributes.BuildTypeAttr' with value 'staging'
? ? ? ? ? ? ? - Other compatible attribute:
? ? ? ? ? ? ? ? ? - Doesn't say anything about its target Java environment (preferred optimized for Android)
? ? ? ? ? - Variant 'releaseApiElements' capability Project:variants-res:unspecified declares an API of a component, as well as attribute 'org.jetbrains.kotlin.platform.type' with value 'androidJvm':
? ? ? ? ? ? ? - Incompatible because this component declares a component, as well as attribute 'com.android.build.api.attributes.BuildTypeAttr' with value 'release' and the consumer needed a component, as well as attribute 'com.android.build.api.attributes.BuildTypeAttr' with value 'staging'
? ? ? ? ? ? ? - Other compatible attribute:
? ? ? ? ? ? ? ? ? - Doesn't say anything about its target Java environment (preferred optimized for Android)
? ? ? ? ? - Variant 'releaseRuntimeElements' capability Project:variants-res:unspecified declares a runtime of a component, as well as attribute 'org.jetbrains.kotlin.platform.type' with value 'androidJvm':
? ? ? ? ? ? ? - Incompatible because this component declares a component, as well as attribute 'com.android.build.api.attributes.BuildTypeAttr' with value 'release' and the consumer needed a component, as well as attribute 'com.android.build.api.attributes.BuildTypeAttr' with value 'staging'
? ? ? ? ? ? ? - Other compatible attribute:
? ? ? ? ? ? ? ? ? - Doesn't say anything about its target Java environment (preferred optimized for Android)
?
?这是由于依赖库和主工程的build type不一致的问题导致的,遇到这种问题,我们可以使用
matchingFallbacks 关键字来设置库的build type优先级,这也是android官方给出的解决方案,如下:
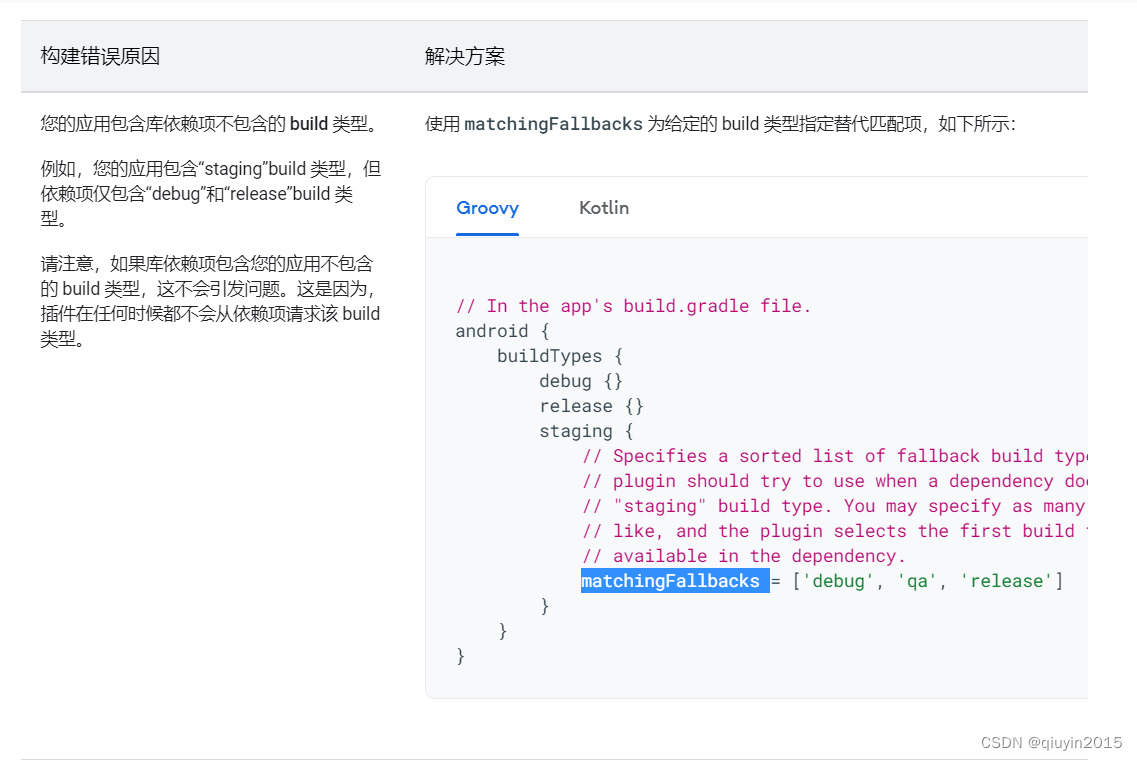
我们只需要在app的build.gradle的build type配置一下?matchingFallbacks即可,如下:
 buildTypes {
        release {
            .....
        }

        debug {
            .....
        }


        staging {
            ......
            // 关键的一行
            matchingFallbacks = ['debug','release']
        }
    }