IT数码 购物 网址 头条 软件 日历 阅读 图书馆
TxT小说阅读器
↓语音阅读,小说下载,古典文学↓
图片批量下载器
↓批量下载图片,美女图库↓
图片自动播放器
↓图片自动播放器↓
一键清除垃圾
↓轻轻一点,清除系统垃圾↓
开发: C++知识库 Java知识库 JavaScript Python PHP知识库 人工智能 区块链 大数据 移动开发 嵌入式 开发工具 数据结构与算法 开发测试 游戏开发 网络协议 系统运维
教程: HTML教程 CSS教程 JavaScript教程 Go语言教程 JQuery教程 VUE教程 VUE3教程 Bootstrap教程 SQL数据库教程 C语言教程 C++教程 Java教程 Python教程 Python3教程 C#教程
数码: 电脑 笔记本 显卡 显示器 固态硬盘 硬盘 耳机 手机 iphone vivo oppo 小米 华为 单反 装机 图拉丁
 
   -> 移动开发 -> Android | Handler源码解析 -> 正文阅读

[移动开发]Android | Handler源码解析

Handler

Looper

prepare 创建线程的消息队列

//保证每个线程只持有唯一looper对象
static final ThreadLocal<Looper> sThreadLocal = new ThreadLocal<Looper>();


private static void prepare(boolean quitAllowed) {
     
        if (sThreadLocal.get() != null) {
            throw new RuntimeException("Only one Looper may be created per thread");
        }
        sThreadLocal.set(new Looper(quitAllowed));
    }

/...
     private Looper(boolean quitAllowed) {
        mQueue = new MessageQueue(quitAllowed);
        mThread = Thread.currentThread();
    }

关于ThreadLocal:
ThreadLocal维护变量时,ThreadLocal为每个使用该变量的线程提供独立的变量副本,所以每一个线程都可以独立地改变自己的副本,而不会影响其它线程所对应的副本。

   public void set(T value) {
        Thread t = Thread.currentThread();
        ThreadLocalMap map = getMap(t);
        if (map != null)
            map.set(this, value);
        else
            createMap(t, value);
    }

map是Thread中的成员变量:
![image.png](https://img-blog.csdnimg.cn/img_convert/882383c49ff74d5a0f205254ba05a257.png#clientId=ucdde6d35-5eb3-4&crop=0&crop=0&crop=1&crop=1&from=paste&height=256&id=u666c5e48&margin=[object Object]&name=image.png&originHeight=320&originWidth=1020&originalType=binary&ratio=1&rotation=0&showTitle=false&size=39108&status=done&style=none&taskId=uf0254fe4-5efb-4c32-8fa5-2008fe07916&title=&width=816)
ThreadLocalMap的构造方法:

      ThreadLocalMap(ThreadLocal<?> firstKey, Object firstValue) {
            table = new Entry[INITIAL_CAPACITY];
            int i = firstKey.threadLocalHashCode & (INITIAL_CAPACITY - 1);
            table[i] = new Entry(firstKey, firstValue);
            size = 1;
            setThreshold(INITIAL_CAPACITY);
        }

loop()开启消息循环:

 for (;;) {
            //next方法很关键
            Message msg = queue.next(); // might block
            if (msg == null) {
                // No message indicates that the message queue is quitting.
                return;
            }

            // This must be in a local variable, in case a UI event sets the logger
            final Printer logging = me.mLogging;
            if (logging != null) {
                logging.println(">>>>> Dispatching to " + msg.target + " " +
                        msg.callback + ": " + msg.what);
            }
            // Make sure the observer won't change while processing a transaction.
            final Observer observer = sObserver;

            final long traceTag = me.mTraceTag;
            long slowDispatchThresholdMs = me.mSlowDispatchThresholdMs;
            long slowDeliveryThresholdMs = me.mSlowDeliveryThresholdMs;
            if (thresholdOverride > 0) {
                slowDispatchThresholdMs = thresholdOverride;
                slowDeliveryThresholdMs = thresholdOverride;
            }
            final boolean logSlowDelivery = (slowDeliveryThresholdMs > 0) && (msg.when > 0);
            final boolean logSlowDispatch = (slowDispatchThresholdMs > 0);

            final boolean needStartTime = logSlowDelivery || logSlowDispatch;
            final boolean needEndTime = logSlowDispatch;

            if (traceTag != 0 && Trace.isTagEnabled(traceTag)) {
                Trace.traceBegin(traceTag, msg.target.getTraceName(msg));
            }

            final long dispatchStart = needStartTime ? SystemClock.uptimeMillis() : 0;
            final long dispatchEnd;
            Object token = null;
            if (observer != null) {
                token = observer.messageDispatchStarting();
            }
            long origWorkSource = ThreadLocalWorkSource.setUid(msg.workSourceUid);
            try {
                msg.target.dispatchMessage(msg);//分发消息,处理
                if (observer != null) {
                    observer.messageDispatched(token, msg);
                }
                dispatchEnd = needEndTime ? SystemClock.uptimeMillis() : 0;
            } catch (Exception exception) {
                if (observer != null) {
                    observer.dispatchingThrewException(token, msg, exception);
                }
                throw exception;
            } finally {
                ThreadLocalWorkSource.restore(origWorkSource);
                if (traceTag != 0) {
                    Trace.traceEnd(traceTag);
                }
            }
            if (logSlowDelivery) {
                if (slowDeliveryDetected) {
                    if ((dispatchStart - msg.when) <= 10) {
                        Slog.w(TAG, "Drained");
                        slowDeliveryDetected = false;
                    }
                } else {
                    if (showSlowLog(slowDeliveryThresholdMs, msg.when, dispatchStart, "delivery",
                            msg)) {
                        // Once we write a slow delivery log, suppress until the queue drains.
                        slowDeliveryDetected = true;
                    }
                }
            }
            if (logSlowDispatch) {
                showSlowLog(slowDispatchThresholdMs, dispatchStart, dispatchEnd, "dispatch", msg);
            }

            if (logging != null) {
                logging.println("<<<<< Finished to " + msg.target + " " + msg.callback);
            }

            // Make sure that during the course of dispatching the
            // identity of the thread wasn't corrupted.
            final long newIdent = Binder.clearCallingIdentity();
            if (ident != newIdent) {
                Log.wtf(TAG, "Thread identity changed from 0x"
                        + Long.toHexString(ident) + " to 0x"
                        + Long.toHexString(newIdent) + " while dispatching to "
                        + msg.target.getClass().getName() + " "
                        + msg.callback + " what=" + msg.what);
            }

            msg.recycleUnchecked();
        }

Message、MessageQueue

消息的实体类,

    void recycleUnchecked() {
        // Mark the message as in use while it remains in the recycled object pool.
        // Clear out all other details.
        flags = FLAG_IN_USE;
        what = 0;
        arg1 = 0;
        arg2 = 0;
        obj = null;
        replyTo = null;
        sendingUid = UID_NONE;
        workSourceUid = UID_NONE;
        when = 0;
        target = null;
        callback = null;
        data = null;

        synchronized (sPoolSync) {
            if (sPoolSize < MAX_POOL_SIZE) {
                next = sPool;
                sPool = this;
                sPoolSize++;
            }
        }
    }

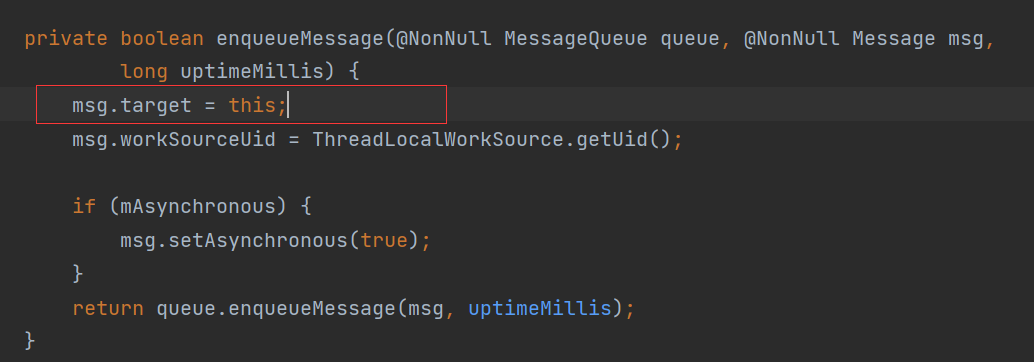
target是一个Handler类型的变量,这也保证了一个Looper可以关联多个Handler。
when是long类型的时间戳,代表此条消息的执行时间点。
postDelayed->sendMessageDelayed->enqueueMessage

 public final boolean sendMessageDelayed(@NonNull Message msg, long delayMillis) {
        if (delayMillis < 0) {
            delayMillis = 0;
        }
        return sendMessageAtTime(msg, SystemClock.uptimeMillis() + delayMillis);
    }

enqueueMessage

enqueueMessage{
 /....
   msg.markInUse();
            msg.when = when;
            Message p = mMessages;
            boolean needWake;
            if (p == null || when == 0 || when < p.when) {
                // New head, wake up the event queue if blocked.
                msg.next = p;
                mMessages = msg;
                needWake = mBlocked;
            } else {
                // Inserted within the middle of the queue.  Usually we don't have to wake
                // up the event queue unless there is a barrier at the head of the queue
                // and the message is the earliest asynchronous message in the queue.
                needWake = mBlocked && p.target == null && msg.isAsynchronous();//异步屏障消息标记唤醒
                Message prev;
                for (;;) {
                    prev = p;
                    p = p.next;
                    if (p == null || when < p.when) {//跳出循环的条件
                        break;
                    }
                    
                    if (needWake && p.isAsynchronous()) {
                        needWake = false;
                    }
                }
                msg.next = p; // 符合条件插入
                prev.next = msg;
            }
    
/.....
}

将when的时间戳赋值给msg,再按时间从小到大的顺序在链表中插入这条消息,循环遍历,如果when不是0的话就寻找一条大于when的msg,插入到这条msg的前面。

next():

Message next() {
 /...
 for (;;) {
    nativePollOnce(ptr, nextPollTimeoutMillis);//阻塞操作  如果为-1,则表示无限等待,直到有事件发生为止。如果值为0,则无需等待立即返回
    
     synchronized (this) {
                // Try to retrieve the next message.  Return if found.
                final long now = SystemClock.uptimeMillis();
                Message prevMsg = null;
                Message msg = mMessages;//mMessages指的是链表中存在的首个消息,会在下面赋值
                //判断是否是屏障消息,屏障消息的target是为null的
                if (msg != null && msg.target == null) {
                    //是的话就取出最近的异步消息执行,暂时不处理同步消息
                    // Stalled by a barrier.  Find the next asynchronous message in the queue.
                    do {
                        prevMsg = msg;
                        msg = msg.next;
                    } while (msg != null && !msg.isAsynchronous());
                }//循环取出异步消息
         
                if (msg != null) {
                    if (now < msg.when) {//消息需要等待执行
                        // Next message is not ready.  Set a timeout to wake up when it is ready.
                        nextPollTimeoutMillis = (int) Math.min(msg.when - now, Integer.MAX_VALUE);
                    } else {
                        // Got a message.
                        mBlocked = false;//标记非阻塞状态,立即返回msg
                        if (prevMsg != null) {
                            prevMsg.next = msg.next;
                        } else {
                            mMessages = msg.next;//mMessages重新标记为头部消息
                        }
                        msg.next = null;
                        if (DEBUG) Log.v(TAG, "Returning message: " + msg);
                        msg.markInUse();
                        return msg;
                    }
                } else {
                    // No more messages.
                    nextPollTimeoutMillis = -1; //一直等待下去
                }

                // Process the quit message now that all pending messages have been handled.
                if (mQuitting) {
                    dispose();
                    return null;
                }

                // If first time idle, then get the number of idlers to run.
                // Idle handles only run if the queue is empty or if the first message
                // in the queue (possibly a barrier) is due to be handled in the future.
                if (pendingIdleHandlerCount < 0
                        && (mMessages == null || now < mMessages.when)) {
                    pendingIdleHandlerCount = mIdleHandlers.size();
                }
                if (pendingIdleHandlerCount <= 0) {
                    // No idle handlers to run.  Loop and wait some more.
                    mBlocked = true;
                    continue;
                }

                if (mPendingIdleHandlers == null) {
                    mPendingIdleHandlers = new IdleHandler[Math.max(pendingIdleHandlerCount, 4)];
                }
                mPendingIdleHandlers = mIdleHandlers.toArray(mPendingIdleHandlers);
            }
 }
    
}

Handler

handler的主要作用是发送和处理消息,方法体现在
post(@NonNull Runnable r);
postAtTime(@NonNull Runnable r, long uptimeMillis)
postDelayed(@NonNull Runnable r, long delayMillis)
sendMessage(@NonNull Message msg)
sendMessageDelayed(@NonNull Message msg, long delayMillis)…
和Message的关联通过target实现
![image.png](https://img-blog.csdnimg.cn/img_convert/a0a265d4faecb5a32e9007f2271a3a6d.png#clientId=u9b8dbcc3-0369-4&crop=0&crop=0&crop=1&crop=1&from=paste&height=290&id=ue8dc4b15&margin=[object Object]&name=image.png&originHeight=362&originWidth=1034&originalType=binary&ratio=1&rotation=0&showTitle=false&size=39740&status=done&style=none&taskId=u9c8754d8-c954-4079-a1b2-d610bf45da5&title=&width=827.2)
处理消息,dispatchMessage,在Looper的loop()循环中会调用到

  public void dispatchMessage(@NonNull Message msg) {
        if (msg.callback != null) {
            handleCallback(msg);
        } else {
            if (mCallback != null) {
                if (mCallback.handleMessage(msg)) {
                    return;
                }
            }
            handleMessage(msg);
        }
    }

产生的问题和思考:

问题 1:阻塞中的话后续无延迟消息如何保证立即执行?

_回到_enqueueMessage方法中看到最后:

  //...根据mBlocked标记的阻塞状态唤醒线程
     if (needWake) {
        nativeWake(mPtr);
     }
问题2 :屏障消息工作原理梳理一下

让异步消息消息优先同步消息执行
1.设置同步屏障postSyncBarrier

    private int postSyncBarrier(long when) {
        // Enqueue a new sync barrier token.
        // We don't need to wake the queue because the purpose of a barrier is to stall it.
        synchronized (this) {
            final int token = mNextBarrierToken++;
            final Message msg = Message.obtain();
           //1、屏障消息和普通消息的区别是屏障消息没有tartget。
            msg.markInUse();
            msg.when = when;
            msg.arg1 = token;

            Message prev = null;
            Message p = mMessages;
            //2、根据时间顺序将屏障插入到消息链表中适当的位置
            if (when != 0) {
                while (p != null && p.when <= when) {
                    prev = p;
                    p = p.next;
                }
            }
            if (prev != null) { // invariant: p == prev.next
                msg.next = p;
                prev.next = msg;
            } else {
                msg.next = p;
                mMessages = msg;
            }
            //3、返回一个序号,通过这个序号可以撤销屏障
            return token;
        }
    }

_2._在上述的next()方法中处理异步消息。

问题 3:View的post方法和handler的post一样吗?为什么说在Activity中的onCreate中通过post就能获取宽高值?
public boolean post(Runnable action) {
        final AttachInfo attachInfo = mAttachInfo;
        if (attachInfo != null) {
            return attachInfo.mHandler.post(action);
        }

        // Postpone the runnable until we know on which thread it needs to run.
        // Assume that the runnable will be successfully placed after attach.
        getRunQueue().post(action);
        return true;
    }

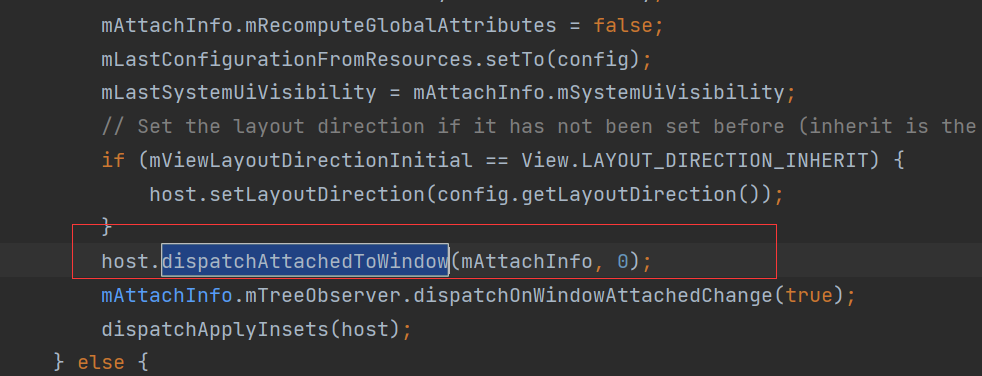
这里会对mAttachInfo判空,要看下mAttachInfo的初始化时机,即dispatchAttachedToWindow方法中

void dispatchAttachedToWindow(AttachInfo info, int visibility){
  mAttachInfo = info;   
    
}

dispatchAttachedToWindow在第一次执行performTraversals()方法中调用
![image.png](https://img-blog.csdnimg.cn/img_convert/12d0222f0777496c3c07f2d402964dc5.png#clientId=u9b8dbcc3-0369-4&crop=0&crop=0&crop=1&crop=1&from=paste&height=301&id=u62505691&margin=[object Object]&name=image.png&originHeight=376&originWidth=982&originalType=binary&ratio=1&rotation=0&showTitle=false&size=62727&status=done&style=none&taskId=ufa2b23a5-a764-4186-b96e-53b1e28ffeb&title=&width=785.6)
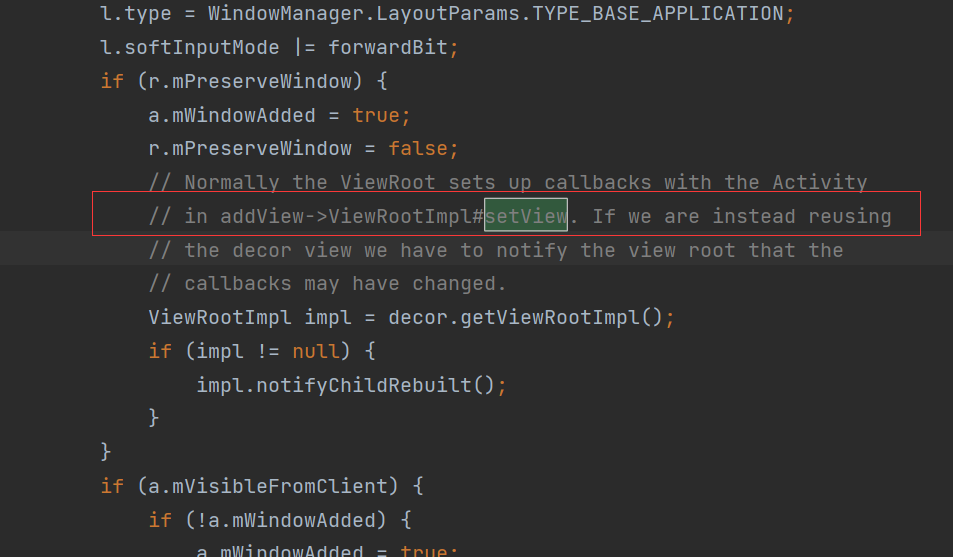
performTraversals这个是在哪个方法里初次调用呢?在ActivityThread.handleResumeActivity()中,
![image.png](https://img-blog.csdnimg.cn/img_convert/c04a4d30be01fe930840e739fa33adfb.png#clientId=u535965d8-657d-4&crop=0&crop=0&crop=1&crop=1&from=paste&height=446&id=u2e518072&margin=[object Object]&name=image.png&originHeight=557&originWidth=953&originalType=binary&ratio=1&rotation=0&showTitle=false&size=77372&status=done&style=none&taskId=ueedb464a-45a3-480c-b4bc-b931347b561&title=&width=762.4)
所以,在onCreate()方法中确实获取不到view的宽高;

  1. 如果attachInfo不为null,则执行 attachInfo.mHandler.post(action);

attachInfo中的mHandler是在ViewRootImpl中new出来的,所以这里还是通过handler去发送主线程消息执行action。
![image.png](https://img-blog.csdnimg.cn/img_convert/5ef474e31784ab2b0f3295a3ab73a96b.png#clientId=u535965d8-657d-4&crop=0&crop=0&crop=1&crop=1&from=paste&height=72&id=u27efb092&margin=[object Object]&name=image.png&originHeight=90&originWidth=784&originalType=binary&ratio=1&rotation=0&showTitle=false&size=7969&status=done&style=none&taskId=u484a26d9-2ba7-4d2e-87fe-88652d1cf00&title=&width=627.2)

  1. attachInfo为null的情况,则执行 getRunQueue().post(action),这种情况只会出现在控件布局初次绘制的时候,将所有的post操作保存起来,在dispatchAttachedToWindow中执行,正常情况下直接通过1就可以发送到主线程执行了

![image.png](https://img-blog.csdnimg.cn/img_convert/11554dbc5795c75c72f5746feee44463.png#clientId=uca6bd235-960b-4&crop=0&crop=0&crop=1&crop=1&from=paste&height=114&id=ue29c47d0&margin=[object Object]&name=image.png&originHeight=114&originWidth=502&originalType=binary&ratio=1&rotation=0&showTitle=false&size=8962&status=done&style=none&taskId=u3606f66f-9a6c-49d0-a137-f474c3d7aff&title=&width=502)
这个runQueue是view持有的一个数组容器
![image.png](https://img-blog.csdnimg.cn/img_convert/9fdae171a8beb424daaa6edd43bd8e9d.png#clientId=uca6bd235-960b-4&crop=0&crop=0&crop=1&crop=1&from=paste&height=103&id=u337af1df&margin=[object Object]&name=image.png&originHeight=103&originWidth=440&originalType=binary&ratio=1&rotation=0&showTitle=false&size=12493&status=done&style=none&taskId=u29546b9a-f81e-41e3-83e2-09e97e5ba29&title=&width=440)
![image.png](https://img-blog.csdnimg.cn/img_convert/edc336a6e18be3971850724c92e0dd38.png#clientId=uca6bd235-960b-4&crop=0&crop=0&crop=1&crop=1&from=paste&height=122&id=u6eb77c52&margin=[object Object]&name=image.png&originHeight=122&originWidth=507&originalType=binary&ratio=1&rotation=0&showTitle=false&size=10711&status=done&style=none&taskId=u0b794246-2d16-401d-a650-a06cf536fd9&title=&width=507)
dispatchAttachedToWindow中
![image.png](https://img-blog.csdnimg.cn/img_convert/712ee3c5c62327a3fbedb6af2b714cb2.png#clientId=uca6bd235-960b-4&crop=0&crop=0&crop=1&crop=1&from=paste&height=159&id=u16c2d1c4&margin=[object Object]&name=image.png&originHeight=159&originWidth=598&originalType=binary&ratio=1&rotation=0&showTitle=false&size=14555&status=done&style=none&taskId=u82f7b02e-31b5-488f-83ce-d1fbda7d754&title=&width=598)
所以本质上说view的post方法还是通过handler去执行的,应该说没啥区别。

那为什么在onCreate中通过post执行就可以获取宽高呢?
上面已经说了初次绘制的时候executeActions是在dispatchAttachedToWindow中执行的,
dispatchAttachedToWindow这个方法是执行在三大步骤之前的,那为什么能够获取宽高呢?
因为三大步骤本身所在的方法就是一次主线程的事件,executeActions是将所有的action通过msg添加到MessageQueue中而且是同步的事件,所以要等三大步骤走完去执行,这个时候自然是可以获取到宽高的。

问题4:为啥设计成单线程更新UI呢?

为啥子线程不可以更新UI?这也是个问题,其实是可以更新的,初次绘制的话在上面的handleResumeActivity执行之前就可以,这个时候viewRootImpl还没有初始化,没有做线程check。
那为啥不设计成可以在子线程更新呢?这样岂不是很多情况下效率更高。如果这么做的话就要考虑到控件的同步处理,界面的渲染、响应可能会莫名其妙的脱离用户操作的预期,保证同步性就要加大量的锁,即使粒度再细也很复杂,想一想源码控件中到处是锁的场景就头皮发麻,而且api的效率也不高。另外,像wing qt windows 这些图形界面都会采用单线程的模式相对简单成熟。

总结

MessageQueue才是hander的核心,hander支撑了主线程的执行机制,也体现了主线程的工作原理。hander在android的渲染机制中也是非常重要的。

  移动开发 最新文章
Vue3装载axios和element-ui
android adb cmd
【xcode】Xcode常用快捷键与技巧
Android开发中的线程池使用
Java 和 Android 的 Base64
Android 测试文字编码格式
微信小程序支付
安卓权限记录
知乎之自动养号
【Android Jetpack】DataStore
上一篇文章      下一篇文章      查看所有文章
加:2022-06-29 19:12:58  更:2022-06-29 19:14:31 
 
开发: C++知识库 Java知识库 JavaScript Python PHP知识库 人工智能 区块链 大数据 移动开发 嵌入式 开发工具 数据结构与算法 开发测试 游戏开发 网络协议 系统运维
教程: HTML教程 CSS教程 JavaScript教程 Go语言教程 JQuery教程 VUE教程 VUE3教程 Bootstrap教程 SQL数据库教程 C语言教程 C++教程 Java教程 Python教程 Python3教程 C#教程
数码: 电脑 笔记本 显卡 显示器 固态硬盘 硬盘 耳机 手机 iphone vivo oppo 小米 华为 单反 装机 图拉丁

360图书馆 购物 三丰科技 阅读网 日历 万年历 2024年11日历 -2024/11/25 3:23:53-

图片自动播放器
↓图片自动播放器↓
TxT小说阅读器
↓语音阅读,小说下载,古典文学↓
一键清除垃圾
↓轻轻一点,清除系统垃圾↓
图片批量下载器
↓批量下载图片,美女图库↓
  网站联系: qq:121756557 email:121756557@qq.com  IT数码