theme: cyanosis
约定
如果我们定义了个 plus 的操作符重载函数, 那么就可以在该类的实例上使用 + 运算符, 这就是约定
kotlin 规定了很多这种规定, 但这些规定程序员都可以不需要知道, 只要依靠 IDEA 的智能提示就行了
重载算术运算符
重载二元算术运算
定义一个成员的 plus 操作符重载函数
class Point(val x: Int, val y: Int) {
   operator fun plus(other: Point): Point {
      return Point(this.x + other.x, this.y + other.y)
   }

   override fun toString(): String {
      return "Point{x = $x, y = $y}"
   }
}

fun main() {
   val point2 = Point(1, 2) + Point(3, 4)
   println(point2)
}
-
可以看出使用的是修饰符
operator定义一个操作符重载函数 -
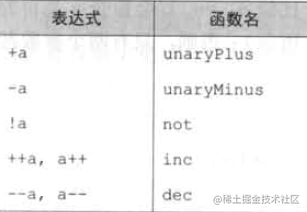
plus 函数根据约定概念对应了运算符的+ -
对应的可重载的函数还有:

- 不论操作符重载函数如何写, 都不会影响操作符的优先级
不会导致 * / 的优先级低于 + -
- 可以定义扩展函数的操作符重载 ★
operator fun Point.plus(other: Point): Point {
   return Point(this.x + other.x, this.y + other.y)
}
kotlin既可以用成员函数重载操作符, 也可以用扩展函数重载操作符
- 操作符左右两边的类型可以不一样
operator fun Point.times(d: Double): Point {
    return Point((this.x * d).toInt(), (this.y * d).toInt())
}

println(p * 1.5)
需要注意: 操作符重载函数的左右两边顺序不可以调换, 上面定义的函数 Point 类型为左, Double 类型为右, 所以 (1.5 * p) 是不可以的, 如果需要则还得创建新的扩展操作符重载函数

private operator fun Double.times(point: Point): Point {
   return Point((this * point.x).toInt(), (this * point.y).toInt())
}
- 定义重载操作符扩展函数比较麻烦, 可以这样:
我建议在定义操作符重载函数时, 可以先把需要的运算公式写好, 比如我要写个将值为
'a'的变量* 3得到"aaa"的字符串 这样的操作符重载扩展函数, 我们可以先写上val str: String = 'a' * 3

然后我们可以创建扩展函数了
private operator fun Char.times(count: Int): String {
   TODO("Not yet implemented")
}
现在加上我们需要的功能和返回值
private operator fun Char.times(count: Int): String {
   return toString().repeat(count)
}
不过需要注意, 生成的操作符重载扩展函数默认是
private如果不需要可以删除掉private可见性修饰符
同时注意, 上面这个扩展函数的亮点: 接收者是 Char 类型, 参数是 Int 类型, 但返回值是 String 类型, 也就是 Char + Int = String 看起来挺奇怪的~~~
kotlin没有定义位运算符, 所以关于位的运算符都不可以重载, 不过kotlin提供了很多中缀调用函数
shl带符号左移shr带符号右移ushr无符号右移and按位与or按位或xor异或inv按位取反
println(0x0F and 0x0F)
重载复合运算符
在 kotlin 中 += 和 -= 这种运算符被称之为复合运算符
- 复合运算符
+=下, 面对可变对象的操作符重载, 它定义了新的引用对象, 这种可以直接复用前面写的对+的操作符重载函数
var point = Point(1, 1)
point += Point(2, 3) // 这里不用再定义新的复合操作符重载函数了, 因为 point = point + Point(2, 3) 前面已经有关于它的 plus 操作符重载函数了
- 使用
+=复合操作符修改容器内部的内容, 不重新分配新的引用时, 需要定义操作符重载函数了
val arrayList = arrayListOf(1, 2, 3, 4, 5)
arrayList += 6
+= 操作符重载会定义一个叫 plusAssign 的函数
public inline operator fun <T> MutableCollection<in T>.plusAssign(element: T) {
    this.add(element)
}
- 当同一个类写了
plus和plusAssign两个操作符重载函数, 理论上这俩函数都会被调用, 所以 这俩操作符重载函数还是别同时存在了, 如果真要同时存在, 那么可以把接收者修改为val类型,这样plusAssign就失效了, 因为val不支持再次赋值
重载一元操作符
按照前面的小窍诀, 先写上一元操作符
val point = Point(1, 2)
println(-point)
然后借助 ide 能够生成 操作符重载扩展函数(你也可以选择成员函数)
private operator fun Point.unaryMinus(): Point {
   return Point(-this.x, -this.y)
}

-
一元操作符没有参数
-
自增和自减操作符的函数重载
operator fun Point.inc(): Point {
    return Point(this.x++, this.y++)
}
自增操作符有这样的操作 i++ 和 ++i, 这两种方式在 kotlin 中重载操作符都是用的同一个扩展函数
var decimal = BigDecimal(0)
decimal++
println(decimal)
++decimal
println(decimal)
public inline operator fun BigDecimal.inc(): BigDecimal = this.add(BigDecimal.ONE)

public inline operator fun BigDecimal.inc(): BigDecimal = this.add(BigDecimal.ONE)
原本以为操作符重载函数相同, ++i 和 i++ 将变得一样的效果结果发现
0
2
反编译后发现原来还是强大的 kotlin 编译器做的操作
i++ 反编译后将会变成这样: (大致的样子)
// i++ 就会是下面那样:
int i = 0;
System.out.println(i);
i = i + 1;
// ++i 则会是这样:
int i = 0;
i = i + 1;
System.out.println(i);
看到了么? 一个是 先打印再 +1, 另一个是先 +1 再打印, kotlin编译器 yyds
重载比较运算符
== === != > < >= <= 等这些都是比较运算符
等号运算符: equals
- 根据
kotlin的约定,==和equals对应 ==和!=可以和null做比较, 比如a.equals(b)中a会先判断null, 然后再调用equals判断

===恒等运算符
(1) 恒等运算符和java 的 == 运算符一样, 比较的是 地址, java 中 叫 引用
(2) 恒等运算符 === 不能被重载
==运算符不支持扩展函数操作符重载
== 的约定是 equals 而 该函数在 Any 中已经存在, 此时定义操作符重载的扩展函数的话, 永远不会调用到, 因为 Any 成员函数的优先级永远高于扩展函数
- 如果写了
==的操作符重载扩展函数, 则不用再写个!=的操作符重载扩展函数了,kotlin编译器会帮你的
override fun equals(obj: Any?): Boolean {
   // 比较引用(地址)
   if (obj === this) return true
   // 比较类型
   if (obj !is Point) return false
   return (this.x == obj.x) && (this.y == obj.y)
}
val point1 = Point(1, 2)
val point2 = Point(1, 2)
if (point1 == point2) {
   println(true) // true
} else {
   println(false)
}
仔细看,
equals不是操作符重载函数, 而是重写函数, 所以根本没办法写equals的操作符重载函数
排序运算符: compareTo

排序运算符有两种实现方式
- 实现
Comparable

- 操作符重载函数

我们会看到
compareValuesBy函数, 该函数接受两个比较对象, 选择比较对象的字段, 依照传递参数的顺序比较, 如果Person::firstName比较有结果(不相等的话)则后面不再比较Person::lastName
集合和约定(集合的操作符重载)
[]操作符重载借助 get/set 操作对象
在 kotlin 中我们可以这样:
只读集合读取:
val value = map[key]
可变集合写入:
mutableMap[key] = value
这些操作都是 kotlin 底层的操作, 主要实现方式是借助 get 和 set 函数完成的, 如果是 读取 则 kotlin 会把读取改成 get(key) 函数, 如果是写入, 则 kotlin 会把它改成 put(key, value)(类似set这样的函数)
那么现在我们要怎么给自定义的类添加类似的操作呢???
拿出前面的Point类为例, 以 p[0] 获取 x 变量, 以 p[1] 获取 y 变量
借助我们前面的小聪明, 利用 ide 生成了下面两个函数
private operator fun Point.set(index: Int, value: Int) {
   when(index) {
      1 -> this.x = value
      2 -> this.y = value
   }
}

private operator fun Point.get(index: Int): Int? {
   return when(index) {
      1 -> this.x
      2 -> this.y
      else -> null
   }
}

fun main() {
   val point = Point(1, 2)
   println(point[0])
   println(point[1])

   point[0] = 10
   point[1] = 20
}
可以看出来 index 对应这 p[index] 的 index, 这样就可以借助约定规则, 使用 get 操作符重载函数方式实现我们的要求
in 约定(contains函数)
private class Rectangle(val upperLeft: Point, val lowerRight: Point) {
   operator fun contains(point: Point): Boolean {
      return point.x in min(upperLeft.x, lowerRight.y) until max(lowerRight.x, upperLeft.x) &&
            point.y in min(upperLeft.y, lowerRight.y) until max(lowerRight.y, upperLeft.y)
   }
}

fun main() {
   val rectangle = Rectangle(Point(4, 4), Point(0, 0))
   val point = Point(1, 1)
   println(point in rectangle)
}
rangTo 约定 n..n+1
val now = LocalDateTime.now()
val vacation = now..now.plusDays(10)
println(now.plusWeeks(1) in vacation)
now..now.plusDays(10) 会被编译成
ClosedRange vacation = RangesKt.rangeTo((Comparable)now, (Comparable)now.plusDays(10L));
for 循环中使用iterator约定 in
fun main() {
   for (c in "abcd") {
      println(c)
   }
}
in 底层源码:
public operator fun CharSequence.iterator(): CharIterator = object : CharIterator() {
    private var index = 0

    public override fun nextChar(): Char = get(index++)

    public override fun hasNext(): Boolean = index < length
}
invoke 约定
类的 invoke 约定
把类对象当作函数调用
class Greeter(val greeting: String) {
   operator fun invoke(name: String) {
      println("$greeting $name")
   }
}

fun main() {
   val greeter = Greeter("hello")
   greeter("world")
}
KFunction 的 invoke 约定
函数类型当父类
data class Issue(
   val id: String, val project: String, val type: String,
   val priority: String, val description: String
) {
}

class ImportantIssuesPredicate(val project: String) : (Issue) -> Boolean {
   override fun invoke(issue: Issue): Boolean {
      return issue.project == project && issue.isImportant()
   }

   private fun Issue.isImportant(): Boolean {
      return type == "Bug" &&
            (priority == "Major" || priority == "Critical")
   }
}

fun main() {
   val issue1 = Issue("IDEA-154446", "IDEA", "Bug", "Major", "Save settings failed")
   val issue2 = Issue(
      "KT-12183",
      "Kotlin",
      "Feature",
      "Normal",
      " Intention: convert several calls on the same receiver to with/apply"
   )
   val predicate = ImportantIssuesPredicate("IDEA")
   listOf(issue1, issue2).filter(predicate).forEach {
      println(it.id)
   }
}
class ImportantIssuesPredicate(val project: String) : (Issue) -> Boolean 看这个
前面学过的, 函数类型里面有一个函数, 它就是 invoke, 所以我们的类ImportantIssuesPredicate继承了函数类型, 就必须重写invoke函数
而下面的 listOf(issue1, issue2).filter(predicate) 这里的过滤函数可以传入 ImportantIssuesPredicate类, 说明该类本质上还是 (Issue) -> Boolean , 只不过多存储了 个属性 project 和扩展函数isImportant
解构声明和组件函数componentN
将一个复合值展开, 用来初始化多个变量, 这就是解构声明
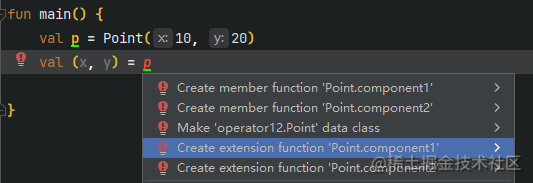
但如果要实现普通对象的解构, 需要添加组件函数,
下图显示的就是普通函数无法使用解构声明, 需要创建成员组件函数或者扩展组件函数, 当然还可以将类改成数据类 data class Point

private operator fun Point.component1(): Int = x
private operator fun Point.component2(): Int = y

fun main() {
   val p = Point(10, 20)
   val (x, y) = p
   println("x = $x, y = $y")
}
我们的解构声明就是按照组件函数来分配复合函数解构出来的值
data class NameComponents(val name: String, val extension: String)

fun splitFileName(fullName: String): NameComponents {
   val split = fullName.split(".")
   return NameComponents(split[0], split[1])
}

fun main() {
   val (name, extension) = splitFileName("1.txt")
   println("name = $name, extension = $extension")
}
实现了一个函数返回多个值的功能, 但解构声明也不是无限的, 它仅允许解析一个对象前5个字段
重用属性访问的逻辑: 委托事件
委托属性的基本用法(约定 by 和 getValue/setValue 函数)
在前面的委托类中我们知道, 委托的本质是借鸡生蛋
类委托本质是, 委托人继承了某个接口, 但该接口函数的实现委托人委托给了另一个同样实现了该接口的子类对象, 并且以类组合的方式调用函数
class C : InterfaceB {
    override fun doSomething(): Unit {
        // do something
    }
}
class A(val cObject: InterfaceB = C()) : InterfaceB by cObject {
    override fun doSomething(): Unit {
        cObject.doSomething()
    }
}
而本章节的属性委托的本质是: 属性把get/set函数交给另一个同样实现的了get/set(getValue/setValue)的对象
class Foo {
    var p:Type by Delegate()
}
上面代码中 Deletgate() 在委托期间会产生对象, 用于初始化 p 属性, 而委托人需要按照约定定义才能够被 by 委托
而这份约定协议是这样:
class Delegate : ReadWriteProperty<Foo, String> {

   override fun getValue(thisRef: Foo, property: KProperty<*>): String {
      TODO("Not yet implemented")
   }

   override fun setValue(thisRef: Foo, property: KProperty<*>, value: String) {
      TODO("Not yet implemented")
   }

}
约定表明了, 约定对象需要实现 ReadWriteProperty接口
或者约定是这样的:
class Delegate {
   operator fun getValue(foo: Foo, property: KProperty<*>): String {
      TODO("Not yet implemented")
   }

   operator fun setValue(foo: Foo, property: KProperty<*>, s: String) {
      TODO("Not yet implemented")
   }
}
需要定义两个操作符重载 getValue/setValue 函数
上面这两种约定都可以
记住, 委托是委托给另一个对象的
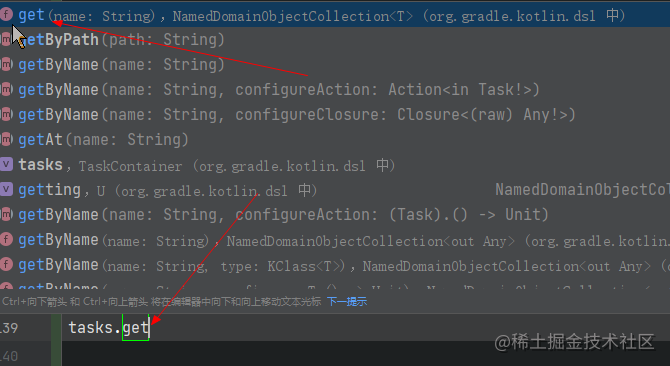
getValue和setValue, 但不仅仅是 这两 函数, 还可以是get和set函数, 只要委托的对象可以println(object["propertyName"])或者object["propertyName"] = value, 都可以被当做委托的对象(by后面的对象)
为什么我会这么认为呢? 看 gradle 的 kts
val compileKotlin: KotlinCompile by tasks
println(compileKotlin.javaClass)
compileKotlin.kotlinOptions {
   freeCompilerArgs = listOf("-opt-in=kotlin.RequiresOptIn")
}

val ck = tasks["compileKotlin"] as KotlinCompile
ck.kotlinOptions {
   freeCompilerArgs = listOf("-opt-in=kotlin.RequiresOptIn")
}
这里的 tasks 只有 get 方法

使用委托属性: 惰性初始化和by lazy()
使用另一个属性来实现懒加载 ▲
以前我们要实现属性懒加载的话, 需要借助临时可空属性, 在第一次需要加载该属性是判断下临时属性是否为 null
class Person(val name: String) {
   private var _emails: List<String>? = null

   val email: List<String>
      get() {
         if (_emails == null) {
            _emails = loadEmail(this)
         }
         return _emails!!
      }

   private fun loadEmail(person: Person): List<String>? {
      return listOf("2033@qq.com", "2133@qq.com")
   }
}
这种方式使用的比较多, 不需要任何概念, 直接搞了个懒加载属性, 而且从代码上判断我们的
_email所以翻译成java源码时肯定是只有_email属性的, 而get/set函数(这里是val所以只有get)
kotlin提供的 lazy 函数实现懒加载
class Person(val name: String) {
   val emails by lazy { loadEmail() }

   private fun loadEmail(): List<String> {
      println("loadEmail被调用")
      return listOf("2033@qq.com", "2933@qq.com")
   }
}
-
lazy是一个标准库函数, 他的参数是 lambda() -> T而lazy返回值是 lambda 的返回值, -
lazy是线程安全的,lazy可以根据需要切换你想要的线程锁, 或者完全关闭锁 -
lazy函数最后会返回一个存在getValue函数的对象
lazy 源码分析
- 从这里开始分析
val emails by lazy { loadEmail() }
- 使用
by属性的话, 正常来说会调用by后面对象的getValue/setValue函数, 看情况,lazy应该有实现getValue函数
lazy { loadEmail() } 这个返回的绝对是一个对象, 且应该有 getValue或者setValue 函数
public actual fun <T> lazy(initializer: () -> T): Lazy<T> = SynchronizedLazyImpl(initializer)
发现它 new 了个 SynchronizedLazyImpl 这个类对象
private class SynchronizedLazyImpl<out T>(initializer: () -> T, lock: Any? = null) : Lazy<T>, Serializable {
    private var initializer: (() -> T)? = initializer
    @Volatile private var _value: Any? = UNINITIALIZED_VALUE
    private val lock = lock ?: this

    override val value: T
        get() { // 略 }
}
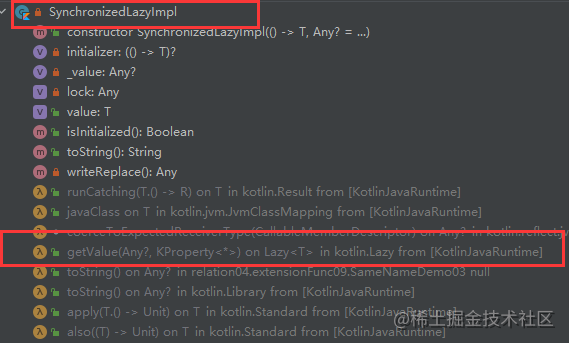
上面是核心算法, 要分析也是分析上面这段代码, 但 getValue 这种函数呢???
可以选择安装 IDEA 的 extSee 插件, 然后查看 扩展函数


public inline operator fun <T> Lazy<T>.getValue(thisRef: Any?, property: KProperty<*>): T = value
发现它调用的是 value 的 get 函数
现在分析他的核心方法就行
override val value: T
    get() {
        val _v1 = _value
        if (_v1 !== UNINITIALIZED_VALUE) {
            @Suppress("UNCHECKED_CAST")
            return _v1 as T // return _v1 赋值给 email 变量
        }
        // 上线程锁. 这里的 lock 其实是 this 对象
        return synchronized(lock) {
            val _v2 = _value
            if (_v2 !== UNINITIALIZED_VALUE) {
                @Suppress("UNCHECKED_CAST") (_v2 as T) // return _v2 赋值给 email 变量
            } else {
                // lambda 的返回值, 返回出去
                val typedValue = initializer!!()
                // 存放在 _value 中, 等待下次判断, 如果 !== UNINITIALIZED_VALUE 直接返回对象
                _value = typedValue
                // 初始化 lambda
                initializer = null
                // 返回 lambda 返回值对象
                typedValue  // return typedValue 赋值给 email 变量
            }
        }
    }
在上面的代码中 _value 刚开始的时候初始化的 UNINITIALIZED_VALUE, 等到被赋值了 lambda 的返回值后, 就可以通过 !== UNINITIALIZED_VALUE 判断是否被赋值过
而 _value 和 value 的实现, 和前面的 这一章节 使用另一个属性来实现懒加载 ▲ 的方式一摸一样, 实现的懒加载方式
所以开始委托的时候 _value 被初始化, 但 value 还是空的(不, value 其实根本没这个字段)
实现委托属性
前面学过, 我们可以借助另外一个对象, 实现延迟功能, 我们也可以这样实现委托功能
class ObservableProperty(val propName: String, var propValue: Number, val supportChange: PropertyChangeSupport) {
   fun getValue(): Number {
      return propValue
   }

   fun setValue(value: Number) {
      supportChange.firePropertyChange(propName, propValue, value)
      propValue = value
   }

}

class Person(_name: String, _age: Int, _scope: Double) {
   private val supportChange = PropertyChangeSupport(this)

   val name: String = _name
   private val __age = ObservableProperty("age", _age, supportChange)
   var age: Int
      get() = __age.getValue() as Int
      set(value) {
         __age.setValue(value)
      }
   private val __scope = ObservableProperty("scope", _scope, supportChange)
   var scope: Double
      get() = __scope.getValue() as Double
      set(value) {
         __scope.setValue(value)
      }

   fun addPropertyChangeEvent(listener: PropertyChangeListener) {
      supportChange.addPropertyChangeListener(listener)
   }

   fun removePropertyChangeEvent(listener: PropertyChangeListener) {
      supportChange.removePropertyChangeListener(listener)
   }
}
fun main() {
   val person = Person("zhazha", 23, 98798.0)
   person.addPropertyChangeEvent {
      PropertyChangeListener {
         println("field ${it.propertyName} changed from ${it.oldValue} to ${it.newValue}")
      }
   }
   person.age = 22
   person.scope = 1000000.0
}
上面的例子使用的是 PropertyChangeSupport, 用来监控属性变化, 如果属性值修改, 则会被监控到(不过这个类好像用于 UI 显示用的, 反正我没效果)
class ObservableProperty(_propValue: Int, _supportChange: PropertyChangeSupport) : ReadWriteProperty<Person, Int> {
   var propValue: Int = _propValue
   val supportChange = _supportChange

   override fun getValue(thisRef: Person, property: KProperty<*>): Int {
      return propValue
   }

   override fun setValue(thisRef: Person, property: KProperty<*>, value: Int) {
      supportChange.firePropertyChange(property.name, propValue, value)
      propValue = value
   }
}

open class PropertyChangeAware {
   protected val supportChange = PropertyChangeSupport(this)

   fun addPropertyChangeEvent(listener: PropertyChangeListener) {
      supportChange.addPropertyChangeListener(listener)
   }

   fun removePropertyChangeEvent(listener: PropertyChangeListener) {
      supportChange.removePropertyChangeListener(listener)
   }

}

class Person(_name: String, _age: Int, _salary: Int) : PropertyChangeAware() {
   val name: String = _name
   var age: Int by ObservableProperty(_age, supportChange)
   var salary: Int by ObservableProperty(_salary, supportChange)
}

fun main() {
   val person = Person("zhazha", 22, 17000)
   person.addPropertyChangeEvent {
      PropertyChangeListener {
         println("field ${it.propertyName} changed ${it.oldValue} to ${it.newValue}")
      }
   }
   person.age = 23
   person.salary = 500000
}
委托的本质前面已经说过了, 借鸡生蛋, 把自己的 get/set 函数能力转移给另一个对象(委托对象), 从这段代码看, 就是这样的, 借助一个对象和对象内的
getValue/setValue函数进行初始化
我们还可以用内置的委托类完成上面的功能, 这样就不需要自己再写了(太麻烦了~~~)
open class PropertyChangeAware {
   protected val supportChange = PropertyChangeSupport(this)

   fun addPropertyChangeEvent(listener: PropertyChangeListener) {
      supportChange.addPropertyChangeListener(listener)
   }

   fun removePropertyChangeEvent(listener: PropertyChangeListener) {
      supportChange.removePropertyChangeListener(listener)
   }
}

class Person(_name: String, _age: Int, _salary: Int) : PropertyChangeAware() {
   val name: String = _name
   private val observer = { property: KProperty<*>, oldValue: Int, newValue: Int ->
      supportChange.firePropertyChange(property.name, oldValue, newValue)
   }
   var age: Int by Delegates.observable(_age, observer)
   var salary: Int by Delegates.observable(_salary, observer)
}

fun main() {
   val person = Person("zhazha", 22, 20000)
   person.addPropertyChangeEvent {
      PropertyChangeListener {
         println("field ${it.propertyName} changed ${it.oldValue} to ${it.newValue}")
      }
   }
   person.age = 23
   person.salary = 5000000
}
从目前掌握的来看,
by关键字 右边可以是: 函数调用, 另一个属性或者其他任意表达式, 只要能满足委托功能便可
委托的观察者模式
import kotlin.properties.Delegates

private class Person {
   var observed = false

   var max: Int by Delegates.observable(0) { property, oldValue, newValue ->
      // property: var delegate13.observable.Person.max: kotlin.Int, oldValue: 0, newValue: 13
      println("property: $property, oldValue: $oldValue, newValue: $newValue")
      observed = true
   }
}

fun main() {
   val person = Person()
   println(person.observed) // false
   println(person.max) // 0
   person.max = 13
   println(person.max) // 13
}
属性委托的变化规则
class C {
    var prop: Type by MyDelegate()
}
其中 MyDelegate 将会生成一个属性<delegate> 同时使用 KProperty类型对象来代表该对象的类型, 它被称为<property>
编译器生成代码:
class C {
    private val <delegate> = MyDelegate()
    var prop: Type
        get() = <delegate>.getValue(this, <property>)
        set(value) = <delegate>.setValue(this, <property>, value)
}
在 map 中保存属性值
by委托给一个map对象的情况
class Person {
   private val _attributes = hashMapOf<String, String>()
   fun setAttributes(attrName: String, value: String) {
      _attributes[attrName] = value
   }

   // get() = _attributes["name"]!!
   val name: String by _attributes
   // get() = _attributes["company"]!!
   val company: String by _attributes
}

fun main() {
   val person02 = MapDemo.Person()
   val data = mapOf("name" to "Dmitry", "company" to "Jetbrain")
   for ((attrName, value) in data) {
      person02.setAttributes(attrName, value)
   }
   println(person02.name)
   println(person02.company)
}
核心代码在这里:
// get() = _attributes["name"]!!
val name: String by _attributes
// get() = _attributes["company"]!!
val company: String by _attributes
说白了就是把变量的名字当作 HashMap 的 key , 然后获得 value
注意, 这里的
by用法, 我估计在其他对象上也能使用, 只要该对象也能object["key"]
.setValue(this, , value)
}
## 在 map 中保存属性值

> `by` 委托给一个 `map` 对象的情况

```kotlin
class Person {
   private val _attributes = hashMapOf<String, String>()
   fun setAttributes(attrName: String, value: String) {
      _attributes[attrName] = value
   }

   // get() = _attributes["name"]!!
   val name: String by _attributes
   // get() = _attributes["company"]!!
   val company: String by _attributes
}

fun main() {
   val person02 = MapDemo.Person()
   val data = mapOf("name" to "Dmitry", "company" to "Jetbrain")
   for ((attrName, value) in data) {
      person02.setAttributes(attrName, value)
   }
   println(person02.name)
   println(person02.company)
}
核心代码在这里:
// get() = _attributes["name"]!!
val name: String by _attributes
// get() = _attributes["company"]!!
val company: String by _attributes
说白了就是把变量的名字当作 HashMap 的 key , 然后获得 value
注意, 这里的
by用法, 我估计在其他对象上也能使用, 只要该对象也能object["key"]