海报
通过移动端生成海报来达到分享引流的目的,海报生成其实就是利用canvas,拿到canvas生成的Data URLs保存为图片或分享给好友
提示:本章分为三部分,分别是canavas的基础用法、微信小程序海报的生成和H5海报的生成,点击目录大纲可以跳转到对应内容
一、Canvas用法
w3school的canvas
canvas基础使用方法
//创建一个宽200px,高100px的画布
<canvas id="myCanvas" width="200" height="100" style="border:1px solid #000000;"></canvas>

//在宽200,高100px像素的画布中,绘画一个宽150,高75px的矩形,矩形填充FF0000颜色
var canvas = document.getElementById("myCanvas");
var ctx = canvas.getContext("2d");
ctx.fillStyle = "#FF0000";
ctx.fillRect(0, 0, 150, 75);//(x,y,width,height)
//绘制文本
ctx.font = "24px Arial";
ctx.fillStyle = "red";
ctx.textAlign = "center";
ctx.fillText("Hello World",10,50);
二、小程序海报
1. 小程序的canvas
微信官方文档:canvas语法
微信官方文档:canvas使用实例基础库2.9.0 起支持一套新 Canvas 2D 接口(需指定 type 属性)
因为canvas2的使用存在版本兼容问题,公司产品有兼容要求时可以通过以下方法进行判断 查看官方兼容做法
function compareVersion(v1, v2) {
  v1 = v1.split('.')
  v2 = v2.split('.')
  const len = Math.max(v1.length, v2.length)

  while (v1.length < len) {
    v1.push('0')
  }
  while (v2.length < len) {
    v2.push('0')
  }

  for (let i = 0; i < len; i++) {
    const num1 = parseInt(v1[i])
    const num2 = parseInt(v2[i])

    if (num1 > num2) {
      return 1
    } else if (num1 < num2) {
      return -1
    }
  }

  return 0
}

//compareVersion('1.11.0', '1.9.9') // 1
const version = wx.getSystemInfoSync().SDKVersion
if (compareVersion(version, '1.1.0') >= 0) {

} else {
  // 如果希望用户在最新版本的客户端上体验您的小程序,可以这样子提示
  wx.showModal({
    title: '提示',
    content: '当前微信版本过低,无法使用该功能,请升级到最新微信版本后重试。'
  })
}
2.使用示例
本人采用uniapp开发小程序,以下的示例是来源于uniapp小程序的代码
<view class="poster-content-wrapper" :class="{'top-10':smallScreen}" >
	<canvas type="2d" id="myCanvas" :hidden='!shareVisibility'  style="background-color: white; width: 100%;height: 100%;box-sizing: border-box;"></canvas>
</view>
.poster-content-wrapper{
	width: 670rpx;
	height: 1032rpx;
	background: #FFFFFF;
	border-radius: 12rpx;
	position: absolute;
	bottom: 240rpx;
	left: 40rpx;
}
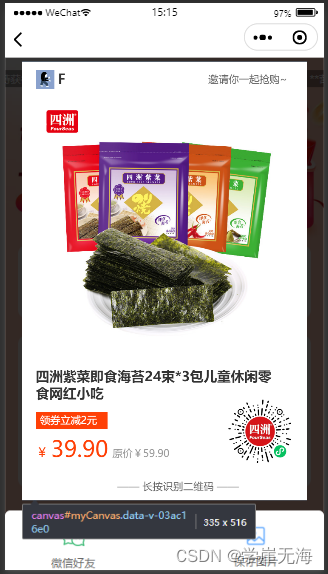
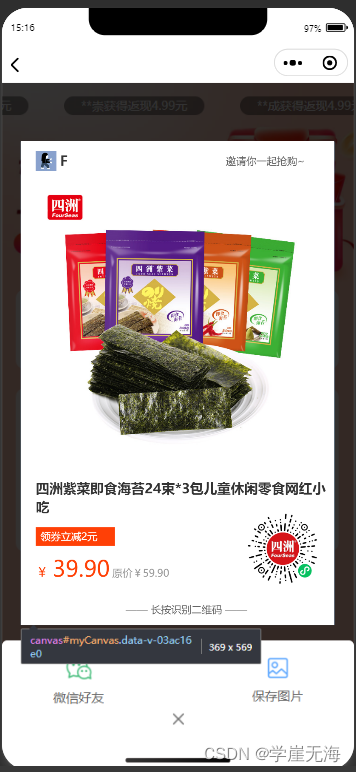
可以看到,画布的宽高设置为 width:670rpx;height:1032rpx
核心代码逻辑
isUseCanvas2D(){
wx.showLoading({
	  title: '海报生成中...',
	  mask:true
	})
	const query = wx.createSelectorQuery()
	    query.select('#myCanvas')
	      .fields({ node: true, size: true })
	      .exec((res) => {
	        const canvas = res[0].node
			this.canvas=res[0].node
	        const ctx = canvas.getContext('2d')
	        const dpr = wx.getSystemInfoSync().pixelRatio
	        canvas.width = res[0].width * dpr
	        canvas.height = res[0].height * dpr
			ctx.fillStyle = "white";
			ctx.fillRect(0, 0, canvas.width, canvas.height);//设置背景色
	        ctx.scale(dpr, dpr)
			console.log('-----',res,dpr)//示例:iphone XR下打印出来的结果中:{height: 569,width: 369},推断出是px单位
			const width= res[0].width

			//为保持不同高倍屏幕下宽高的拉伸,采用比例法
			//例如海报商品图,ui图给出的是606rpx,606/海报设计的宽度rpx,乘以canvas的实际像素值369,就是对应canvas中商品图实际要显示的的px宽度
			const img1 = canvas.createImage()
			img1.src=this.goods.img
			const width1= res[0].width-32
			img1.onload=function(){
				ctx.drawImage(img1, 32/670*res[0].width , 90/670*res[0].width,606/670*res[0].width,606/670*res[0].width); //宽高和画布一致
			}
			const img2 = canvas.createImage()
			img2.src=this.codeImg
			// 三倍屏幕加上32
			img2.onload=function(){
				ctx.drawImage(img2, 482/670*res[0].width,792/670*res[0].width, 156/670*res[0].width,156/670*res[0].width); //宽高和画布一致
			}

			const arrText=this.goods.name.split('')
			let temp=''
			var row=[]
			for(let a=0;a<arrText.length;a++){
				if ((ctx.measureText(temp).width/res[0].width*670) <res[0].width) {
				   temp += arrText[a];
				   // console.log('---text width2',ctx.measureText(temp).width/res[0].width*670,temp,res[0].width)
				}else {
				  a--; //这里添加了a-- 是为了防止字符丢失,效果图中有对比
				  row.push(temp);
				  temp = "";
			  }
			}
			row.push(temp)
			const len=row.length>2?2:row.length
			for (var b = 0; b < len; b++) {
					ctx.font ='bold 16px sans-serif';
					 ctx.fillStyle='#333333';
					 ctx.fillText(row[b], 32/670*res[0].width,752/670*res[0].width+ b * (40/670*res[0].width));
			 }

			//绘制标签
			ctx.rect(32/670*res[0].width, 824/670*res[0].width,169/670*res[0].width, 40/670*res[0].width);
			ctx.fillStyle = "#FF4006"// 设置填充颜色
			ctx.fill()
			ctx.font ='12px sans-serif';
			ctx.fillStyle='white';
			ctx.fillText(`领券立减${this.goods.discount}元`, 42/670*res[0].width, 852/670*res[0].width);
			//绘制价格
			ctx.font='bold'
			ctx.font ='15px sans-serif';
			ctx.fillStyle='#FF4006'
			ctx.fillText('¥', 32/670*res[0].width, 930/670*res[0].width);
			ctx.font ='26px sans-serif';
			ctx.fillText(`${this.goods.price}`, 68/670*res[0].width, 930/670*res[0].width);
			const leftwidth=ctx.measureText(this.goods.price.toString()+'¥').width+26/670*res[0].width// <res[0].width
			console.log('-----leftwidth',leftwidth)//220/670*res[0].width

			if(Number(this.goods.original_price)>0){
				ctx.font ='12px sans-serif';
				ctx.fillStyle='#999999'
				ctx.fillText(`原价¥${this.goods.original_price}`,leftwidth, 930/670*res[0].width);
			}


			ctx.font ='12px sans-serif';
			ctx.fillStyle='#666666'
			ctx.fillText('—— 长按识别二维码 ——', 224/670*res[0].width, 1008/670*res[0].width);

			//绘制顶部文字
			ctx.font ='12px sans-serif';
			ctx.fillStyle='#666666'
			ctx.fillText('邀请你一起抢购~',  438/670*res[0].width,50/670*res[0].width);

			const img3 = canvas.createImage()
			img3.src=this.user.avatar
			img3.onload=function(){
				//头像要圆角需要画图
				ctx.drawImage(img3, 32/670*res[0].width , 20/670*res[0].width,44/670*res[0].width,44/670*res[0].width); //宽高和画布一致
			}
			ctx.font ='bold 16px sans-serif ';
			ctx.fillStyle='#333333'
			ctx.fillText(`${this.user.name}`, 84/670*res[0].width,52/670*res[0].width);


			wx.canvasToTempFilePath({
			  canvas: this.canvas, // 使用2D 需要传递的参数
			  canvasId: 'myCanvas',
			  success:(res)=> {
				  this.posterCanvas=res.tempFilePath//拿到Data URLs图片数据,可作为微信分享接口要传递的参数
				  wx.hideLoading()
				  console.log('-----posterCanvas',res.tempFilePath)
				}
			})
	      })
},
savePhone(){//保存图片到本地
wx.canvasToTempFilePath({
	  canvas: this.canvas, // 使用2D 需要传递的参数
	  canvasId: 'myCanvas',
	  success:(res)=> {
		  this.posterCanvas=res.tempFilePath

		  console.log('-----posterCanvas',res.tempFilePath)
		  wx.saveImageToPhotosAlbum({
		    filePath: this.posterCanvas,
		    success(res) {
		  	  console.log('----xxx save',res)
		  		wx.showToast({
		  		  title: '保存成功,请在相册中查看',
		  		  duration:3000
		  		})
		  	}
		  })
		}
	})
},
onShareAppMessage: function (options) {//转发链接
	    // 设置菜单中的转发按钮触发转发事件时的转发内容
	    var shareObj = {
	        title: "分享有礼",        // 默认是小程序的名称(可以写slogan等)
	        path: '/xxxxx/?scene='+this.scene,        // 默认是当前页面,必须是以‘/’开头的完整路径
	        imgUrl: this.posterCanvas,     //自定义图片路径,可以是本地文件路径、代码包文件路径或者网络图片路径,支持PNG及JPG,不传入 imageUrl 则使用默认截图。显示图片长宽比是 5:4
	        success: function (res) {
	            // 转发成功之后的回调
	            if (res.errMsg == 'shareAppMessage:ok') {
	            }
	        },
	        fail: function () {
	            // 转发失败之后的回调
	            if (res.errMsg == 'shareAppMessage:fail cancel') {
	                // 用户取消转发
	            } else if (res.errMsg == 'shareAppMessage:fail') {
	                // 转发失败,其中 detail message 为详细失败信息
	            }
	        },
	    };
		return shareObj;

	},
3.结果
分享海报的生成,可以看到不同机型的海报的大小不同
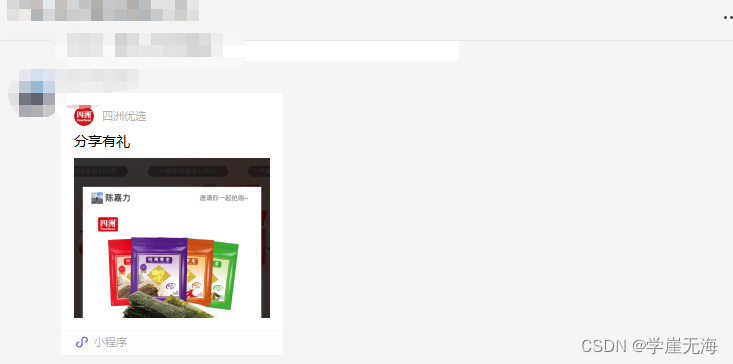
分享给微信好友的情景
三、H5海报
1.安装插件html2canvas
npm install --save html2canvas//安装
import html2canvas from 'html2canvas';//引用
选用这个插件的理由:它可以像“截图”一样,把目标DOM元素生成base64图片;所以在DOM元素在进行页面适配(postcss-px-to-viewport)的时候,生成对应的海报也随着目标DOM元素的适配变化进行大小调整。
而用原生canvas的话,海报每个元素都要指定位置,大小,css属性来生成,显然麻烦多了。
//可以一开始就写好画布大小,px单位,因为画布的大小是写死的,并不能适配不同机型。
<canvas id="canvas" width="300" height="300"></canvas>
//也可以获取canvas元素,再动态设置宽高
<canvas id="canvas" ></canvas>
var canvas = document.getElementById('canvas')
      canvas.width = '500'
      canvas.height = '500'
兼容性方面:
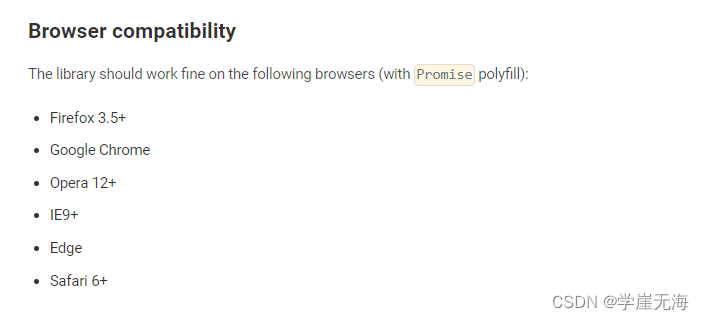
点击进入:html2Canvas官网入口
官网的部分配置项解释如下:
| 属性 | 作用 |
|---|---|
| allowTaint | 是否允许跨域图片污染画布 |
| backgroundColor | 画布的背景颜色,不需要的话设置null值相当于透明transparent |
| onclone | 当文档为了重新渲染某些元素时会调用这个回调方法,用于更改DOM元素上需要重新渲染的部分而不会影响到原本的DOM元素 |
| useCORS | 为了使用服务器上的图片而允许跨域 |
| width | 指定画布的宽度 |
| height | 指定画布的高度 |
2.使用示例
代码如下(示例):
html2canvas(document.body).then(function(canvas) {
    document.body.appendChild(canvas);
});
实际使用中:
先在页面写出ui给的海报设计图,DOM最外层的盒子指定样式id,记住这个id
  <div class="poster-wrapper" id="posterHtml">
    <div class="poster-img-wrapper">
      <img src="https://img1.baidu.com/it/u=4276151928,2257626089&fm=253&fmt=auto&app=138&f=JPEG?w=500&h=313" alt=""  class="poster-img" @load="finishedImg" @error="errorImg"
        crossorigin="anonymous" />
    </div>
  </div>
在js代码中,选中posterHtml所在的盒子内容,生成海报的base64代码
const generatePoster = () => {
      const domObj = document.getElementById('posterHtml')
      html2canvas(domObj, {
        useCORS: true,//是否使用服务器上的图片
        backgroundColor: null,
        allowTaint: true,
        onclone (doc) {
          // 克隆文档进行渲染时调用的回调函数,可用于修改将要渲染的内容而不影响原始源文档。
          //   const e = doc.getElementsByTagName('h1')
        }
      }).then(canvas => {
        base64Img.value = canvas.toDataURL('image/png')

      })
    }
注意点
由于实际的使用过程中,海报图来源服务器,所以必须要开启 useCORS:true,使用生成的base64Img的图片标签上,设置crossorigin="anonymous"
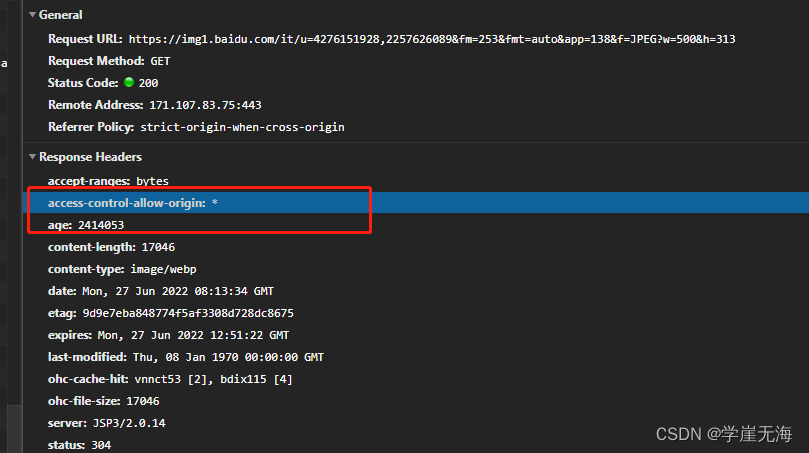
最后,服务器上的图片一定要有应答头部 access-control-allow-origin: *,不然会报跨域错误
https://img1.baidu.com/it/u=4276151928,2257626089&fm=253&fmt=auto&app=138&f=JPEG?w=500&h=313
3.结果
可以看到生成的base64海报图可以成功的被img加载出来
总结
通过以上例子可以看出,海报生成的核心是canvas的绘制。有对应插件使用的情况下,可以让插件把页面样式绘制成canvas,否则相当于自己填充canvas画布内容,这种需要掌握canvas基础语法掌握。
