1. Android的基础布局
LinearLayout 线性布局
RelativeLayout 相对布局
TableLayout 表格布局
FrameLayout 帧布局(框架布局)
ConstrantLayout 约束布局 (Android Studio默认布局) 用于拖拽的
2. LinearLayout 线性布局
2.1 怎么将Android Studio默认的ConstrantLayout改为LinearLayout
1. 在design页面下--->component tree--->ConstrainLayout右键--->Convert view...--->选择LinearLayout 点击Apply  (第一种方法,不推荐)

2. 在code页面下--->直接修改代码 将 androidx.constraintlayout.widget.ConstraintLayout  改为 LinearLayout  (第二种方法,推荐)
2.2 线性布局有两种:
-
水平的线性布局 所有控件都是水平挨个排布
如果没有android:orientation属性的存在
或者
android:orientation="horizontal" -
垂直的线性布局 所有控件都是垂直挨个排布
android:orientation="vertical"
tips: 在android中,所有在页面上显示的东西,必须具备两个属性,这两个属性是宽和高
android:layout_width 宽度
Android:layout_height 高度
对于宽度和高度,他们的值有三个
1. wrap_content  按照内容自适应
1. match_parent  按照父容器尺寸填满
1. 50dp ? ? ? ? ? ? ? ?  数值(用的地方很单一) ? ? ? ? ? ? ?
2.3 比重:
android:layout_weight
?
如何算总比重:  看同一父亲且同一级的各个控件的weight
一旦weight属性生效,android:layout_width失效
2.4 布局排布:
android:gravity                  内容位置改变
?
android:layout_gravity           本身位置改变 ?
2.5 分隔线:内部的线
android:divider="@color/black"
android:showDividers="middle"
2.6 嵌套线性布局结构
<LinearLayout
    android:layout_width="match_parent"
    android:layout_height="match_parent"
    android:orientation="vertical">
?
    <LinearLayout
        android:layout_width="match_parent"
        android:layout_height="wrap_content">

    </LinearLayout>

    <LinearLayout
        android:layout_width="match_parent"
        android:layout_height="wrap_content">

    </LinearLayout>
?
</LinearLayout>
3. RelativeLayout
????????RelativeLayout 又称相对布局。 从名称上可以看出,这种布局方式是以一种让组件以相对于容器或者相对于容器中的另一个组件的相对位置进行放置的布局方式。 RelativeLayout 布局提供了一些常用的布局设置属性用于确定组件在视图中的相对位置
????????常见属性
????????????????根据父容器定位
????????????????layout_alignParentLeft 左对齐
????????????????layout_alignParentRight 右对齐
????????????????layout_alignParentTop 顶部对齐
????????????????layout_alignParentBottom 底部对齐
????????????????layout_centerHorizontal 水平居中
????????????????layout_centerVertical 垂直居中
????????????????layout_centerInParent 中间位置????????根据兄弟组件定位
????????????????layout_toLeftOf 放置于参考组件的左边
????????????????layout_toRightOf 放置于参考组件的右边
????????????????layout_above 放置于参考组件的上方
????????????????layout_below 放置于参考组件的下方
????????????????layout_alignTop 对齐参考组件的上边界
????????????????layout_alignBottom 对齐参考组件的下边界
????????????????layout_alignLeft 对齐参考组件的左边界
????????????????layout_alignRight 对齐参考组件的右边界????????通用属性
????????????????margin 设置组件与父容器的边距
????????????????layout_margin 上下左右偏移
????????????????layout_marginLeft
????????????????layout_marginRight
????????????????layout_marginTop
????????????????layout_marginBotton
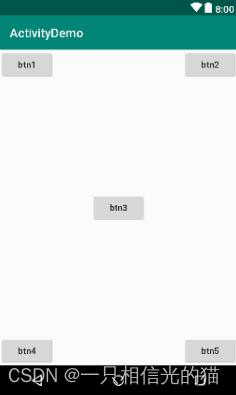
根据父容器定位activity_main.xml代码:
<?xml version="1.0" encoding="utf-8"?>
<RelativeLayout xmlns:android="http://schemas.android.com/apk/res/android"
    android:layout_width="match_parent"
    android:layout_height="match_parent">

    <Button
        android:id="@+id/btn1"
        android:layout_width="wrap_content"
        android:layout_height="wrap_content"
        android:layout_alignParentLeft="true"
        android:layout_alignParentTop="true"
        android:text="btn1"
        android:textAllCaps="false" />

    <Button
        android:id="@+id/btn2"
        android:layout_width="wrap_content"
        android:layout_height="wrap_content"
        android:layout_alignParentTop="true"
        android:layout_alignParentRight="true"
        android:text="btn2"
        android:textAllCaps="false" />

    <Button
        android:id="@+id/btn3"
        android:layout_width="wrap_content"
        android:layout_height="wrap_content"
        android:layout_centerInParent="true"
        android:text="btn3"
        android:textAllCaps="false" />

    <Button
        android:id="@+id/btn4"
        android:layout_width="wrap_content"
        android:layout_height="wrap_content"
        android:layout_alignParentLeft="true"
        android:layout_alignParentBottom="true"
        android:text="btn4"
        android:textAllCaps="false" />

    <Button
        android:id="@+id/btn5"
        android:layout_width="wrap_content"
        android:layout_height="wrap_content"
        android:layout_alignParentRight="true"
        android:layout_alignParentBottom="true"
        android:text="btn5"
        android:textAllCaps="false" />

</RelativeLayout>
相对于父布局定位的效果图:
 ?
?
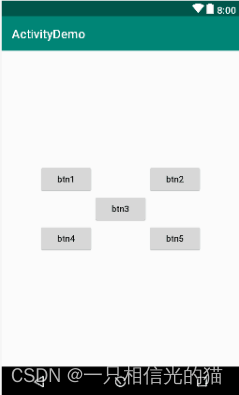
??根据兄弟组件定位activity_main.xml代码:
<?xml version="1.0" encoding="utf-8"?>
<RelativeLayout xmlns:android="http://schemas.android.com/apk/res/android"
    android:layout_width="match_parent"
    android:layout_height="match_parent">

    <Button
        android:id="@+id/btn3"
        android:layout_width="wrap_content"
        android:layout_height="wrap_content"
        android:layout_centerInParent="true"
        android:text="btn3"
        android:textAllCaps="false" />

    <Button
        android:id="@+id/btn1"
        android:layout_width="wrap_content"
        android:layout_height="wrap_content"
        android:layout_above="@id/btn3"
        android:layout_toLeftOf="@id/btn3"
        android:text="btn1"
        android:textAllCaps="false" />

    <Button
        android:id="@+id/btn2"
        android:layout_width="wrap_content"
        android:layout_height="wrap_content"
        android:layout_above="@id/btn3"
        android:layout_toRightOf="@id/btn3"
        android:text="btn2"
        android:textAllCaps="false" />

    <Button
        android:id="@+id/btn4"
        android:layout_width="wrap_content"
        android:layout_height="wrap_content"
        android:layout_below="@id/btn3"
        android:layout_toLeftOf="@id/btn3"
        android:text="btn4"
        android:textAllCaps="false" />

    <Button
        android:id="@+id/btn5"
        android:layout_width="wrap_content"
        android:layout_height="wrap_content"
        android:layout_below="@id/btn3"
        android:layout_toRightOf="@id/btn3"
        android:text="btn5"
        android:textAllCaps="false" />

</RelativeLayout>
效果图: ?
?
?
4. 常用的控件
TextView 文本控件 给用户一个文字性的提示
EditText 输入文本控件
ImageView 图片控件 显示图片
Button 按钮
TextView
-
掌握常用的属性
-
掌握资源文件的使用
-
如何创建资源文件,并对资源文件编程
-
使用资源文件
-
第一步:

?第二步:

?
-
跑马灯 (浅探索一下)
代码案列:
<?xml version="1.0" encoding="utf-8"?>
<androidx.constraintlayout.widget.ConstraintLayout xmlns:android="http://schemas.android.com/apk/res/android"
    xmlns:app="http://schemas.android.com/apk/res-auto"
    xmlns:tools="http://schemas.android.com/tools"
    android:layout_width="match_parent"
    android:layout_height="match_parent"
    tools:context=".MainActivity5">
    <TextView
        android:id="@+id/textView2"
        android:layout_width="wrap_content"
        android:layout_height="wrap_content"
        android:text="Hello World!"
        app:layout_constraintBottom_toBottomOf="parent"
        app:layout_constraintEnd_toEndOf="parent"
        app:layout_constraintStart_toStartOf="parent"
        app:layout_constraintTop_toTopOf="parent" />

    <TextView
        android:id="@+id/textView"
        android:layout_width="match_parent"
        android:layout_height="wrap_content"
        android:layout_marginTop="28dp"
        android:text="你好 世界!"
        android:textColor="#FF69B4"
        android:textSize="24sp"
        android:textStyle="bold"
        android:gravity="center"
        app:layout_constraintStart_toStartOf="@+id/textView2"
        app:layout_constraintTop_toBottomOf="@+id/textView2" />

    <TextView
        android:id="@+id/textView3"
        android:layout_width="match_parent"
        android:layout_height="wrap_content"
        android:layout_marginTop="36dp"
        android:text="带阴影的你好世界"
        android:textSize="36sp"
        android:textColor="#FF69B4"
        android:shadowColor="@color/black"
        android:shadowRadius="3.0"
        android:shadowDx="10.0"
        android:shadowDy="10.0"
        android:gravity="center"
        app:layout_constraintStart_toStartOf="@+id/textView2"
        app:layout_constraintTop_toBottomOf="@+id/textView" />

    <TextView
        android:id="@+id/textView4"
        android:layout_width="match_parent"
        android:layout_height="wrap_content"
        android:layout_marginTop="40dp"
        android:text="跑马灯你好世界跑马灯你好世界跑马灯你好世界跑马灯你好世界跑马灯你好世界"
        android:singleLine="true"
        android:ellipsize="marquee"
        android:marqueeRepeatLimit="marquee_forever"
        android:focusable="true"
        android:focusableInTouchMode="true"
        app:layout_constraintStart_toStartOf="@+id/textView2"
        app:layout_constraintTop_toBottomOf="@+id/textView3">
        <requestFocus />
    </TextView>

</androidx.constraintlayout.widget.ConstraintLayout>
?
-
带图片的TextView
android:drawableTop
重点1:怎么样设置一个shaper(皮肤)
????????在drawable文件夹下设置 xml
<?xml version="1.0" encoding="utf-8"?>
<shape xmlns:android="http://schemas.android.com/apk/res/android">
<!--设置一个黑色边框-->
    <stroke android:width="2px" android:color="#000000"/>
<!-- 渐变-->
    <gradient
        android:angle="270"
        android:endColor="#C0C0C0"
        android:startColor="#FCD209"/>
    <!-- 设置一下边距,让空间大一点 -->
    <padding
        android:left="5dp"
        android:top="5dp"
        android:right="5dp"
        android:bottom="5dp"/>
</shape>
重点2:带图片的TextView
? ? ? ? 在TextView里,用android:drawableTop引用你要添加的图片,一定要写在TextView里
<TextView
        android:layout_marginTop="20dp"
        android:id="@+id/textView9"
        android:gravity="center_horizontal"
        android:layout_width="wrap_content"
        android:layout_height="wrap_content"
        android:drawableTop="@drawable/fly"
        android:text="跑步" />