一、Getx?路由基本使用
1、普通路由
Get.to(SecondPage())和 Get.to(() => SecondPage());
这两种都可以写,但是推荐使用后者,这也是官方推荐的,因为后者将controller的生命周期和widget绑定起来。
widget被dispose后,相应的controller也会从内存中删除。
如果需要带参数的话,可以声明arguments,它可以携带任何类型的数据。
Get.to(() => SecondPage(),arguments: '参数');
2、命名路由
Get.toNamed("/second")可以直接使用arguments传参,也可以直接在路由别名后面跟参数,类似于 Url get 传参的方式:
Get.toNamed("/second?name=river")
如果使用这种命名路由的话,需要声明一个路由注册。具体声明如下代码所示:
class Routers {
  static const second = '/second';
  static List<GetPage> getPages = [
    GetPage(name: second, page: () => SecondPage())
  ];
}
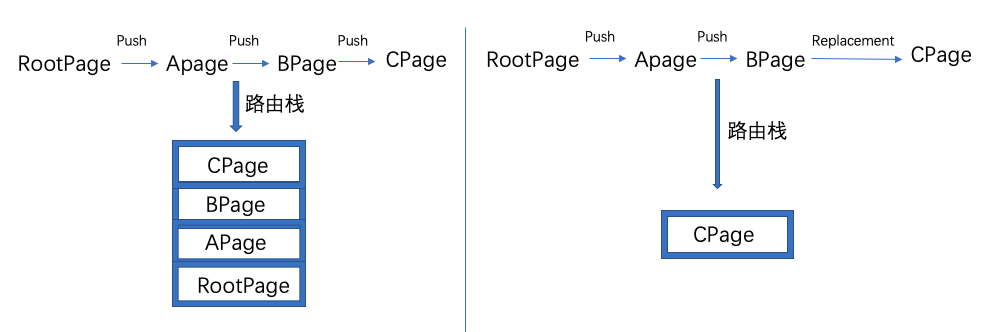
?3、Get.off()和Get.offNamed()
这两个效果是一样的。表示跳到下一个页面,会关闭上一个页面。
?
4、Get.offAll()和Get.offAllNamed()
这两个效果是一样的。表示跳到下一个页面,会关闭除它之外的所有页面。
这个场景是我们退出登录,清空之前的所有页面。
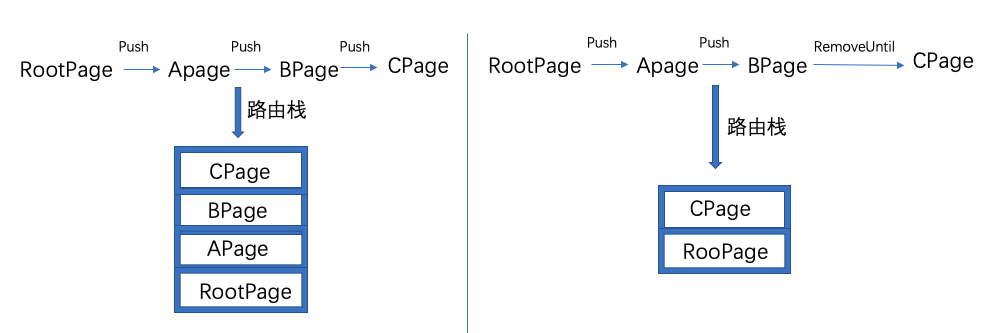
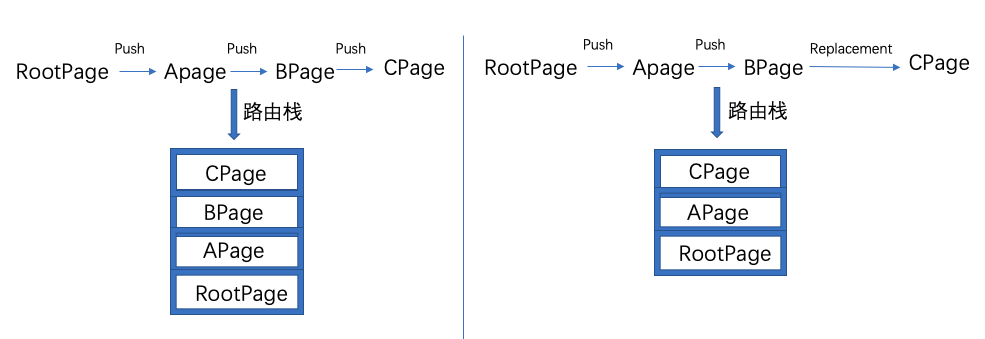
5、Get.offUntil()
对应的原生路由 ?Navigation.pushAndRemoveUntil()
在使用上述方式跳转时,会按次序移除其他的路由,直到遇到被标记的路由(predicate函数返回了true)时停止。若 没有标记的路由,则移除全部。当路由栈中存在重复的标记路由时,默认移除到最近的一个停止。
Get.offUntil(GetPageRoute(page: () => SecondPage()),(route) => (route as GetPageRoute).routeName == null);
此时的路由栈示意图(来自网络):

Get.offUntil(GetPageRoute(page: () => SecondPage()),(route) => (route as GetPageRoute).routeName == '/');
?此时的路由栈示意图(来自网络):

6、 Get.offAndToNamed()
对应的原生路由是 Navigation.popAndPushNamed()/ pushReplacement / pushReplacementNamed /?
表示跳到的下一个页面会替换上一个页面。
此时的路由栈示意图(来自网络):

?7、Get.back()
返回到上一个页面(对应于Get.to放到到路由页面跳转有效,off方法页面跳转无效)
如果需要携带数据返回可加result参数:Get.back(result)
然后上一个页面接收返回的数据:var result = await Get.to(page);
二、路由中间件
当触发路由事件的时候,会回调GetMaterialApp里的一个回调方法routingCallback
GetMaterialApp(
    unknownRoute: GetPage(name: '/notfound', page: () => UnknownRoutePage()),
    routingCallback: (routing) {
      if(routing?.current == '/second'){
       ///处理一些业务
      }
    },
    initialRoute: '/',
    getPages: [
      GetPage(name: '/first', page: ()=>First()),
      GetPage(name: '/second', page: ()=>Second())
    ],
  )
如果你没有使用GetMaterialApp,你可以使用手动API来附加Middleware观察器。
 MaterialApp(
      onGenerateRoute: Router.generateRoute,
      initialRoute: "/",
      navigatorKey: Get.key,
      navigatorObservers: [
        GetObserver(MiddleWare.observer)
      ],
    ),
三、嵌套导航
Get让Flutter的嵌套导航更加简单。 你不需要context,而是通过Id找到你的导航栈。
注意:创建平行导航堆栈可能是危险的。理想的情况是不要使用NestedNavigators,或者尽量少用。如果你的项目需要它,请继续,但请记住,在内存中保持多个导航堆栈可能不是一个好主意(消耗RAM)。
?
Navigator(
  key: Get.nestedKey(1), // create a key by index
  initialRoute: '/',
  onGenerateRoute: (settings) {
    if (settings.name == '/') {
      return GetPageRoute(
        page: () => Scaffold(
          appBar: AppBar(
            title: Text("Main"),
          ),
          body: Center(
            child: TextButton(
              color: Colors.blue,
              onPressed: () {
                Get.toNamed('/second', id:1); // navigate by your nested route by index
              },
              child: Text("Go to second"),
            ),
          ),
        ),
      );
    } else if (settings.name == '/second') {
      return GetPageRoute(
        page: () => Center(
          child: Scaffold(
            appBar: AppBar(
              title: Text("Main"),
            ),
            body: Center(
              child:  Text("second")
            ),
          ),
        ),
      );
    }
  }
),
四、其他用法
snackbar用法
Get.snackbar('Hi', 'i am a modern snackbar');To open dialog:
Get.dialog(YourDialogWidget());
To open default dialog:
Get.defaultDialog(
onConfirm: () => print("Ok"),
middleText: "Dialog made in 3 lines of code"
);Get.bottomSheet(
Container(
child: Wrap(
children: <Widget>[
ListTile(
leading: Icon(Icons.music_note),
title: Text('Music'),
onTap: () {}
),
ListTile(
leading: Icon(Icons.videocam),
title: Text('Video'),
onTap: () {},
),
],
),
)
);来源:https://github.com/jonataslaw/getx/blob/master/documentation/en_US/route_management.md