一、消失的Info.plist文件
用Xcode13新建一个iOS工程,会发现Info.plist文件里的东西特别少,原来的内容去哪呢?

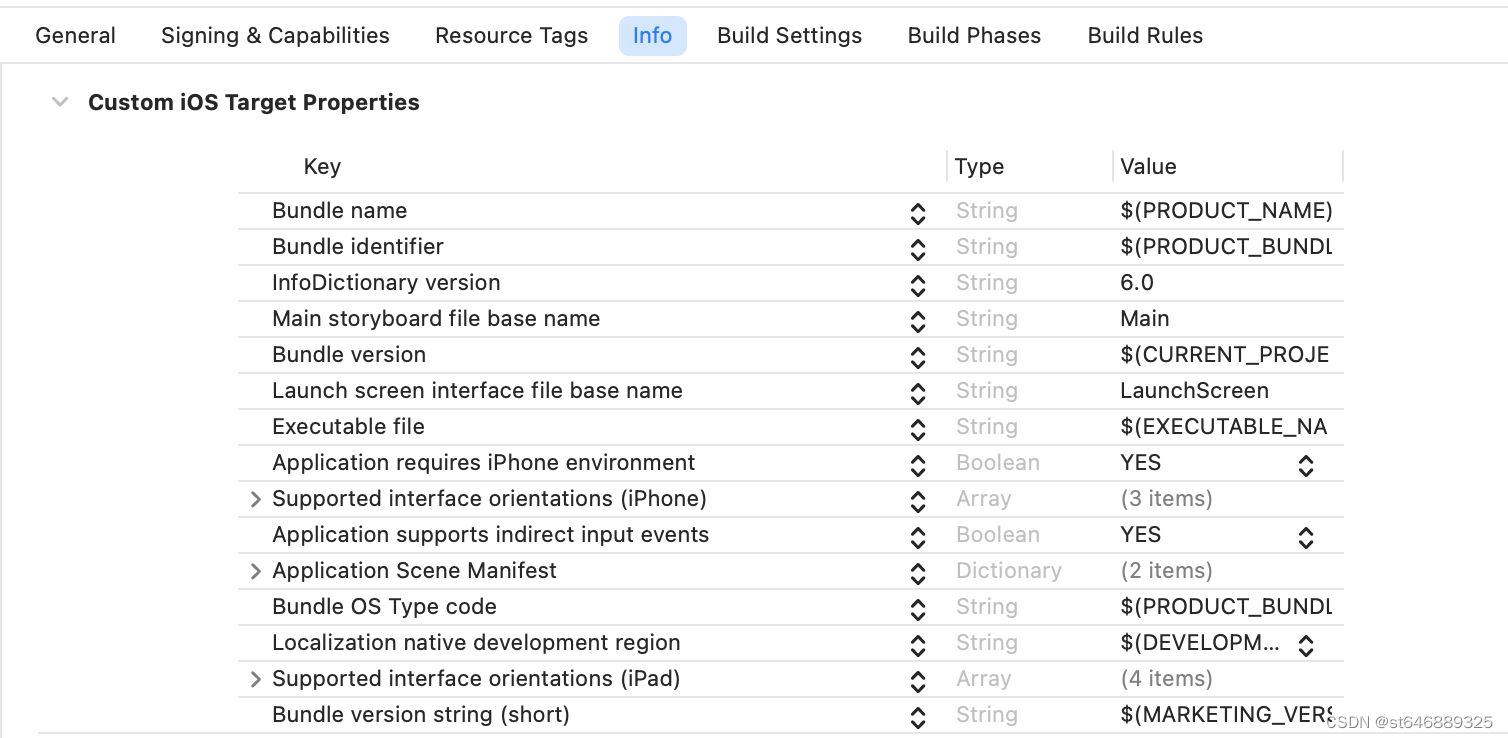
全部挪到 target - Info 里面去了,如下图

苹果在《Xcode13 Release Notes》[1]中写道:
“Projects created from several templates no longer require configuration files such as entitlements and Info.plist files. Configure common fields in the target’s Info tab, and build settings in the project editor. These files are added to the project when additional fields are used. (68254857)”
意思是说,从Xcode13开始,新建的工程不再要求使用配置文件(Info.plist、entitlements)。如果需要修改Xcode的配置,请直接在Xcode面板"target - Info - Custom iOS Target Properties"和"build settings"中设置。
早在Xcode13之前,“Custom iOS Target Properties”这个面板就有了,只是Xcode会自动同步“Cusutom iOS Target Properties”和Info.plist文件。而现在,Xcode13默认删除了Info.plist文件中的大部分属性,保留在“Cusutom iOS Target Properties”中。
其实,info.plist并没有被“干掉”,打包时Xcode会自动合并Info.plist文件 和 Custom iOS Target Properties 里面的配置,并将合并后的Info.plist放在.app目录中。
二、如何回到从前的Info.plist?
苹果经常好心办坏事,苹果本意是想简化Xcode配置,更少的文件,更统一的配置入口。但实际使用中,开发者似乎并不买账。
1. "Custom iOS Target Properties"的缺点
首先,不支持搜索。没有搜索简直是程序员的噩梦。
其次,不支持“Open As Source Code”,不能直接编辑源码。程序员可以没有GUI,但是不能没有Soure Code。
最后,由于“Custom iOS Target Properties”并没有完全摆脱Info.plist文件,这导致属性分布在“Custom iOS Target Properties”和Info.plist两个地方,最终的Info.plist只有在打包时才会合并。在打包前查看或操作(比如用脚本)完整的Info.plist属性将变得困难。
2. 如何恢复从前的Info.plist
- BuildSetting - Generate Info.plist File设置为NO,关闭打包合并功能。

这是Xcode13新增的配置,Xcode13打开老项目,这里默认是NO;如果Xcode13新建项目,这里默认是YES。当这个属性为YES时,Xcode会自动同步“Custom iOS Target Properties”和Info.plist文件,并在打包时合并,如果我们需要手动管理Info.plist,设置为YES这会引起同步混乱。
2.修改Info.plist文件为下列代码(这是备份的一份旧的Info.plist文件)
<?xml version="1.0" encoding="UTF-8"?>
<!DOCTYPE plist PUBLIC "-//Apple//DTD PLIST 1.0//EN" "http://www.apple.com/DTDs/PropertyList-1.0.dtd">
<plist version="1.0">
<dict>
     <key>CFBundleExecutable</key>
     <string>YourAppName</string>
     <key>CFBundleIdentifier</key>
     <string>com.YourName.YourAppName</string>
     <key>CFBundleName</key>
     <string>YourAppName</string>
     <key>CFBundleShortVersionString</key>
     <string>1.0</string>
     <key>CFBundleVersion</key>
     <string>1</string>
     <key>LSRequiresIPhoneOS</key>
     <true/>
     <key>UIApplicationSceneManifest</key>
     <dict>
         <key>UIApplicationSupportsMultipleScenes</key>
         <false/>
     </dict>
     <key>UIApplicationSupportsIndirectInputEvents</key>
     <true/>
     <key>UILaunchScreen</key>
     <dict>
         <key>UILaunchScreen</key>
         <dict/>
     </dict>
     <key>UISupportedInterfaceOrientations~ipad</key>
     <array>
         <string>UIInterfaceOrientationPortrait</string>
         <string>UIInterfaceOrientationPortraitUpsideDown</string>
         <string>UIInterfaceOrientationLandscapeLeft</string>
         <string>UIInterfaceOrientationLandscapeRight</string>
     </array>
     <key>UISupportedInterfaceOrientations~iphone</key>
     <array>
         <string>UIInterfaceOrientationPortrait</string>
         <string>UIInterfaceOrientationLandscapeLeft</string>
         <string>UIInterfaceOrientationLandscapeRight</string>
     </array>
</dict>
</plist>
3.大退Xcode(必须),使这些修改生效。
Tips:修改Info.plist后不一定会马上生效,Xcode同步会有一定延迟。最保险的方法就是重启一下Xcode,强制触发同步。
接下来,你就可以像以前一样愉快地在Info.plist中改配置了,Over。