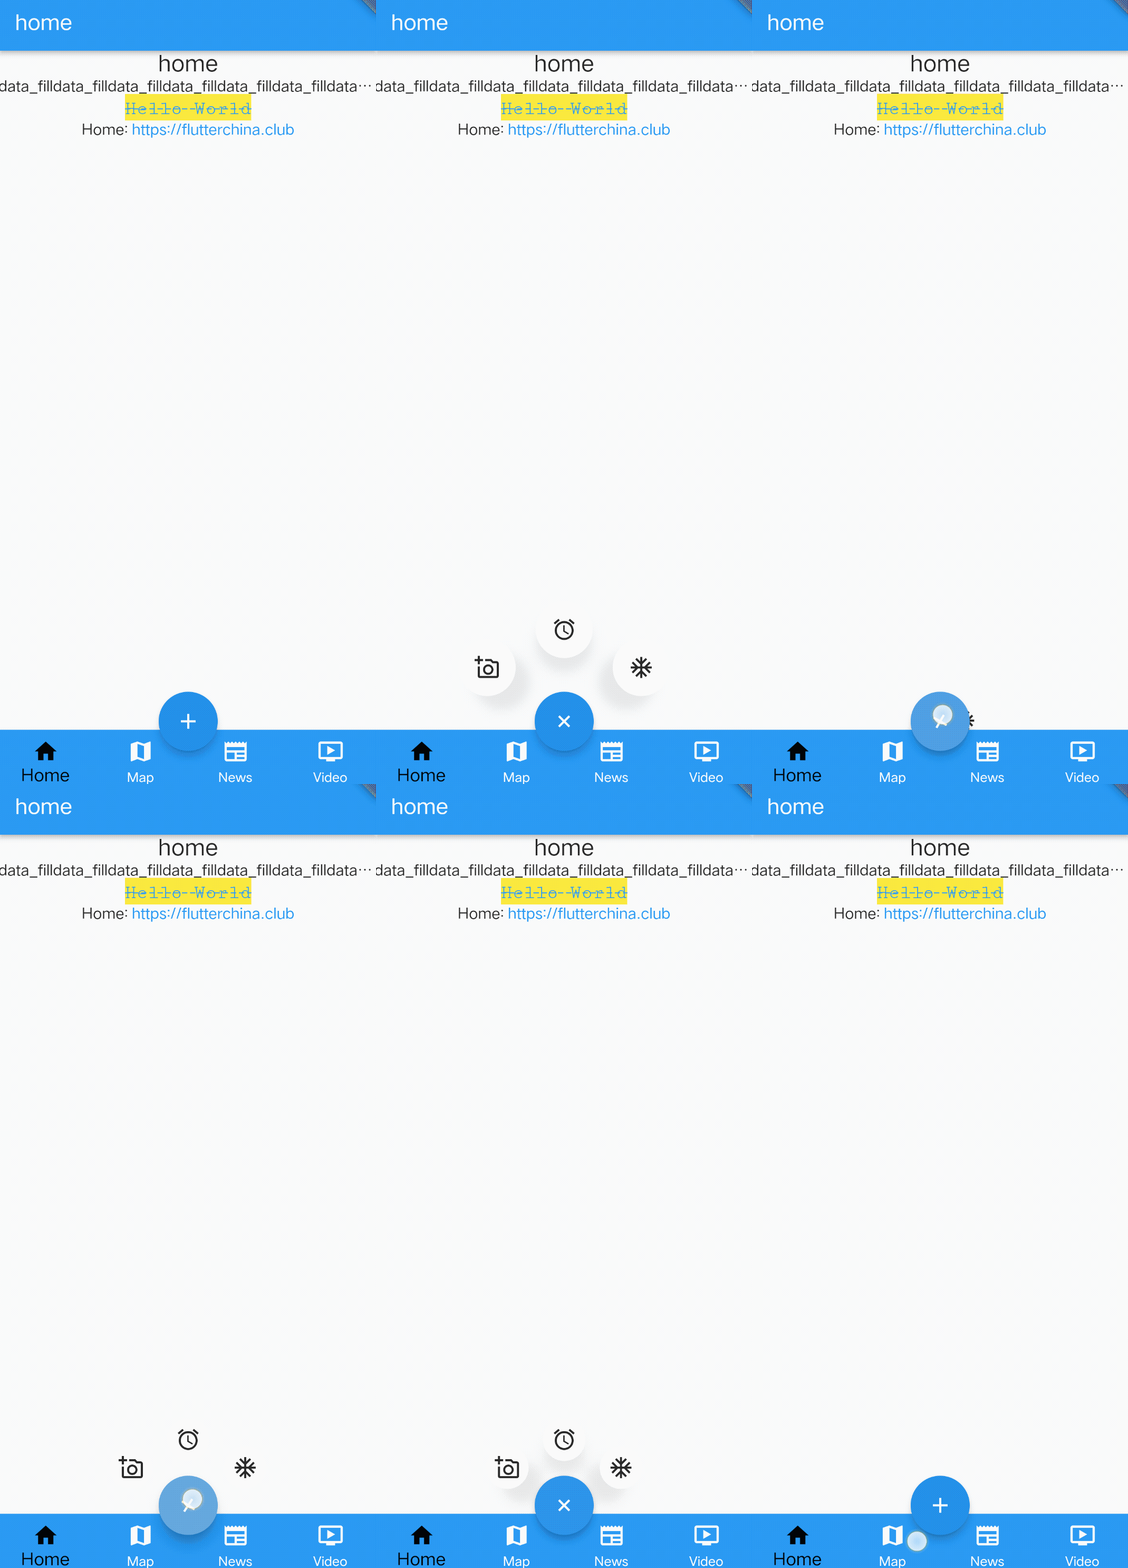
先看下完成后的效果:

?这个动画效果在app中很常见,由底部蓝色的FloatingActionButton旋转动画和另外的三个白色按钮的弹入弹出平移缩放动画组成。先看旋转动画的实现:
一.FloatingActionButton旋转动画
蓝色按钮在相邻次数的点击时分别对应了顺时针和逆时针的两次45度旋转,所以我们需要声明一个补间动画进行控制:
class _MyHomePageState extends State<MyHomePage> with TickerProviderStateMixin {

    ... ...

    /// 手动控制动画的控制器
    late final AnimationController floatButtonAnimController;

    /// 手动控制
    late final Animation<double> floatButtonAnimation;

    @override
    void initState() {
        super.initState();
        /// 不设置重复,使用代码控制进度
        floatButtonAnimController = AnimationController(
          duration: const Duration(milliseconds: 500),
          vsync: this,
        );
        floatButtonAnimation = Tween<double>(
            begin: 0,
            end: 0.5
        ).animate(floatButtonAnimController);
    }

    ... ...
}
声明动画控制器为500ms执行一次,插值器不特殊指定使用默认的线性插值器,并且不指定执行重复次数,由实际代码进行控制:
      floatingActionButton: Container(
        margin: const EdgeInsets.only(bottom: 16),
        child: RotationTransition(
          turns: floatButtonAnimation,
          child: FloatingActionButton(
            backgroundColor: const Color.fromARGB(255, 30, 136, 229),
            onPressed: () {//点击事件
                ... ...
                var animValue = floatButtonAnimController.value;
                if (animValue == 0.25) {
                  floatButtonAnimController.animateTo(0);//逆时针
                } else {
                  floatButtonAnimController.animateTo(0.25);//顺时针
                }
            },
            child: const Icon(Icons.add),
          ),
        ),
      ), // This trailing comma makes auto-formatting nicer for build methods.
      floatingActionButtonLocation: FloatingActionButtonLocation.centerDocked,
可以看到在布局中使用了一个旋转动画的Widget即RotationTransition,给他的turns属性指定动画实例即floatButtonAnimation,点击时会判断controller当前的value来执行顺时针/逆时针动画。整体上没有特殊的地方需要注意,很简单的一个补间动画实现。下面来主要说说平移和缩放的实现:
二.平移缩放动画
由于三个白色按钮的动画是同时执行和结束的,所以三个组合动画可以直接共用同一个控制器就可以了:
_controller = AnimationController(
    vsync: this,
    duration: const Duration(milliseconds: 200)
);

_animation = CurvedAnimation( //贝塞尔曲线动画插值器
    parent: _controller,
    curve: Curves.easeIn,
);
对于平移动画,最主要的事情就是确定Button移动的起点和终点。终点其实就是放大后三个按钮各自在坐标系中的位置,他们分别对应各自的三个位置,而至于起点是他们三个缩小后的位置,这个位置从理论上来说是同一个并且是蓝色按钮的中心位置,但是在实际绘制布局时仍然需要声明三个重叠的起点,因为他们各自的动画是不尽相同的且是同时执行的,我们无法对同一个Widget同时进行三个不同的动画。
确定Button移动的起点和终点我们需要用到flukit三方库(pubspec.yaml文件中引入flukit: ^3.0.1)中的一个AfterLayout组件,他是专门用来获取组件大小和相对于屏幕的坐标的:
AfterLayout(
  callback: (RenderAfterLayout ral) {
    print(ral.size); //子组件的大小
    print(ral.offset);// 子组件在屏幕中坐标
  },
  child: Text('flutter@wendux'),
),
首先我们在堆叠布局Stack下声明三个透明布局用来定位,并使用Positioned布局来调整位置:
body: Stack(
        alignment: Alignment.bottomCenter,
        children: <Widget> [
          _widgetOptions[_curIndex],
          Positioned( ///中间的
            bottom: 68,
            child: Opacity(
                opacity: 0,//设置为透明 这里是为了知道放大动画结束后icon应该摆放的位置,所以不需要展示也不需要响应事件
                child: AfterLayout(
                  callback: (v) => childBig1Rect = _getRect(v),
                  child: childBig1,
                )
            )
          ),
          Positioned( ///右边的
              bottom: 32,
              right: 80,
              child: Opacity(
                  opacity: 0,
                  child: AfterLayout(
                    callback: (v) => childBig2Rect = _getRect(v),
                    child: childBig2,
                  )
              )
          ),
          Positioned( ///左边的
              bottom: 32,
              left: 80,
              child: Opacity(
                  opacity: 0,
                  child: AfterLayout(
                    callback: (v) => childBig3Rect = _getRect(v),
                    child: childBig3,
                  )
              )
          ),

... ...


//我们需要获取的是AfterLayout子组件相对于Stack的Rect,通过_getRect方法转换一下
Rect _getRect(RenderAfterLayout renderAfterLayout) {
    return renderAfterLayout.localToGlobal(
      Offset.zero,
      ///找到Stack对应的 RenderObject 对象
      ancestor: context.findRenderObject(),
    ) & renderAfterLayout.size;
}
我们拿到定位后的RenderAfterLayout对象后需要通过_getRect方法来转为在Stack下的Rect,而这个Rect一定意义来说就是坐标。
接着还需要声明三个动画组件作为三个按钮的初始位置:
  //是否展示小图标
  bool showChild1 = !_animating && _lastAnimationStatus != AnimationStatus.forward;
  //执行动画时的目标组件;如果是从小图变为大图,则目标组件是大图;反之则是小图
  Widget targetWidget1;
  Widget targetWidget2;
  Widget targetWidget3;
  if (showChild1 || _controller.status == AnimationStatus.reverse) {
    targetWidget1 = childSmall1;
    targetWidget2 = childSmall2;
    targetWidget3 = childSmall3;
  } else {
    targetWidget1 = childBig1;
    targetWidget2 = childBig2;
    targetWidget3 = childBig3;
  }

    ... ...
          showChild1 ? AfterLayout(
              callback: (v) => child1Rect = _getRect(v),
              child: childSmall1
          ) : AnimatedBuilder(
            animation: _animation,
            builder: (context, child) {
              //rect 估值器
              final rect = Rect.lerp(
                child1Rect,
                childBig1Rect,
                _animation.value,
              );
              // 通过 Positioned 设置组件大小和位置
              return Positioned.fromRect(rect: rect!, child: child!);
            },
            child: targetWidget1,
          ),

          showChild1 ? AfterLayout(
              callback: (v) => child1Rect = _getRect(v),
              child: childSmall2
          ) : AnimatedBuilder(
            animation: _animation,
            builder: (context, child) {
              final rect = Rect.lerp(
                child1Rect,
                childBig2Rect,
                _animation.value,
              );
              return Positioned.fromRect(rect: rect!, child: child!);
            },
            child: targetWidget2,
          ),

          showChild1 ? AfterLayout(
              callback: (v) => child1Rect = _getRect(v),
              child: childSmall3
          ) : AnimatedBuilder(
            animation: _animation,
            builder: (context, child) {
              final rect = Rect.lerp(
                child1Rect,
                childBig3Rect,
                _animation.value,
              );
              return Positioned.fromRect(rect: rect!, child: child!);
            },
            child: targetWidget3,
          ),
通过布尔型变量showChild1来判断当前是应该显示起点还是应该展示动画,平移和缩放动画的执行是通过Rect自带的估值器完成的,最后用Positioned的fromRect方法刷新位置。
最后就是点击FloatingActionButton按钮执行弹出弹入动画:
      floatingActionButton: Container(
        margin: const EdgeInsets.only(bottom: 16),
        child: RotationTransition(
          turns: floatButtonAnimation,
          child: FloatingActionButton(
            backgroundColor: const Color.fromARGB(255, 30, 136, 229),
            onPressed: () {
              /// 平移缩放
              setState(() {//通过setState方法重置动画状态完成逆向执行
                _animating = true;
                if (isSmallToBig) {
                  isSmallToBig = false;
                  _controller.forward();
                } else {
                  isSmallToBig = true;
                  _controller.reverse();
                }
              });
              /// 旋转
              var animValue = floatButtonAnimController.value;
              if (animValue == 0.25) {
                floatButtonAnimController.animateTo(0);
              } else {
                floatButtonAnimController.animateTo(0.25);
              }
            },
            child: const Icon(Icons.add),
          ),
        ),
      ), // This trailing comma makes auto-formatting nicer for build methods.
      floatingActionButtonLocation: FloatingActionButtonLocation.centerDocked,
代码自提入口: