参考地址:?GitHub - Ccapton/Android-ColorfulProgressBar: Android 自定义彩色ProgressBar,类似Bootstrap
android绘图canvas.clipRect()方法的作用_moble_xie的博客-CSDN博客_cliprect
实现效果
源码奉上
activity
import android.os.Bundle
import android.widget.SeekBar
import android.widget.TextView
import com.orhanobut.logger.Logger
import com.pb.test.R
import com.pb.test.base.BaseActivity
import com.pb.test.bilibili.progressbar.myprogressbar.LiveLikeColorfulViewV3
/**
*
* @author : YingYing Zhang
* @e-mail : 540108843@qq.com
* @time : 2022-09-15
* @desc :
*
*/
class MyCustomProgressBarActivity : BaseActivity() {
private var colorfulView: LiveLikeColorfulViewV3? = null
private var seekBarX: SeekBar? = null
private var seekBarRadius: SeekBar? = null
private var tvTranslationX: TextView? = null
private var tvRadius: TextView? = null
companion object {
const val TEST_STR = "MyCustomProgressBarActivity"
}
override fun onCreate(savedInstanceState: Bundle?) {
super.onCreate(savedInstanceState)
setContentView(R.layout.activity_my_custom_progress_bar)
colorfulView = findViewById(R.id.colorful_view)
seekBarX = findViewById(R.id.seek_bar_x)
seekBarRadius = findViewById(R.id.seek_bar_radius)
tvTranslationX = findViewById(R.id.tv_translation_x)
tvRadius = findViewById(R.id.tv_radius)
colorfulView?.post {
colorfulView?.startAnimation()
}
seekBarX?.setOnSeekBarChangeListener(object: SeekBar.OnSeekBarChangeListener {
override fun onProgressChanged(seekBar: SeekBar?, progress: Int, fromUser: Boolean) {
val width = colorfulView?.width?.toFloat() ?: 0F
val translationX = -width + (colorfulView?.width?.times(progress)?.div(100F) ?: 0F)
Logger.d("seekBarX onProgressChanged translationX = $translationX, progress = $progress")
colorfulView?.translationX = translationX
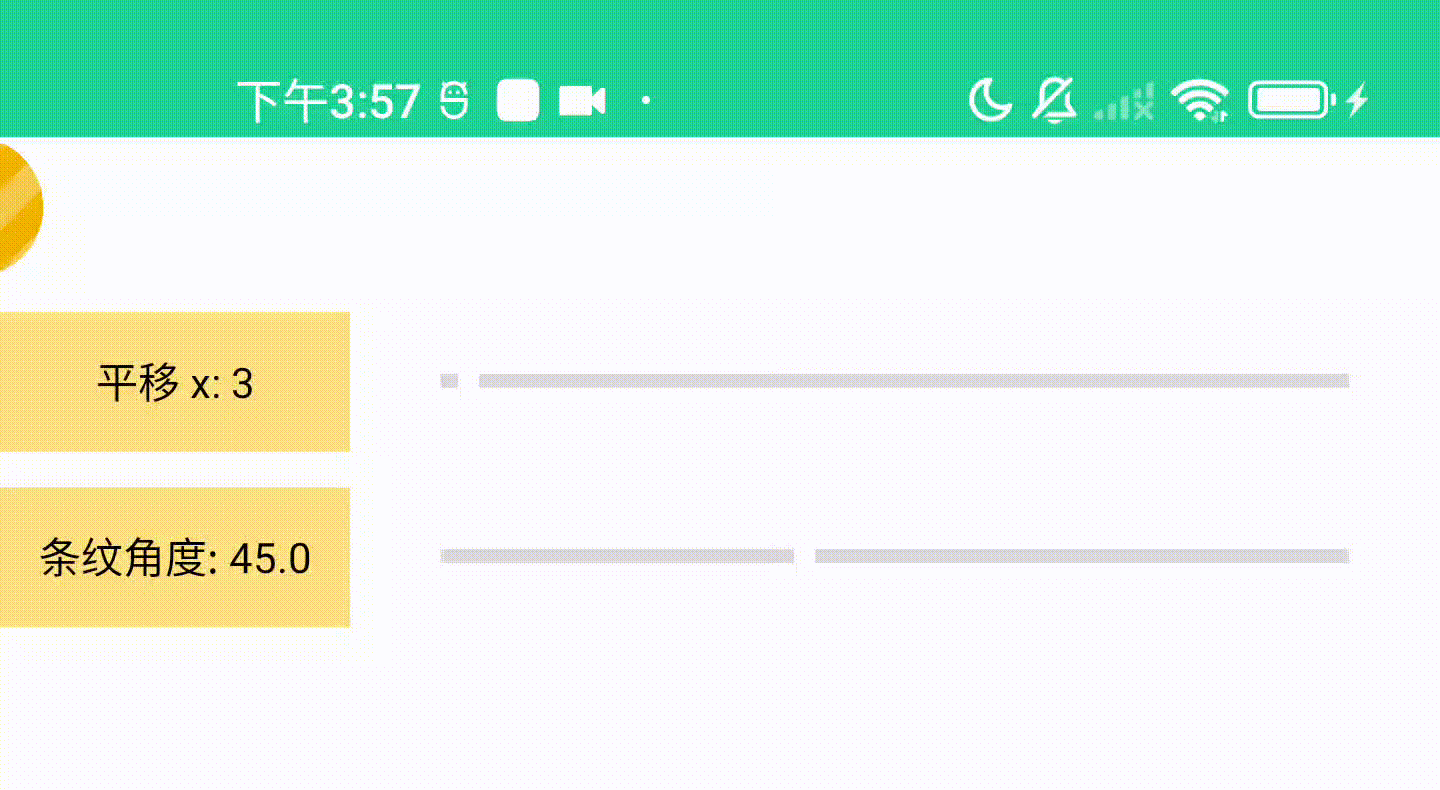
tvTranslationX?.text = "平移 x: $progress"
}
override fun onStartTrackingTouch(seekBar: SeekBar?) {}
override fun onStopTrackingTouch(seekBar: SeekBar?) {}
})
seekBarRadius?.setOnSeekBarChangeListener(object: SeekBar.OnSeekBarChangeListener {
override fun onProgressChanged(seekBar: SeekBar?, progress: Int, fromUser: Boolean) {
val radius = progress + 15.0
Logger.d("seekBarRadius onProgressChanged radius = $radius, progress = $progress")
LiveLikeColorfulViewV3.COLORFUL_VIEW_RADIUS = radius
tvRadius?.text = "条纹角度: $radius"
}
override fun onStartTrackingTouch(seekBar: SeekBar?) {}
override fun onStopTrackingTouch(seekBar: SeekBar?) {}
})
}
}自定义 view 代码如下:
import android.animation.ValueAnimator
import android.content.Context
import android.graphics.*
import android.util.AttributeSet
import android.view.View
import android.view.animation.LinearInterpolator
import com.orhanobut.logger.Logger
import com.pb.test.BuildConfig
import com.pb.test.R
import kotlin.math.tan

/**
 *
 * @author : YingYing Zhang
 * @e-mail : 540108843@qq.com
 * @time   : 2022-09-23
 * @desc   : 斑马波纹条 view 第三版, 第二版也不知道去哪了, 反正感觉就该是 v3
 *
 */
class LiveLikeColorfulViewV3 @JvmOverloads constructor(
    context: Context,
    attrs: AttributeSet? = null,
    defStyleAttr: Int = 0
) : View(context, attrs, defStyleAttr) {
    private val paint: Paint = Paint().apply {
        color = resources.getColor(R.color.progress_color)
        isAntiAlias = true
        style = Paint.Style.FILL
    }
    private var itemWidth = 40

    private var isRadius = true

    private var xPoint = 0
    private var valueAnimator: ValueAnimator? = null

    // 圆角 path
    private var roundRectPath: Path? = null
    // 斑马条纹 path
    private var stripPath: Path? = null


    override fun onDraw(canvas: Canvas?) {
        super.onDraw(canvas)
        val curHeight = measuredHeight
        if (BuildConfig.DEBUG) {
            if (curHeight == 0) {
                throw Exception("LiveLikeColorfulViewV3 onDraw height is 0!!!")
            }
            if (COLORFUL_VIEW_RADIUS > 90.0) {
                throw Exception("LiveLikeColorfulViewV3 onDraw radius must be in (0, 90]")
            }
        }

        // 现在倾斜角度是 45度, 通过 tan45 = 1来计算坐标点值, delta 临边
        val delta = curHeight / tan(Math.toRadians(COLORFUL_VIEW_RADIUS))
        Logger.d("LiveLikeColorfulView onDraw delta = $delta, height = $curHeight")

        /**
         * 绘制斑马条纹
         * 以 xPoint 中心, 左右两边画斑波纹条, xPoint 根据属性动画动态变化
         */
        val stripPath = getStripPath()
        // 画 xPoint 左边线条
        var tempXPoint = xPoint
        while (tempXPoint >= -delta) {
            val x = tempXPoint.toFloat()
            val y = curHeight.toFloat()

            stripPath.moveTo(x, y)
            stripPath.lineTo(x, y)
            stripPath.lineTo((x + delta).toFloat(), 0F)
            stripPath.lineTo((x + delta - itemWidth).toFloat(), 0F)
            stripPath.lineTo(x - itemWidth, y)
            stripPath.lineTo(x, y)

            tempXPoint -= 2 * itemWidth
        }
        // 画 xPoint 右边线条
        tempXPoint = xPoint
        while (tempXPoint <= measuredWidth + delta) {
            val x = tempXPoint.toFloat()
            val y = curHeight.toFloat()

            stripPath.moveTo(x, y)
            stripPath.lineTo(x, y)
            stripPath.lineTo((x + delta).toFloat(), 0F)
            stripPath.lineTo((x + delta - itemWidth).toFloat(), 0F)
            stripPath.lineTo(x - itemWidth, y)
            stripPath.lineTo(x, y)

            tempXPoint += 2 * itemWidth
        }
        stripPath.close()

        // clipxx 方法只对设置以后的 drawxx 起作用,已经画出来的图形, 是不会有作用的
        // 也就是说 clipxx需要先调用!!
        if (isRadius) {
            canvas?.clipPath(getRoundRectPath())
        }

        canvas?.drawPath(stripPath, paint)
    }

    fun startAnimation() {
        if (isRunning()) return
        val distance = measuredWidth
        valueAnimator = ValueAnimator.ofInt(0, distance)
        val time = distance / COLORFUL_VIEW_X_DEFAULT_SPEED * 1_000
        valueAnimator?.duration = time
        Logger.d(
            "live colorful view v3 -> distance = $distance, " +
                    "time = $time, " +
                    "speed = $COLORFUL_VIEW_X_DEFAULT_SPEED"
        )
        valueAnimator?.repeatCount = ValueAnimator.INFINITE
        valueAnimator?.addUpdateListener {
            xPoint = (it?.animatedValue ?: 0) as Int
            invalidate()
        }
        valueAnimator?.interpolator = LinearInterpolator()
        valueAnimator?.start()
    }

    private fun getRoundRectPath(isForced: Boolean = false): Path {
        if (roundRectPath == null || isForced) {
            roundRectPath = Path()
            Logger.d("zyy only init once round rect path")
            val rect = RectF(0F, 0F, width.toFloat(), height.toFloat())
            roundRectPath?.addRoundRect(rect, height.toFloat() / 2, height.toFloat() / 2, Path.Direction.CW)
        }
        return roundRectPath ?: Path()
    }

    private fun getStripPath(): Path {
        if (stripPath == null) {
            Logger.d("zyy only init once strip path")
            stripPath = Path()
        }
        stripPath?.reset()
        return stripPath ?: Path()
    }

    fun configChanged() {
        getRoundRectPath(true)
    }

    fun stopAnimation() {
        if (isRunning()) {
            valueAnimator?.end()
        }
    }

    fun isRunning() = valueAnimator?.isRunning == true

    fun setRoundRadius() {
        isRadius = true
        invalidate()
    }

    fun resetRadius() {
        isRadius = false
        invalidate()
    }

    override fun onDetachedFromWindow() {
        super.onDetachedFromWindow()
        valueAnimator?.removeAllUpdateListeners()
    }

    companion object {
        // 斑马波纹内部移动速度, 标准速度: 每秒移动 400px
        private const val COLORFUL_VIEW_X_DEFAULT_SPEED = 250L
        // 斑马条纹倾斜角度
        var COLORFUL_VIEW_RADIUS = 45.0
    }
}
activity_my_custom_progress_bar.xml
<?xml version="1.0" encoding="utf-8"?>
<androidx.constraintlayout.widget.ConstraintLayout xmlns:android="http://schemas.android.com/apk/res/android"
    xmlns:app="http://schemas.android.com/apk/res-auto"
    xmlns:tools="http://schemas.android.com/tools"
    android:layout_width="match_parent"
    android:layout_height="match_parent"
    tools:context=".bilibili.progressbar.MyCustomProgressBarActivity">

    <com.pb.test.bilibili.progressbar.myprogressbar.LiveLikeColorfulViewV3
        android:id="@+id/colorful_view"
        android:layout_width="0dp"
        android:layout_height="40dp"
        android:background="@drawable/custom_progress_bar_bg"
        app:layout_constraintTop_toTopOf="parent"
        app:layout_constraintStart_toStartOf="parent"
        app:layout_constraintEnd_toEndOf="parent" />

    <TextView
        android:id="@+id/tv_translation_x"
        android:layout_width="100dp"
        android:layout_height="40dp"
        android:gravity="center"
        android:text="平移 x: 100"
        android:textSize="12sp"
        android:background="@color/amber_200"
        android:layout_marginTop="10dp"
        app:layout_constraintTop_toBottomOf="@id/colorful_view"
        app:layout_constraintStart_toStartOf="@id/colorful_view" />

    <SeekBar
        android:id="@+id/seek_bar_x"
        style="?android:attr/progressBarStyleHorizontal"
        android:layout_width="0dp"
        android:layout_height="24dp"
        android:max="100"
        android:progress="100"
        android:layout_marginStart="10dp"
        android:layout_marginEnd="10dp"
        android:paddingLeft="10dp"
        android:paddingRight="10dp"
        app:layout_constraintTop_toTopOf="@id/tv_translation_x"
        app:layout_constraintBottom_toBottomOf="@id/tv_translation_x"
        app:layout_constraintStart_toEndOf="@id/tv_translation_x"
        app:layout_constraintEnd_toEndOf="parent" />

    <TextView
        android:id="@+id/tv_radius"
        android:layout_width="100dp"
        android:layout_height="40dp"
        android:gravity="center"
        android:text="条纹角度: 45"
        android:textSize="12sp"
        android:layout_marginTop="10dp"
        android:background="@color/amber_200"
        app:layout_constraintTop_toBottomOf="@id/tv_translation_x"
        app:layout_constraintStart_toStartOf="@id/colorful_view" />

    <SeekBar
        android:id="@+id/seek_bar_radius"
        style="?android:attr/progressBarStyleHorizontal"
        android:layout_width="0dp"
        android:layout_height="24dp"
        android:max="75"
        android:progress="45"
        android:layout_marginStart="10dp"
        android:layout_marginEnd="10dp"
        android:paddingLeft="10dp"
        android:paddingRight="10dp"
        app:layout_constraintTop_toTopOf="@id/tv_radius"
        app:layout_constraintBottom_toBottomOf="@id/tv_radius"
        app:layout_constraintStart_toEndOf="@id/tv_radius"
        app:layout_constraintEnd_toEndOf="parent"
        tools:progress="50" />
</androidx.constraintlayout.widget.ConstraintLayout>
custom_progress_bar_bg.xml
<?xml version="1.0" encoding="utf-8"?>
<shape xmlns:android="http://schemas.android.com/apk/res/android">
    <gradient
        android:angle="180"
        android:startColor="#F1B300"
        android:endColor="#FF9B04" />

    <corners android:radius="20dp" />
</shape>
实现思路
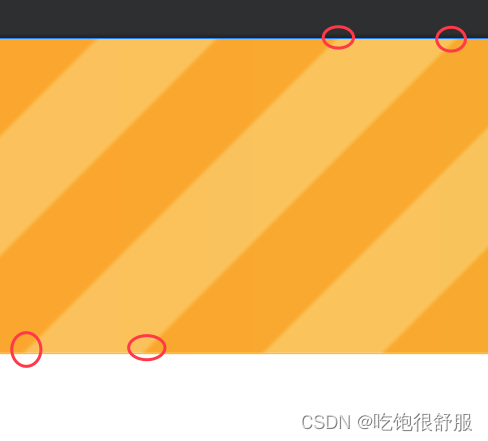
看到炫酷动画, 不要慌, 我们逐步分析动画的各个动作,?
1. 进度条从左向右移动
2. 绘制斑马条纹
3. 斑马条纹从左向右移动
4. 剪切成为圆角
对, 就这三步...
第一步
进度条整体的移动, 通过设置 view translationX 就可以移动啦
第二步
绘制斑马条纹, 这一步需要了解 canvas 的一些常用 API, 我就是吃了不了解的苦, 这一步浪费了好些时间.
首先背景色是一块渐变色, 我们通过 gradient 实现就好啦~
斑马条纹实际上就是渐变色上的半透明小方块,
绘制方块的方法就是, canvas.drawPath,
这个 path 我们可以来自由定义形状,
通过 x, y 轴我们可以定位到小方块的4个点的坐标,
通过 path.lineTo 把这4个点连接起来, 就可以把小方块绘制出来啦
然后通过 while 循环可以绘制进度条上的多个方块, 此时需要注意边界场景, 在坐标 x = 0 的位置需要再往左边绘制 delta =?height / tan(Math.toRadians(COLORFUL_VIEW_RADIUS)) 的距离, 因为左边 delta 距离内的小方块会倾斜到 x = 0 的位置右边, 大概大家画一个坐标轴就很清晰啦~
第三步
让所有斑马条纹(小透明方块)向右移动, 因为此时 view 整体已经在沿 x 轴方向位移了, 小方块在 view 内部向右移动的效果就只能通过变更绘制的起点, 起点的位置从 0 到 view 的 width 来回移动, 就可以实现 小方块在 view 内部做平移啦~
具体实现的时候需要注意, 选择的起点需要分两边开始画, 绘制起点左边的小方块, 和绘制起点右边的小方块~!
第四部
基本效果已经出来了, 可恶的 UI 小姐姐竟然还需要一个圆角, 还好 canvas 提供了 clipPath 函数,?
然后 path.addRoundRect 就可以把想要的圆角添加进来啦~
需要注意的是 clipPath 需要再 绘制小方块之前, 不然是无法生效的~
坎坷过程
看到效果的时候有点懵, 有点慌, 不知道该怎么整...
首先开始在 github 上搜一些类似的效果, 在此感谢大佬的无私分享, 参考大佬实现的效果, 修修补补, 最后发现无法实现需求的效果...吐血...
然后就开始自己写, 还研究了一番?xfermode, 整出来了一个半成品, 但还差一丢丢,?
最后的最后, 重新整理了思路, 达成效果...
思考
不了解 canvas 各种好使的 API 吃了大亏, 需要多学习啊...
想做两件事
1. 因为现在 clipPath 缺少了 绘制圆角的函数, 想写一个 View 的扩展函数来提高便用性,?
2. xfermode 用起来实在是不舒服, 想封装一套好用的 API 来快速实现各种规则形状内剪切效果...
待我再学习一波, 再来更新上面两项...
菜鸡一枚, 有问题大佬们及时指正, 以防误导他人 0-0