基本控件案例集锦(中)
ChecckBox,ImageView,RadioButton,ImageButton
1.ImageView
1.1简介
1.简介:ImageView是一个图片控件,负责显示图片。
1.2属性
1.常见的属设置ImageView的最大高度和宽度,单独使用无效,需要与setAdjustViewBounds一起使用。
- android:maxHeight,设置最大高度
- android:maxWidth,设置最大宽度
- android:src,设置ImageView要显示的图片
- android:adjustViewBounds,设置是否需要ImageView调整自己的边界来保证所显示的图片的长宽比例
- android:alpha:设置图片透明度,0~1之间
2.java中?
- setMaxHeight(int),设置最大高度
- setMaxWidth(int),设置最大宽度
- setImageResource(int),设置ImageView要显示的图片
- etAdjustViewBounds(boolean),设置是否需要ImageView调整自己的边界来保证所显示的图片的长宽比例
1.3案例-切换图片案例
1.案例:ImageViewTestActivity.java
第一步:mipmap中导入几张图片
第二步:编写布局文件
<?xml version="1.0" encoding="utf-8"?>
<LinearLayout xmlns:android="http://schemas.android.com/apk/res/android"
    android:layout_width="match_parent"
    android:layout_height="match_parent"
    android:orientation="vertical"
    >
<!--    1.1button按钮区域-->
    <LinearLayout
        android:layout_width="match_parent"
        android:layout_height="wrap_content"
        android:orientation="horizontal">
<!--        1.1-->
        <Button
            android:id="@+id/btnFirst"
            android:text="第一张"
            android:layout_width="wrap_content"
            android:layout_height="wrap_content" />
<!--        1.2-->
        <Button
            android:id="@+id/btnSecond"
            android:text="第二张"
            android:layout_width="wrap_content"
            android:layout_height="wrap_content" />
<!--        1.3-->
        <Button
            android:id="@+id/btnThird"
            android:text="第三张"
            android:layout_width="wrap_content"
            android:layout_height="wrap_content" />
<!--        1.4-->
<!--        绑定事件监听-->
        <Button
            android:id="@+id/btnAdd"
            android:text="透明度+"
            android:onClick="btnAddClick"
            android:layout_width="wrap_content"
            android:layout_height="wrap_content" />
<!--        1.5-->
<!--        绑定事件监听-->
        <Button
            android:id="@+id/btnSubstract"
            android:text="透明度-"
            android:onClick="btnSubstractClick"
            android:layout_width="wrap_content"
            android:layout_height="wrap_content" />
    </LinearLayout>
<!--    2.-->
<!--    2.1
显示图片
设置默认的透明度是1
设置宽度和高度
设置随时调整图片的比例
-->
    <ImageView
        android:id="@+id/imageView1"
        android:layout_width="wrap_content"
        android:layout_height="wrap_content"
        android:adjustViewBounds="true"
        android:maxWidth="700dp"
        android:maxHeight="900dp"
        android:alpha="1.0"
        />
</LinearLayout>
第三步:编写对应的activity
不透明度在0-1之间的。0看不见,1完全看的见。
package com.example.basecontrols2;


import android.os.Bundle;
import android.view.View;
import android.widget.Button;
import android.widget.ImageView;
//切换美女的照片
import androidx.appcompat.app.AppCompatActivity;
public class ImageViewTestActivity extends AppCompatActivity {
//    定义控件1-3
    Button btnFirst,btnSecond,btnThird;
//    设置图片控件
    ImageView imageView1;
//    不透明度
    float alpha=0.5f;
    @Override
    protected void onCreate(Bundle savedInstanceState) {
        super.onCreate(savedInstanceState);
        setContentView(R.layout.activity_image_view_test);
//       1.获取控件
        btnFirst=(Button)findViewById(R.id.btnFirst);
        btnSecond=(Button)findViewById(R.id.btnSecond);
        btnThird=(Button)findViewById(R.id.btnThird);
        imageView1=(ImageView)findViewById(R.id.imageView1) ;
//         alpha=imageView1.getAlpha();
//        2.设置按钮1的事件监听
        btnFirst.setOnClickListener(new View.OnClickListener() {
            @Override
            public void onClick(View v) {
//                2.1设置图片源
                imageView1.setImageResource(R.mipmap.mingxing1);
            }
        });
//       3.设置按钮2的事件监听
        btnSecond.setOnClickListener(new View.OnClickListener() {
            @Override
            public void onClick(View v) {
//                3.1设置图片源
//                 设置图片,图片源自drawable或者mipmap
                imageView1.setImageResource(R.mipmap.mingxing2);
            }
        });
//      4.设置按钮3的事件监听
        btnThird.setOnClickListener(new View.OnClickListener() {
//      4.1设置图片源
            @Override
            public void onClick(View v) {
                imageView1.setImageResource(R.mipmap.mingxing3);
            }
        });

    }
//    5.设置按钮4的事件监听(用于改变按钮的不透明度)
    public void btnAddClick(View v) {
        if(alpha<=0.9f)
            alpha=alpha+0.1f;
        imageView1.setAlpha(alpha);
        //setAlpha()是对设置控件view的透明度,参数是float型,0f~1f
        //Android:alpha="0.0"那看不见的
        // Android:alpha="1.0"全可见
    }
//    6.设置透明度
    public void btnSubstractClick(View v) {
        if(alpha>=0.1f)
            alpha=alpha-0.1f;
        imageView1.setAlpha(alpha);
    }
}
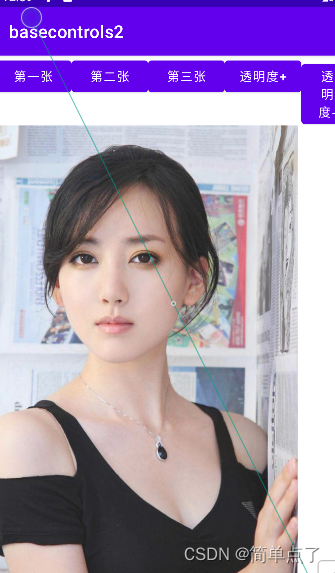
效果图:
2.CheckBox
2.1简介
1.简介:CheckBox的主要功能是完成复选框的操作,在用户输入信息的时候,可以一次性选择多个内容。
2.常见的案例:例如:用户在选择个人兴趣爱好的时候一定会存在多个,则此时就直接使用CheckBox即可完成功能
3.复选框有两种状态?
- 选中和未选中
2.2属性
1.常见的属性:
- android:checked="true"
2.Java中常用的属性?
- public boolean isChecked():确定复选框是否被选中。
- public void setChecked(boolean checked):设置默认选中
- public void toggle():切换复选框的选中和未选中状态
2.3事件监听
1.实现事件监听?
- 实现OnCheckedChangeListener接口,实现回调方法onCheckedChanged ()。
注意:如果一个Activity中存在多个CheckBox,我们需要为每个CheckBox都各自添加一个监听事件
2.事件监听方法?
public void setOnCheckedChangeListener (CompoundButton.OnCheckedChangeListener listener)
- 第一个参数:状态发生改变的CompoundButton按钮
- 第二个参数checked,表示当前点击的CheckBox是否为选中(Checked)状态。
2.4案例1-爱好选择
第一步:编写布局文件
<?xml version="1.0" encoding="utf-8"?>
<LinearLayout xmlns:android="http://schemas.android.com/apk/res/android"
    xmlns:app="http://schemas.android.com/apk/res-auto"
    xmlns:tools="http://schemas.android.com/tools"
    android:layout_width="match_parent"
    android:layout_height="match_parent"
    android:orientation="vertical"
    tools:context=".MainActivity">

<!--1-->
<TextView
    android:layout_width="wrap_content"
    android:layout_height="wrap_content"
    android:text="哥就是幸福的多选框..."
    />
<!--2.-->
<CheckBox
    android:id="@+id/check1"
    android:layout_width="wrap_content"
    android:layout_height="wrap_content"
    android:text="房价高"
    />
    <!--3.-->
    <CheckBox
        android:id="@+id/check2"
        android:layout_width="wrap_content"
        android:layout_height="wrap_content"
        android:text="工资低"
        />
    <!--4.-->
    <CheckBox
        android:id="@+id/check3"
        android:layout_width="wrap_content"
        android:layout_height="wrap_content"
        android:text="生活质量差"
        />
    <!--5.-->
    <CheckBox
        android:id="@+id/check4"
        android:layout_width="wrap_content"
        android:layout_height="wrap_content"
        android:text="工作压力大"
        />
<!--    6.-->
    <EditText
        android:id="@+id/checkresult"
        android:layout_width="match_parent"
        android:layout_height="wrap_content"
        android:inputType="text"
        />
</LinearLayout>
第二步:编写activity
package com.example.basecontrols2;

import androidx.appcompat.app.AppCompatActivity;

import android.os.Bundle;
import android.widget.CheckBox;
import android.widget.CompoundButton;
import android.widget.EditText;
import android.widget.Toast;

//多选的测试
public class MainActivity extends AppCompatActivity {
//1.定义控件
    CheckBox checkBox1=null;
    CheckBox checkBox2=null;
    CheckBox checkBox3=null;
    CheckBox checkBox4=null;
    EditText editText=null;
//    显示的内容
    String str="";
    @Override
    protected void onCreate(Bundle savedInstanceState) {
        super.onCreate(savedInstanceState);
        setContentView(R.layout.activity_main);
//        2.获取控件
        checkBox1=findViewById(R.id.check1);
        checkBox2=findViewById(R.id.check2);
        checkBox3=findViewById(R.id.check3);
        checkBox4=findViewById(R.id.check4);
        editText=findViewById(R.id.checkresult);
//      3.设置监听
//        3.1
        checkBox1.setOnCheckedChangeListener(new CompoundButton.OnCheckedChangeListener() {
            @Override
            public void onCheckedChanged(CompoundButton buttonView, boolean isChecked) {
//                可以用isChecked参数去判断
                if (checkBox1.isChecked()){
                    Toast.makeText(MainActivity.this, checkBox1.getText().toString(), Toast.LENGTH_SHORT).show();
                    str=str+checkBox1.getText().toString();
                    editText.setText(str);
                }
                else
                {
                    str="";
                    editText.setText(str);
//                    设置其他的控件为fasle
                    checkBox2.setChecked(false);
                    checkBox3.setChecked(false);
                    checkBox4.setChecked(false);
                }
            }
        });
//         3.2
        checkBox2.setOnCheckedChangeListener(new CompoundButton.OnCheckedChangeListener() {
            @Override
            public void onCheckedChanged(CompoundButton buttonView, boolean isChecked) {
                if (checkBox2.isChecked()){
                    Toast.makeText(MainActivity.this, checkBox2.getText().toString(), Toast.LENGTH_SHORT).show();
                    str=str+checkBox2.getText().toString();
                    editText.setText(str);

                }
                else
                {
                    str="";
                    editText.setText(str);
//                    设置其他的控件为fasle
                    checkBox1.setChecked(false);
                    checkBox3.setChecked(false);
                    checkBox4.setChecked(false);
                }
            }
        });
//        3.3
        checkBox3.setOnCheckedChangeListener(new CompoundButton.OnCheckedChangeListener() {
            @Override
            public void onCheckedChanged(CompoundButton buttonView, boolean isChecked) {
                if (checkBox3.isChecked()){
                    Toast.makeText(MainActivity.this, checkBox3.getText().toString(), Toast.LENGTH_SHORT).show();
                    str=str+checkBox3.getText().toString();
                    editText.setText(str);
                }
                else
                {
                    str="";
                    editText.setText(str);
//                    设置其他的控件为fasle
                    checkBox1.setChecked(false);
                    checkBox2.setChecked(false);
                    checkBox4.setChecked(false);
                }
            }
        });
//        3.4
        checkBox4.setOnCheckedChangeListener(new CompoundButton.OnCheckedChangeListener() {
            @Override
            public void onCheckedChanged(CompoundButton buttonView, boolean isChecked) {
                if (checkBox4.isChecked()){
                    Toast.makeText(MainActivity.this, checkBox4.getText().toString(), Toast.LENGTH_SHORT).show();
                    str=str+checkBox4.getText().toString();
                    editText.setText(str);
                }
                else
                {
                    str="";
                    editText.setText(str);
//                    设置其他的控件为fasle
                    checkBox1.setChecked(false);
                    checkBox2.setChecked(false);
                    checkBox4.setChecked(false);
                }
            }
        });
//      4.

    }
}
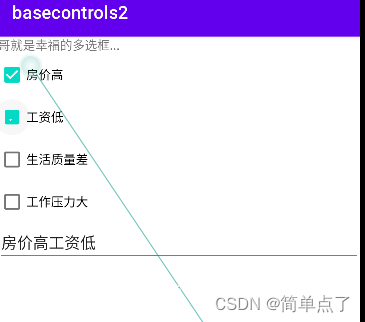
效果图:
3.RadioButton
3.1简介
1.简介:单选钮在开发中提供了一种多选一的操作模式,也是经常见到的一种控件。
- RadioGroup类相当于一个单选钮的容器;
- RadioButton类用于定义单选钮中的内容。
2.RadioGroup:提供的只是一个单选钮的容器,只有在此容器之中配置多个按钮组件之后才可以使用,而要想设置单选钮的内容,则需要使用:
3.如何控制一个RadioGroup中包含几个RadioButton呢?
- 通过在RadioGroup标签中,添加RadioButton
3.2RdioGroup属性
1.常见的属性?
- check (int id):设置要选中的单选钮编号
- clearCheck ():清空选中状态
- getCheckedRadioButtonId():取得选中按钮的RadioButton的ID(如果没有任何按钮被选中,则返回一1)
3.3RadioButton属性
1.常见的属性?和多选框的属性是类似的。
- public boolean isChecked():确定单选框是否被选中。
- public void setChecked(boolean checked):设置默认选中。
- public void toggle():切换单选框的选中和未选中状态
3.3事件监听
1.如何设置事件监听?设置单选钮选中的操作事件。
- public void setOnCheckedChangeListener(
RadioGroup.OnCheckedChangeListener listener)
2.绑定方法?
- setOnCheckedChangeListener(RadioGroup.OnCheckedChangeListener)
3.监听方法?
- public void onCheckedChanged(RadioGroup group, int checkedId)
- 第一个参数:状态发生改变的RadioGroup
- 第二个参数checkedId,表示当前被选中的RadioButton的ID。
3.2案例-聊天界面-重点
第二步是重点。
第一步:编写基本的布局文件
<?xml version="1.0" encoding="utf-8"?>
<LinearLayout xmlns:android="http://schemas.android.com/apk/res/android"
    xmlns:app="http://schemas.android.com/apk/res-auto"
    xmlns:tools="http://schemas.android.com/tools"
    android:layout_width="match_parent"
    android:layout_height="match_parent"
    tools:context=".mychart">

<!--    2.-->
    <RadioGroup
        android:layout_width="match_parent"
        android:layout_height="wrap_content"
        android:orientation="horizontal">
<!--2.1 -->
    <RadioButton
        android:id="@+id/btn1"
        android:layout_width="0dp"
        android:layout_height="wrap_content"
        android:text="会话"
        android:layout_weight="1"
        android:button="@null"
        android:gravity="center"
        />
<!--2.2 -->
        <RadioButton
            android:id="@+id/btn2"
            android:layout_width="0dp"
            android:layout_weight="1"
            android:layout_height="wrap_content"
            android:text="联系人"
            android:button="@null"
            android:gravity="center"

            />
<!--2.3 -->
        <RadioButton
            android:id="@+id/btn3"
            android:layout_width="0dp"
            android:layout_weight="1"
            android:layout_height="wrap_content"
            android:text="空间"
            android:button="@null"
            android:gravity="center"
            />

    </RadioGroup>


</LinearLayout>
效果图:

第二步:将按钮组弄到屏幕下方
方法1:
RadioGroup设置:
android:layout_gravity="bottom"
父:
? android:orientation="vertical"不能设置
方法2:
父设置:
?
android:orientation="vertical"
多设置一个和RadioGroup同级的
?
 <FrameLayout
        android:layout_width="match_parent"
        android:layout_height="0dp"
        android:layout_weight="1"
       />
方法3:借助相对布局的属性
<?xml version="1.0" encoding="utf-8"?>
<RelativeLayout xmlns:android="http://schemas.android.com/apk/res/android"
    xmlns:app="http://schemas.android.com/apk/res-auto"
    xmlns:tools="http://schemas.android.com/tools"
    android:layout_width="match_parent"
    android:layout_height="match_parent"
    android:orientation="vertical"
    tools:context=".mychart">
<!--多种方法-->
    <LinearLayout
        android:layout_width="match_parent"
        android:layout_height="wrap_content"
        android:layout_alignParentBottom="true"
        >
        <RadioGroup
            android:id="@+id/radio3"
            android:layout_width="match_parent"
            android:layout_height="60dp"

            android:orientation="horizontal">

            <!--2.1 -->
            <RadioButton
                android:id="@+id/btn1"
                android:layout_width="0dp"
                android:layout_height="wrap_content"
                android:text="会话"
                android:layout_weight="1"
                android:button="@null"
                android:gravity="center"
                android:textSize="20dp"
                />
            <!--2.2 -->
            <RadioButton
                android:id="@+id/btn2"
                android:layout_width="0dp"
                android:layout_weight="1"
                android:layout_height="wrap_content"
                android:text="联系人"
                android:button="@null"
                android:gravity="center"
                android:textSize="20dp"

                />
            <!--2.3 -->
            <RadioButton
                android:id="@+id/btn3"
                android:layout_width="0dp"
                android:layout_weight="1"
                android:layout_height="wrap_content"
                android:text="空间"
                android:button="@null"
                android:gravity="center"
                android:textSize="20dp"
                />

        </RadioGroup>

    </LinearLayout>

</RelativeLayout>
第三步:设置字体大小以及相应的选择样式。
(1)设置颜色
<?xml version="1.0" encoding="utf-8"?>
<resources xmlns:tools="http://schemas.android.com/tools">
    <color name="myblue" tools:ignore="MissingDefaultResource">#00c1ff</color>
    <color name="mywhite" tools:ignore="MissingDefaultResource">#ffffff</color>
</resources>
(2)设置背景
<?xml version="1.0" encoding="utf-8"?>
<selector xmlns:android="http://schemas.android.com/apk/res/android">
<!--设置选中-->
    <item android:state_checked="true" android:drawable="@color/myblue"/>
    <item android:state_checked="false" android:drawable="@color/mywhite"/>
</selector>
(2)布局文件
- 在每个单选按钮上设置
android:background="@drawable/myradio"第四步:设置监听
package com.example.basecontrols2;

import androidx.appcompat.app.AppCompatActivity;

import android.os.Bundle;
import android.widget.Button;
import android.widget.RadioButton;
import android.widget.RadioGroup;
import android.widget.Toast;

//聊天界面
public class mychart extends AppCompatActivity {
//1.定义要监听的对象
    RadioGroup radioGroup=null;
    @Override
    protected void onCreate(Bundle savedInstanceState) {
        super.onCreate(savedInstanceState);
        setContentView(R.layout.activity_mychart);
//      2.获取RadioGroup对象
        radioGroup=findViewById(R.id.radio3);

//      3.设置事件监听
        radioGroup.setOnCheckedChangeListener(new RadioGroup.OnCheckedChangeListener() {
            @Override
            public void onCheckedChanged(RadioGroup group, int checkedId) {
                if (checkedId==R.id.btn1){
                    RadioButton btn1=findViewById(R.id.btn1);
                    Toast.makeText(mychart.this, "当前选中的是"+btn1.getText(), Toast.LENGTH_SHORT).show();
                }
               if (checkedId==R.id.btn2){
                    RadioButton btn2=findViewById(R.id.btn2);
                    Toast.makeText(mychart.this, "当前选中的是"+btn2.getText(), Toast.LENGTH_SHORT).show();
                }
               if (checkedId==R.id.btn3){
                    RadioButton btn3=findViewById(R.id.btn3);
                    Toast.makeText(mychart.this, "当前选中的是"+btn3.getText(), Toast.LENGTH_SHORT).show();
                }

            }
        });

    }
}
第五步:修改瑕疵
效果图:显示的不是全部。

解决方法:高度设置成match_parent就可以了。
<?xml version="1.0" encoding="utf-8"?>
<RelativeLayout xmlns:android="http://schemas.android.com/apk/res/android"
    xmlns:app="http://schemas.android.com/apk/res-auto"
    xmlns:tools="http://schemas.android.com/tools"
    android:layout_width="match_parent"
    android:layout_height="match_parent"
    android:orientation="vertical"
    tools:context=".mychart">
<!--多种方法-->
    <LinearLayout
        android:layout_width="match_parent"
        android:layout_height="wrap_content"
        android:layout_alignParentBottom="true"
        android:layout_margin="0dp"
        >
        <RadioGroup
            android:id="@+id/radio3"
            android:layout_width="match_parent"
            android:layout_height="60dp"
            android:orientation="horizontal"
            >

            <!--2.1 -->
            <RadioButton
                android:id="@+id/btn1"
                android:layout_width="0dp"
                android:layout_height="match_parent"
                android:text="会话"
                android:layout_weight="1"
                android:button="@null"
                android:gravity="center"
                android:textSize="20dp"
                android:checked="true"

                android:background="@drawable/myradio"
                />
            <!--2.2 -->
            <RadioButton
                android:id="@+id/btn2"
                android:layout_width="0dp"
                android:layout_weight="1"
                android:layout_height="match_parent"
                android:text="联系人"
                android:button="@null"
                android:gravity="center"
                android:textSize="20dp"
                android:background="@drawable/myradio"
                />
            <!--2.3 -->
            <RadioButton
                android:id="@+id/btn3"
                android:layout_width="0dp"
                android:layout_height="match_parent"
                android:layout_weight="1"
                android:background="@drawable/myradio"
                android:button="@null"
                android:gravity="center"
                android:text="空间"
                android:textSize="20dp" />

        </RadioGroup>

    </LinearLayout>

</RelativeLayout>
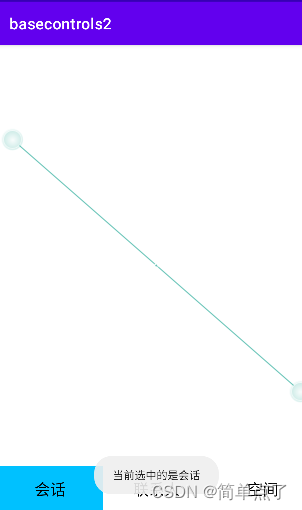
效果图:
4.ImageButton
4.1简介
1.简介:ImageButton(图片按钮)用以实现能够显示图像功能的控件按钮。
它与Button控件的不同之处只是在设置图片时有些区别。ImageButton控件继承自ImageView类,ImageButton控件与Button控件的主要区别是ImageButton中没有text属性,即按钮中将显示图片而不是文本。
4.2常见属性
1.常见属性
- android:src,设置图片。等价于,setImageResource(int)。
2.注意:
- 默认情况下,ImageButton控件与Button控件一样具有背景色,当按钮处于不同的状态时,背景色也会随之改变。如果当ImageButton控件所显示的图片不能完全覆盖掉背景色时,这样效果非常差,所以一般使用ImageButton控件要将背景色设置为其他图片或直接设置为透明。
3.取消默认的背景色?
- android:background="#0000"
4.3案例1-图片按钮
第一步:导入图片
第二步:创建布局文件。
<?xml version="1.0" encoding="utf-8"?>
<LinearLayout xmlns:android="http://schemas.android.com/apk/res/android"
    xmlns:app="http://schemas.android.com/apk/res-auto"
    xmlns:tools="http://schemas.android.com/tools"
    android:layout_width="match_parent"
    android:layout_height="match_parent"
    android:orientation="vertical"
    android:gravity="center"
    tools:context=".imageviewtest">

<!--    图片按钮-->
        <ImageButton
            android:layout_width="wrap_content"
            android:layout_height="wrap_content"
            android:src="@mipmap/download"
            />
</LinearLayout>
效果图:
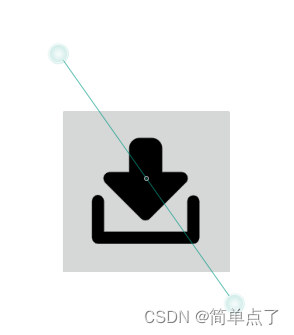
第三步:取消背景,设置大小
(1)设置颜色
注意是4个0
<color name="imgbutton_bc">#0000</color>(2)设置背景
<?xml version="1.0" encoding="utf-8"?>
<LinearLayout xmlns:android="http://schemas.android.com/apk/res/android"
    xmlns:app="http://schemas.android.com/apk/res-auto"
    xmlns:tools="http://schemas.android.com/tools"
    android:layout_width="match_parent"
    android:layout_height="match_parent"
    android:orientation="vertical"
    android:gravity="center"
    tools:context=".imageviewtest">

<!--    图片按钮-->
        <ImageButton
            android:layout_width="wrap_content"
            android:layout_height="wrap_content"
            android:src="@mipmap/download"
            android:background="@color/imgbutton_bc"
            />
</LinearLayout>
效果图:
