By Toradex秦海
1).?简介
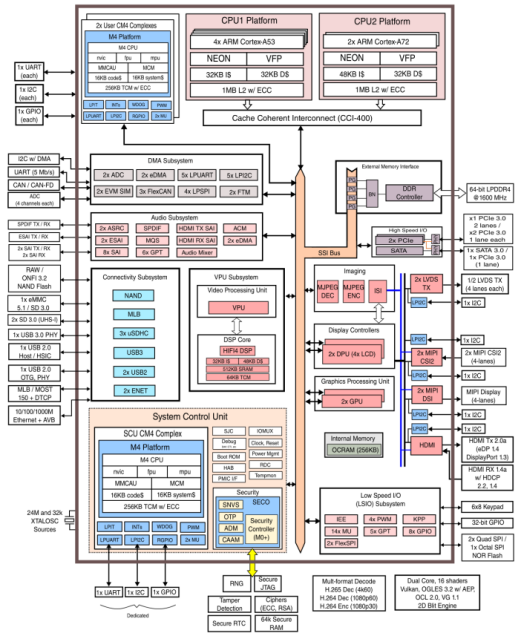
NXP iMX8系列ARM处理器是NXP目前性能最强劲确也是架构最复杂的ARM处理器,和之前的ARMv7系列处理器比如iMX6系列不同,在iMX8系列芯片中NXP加入了SCU模块来管理芯片的启动和关键外设初始化(如PMIC、时钟等),iMX8QM处理器的简单框图如下:
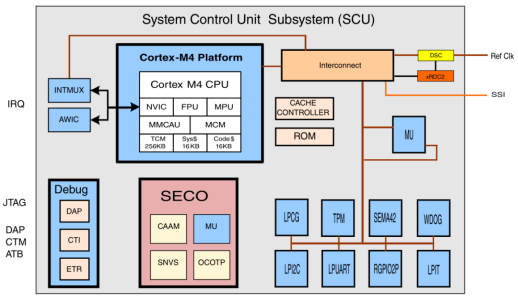
SCU(System Control Unit)的框图放大如下,其中包含一个基于Cortex-M4内核的SCU CM4 Complex模块,其运行的固件就是SCFW,还有一基于Cortex-M0内核的SECO模块,运行SECO固件,负责安全认证相关的工作。
本文就简单介绍下iMX8处理器的启动流程,然后结合来自于Toradex Apalis?iMX8?的ARM嵌入式平台,演示一下包含了SCFW以及SECO固件等的boot container image的编译流程。
2).?准备
a).?Apalis iMX8QM?4GB?WB IT?ARM核心版配合Ioxra?载板,连接调试串口UART1(载板X22)到开发主机方便调试。
3).?NXP iMX8?启动流程
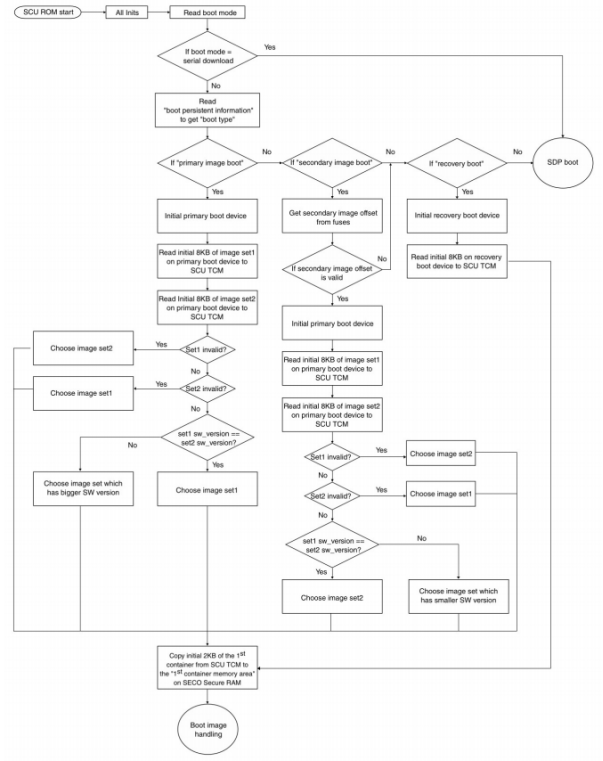
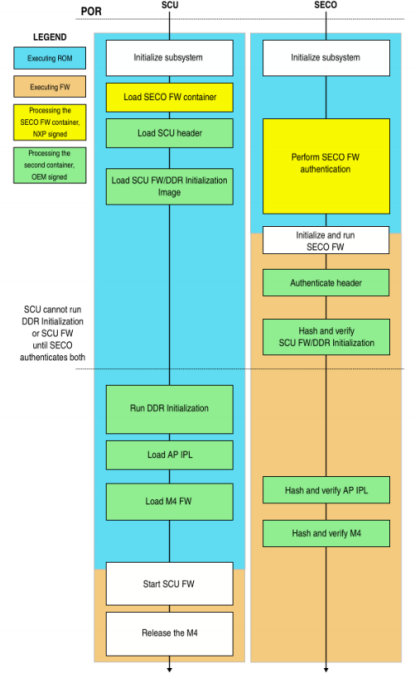
a).?NXP iMX8启动流程图如下所示,首先SCU boot rom代码加载启动,然后通过芯片的SCU boot mode相关管脚配置,来选择进入那种启动模式,一般要么是正常启动,要么是进入恢复模式,然后通过SDP模式启动。正常启动流程到最后,加载运行Boot container image来继续下一阶段启动。
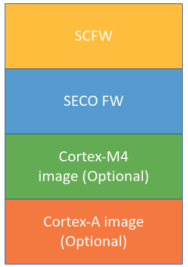
b).?Boot container image?包含如下内容
./ SCFW -?运行与SCU M4核心的firmware,用于启动管理和外设初始化等任务,可以进行定制修改。
./ SECO FW - SECO firmware,NXP只提供binary文件,负责启动过程中的一些security认证。
./ Optional Coretex-M4 firmware,?由上面章节一的iMX8芯片框图可以看到iMX8支持2x Cortex-M4?核心,那么运行与这些M4核心的固件可以一起集成到boot container image里面去,如果不需要或者可以后续通过U-boot加载,因此可选添加。
./ Optional Cortex-A image,运行于Cortex-A核心启动相关的image,主要包含ATF(ARM Trusted Firmware)和U-boot image。
c).?Boot container image?加载流程如下图,最后当U-boot运行后,就由U-boot控制进行正常的Linux Kernel和Rootfs加载流程了。
4).?Boot Container Image编译组装
a).?本文以下编译流程都是基于当前Toradex?最新Linux BSP V5.3版本操作,其他版本基本流程都是一致的,版本差异可以参考这里说明修改适配
b).?首先获取?SECO firmware
----------------------------------
$ cd ~/workdir
$ wget -c https://www.nxp.com/lgfiles/NMG/MAD/YOCTO/imx-seco-3.8.1.bin
$ chmod u+x imx-seco-3.8.1.bin
$ ./imx-seco-3.8.1.bin
$ ls imx-seco-3.8.1/firmware/seco/
commit-id.txt??mx8dxla1-ahab-container.img ?mx8qxb0-ahab-container.img ?SECO_FW_release_note.pdf
mx8dxla0-ahab-container.img ?mx8qmb0-ahab-container.img ??mx8qxc0-ahab-container.img
----------------------------------
可以看到SECO firmware binary已经在?imx-seco-3.8.1/firmware/seco/?目录下,针对不同的iMX8芯片选择不同的文件,本文测试使用的iMX8QM处理器对应的是?mx8qmb0-ahab-container.img?这个文件。
c).?然后编译?SCFW
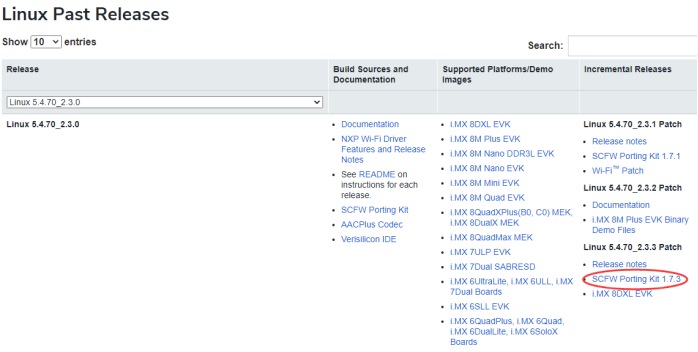
./从NXP官网下载?SCFW porting kit(需要有效的NXP账号登录),当前适用版本为?SCFW Porting Kit 1.7.3
./?解压到?build-scfw?目录
----------------------------------
###?create build-scfw folder for building
$ cd ~/workdir
$?mkdir build-scfw
$?cd build-scfw
###?extract package
$?tar xf imx-scfw-porting-kit-1.7.3.tar.gz
$ cd packages/
$ chmod +x imx-scfw-porting-kit-1.7.3.bin
$ ./imx-scfw-porting-kit-1.7.3.bin
###?deploy source code, corresponding to iMX8QM
$ cd imx-scfw-porting-kit-1.7.3/src/
$ tar xf scfw_export_mx8qm_b0.tar.gz
$ ls scfw_export_mx8qm_b0
bin ?build_mx8qm_b0 ?COPYING ?Makefile ?makefiles ?MANIFEST ?platform ?SCR-imx-scfw-porting-kit.txt
----------------------------------
./?查看当前SCFW版本号/Commit
----------------------------------
$ cd ~/workdir/build-scfw/packages/imx-scfw-porting-kit-1.7.3/
$ $ cat VERSION
NXP i.MX System Controller Firmware
--------------------------------------------
Git repo: ?????ssh://bitbucket.sw.nxp.com/imxpriv/imx-sc-firmware.git
Branch name: ??imx_scfw_2020q4
Build version: 5222
Commit ID: ????bc122ee1
Build date: ???May 27 2021
Build time: ???16:27:17
----------------------------------
./?将Toradex Apalis iMX8QM针对其核心板的相关修改部署到上述下载NXP imx8qm SCFW?源代码中
----------------------------------
$ cd build-scfw/packages/imx-scfw-porting-kit-1.7.3/src
$ git clone?https://github.com/toradex/i.MX-System-Controller-Firmware.git
$ cp -r i.MX-System-Controller-Firmware/src/scfw_export_mx8qm_b0/*?/scfw_export_mx8qm_b0/
----------------------------------
./?可选?-?根据需要修改SCFW源代码
----------------------------------
###?参考文档位于?../imx-scfw-porting-kit-1.7.3/doc/,有HDML和PDF两种格式文档
$ ls?pdf/
sc_fw_api_dxl_a0.pdf ?sc_fw_api.pdf ?sc_fw_api_qm_b0.pdf ?sc_fw_api_qx_b0.pdf ???sc_fw_rn.pdf
###?针对Toradex Apalis iMX8,核心修改文件位于
### build-scfw/packages/imx-scfw-porting-kit-1.7.3/src/scfw_export_mx8qm_b0/platform/board/mx8qm_apalis
$ ls
board.bom ?board.c ?board.h ?dcd ?Makefile
### dcd?目录主要存放ram timing配置文件,主要修改部分在?board.c?这个文件,这个文件的内容和修改请参考上述sc_fw_port.pdf文档说明,包含了从底层CPU/RAM/时钟/PMIC初始化到外部资源分配的各方面
###?比如常用的SOC资源在SCU、Cortex-A、Cortex-M核心直接的分配,可以参考文档的第六章节,通过?board.c?文件的board_system_config()?函数来进行配置,当然也有其他run-time的API函数可用
void board_system_config(sc_bool_t early, sc_rm_pt_t pt_boot)
{
????sc_err_t err = SC_ERR_NONE;
????/* This function configures the system. It usually partitions
???????resources according to the system design. It must be modified by
???????customers. Partitions should then be specified using the mkimage
???????-p option. */
????/* Note the configuration here is for NXP test purposes */
????......
????/* Name default partitions */
????PARTITION_NAME(SC_PT, "SCU");
????PARTITION_NAME(SECO_PT, "SECO");
????PARTITION_NAME(pt_boot, "BOOT");
????/* Configure initial resource allocation (note additional allocation
???????and assignments can be made by the SCFW clients at run-time */
????......
/* Create M4 0 partition */
????????if (rm_is_resource_avail(SC_R_M4_0_PID0) != SC_FALSE)
????????{
????????????sc_rm_mr_t mr;
????????????/* List of resources */
????????????static const sc_rsrc_t rsrc_list[7U] =
????????????{
????????????????SC_R_SYSTEM,
????????????????SC_R_IRQSTR_M4_0,
????????????????SC_R_MU_5B,
????????????????SC_R_MU_7A,
????????????????SC_R_MU_8B,
????????????????SC_R_GPT_4,
????????????????SC_R_SECO_MU_4
????????????};
......
----------------------------------
./?修改好源代码后,配置toolchain准备进行编译
----------------------------------
###?使用GCC ARM?针对?Coretex-M核心的GNU-RM?最新版本即可,下载地址如下,当前针对Linux X86_64平台的最新版本为gcc-arm-none-eabi-10-2020-q4-major-x86_64-linux.tar.bz2
https://developer.arm.com/tools-and-software/open-source-software/developer-tools/gnu-toolchain/gnu-rm/downloads
$ cd ~/workdir
$?mkdir toolchain
$ cd toolchain
###?解压下载的toolchain压缩包
$ tar xvf gcc-arm-none-eabi-10-2020-q4-major-x86_64-linux.tar.bz2
$ ls gcc-arm-none-eabi-10-2020-q4-major
arm-none-eabi ?bin ?lib ?share
### export?编译环境变量
$ export ARCH=arm
$ export CROSS_COMPILE=~/workdir/toolchain/gcc-arm-none-eabi-10-2020-q4-major/bin/arm-none-eabi-
$ export PATH=$PATH:~/workdir/toolchain/gcc-arm-none-eabi-10-2020-q4-major/bin
###?测试toolchain
$ arm-none-eabi-gcc --version
arm-none-eabi-gcc (GNU Arm Embedded Toolchain 10-2020-q4-major) 10.2.1 20201103 (release)
Copyright (C) 2020 Free Software Foundation, Inc.
This is free software; see the source for copying conditions. ?There is NO
warranty; not even for MERCHANTABILITY or FITNESS FOR A PARTICULAR PURPOSE.
./?SCFW编译
----------------------------------
$ cd?~/workdir/build-scfw/packages/imx-scfw-porting-kit-1.7.3/src/scfw_export_mx8qm_b0
$ make clean;make SOC=MX8QM B=apalis D=0 DL=0 R=b0 U=0 V=0 qm
Generating platform/board/mx8qm_apalis/dcd/imx8_ramid1_dcd_1.6GHz.h
......
Linking build_mx8qm_b0/scfw_tcm.elf ....
Objcopy build_mx8qm_b0/scfw_tcm.bin ....
done.
###?关于编译的相关选项含义,可以通过help查看,比如D配置debug选项,U配置SCU调试UART
$ make help
Usage: make TARGET OPTIONS
Targets:
help ??????????: display help text
clean ?????????: remove all build files
??dxl ????????????: build for i.MX8DXL die, output in build_mx8dxl
??qm ????????????: build for i.MX8QM die, output in build_mx8qm
??......
Options:
V=0 ???????????: quite output (default)
V=1 ???????????: verbose output
D=0 ???????????: configure for no debug
D=1 ???????????: configure for debug (default)
DL=<level> ????: configure debug level (0-5)
B=<board> ?????: configure board (default=val)
U=<uart> ??????: configure debug UART (default=0)
DDR_CON=<file> : specify DDR config file
R=<srev> ??????: silicon revision (default=A0)
M=0 ???????????: no debug monitor (default)
M=1 ???????????: include debug monitor
LTO=0 ?????????: build without link-time optimization (default)
LTO=1 ?????????: build with link-time optimization
T=<test> ??????: run tests rather than boot next core
----------------------------------
./?编译好生成的SCFW固件位于如下位置,后面打包Boot Container Image会需要
----------------------------------
$ ls build_mx8qm_b0/scfw_tcm.bin
----------------------------------
当然,如果你无需修改Toradex SCFW的默认配置,也可以从下面github上面直接下载Toradex编译好的SCFW binary固件文件mx8qm-apalis-scfw-tcm.bin后重命名为scfw_tcm.bin
----------------------------------
$ wget https://github.com/toradex/i.MX-System-Controller-Firmware/blob/master/src/scfw_export_mx8qm_b0/build_mx8qm_b0/mx8qm-apalis-scfw-tcm.bin
$ mv?mx8qm-apalis-scfw-tcm.bin?scfw_tcm.bin
----------------------------------
d).?编译ATF
./?获取ATF源代码
-------------------------------
$ cd ~/workdir
$?git clone git://git.toradex.com/imx-atf.git -b?toradex_imx_5.4.70_2.3.0
-------------------------------
./?参考这里说明配置编译toolchain,因为ATF运行与Cortex-A核心,因此和上面SCFW不同,需要使用GCC ARM针对Coretx-A核心的GNU-A toolchain,为了和Ycoto编译版本Dunfell对应,这里使用了9.2 aarch64 64bit版本。另外,请注意因为使用编译器和上述SCFW编译不同,因此要开一个新的Terminal窗口进行配合和后续编译。
-------------------------------
$ cd ~/workdir/toolchain/
###?解压下载的toolchain压缩包
$ tar xvf gcc-arm-9.2-2019.12-x86_64-aarch64-none-linux-gnu.tar.xz
$ ls gcc-arm-9.2-2019.12-x86_64-aarch64-none-linux-gnu
9.2-2019.12-x86_64-aarch64-none-linux-gnu-manifest.txt ?bin ?????lib ???libexec
aarch64-none-linux-gnu ?????????????????????????????????include ?lib64 ?share
### export?编译环境变量
$ export ARCH=arm
$ export CROSS_COMPILE=aarch64-none-linux-gnu-
$ export PATH=$PATH:~/workdir/toolchain/gcc-arm-9.2-2019.12-x86_64-aarch64-none-linux-gnu/bin
###?测试toolchain
$ aarch64-none-linux-gnu-gcc --version
aarch64-none-linux-gnu-gcc (GNU Toolchain for the A-profile Architecture 9.2-2019.12 (arm-9.10)) 9.2.1 20191025
Copyright ? 2019 Free Software Foundation, Inc.
......
-------------------------------
./?编译ATF
-------------------------------
$ cd ~/workdir/imx-atf
$ make PLAT=imx8qm bl31
??CC ?????plat/imx/imx8qm/imx8qm_bl31_setup.c
......
??LD ?????build/imx8qm/release/bl31/bl31.elf
??BIN ????build/imx8qm/release/bl31.bin
Built build/imx8qm/release/bl31.bin successfully
??OD ?????build/imx8qm/release/bl31/bl31.dump
###?编译出?bl31.bin?再后续组装Boot Container Image中会需要
$ ls build/imx8qm/release/bl31.bin
build/imx8qm/release/bl31.bin
-------------------------------
e).?U-boot编译
./?参考这里说明进行U-boot源代码下载以及编译,这个就是比较常规的bootloader修改编译过程了,针对iMX8/iMX8X平台,如果只是需要修改U-boot(SCFW不做修改)的话也需要参考本文流程重新组装Boot Container Image文件后再进行部署。
./?下载对应BSP版本U-boot源代码
-------------------------------
$ cd ~/workdir
$?git clone -b toradex_imx_v2020.04_5.4.70_2.3.0 git://git.toradex.cn/u-boot-toradex.git
-------------------------------
./?编译toolchain及上一章节编译ATF同样toolchain配置,这里不再赘述。
./?编译,生成u-boot.bin用于后续Boot Container Image组装
-------------------------------
$ cd ~/workdir/u-boot-toradex
$ make apalis-imx8_defconfig
$?make -j$(nproc) 2>&1 | tee build.log
$ ls u-boot.bin
u-boot.bin
-------------------------------
f).?Boot Container Image组装
./?首先下载?imx-mkimage?工具
-------------------------------
$ cd ~/workdir/
$ git clone -b imx_5.4.70_2.3.0 https://source.codeaurora.org/external/imx/imx-mkimage/
-------------------------------
./?将上述章节准备好的SECO、SCFW、ATF、U-boot binary文件复制到imx-mkimage对应目录
-------------------------------
$ cd ~/workdir/imx-mkimage/
$ cp ~/workdir/imx-seco-3.8.1/firmware/seco/mx8qmb0-ahab-container.img?iMX8QM
$ cp?~/workdir/build-scfw/../build_mx8qm_b0/scfw_tcm.bin iMX8QM
$ cp ~/workdir/imx-atf/build/imx8qm/release/bl31.bin iMX8QM
$ cp ~/workdir/u-boot-toradex/u-boot.bin iMX8QM
-------------------------------
./?组装Boot Container Image,最终生成?flash.bin?文件
-------------------------------
$ make SOC=iMX8QM flash_b0
$ ls iMX8QM/flash.bin
iMX8QM/flash.bin
-------------------------------
5).?部署测试
a).?从这里下载Toradex Ycoto Linux BSP Multimedia Image Quarterly 5.2.0+build.7版本,默认image通过Toradex Easy Installer安装后启动通过调试串口可以看到目前的SCFW Commit ID
-------------------------------
U-Boot 2020.04-5.2.0-devel+git.76fd4496a40b (Apr 07 2021 - 07:35:42 +0000)
CPU: ??NXP i.MX8QM RevB A53 at 1200 MHz
DRAM: ?4 GiB
MMC: ??FSL_SDHC: 0, FSL_SDHC: 1, FSL_SDHC: 2
Loading Environment from MMC... OK
In: ???serial
Out: ??serial
Err: ??serial
Model: Toradex Apalis iMX8 QuadMax 4GB Wi-Fi / BT IT V1.1B, Serial# 06738378
?BuildInfo:
??- SCFW?0d54291f, SECO-FW d63fdb21, IMX-MKIMAGE 8947fea3, ATF 7f1187b
??- U-Boot 2020.04-5.2.0-devel+git.76fd4496a40b
-------------------------------
b).?用上述章节4生成的?flash.bin文件替换掉刚才下载的BSP 5.2.0 image压缩包里面的imx-boot文件
-------------------------------
$ cd ~/workdir/
$ tar xvf Apalis-iMX8_Reference-Multimedia-Image-Tezi_5.2.0+build.7.tar
$ cd Apalis-iMX8_Reference-Multimedia-Image-Tezi_5.2.0+build.7/
$ rm imx-boot
$ cp?imx-mkimage/iMX8QM/flash.bin?imx-boot
-------------------------------
c).?将上述修改后的image重新通过Toradex Easy Installer更新到Apalis iMX8模块后,启动查看SCFW Commit ID是否和之前SCFW编译章节查看到的Commit一致,如一致说明编译部署成功。
-------------------------------
U-Boot 2020.04-06904-g7f3416a28c (Jul 05 2021 - 15:43:42 +0800)
CPU: ??NXP i.MX8QM RevB A53 at 1200 MHz
DRAM: ?4 GiB
MMC: ??FSL_SDHC: 0, FSL_SDHC: 1, FSL_SDHC: 2
Loading Environment from MMC... OK
In: ???serial
Out: ??serial
Err: ??serial
Model: Toradex Apalis iMX8 QuadMax 4GB Wi-Fi / BT IT V1.1B, Serial# 06738378
?BuildInfo:
??- SCFW?bc122ee1, SECO-FW d63fdb21, IMX-MKIMAGE 8947fea3, ATF
??- U-Boot 2020.04-06904-g7f3416a28c
-------------------------------
6).?总结
本文基于NXP iMX8嵌入式平台简单介绍了NXP iMX8/iMX8X新一代iMX处理器的启动流程,以及SCFW、ATF、U-boot的编译和Boot Container Image的组装供参考,而NXP另外一个iMX8M Mini/Plus系列是不包含SCU的,但是还是需要一个包含DDR timing、ATF、SPL、U-boot等的Boot Container Image,详细编译可以参考这里说明。
参考文献
https://www.nxp.com.cn/docs/en/application-note/AN13275.pdf
https://developer.toradex.com/knowledge-base/build-custom-imx-88x-system-controller-firmware-scfw
https://developer.toradex.cn/knowledge-base/build-u-boot-and-linux-kernel-from-source-code