在后续的调试过程中,经常需要我们对字符和数据进行输出(例如反应PWM值)从而检测实验目的是否达到。此节教程将讲解如何实现字符的输出。
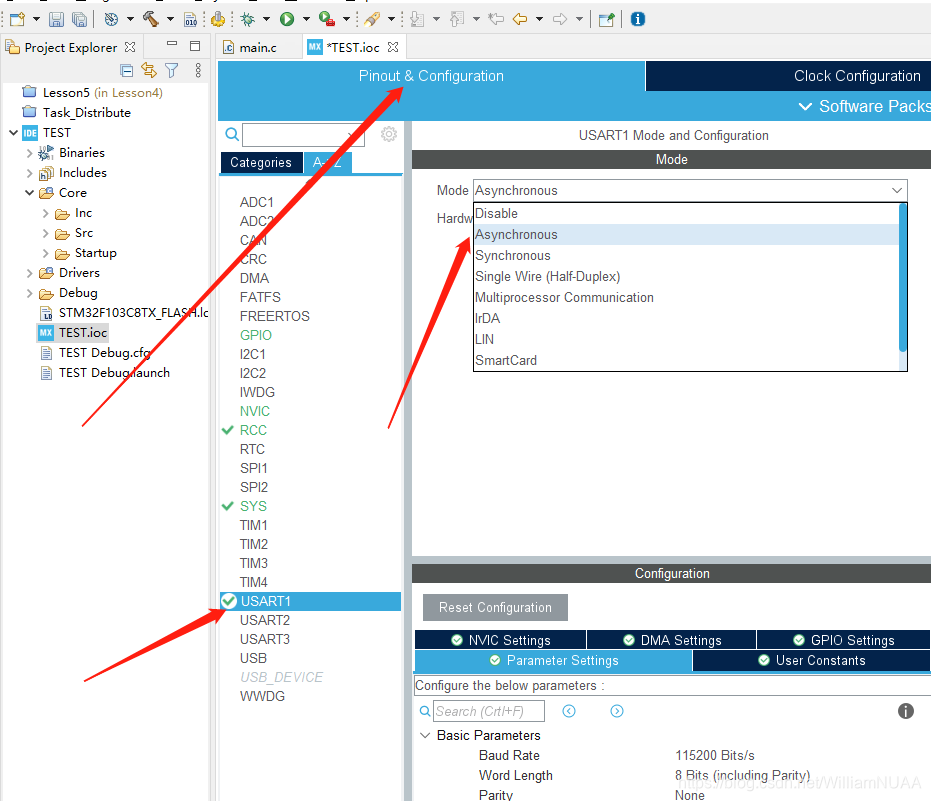
1.新建一个项目文件,选择在左侧Pinout&Configuration 界面中点击USART1,然后在
USART1 Mode and Configuration 的 Mode 中选择Asynchronous。

2.点击NVIC Setting,对USART1 global interrupt 的选择框打钩,启用USART1 的全局中断。

3.在Project Manager 的Code Generator 中勾选generate periheral initialization as apair of“.c/.h”files per periheral ,可以让每个外设都生成一个文件,不用全部都堆在Main.c 文件中。
?
4.点击重新生成代码。
?
5.?打开usart.c,在/* USER CODE BEGIN 0 */ 和/* USER CODEEND 0 */ 把标准输入输入头文件
stdio.h 加进去(注意是在usart.c中加),并且加入以下代码:
#ifdef __GNUC__
/* With GCC/RAISONANCE, small printf (option LD Linker->Libraries->Small printf
set to 'Yes') calls __io_putchar() */
#define PUTCHAR_PROTOTYPE int __io_putchar(int ch)
#else
#define PUTCHAR_PROTOTYPE int fputc(int ch, FILE *f)
#endif /* __GNUC__ */
?6.在/* USER CODE BEGIN 1 */ 和/* USER CODE END 1 */ 之间加入以下代码:
/**
* @brief Retargets the C library printf function to the USART.
* @param None
* @retval None
*/
PUTCHAR_PROTOTYPE
{
/* Place your implementation of fputc here */
/* e.g. write a character to the EVAL_COM1 and Loop until the end of transmission */
HAL_UART_Transmit(&huart1, (uint8_t *)&ch, 1, 0xFFFF);
return ch;
}
?7.在主函数main 里面的主循环中加入以下代码:

8.点击编译,没有报错,进行烧录。
9.将小车用USB和电脑相连接,打开sscom软件,选择端口,接收在main.c文件中设置输出的字符。
