STM32基于cubemx HAL库 MPU6050 DMP 移植教程
本次移植我用的官方开发板芯片:STM32L1系列,其实F系列类似可按此教程移植;
还需要mpu6050 dmp库程序包;
mup6050库地址:https://download.csdn.net/download/liuyao666/21325719
cubemx创建工程项目
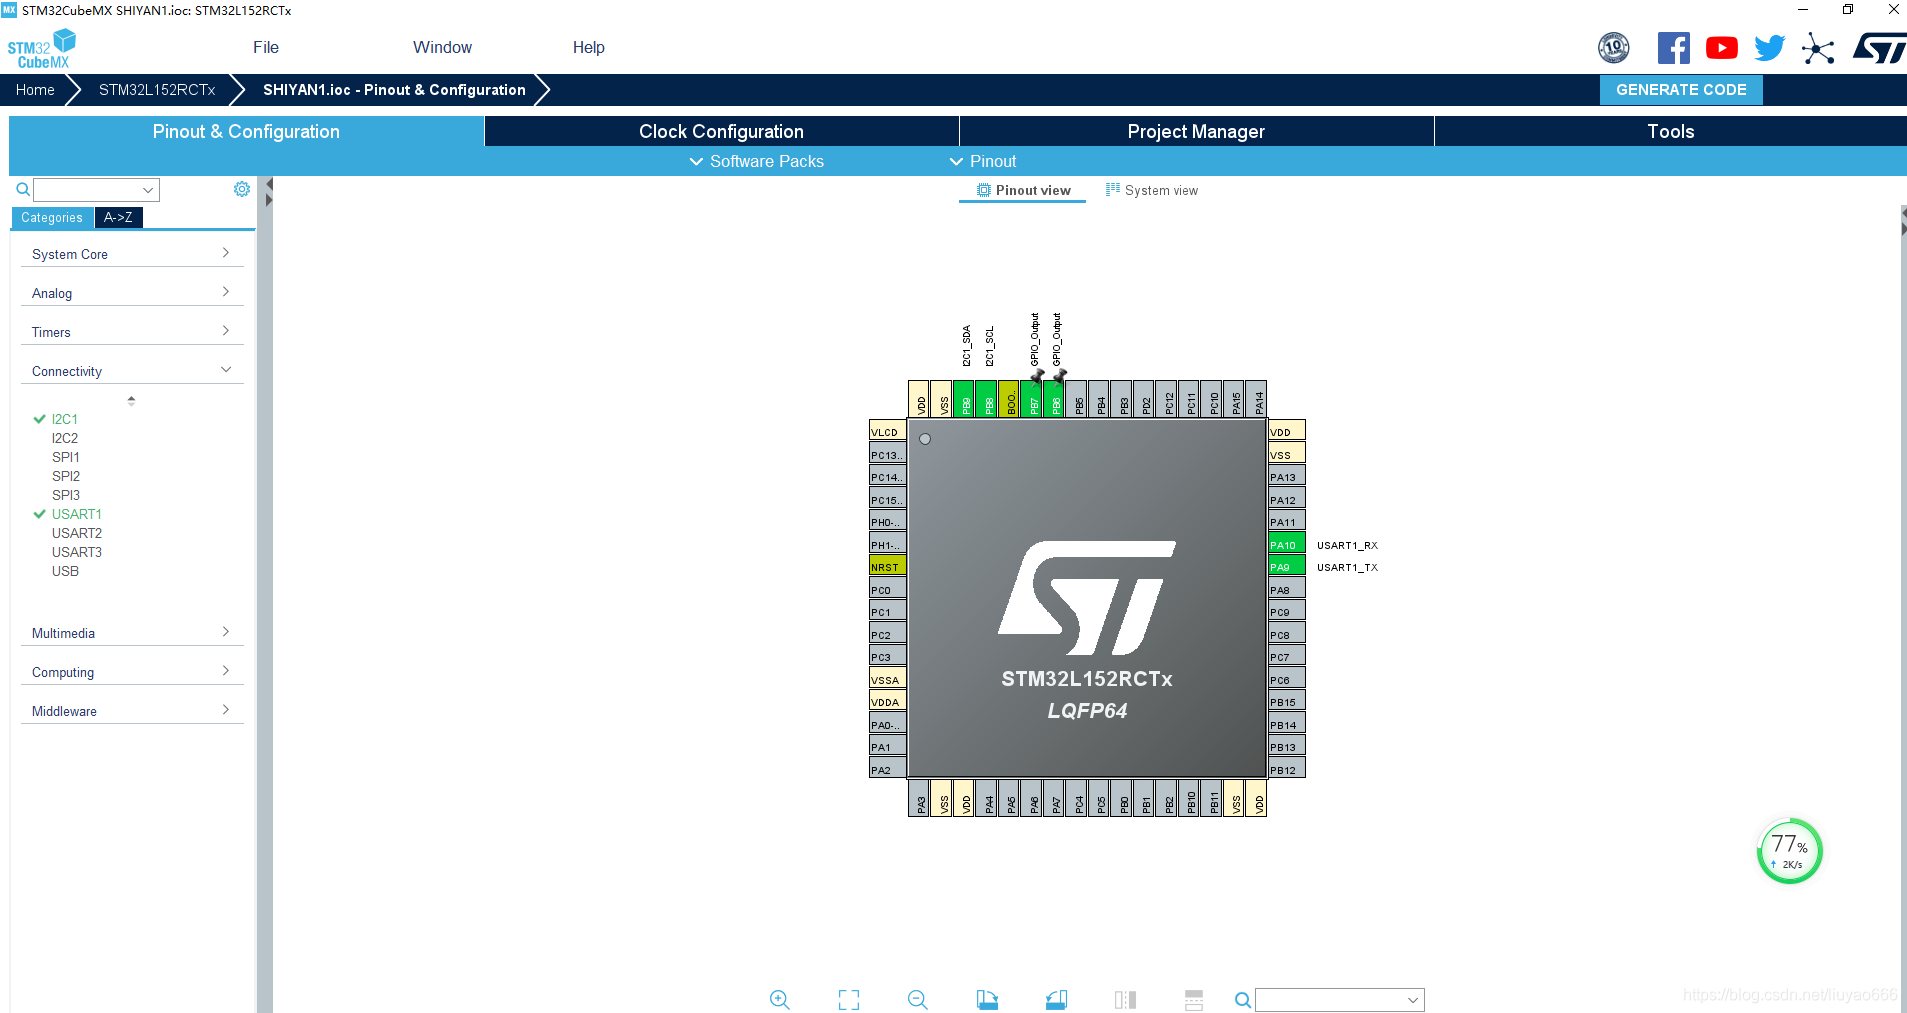
为了演示方便项目只定义了简单的必须的几个接口i2c1,usart1;

库移植
首先在刚才新建的工程下面新建Hardware文件夹,将MPU6050文件夹粘贴到该文件夹下面;


添加.C文件
~~ 打开刚下新建工程程序,添加DMP库.c文件到工程内;


添加编译路径

将mpu6050.h文件中"sys.h"改为"main.h",移植程序并没有"sys.h"现有程序的配置均在"main.h",同时删除"delay.h";


然后编译会提示报错;

在mpu6050.h文件中添加宏定义#define u8 uint8_t #define u16 uint16_t 同时将"mpuiic.h"头文件改为"i2c.h",我们关于I2C的配置均在"i2c.h"中


修改mpu6050.c中I2C初始化函数,将库函数修改为HAL函数,延迟函数delay_ms(100);也改为HAL库函数;

修改mpu6050.c中I2C读写的函数需要由库函数改为HAL函数;
}
//IIC连续写
//addr:器件地址
//reg:寄存器地址
//len:写入长度
//buf:数据区
//返回值:0,正常
//    其他,错误代码
u8 MPU_Write_Len(u8 addr,u8 reg,u8 len,u8 *buf)
{
	u8 i;
    MPU_IIC_Start();
	MPU_IIC_Send_Byte((addr<<1)|0);//发送器件地址+写命令
	if(MPU_IIC_Wait_Ack())	//等待应答
	{
		MPU_IIC_Stop();
		return 1;
	}
    MPU_IIC_Send_Byte(reg);	//写寄存器地址
    MPU_IIC_Wait_Ack();		//等待应答
	for(i=0;i<len;i++)
	{
		MPU_IIC_Send_Byte(buf[i]);	//发送数据
		if(MPU_IIC_Wait_Ack())		//等待ACK
		{
			MPU_IIC_Stop();
			return 1;
		}
	}
    MPU_IIC_Stop();
	return 0;
}
//IIC连续读
//addr:器件地址
//reg:要读取的寄存器地址
//len:要读取的长度
//buf:读取到的数据存储区
//返回值:0,正常
//    其他,错误代码
u8 MPU_Read_Len(u8 addr,u8 reg,u8 len,u8 *buf)
{
 	MPU_IIC_Start();
	MPU_IIC_Send_Byte((addr<<1)|0);//发送器件地址+写命令
	if(MPU_IIC_Wait_Ack())	//等待应答
	{
		MPU_IIC_Stop();
		return 1;
	}
    MPU_IIC_Send_Byte(reg);	//写寄存器地址
    MPU_IIC_Wait_Ack();		//等待应答
    MPU_IIC_Start();
	MPU_IIC_Send_Byte((addr<<1)|1);//发送器件地址+读命令
    MPU_IIC_Wait_Ack();		//等待应答
	while(len)
	{
		if(len==1)*buf=MPU_IIC_Read_Byte(0);//读数据,发送nACK
		else *buf=MPU_IIC_Read_Byte(1);		//读数据,发送ACK
		len--;
		buf++;
	}
    MPU_IIC_Stop();	//产生一个停止条件
	return 0;
}
//IIC写一个字节
//reg:寄存器地址
//data:数据
//返回值:0,正常
//    其他,错误代码
u8 MPU_Write_Byte(u8 reg,u8 data)
{
    MPU_IIC_Start();
	MPU_IIC_Send_Byte((MPU_ADDR<<1)|0);//发送器件地址+写命令
	if(MPU_IIC_Wait_Ack())	//等待应答
	{
		MPU_IIC_Stop();
		return 1;
	}
    MPU_IIC_Send_Byte(reg);	//写寄存器地址
    MPU_IIC_Wait_Ack();		//等待应答
	MPU_IIC_Send_Byte(data);//发送数据
	if(MPU_IIC_Wait_Ack())	//等待ACK
	{
		MPU_IIC_Stop();
		return 1;
	}
    MPU_IIC_Stop();
	return 0;
}
//IIC读一个字节
//reg:寄存器地址
//返回值:读到的数据
u8 MPU_Read_Byte(u8 reg)
{
	u8 res;
    MPU_IIC_Start();
	MPU_IIC_Send_Byte((MPU_ADDR<<1)|0);//发送器件地址+写命令
	MPU_IIC_Wait_Ack();		//等待应答
    MPU_IIC_Send_Byte(reg);	//写寄存器地址
    MPU_IIC_Wait_Ack();		//等待应答
    MPU_IIC_Start();
	MPU_IIC_Send_Byte((MPU_ADDR<<1)|1);//发送器件地址+读命令
    MPU_IIC_Wait_Ack();		//等待应答
	res=MPU_IIC_Read_Byte(0);//读取数据,发送nACK
    MPU_IIC_Stop();			//产生一个停止条件
	return res;
}
改为
uint8_t MPU_Write_Len(uint8_t reg,uint8_t len,uint8_t *buf)
{
  extern I2C_HandleTypeDef hi2c1;
  HAL_I2C_Mem_Write(&hi2c1, MPU_WRITE, reg, I2C_MEMADD_SIZE_8BIT, buf, len, 0xfff);
  HAL_Delay(1);

  return 0;
}

uint8_t MPU_Read_Len(uint8_t reg,uint8_t len,uint8_t *buf)
{
  extern I2C_HandleTypeDef hi2c1;
  HAL_I2C_Mem_Read(&hi2c1, MPU_READ, reg, I2C_MEMADD_SIZE_8BIT, buf, len, 0xfff);
  HAL_Delay(1);

  return 0;
}

uint8_t MPU_Write_Byte(uint8_t reg,uint8_t data)
{
  extern I2C_HandleTypeDef hi2c1;
  unsigned char W_Data=0;

  W_Data = data;
  HAL_I2C_Mem_Write(&hi2c1, MPU_WRITE, reg, I2C_MEMADD_SIZE_8BIT, &W_Data, 1, 0xfff);
  HAL_Delay(1);

  return 0;
}

uint8_t MPU_Read_Byte(uint8_t reg)
{
  extern I2C_HandleTypeDef hi2c1;
  unsigned char R_Data=0;

  HAL_I2C_Mem_Read(&hi2c1, MPU_READ, reg, I2C_MEMADD_SIZE_8BIT, &R_Data, 1, 0xfff);
  HAL_Delay(1);

  return R_Data;
}
并将函数在mpu6050.h文件中声明

然后编译会提示错误;

这是因为我们用的是L1芯片、HAL库,将#include "stm32f10x.h"改为#include “stm32l1xx-hal.h”;

再次编译错误提示:

定位错误,错误原因是因为我们改写的语句调用的函数,函数参数内多一个参数,将第一个参数删除;
这一类问题都可这么解决;


编译提示错误:

定位u8错误,在文件开头添加宏定义#define u8 uint8_t,同时删除头(失能)文件“delay.h”;


再次编译提示错误:

这种错误其实是,用户自己写的IIC读写函数(3个形参),与DMP的内部解码函数的形参(4个形参)不匹配,最好的修改方法就是,用户再增加两个IIC读写函数,放到mpu6050.c里面;区别于之前的MPU_Write_Len,于是将函数名称改为DMP_Write_Len;并更改对应的.h库


在调用DMP_Write_Len与DMP_Read_Len的inv_mpu.c文件中修改宏定义;

编译错误提示

定位错误发现HAL_I2C_Mem_Read(&hi2c1, MPU_READ, reg, I2C_MEMADD_SIZE_8BIT, &R_Data, 1, 0xfff);函数参数MPU_READ,在该函数内此参数代表地址,因此在对应的mpu6050.h文件中需要添加宏定义;

如果MPU6050芯片ADD引脚接地则7位地址为0x68,如果MPU6050芯片ADD引脚接VCC则7位地址为0x69,但当为读写寻址寻址时,芯片的地址为前七位,最后一位为读写为,
譬如:0x68=01101000为芯片地址,若读写寻址时地址前七位为1101000若为写则第8位为0地址为11010000=0xd0;
若读写寻址时地址前七位为1101000若为写则第8位为1地址为11010001=0xd1;
编译错误提示;

定位错误与警告,原因是在mpu_dmp_init函数中调用了库函数MPU_IIC_Init,而不是HAL库函数,需要将MPU_IIC_Init改为HAL库函数;

将我们所调用的头文件都添加到main.c中;

到此dmp移植已经全部结束,用户可在inv-mpu.c文件中找到自己所需的DMP函数进行调用;
