LVGL 8.1_学习总结
LVGL介绍
一款开源GUI库,适合嵌入式开发,对资源要求小。适用单片机开发和其他嵌入式开发,最主要是的是UI界面美观深得我心
LVGL开发环境
PC:win10操作系统,在VS上进行仿真
硬件:阿波罗开发板F429
LVGL的GitHub的代码介绍
由于本人对GIT使用不是很熟练,所以都是直接从git上下载代码后自己移植,不能像大佬们一样直接使用git命令直接从github上把代码搞下来。
登录网址
https://github.com/lvgl/lv_sim_visual_studio
下载这个VS工程
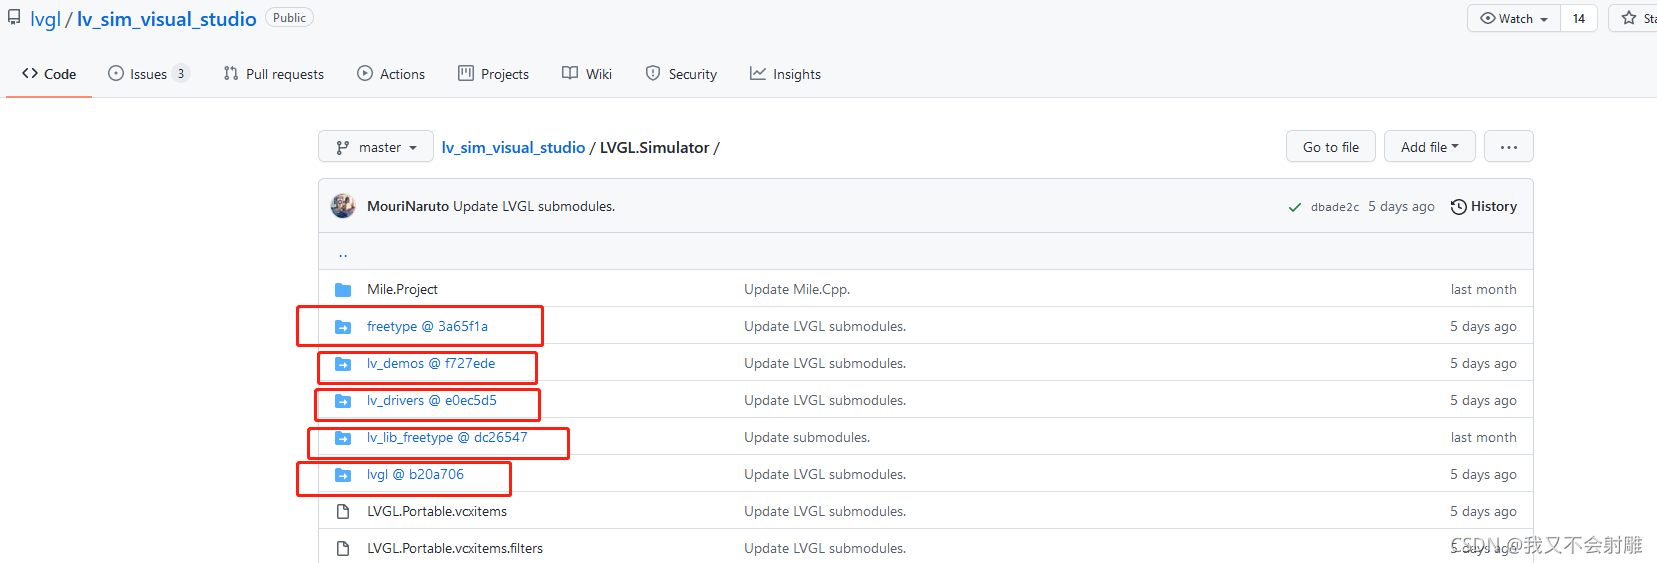
下载完成后发现lv_sim_visual_studio-master\LVGL.Simulator这个目录下的freetype,lv_demo,lv_drivers,lv_lib_freetype,lvgl。这几个源码文件里面没有任何内容。
其实这是一个空的LVGL8.1 VS空项目。后面我们只需要进入github上面这个工程里面把这几个最新的项目也下载下来复制进去就可以了。

 点击进去和刚刚下载VS空工程一样下载这几个缺失的源码。
下载完成后,将刚下载的freetype,lv_demo,lv_drivers,lv_lib_freetype,lvgl。这5个文件夹下的内容复制到工程中相对应的空文件夹下去。
之后就可以打开VS工程文件
 换位x64方案解决平台,这个根据个人电脑。
然后编译,直接成功相当丝滑。
 工程中LVGL.Simulator.cpp是mian函数所在位置,可以在源码中切换其他的demo例程。
LVGL8.1 在F429上面的移植
准备
实现屏幕显示函数,和触屏函数
我先前已经在LVGL上面实现了LTDC和触摸屏驱动
话不多说开始在单片机上面移植
然后复制刚刚PC上文件夹中的 lvgl 和 lvgl_demo两个文件下的全部内容到工程中
然后将下面几个文件改名去掉后缀。
 这个是配置文件。
还有Littel_VGL\GUI\lvgl\examples\porting下的
 这几个是接口文件,indev设备输入接口文件,disp显示接口文件
还有demo_conf文件也删除掉后缀
然后将lvgl_scr中的文件和demo中的文件添加到STM32的项目中
打开lv_conf.h 文件中的条件编译 0 改为1
打开lv_demo_conf.h的条件编译 0改为1
将lv_printf.h
//#if defined(__has_include) && __has_include(<inttypes.h>)//屏蔽
    #include<inttypes.h>
    /* platform-specific printf format for int32_t, usually "d" or "ld" */
    #define LV_PRId32 PRId32
//#else//屏蔽
    /* hope this is correct for ports without __has_include or without inttypes.h */
//    #define LV_PRId32 "d"//屏蔽
//#endif    //屏蔽
然后编译缺什么加什么 缺.h路径就加路径 缺函数就去相应的src源码文件夹下添加对应的.c文件
 类似这种
类似这种
 把一些没必要的警告屏蔽掉
编译没有错误后
打开lv_port_disp.h的条件编译 0改为1
打开lv_port_indev.h的条件编译 0改为1
打开lv_port_disp.c的条件编译 0改为1
打开lv_port_indev.c的条件编译 0改为1
最后需要实现几个接口
	lv_tick_inc(1);//lvgl 的 1ms 心跳  在定时器中调用
	lv_port_disp_init();						//lvgl显示接口初始化,放在lv_init()的后面
	lv_port_indev_init();						//lvgl输入接口初始化,放在lv_init()的后面
修改lv_port_disp.c文件中的
void lv_port_disp_init(void)
{
    /*-------------------------
     * Initialize your display
     * -----------------------*/
		static lv_disp_draw_buf_t disp_buf;
    disp_init();

    /*-----------------------------
     * Create a buffer for drawing
     *----------------------------*/

    /**
     * LVGL requires a buffer where it internally draws the widgets.
     * Later this buffer will passed to your display driver's `flush_cb` to copy its content to your display.
     * The buffer has to be greater than 1 display row
     *
     * There are 3 buffering configurations:
     * 1. Create ONE buffer:
     *      LVGL will draw the display's content here and writes it to your display
     *
     * 2. Create TWO buffer:
     *      LVGL will draw the display's content to a buffer and writes it your display.
     *      You should use DMA to write the buffer's content to the display.
     *      It will enable LVGL to draw the next part of the screen to the other buffer while
     *      the data is being sent form the first buffer. It makes rendering and flushing parallel.
     *
     * 3. Double buffering
     *      Set 2 screens sized buffers and set disp_drv.full_refresh = 1.
     *      This way LVGL will always provide the whole rendered screen in `flush_cb`
     *      and you only need to change the frame buffer's address.
     */

    /* Example for 1) */
//    static lv_disp_draw_buf_t draw_buf_dsc_1;
//    static lv_color_t buf_1[MY_DISP_HOR_RES * 10];                          /*A buffer for 10 rows*/
//    lv_disp_draw_buf_init(&draw_buf_dsc_1, buf_1, NULL, MY_DISP_HOR_RES * 10);   /*Initialize the display buffer*/

    /* Example for 2) */
//    static lv_disp_draw_buf_t draw_buf_dsc_2;
//    static lv_color_t buf_2_1[MY_DISP_HOR_RES * 10];                        /*A buffer for 10 rows*/
//    static lv_color_t buf_2_2[MY_DISP_HOR_RES * 10];                        /*An other buffer for 10 rows*/
//    lv_disp_draw_buf_init(&draw_buf_dsc_2, buf_2_1, buf_2_2, MY_DISP_HOR_RES * 10);   /*Initialize the display buffer*/
			lv_disp_draw_buf_init(&disp_buf, color_buf, color_buf2, COLOR_BUF_SIZE);   /*Initialize the display buffer*/  双缓冲 刷屏
    /* Example for 3) also set disp_drv.full_refresh = 1 below*/
//    static lv_disp_draw_buf_t draw_buf_dsc_3;
//    static lv_color_t buf_3_1[MY_DISP_HOR_RES * MY_DISP_VER_RES];            /*A screen sized buffer*/
//    static lv_color_t buf_3_2[MY_DISP_HOR_RES * MY_DISP_VER_RES];            /*An other screen sized buffer*/
//    lv_disp_draw_buf_init(&draw_buf_dsc_3, buf_3_1, buf_3_2, MY_DISP_VER_RES * LV_VER_RES_MAX);   /*Initialize the display buffer*/

    /*-----------------------------------
     * Register the display in LVGL
     *----------------------------------*/

    static lv_disp_drv_t disp_drv;                         /*Descriptor of a display driver*/
    lv_disp_drv_init(&disp_drv);                    /*Basic initialization*/

    /*Set up the functions to access to your display*/

    /*Set the resolution of the display*/
    disp_drv.hor_res = LCD_WIDTH;//自己显示屏的分辨率
    disp_drv.ver_res = LCD_HEIGHT;//自己显示屏的分辨率

    /*Used to copy the buffer's content to the display*/
    disp_drv.flush_cb = disp_flush;

    /*Set a display buffer*/
    disp_drv.draw_buf = &disp_buf;

    /*Required for Example 3)*/
    //disp_drv.full_refresh = 1

    /* Fill a memory array with a color if you have GPU.
     * Note that, in lv_conf.h you can enable GPUs that has built-in support in LVGL.
     * But if you have a different GPU you can use with this callback.*/
    //disp_drv.gpu_fill_cb = gpu_fill;

    /*Finally register the driver*/
    lv_disp_drv_register(&disp_drv);
}
实现disp_flush函数
static void disp_flush(lv_disp_drv_t * disp_drv, const lv_area_t * area, lv_color_t * color_p)
{
    /*The most simple case (but also the slowest) to put all pixels to the screen one-by-one*/


//    /*IMPORTANT!!!
//     *Inform the graphics library that you are ready with the flushing*/
			//用DMA2D实现刷屏的刷屏函数
			LTDC_Color_Fill(area->x1,area->y1,area->x2,area->y2,(uint16_t*)color_p);
    /* IMPORTANT!!!
     * Inform the graphics library that you are ready with the flushing*/
    lv_disp_flush_ready(disp_drv);

}
修改lv_port_indev.c函数
因为我们用的是touchpad 触摸屏 所以这个文件中源码的 鼠标mouse和键盘keypad 以及其他encoder都要删掉
void lv_port_indev_init(void)
{
    /**
     * Here you will find example implementation of input devices supported by LittelvGL:
     *  - Touchpad
     *  - Mouse (with cursor support)
     *  - Keypad (supports GUI usage only with key)
     *  - Encoder (supports GUI usage only with: left, right, push)
     *  - Button (external buttons to press points on the screen)
     *
     *  The `..._read()` function are only examples.
     *  You should shape them according to your hardware
     */

    static lv_indev_drv_t indev_drv;

    /*------------------
     * Touchpad
     * -----------------*/

    /*Initialize your touchpad if you have*/
    touchpad_init();

    /*Register a touchpad input device*/
    lv_indev_drv_init(&indev_drv);
    indev_drv.type = LV_INDEV_TYPE_POINTER;
    indev_drv.read_cb = touchpad_read;
    indev_touchpad = lv_indev_drv_register(&indev_drv);

}
实现touchpad_read函数
static void touchpad_read(lv_indev_drv_t * indev_drv, lv_indev_data_t * data)
{
		static uint16_t last_x = 0;
		static uint16_t last_y = 0;

		if(Dev_Now.Touch&TP_PRES_DOWN)//触摸按下了  这是我在触摸屏处理函数触摸按下的标记位。
		{
			last_x = Dev_Now.X[0];
			last_y = Dev_Now.Y[0];//赋值坐标
			data->point.x = last_x;
			data->point.y = last_y;
			data->state = LV_INDEV_STATE_PR;//按下状态
		}else{
			data->point.x = last_x;
			data->point.y = last_y;
			data->state = LV_INDEV_STATE_REL;//松开状态
		}
    /*Return `false` because we are not buffering and no more data to read*/
   // return false;
}
在项目中调用所有需要用到lvgl库函数实现demo例程
修改lv_conf.h中的配置宏定义
/*Color depth: 1 (1 byte per pixel), 8 (RGB332), 16 (RGB565), 32 (ARGB8888)*/
#define LV_COLOR_DEPTH     16

/*Size of the memory available for `lv_mem_alloc()` in bytes (>= 2kB)*/
#  define LV_MEM_SIZE    (64U * 1024U)          /*[bytes]*/增加lvgl所需的RAM 因为widgets例程需要控件比较大

/*1: Show CPU usage and FPS count in the right bottom corner*/
#define LV_USE_PERF_MONITOR     1

/*1: Show the used memory and the memory fragmentation in the left bottom corner
 * Requires LV_MEM_CUSTOM = 0*/
#define LV_USE_MEM_MONITOR      1
在lv_demo_conf.h打开widgets例程宏定义
/*Show some widget*/
#define LV_USE_DEMO_WIDGETS        1
#if LV_USE_DEMO_WIDGETS
#define LV_DEMO_WIDGETS_SLIDESHOW  1
#endif
在主循环之前调用
	lv_init();											//lvgl系统初始化
	lv_port_disp_init();						//lvgl显示接口初始化,放在lv_init()的后面
	lv_port_indev_init();						//lvgl输入接口初始化,放在lv_init()的后面
	lv_demo_widgets();						//demo例程
在定时器中调用
lv_tick_inc(1);//lvgl 的 1ms 心跳
在主循环中调用
			GT911_Scan(0);//触摸扫描函数  你也就可以放在touchpad_read中调用
			lv_task_handler();//LittleVGL必须要调用的任务处理函数
然后再次编译,有错误到错误处看看那里的字体未定义 就打开宏定义
然后看还有什么警告和错误 lv_printf();这样的串口输出函数对总体不影响就可以直接屏蔽
之后基本没有什么错误了。
然后再次编译编译成功后下载到阿波罗开发板中
 移植成功 然后就可以 开始开心的进行LVGL的自定义UI界面设计了
其中各个控件的使用方法可以参考
百问网的文档和LVGL官方源文档。还有正点原子阿波罗开发板。以及正点原子讲师熊老师的视频
[1]: http://lvgl.100ask.org/8.1/intro/index.html
[2]: https://docs.lvgl.io/8.1/