此文章为滤波算法、ssd1307库、u8g2库
NOTE
此文章为自己本人学习所作笔记,总结学习成果以及作为保留笔记以后用到时可以回来参考的,仅供参考,不到之处敬请谅解。
超声波HCSR-04
滤波算法
在使用HCSR-04模块的过程中可以发现其测量距离有一定的误差,当HC-SR04和被测量物体同时禁止时,还是会有误差。这是模块的测量特性所决定的,为了减小误差,可以采用滤波算法。
滤波算法链接(此链接为滤波算法)
PS:代码里面的"SR04.h"是我自己编的库(网上应该有开源的可以下载)
#include "SR04.h"
SR04 mysr_1 = SR04(2,3);
float distance1;
void setup() {
  Serial.begin(9600);       // 初始化串口通信

}

void loop() {
  distance1 = Filter_1();       // 获得滤波器输出值
  Serial.print("The distance is: ")
  Serial.print(distance1-0.3);// 串口输出
  Serial.println(" cm");

  delay(100);
}


// 算术平均滤波法
#define FILTER_N 12
float Filter_1() {
  int i;
  float filter_sum = 0;
  for(i = 0; i < FILTER_N; i++) {
    filter_sum += mysr_1.Get();
    delay(5);
  }
  return filter_sum / FILTER_N;
}
采用此算法后可以大大减小误差
另外一种算法
链接:link
OLED_SSD1306库学习
学习链接 :这个博主讲的很详细,但是这个库只支持SSD1306这一个型号的OLED,幸运的是,在GitHub上有一个很强大的库u8g2,这个库几乎可以涵盖了所有的OLED并且可以应用于多种单片机。
u8g2库
首先贴出三个可参考的链接,这都是GitHub上的链接,讲得可以说是非常详细,如果感兴趣可以去阅读一下,会有不小的收获的。
GitHub设置教程说明文档
GitHub参考手册链接
u8g2-Arduino设置参考链接
begin
c++/Arduino Ptototype:
bool U8G2 :: begin(void)
bool U8G2 :: begin(uint8_t  menu_select_pin, uint8_t  menu_next_pin, uint8_t menu_prev_pin, uint8_t menu_up_pin = U8X8_PIN_NONE, uint8_t  menu_down_pin = U8X8_PIN_NONE, uint8_t menu_home_pin);
描述:简化的 Arduino 环境显示设置程序。请参阅设置指南以选择合适的 U8g2 构造函数。此功能将重置、配置、清除和禁用显示器的省电模式。U8g2 还可以检测按键事件。最多可以观察六个按钮。可以在此处分配 Arduino 引脚编号。U8X8_PIN_NONE 如果没有连接到引脚的开关,请使用。开关必须将 GPIO 引脚与 GND(低活动按钮)连接。使用getMenuEvent检查任何按键事件。用户界面程序(例如userInterfaceMessage)也需要 Select、next 和 prev 引脚 。begin将会通知
1.initDisplay
2.clearDisplay
3.setPowerSave
参数: -
解释:
menu_select_pin: 注册选择按键引脚,当这个引脚通低电平时,U8g2可以检测到该按键事件
menu_next_pin :注册一个前进按键引脚(类似于遥控器的左键),当这个引脚通低电平时,U8g2可以检测到该事件
menu_prev_pin :注册一个后退按键引脚(类似于右键),当这个引脚通低电平时,U8g2可以检测到该事件
menu_up_pin , 和menu_down_pin 两个参数与前面两个注册引脚功能相似。
menu_home_pin :注册一个home按键引脚,(实现home或取消功能),当这个引脚通低电平时,U8g2可以检测到该事件
返回值:总是1
至于具体怎么用,如果只是简单初始化,可以u8g2.begin()实现就好,当用到用户选择界面userInterfaceSelectionList 函数时就要设置按键事件参数,如果不需要注册某个按键时,将值设置为U8X8_NONE 即可
draStr
C++/Arduino Prototype
u8g2_uint_t U8g2::drawStr(u8g2_uint_t x, u8g2_uint_t y, const char *s);
Desctiption:Draw a string. The first character is placed at position x and y. Use setFont to assign a font before drawing a string on the display. To draw a character with encoding 127 to 255, use the C/C++/Arduino escape sequence “\xab” (hex value ab) or “\xyz” (octal value xyz). This function can not draw any glyph with encoding greater or equal to 256. Use drawUTF8 or drawGlyph to access glyphs with encoding greater or equal to 256.
Arguments:
u8g2:A pointer to the u8g2 structure.
x, y :Position of the first character on the display
s: Text(The string you want print)
Returns:Width of the string.
Note 1This drawing fuction depends in the current font mode(字体) and drawing color.
Note 2Use the print fuction to print the value of a numeric variable(使用 print 函数打印数值变量的值)
解释:drawStr 是不能绘制变量的只能发送常量,例如:drawStr(“Hello, world!”),如果你想绘制一个变量就需要用到 print ,例如:
String str = "Hello, world!";
u8g2.print(str);
draUTF8
C++/Arduino Prototype:
u8g2_uint_t u8g2_DrawUTF8(u8g2_t *u8g2, u8g2_uint_t x, u8g2_uint_t y, const char *s);
Description: Draw a string which is encoded as UTF-8. There are two preconditions for the use of this function: (A) the C/C++/Arduino compiler must support UTF-8 encoding (this is default for the gnu compiler, which is also used for most Arduino boards) and (B) the code editor/IDE must support and store the C/C++/Arduino code as UTF-8 (true for the Arduino IDE). If these conditions are met, you can use the character with code value greater than 127 directly in the string (of course the character must exist in the font file, see also setFont). Advantage: No escape codes are required and the source code is more readable. The glyph can be copied and paste into the editor from a “char set” tool. Disadvantage: The code is less portable and the strlen function will not return the number of visible characters. Use getUTF8Len instead of strlen.
Arguments:
u8g2: A pointer to the u8g2 structure.
x, y: Position of the first character on the display.
s: UTF-8 encoded text.(UTF8 类型文本)
Returns: Width of the string.
Note 1 : This drawing function depends on the current font mode and drawing color.
Note 2 : Use the print function to print the value of a numeric variable.
我的理解是如果你是用 drawStr 函数的话是用来输出英文字符的,要是输出127~255的字符得用到转义符,而用到UTF8Print 时可以输出UTF8型字符(例如中文)。
enableUTF8Print
C++/Arduino Prototype:
void U8G2::enableUTF8Print(void)
Description: Activates UTF8 support for the Arduino print function. When activated, unicode symbols are allowed for strings passed to the print function. Usually this function is called after begin():
void setup(void) {
  u8g2.begin();
  u8g2.enableUTF8Print();		// enable UTF8 support for the Arduino print()
}
Arguments: -
Returns: -
Example:
void setup(void) {
  u8g2.begin();
  u8g2.enableUTF8Print();		// enable UTF8 support for the Arduino print() function
}
void loop(void) {
  u8g2.setFont(u8g2_font_unifont_t_chinese2);  // use chinese2 for all the glyphs of "你好世界"
  u8g2.firstPage();
  do {
    u8g2.setCursor(0, 40);
    u8g2.print("你好世界");		// Chinese "Hello World"
  } while ( u8g2.nextPage() );
  delay(1000);
}
c++/Arduino Prototype:
void U8G2::print(. . .)
Description: This is the Arduino print() function. See the description on the Arduino Web Page here and here. This procedure will write the text to the current cursor position with the current font, set by setFont. The cursor position can be set by setCursor. Support for UTF-8 can be enabled with enableUTF8Print. This function can print variable values and supports the F() macro.
Arguments: See link.
Returns: -
Note 1: This function depends on the current font mode and drawing color.
Note 2: Use print(u8x8_u8toa(value, digits)) or print(u8x8_u16toa(value, digits)) to print numbers with constant width (numbers are prefixed with 0 if required).
print函数类似于Arduino函数print,
sendBuffer
c++/Arduino Prototype
void u8g2_SendbBuffer(u8g2_t *u8g2);
Description: Send the content of the memory frame buffer to the display. Use clearBuffer to clear the buffer and the draw functions to draw something into the frame buffer. This procedure is useful only with a full frame buffer in the RAM of the microcontroller (Constructor with buffer option “f”, see here). This procedure will also send a refresh message (refreshDisplay) to an e-Paper/e-Ink device.
Arguments:
u8g2: A pointer to the u8g2 structure.
Returns: -
Note: Actually this procedure will send the current page to the display. This means, the content of the internal pixel buffer will be placed in the tile row given by the current page position. This means, that this procedure could be used for partial updates on paged devices (constructor with buffer option “1” or “2”). However, this will only work for LCDs. It will not work with most e-Paper/e-Ink devices because of the buffer switch in the display controller. Conclusion: Use this command only together with full buffer constructors. It will then work with all LCDs and e-Paper/e-Ink devices.
sendBuffer一般与clearBuffer一起使用,它有点类似于SSD1306库里面的display 的用法,使用drawStr只是将数据发送到缓冲区,只有在使用了sendBuffer之后才会将缓冲区的数据显示到屏幕上
setContrast(对比度)
c++/Arduino Prototype
void U8G2::setContrast(uint8_t value)
Description: Set the contrast or brightness for the display (if supported). Range for ‘value’: 0 (no contrast) to 255 (maximum contrast or brightness).
Arguments:
u8g2: A pointer to the u8g2 structure.
value: Contrast or brightness from 0 to 255.
setCursuo
c++/Arduino Prototype:
void U8G2 :: setCursor(u8g2_uint_t x, u8g2_uint_t y)
**Description: **Define the cursor for the print function. Any output of the print function will start at this position.
Arguments:
x, y: Pixel position for the cursor of the print function.
setDrawColor
C++/Arduino Prototype:
void U8G2::setDrawColor(uint8_t color)
Description: Defines the bit value (color index) for all drawing functions. All drawing function will change the display memory to this bit value. Default value is 1. For example the drawBox procedure will set all pixels for the defined area to the bit value, provided here. In v2.11 the new color value 2 will activate the XOR mode. Exceptions:
clear, clearBuffer: Both functions will always set the buffer to the pixel value 0. The color argument of setDrawColor is ignored.
drawGlyph: All font drawing procedures will use this color argument as foreground color. In none-transparent (solid) mode (setFontMode) the complement of the color value will be the background color and is set to 0 for color value 2 (However, suggestion is not to use solid and XOR mode together):
| Font Mode | Draw Color | Glyph Foreground Color | Glyph Background Color |
|---|---|---|---|
| 0: solid | 0 | 0 | 1 |
| 0: solid | 1 | 1 | 0 |
| 0: solid | 2 | XOR | 0 |
| 1: transparent | 0 | 0 | - |
| 1: transparent | 1 | 1 | - |
| 1: transparent | 2 | XOR | - |
Arguments:
u8g2: A pointer to the u8g2 structure.
color: 0 (clear pixel value in the display RAM), 1 (set pixel value) or 2 (XOR mode)
Returns: -
Note: Not all graphics procedures will support XOR mode. Especially XOR mode is not supported by drawCircle, drawDisc, drawEllipse and drawFilledEllipse.
See also: drawBox drawGlyph setFontMode
setFont
字体链接link
c++/Arduino Prototype
void U8G2 :: setFont(const uint8_t *font)
描述:为字形和字符串绘制函数定义一个 u8g2 字体。注意:不能使用 u8x8 字体。此处列出了可用字体。字体名称的最后两个字符定义字体的类型和字符集:
| 字体名称 | 字体类型 |
|---|---|
| u8g2_xxx_tx | 具有可变宽度的透明字体 |
| u8g2_xxx_mx | 等宽/固定宽度字形 |
| u8g2_xxx_hx | 具有可变宽度和通用高度的字形 |
| u8g2_xxx_8x | 8X8框中的等宽/固定宽度字形 |
| 字体名称 | 字符集 |
|---|---|
| u8g2_xxx_xe | 扩展:字体中包含 unicode 32 到 701 的字形 |
| u8g2_xxx_xf | 完整:字体中包含 unicode 32 到255 的字形 |
| u8g2_xxx_xr | 限制:仅包含32 到127 之间的字符 |
| u8g2_xxx_xu | 大写:数字和大写字母 |
| u8g2_xxx_xn | 包含数字和一些用于日期和时间打印的额外字形 |
| u8g2_xxx_x_something | 特殊的字形。详见字体图片 |
setFontDirection
c++/Arduino Ptototype
void U8G2 :: setFontDirection(uin8_t dir)
| Arguement | String Rotation | Description |
|---|---|---|
| 0 | 0degree | Left to right |
| 1 | 90 degree | Top to down |
| 2 | 180 degree | right to left |
| 3 | 270 degree | down to top |
userInterfaceInputValue
c++/Arduino Prototype:
uint8_t U8G2::userInterfaceInputValue(const char *title, const char *pre, uint8_t *value, uint8_t lo, uint8_t hi, uint8_t digits, const char *post)
**Description: ** Requests the input of a 8-bit value. All display output and key processing is done inside this function.
Arguments:
u8g2 : A pointer to the u8g2 structure.
title: Multiline description for the value (Lines have to be separated with \n).
pre: Text before the value.
value: A pointer to a variable which will be filled with the input from the user.
**lo: ** Lowest value, which can be selected by the user.
hi: Highest value, which can be selected by the user.
digits: Number of digits (1 to 3).
post: Text after the value.
Returns: 1, if the user has pressed the select button. 0 if the user has pressed the home/cancel button. The selected value will be stored in value only if the user has pressed the select key.
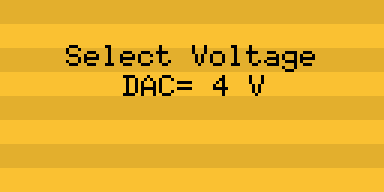
Example:
u8g2.userInterfaceInputValue("Select Voltage", "DAC= ", &v, 0, 5, 1, " V");

userInterfaceMessage
c++/Arduino Prototype:
uint8_t U8G2::userInterfaceMessage(const char *title1, const char *title2, const char *title3, const char *buttons)
**Description: ** Displays a message text and wait for user input. The user can press one button or select between two or more buttons.
Arguments:
u8g2: A pointer to the u8g2 structure.
title1: First multiline description (Lines have to be separated with \n).
title2: Second singleline description (One line is drawn until first \n or \0).
title3: Third multiline description (Lines have to be separated with \n).
**button: ** One or more buttons, separated with \n.
Returns: 1 to n for if one of the buttons had been selected. 0 if the user has pressed the home/cancel button.
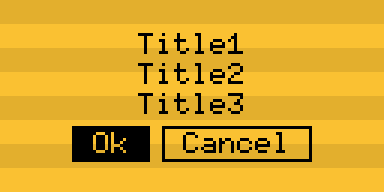
Example:
u8g2.setFont(u8g2_font_6x10_tf);
u8g2.setFontRefHeightAll();  	/* this will add some extra space for the text inside the buttons */
u8g2.userInterfaceMessage("Title1", "Title2", "Title3", " Ok \n Cancel ");

userInterfaceSelectionList
c++/Arduino Prototype:
uint8_t U8G2::userInterfaceSelectionList(const char *title, uint8_t start_pos, const char *sl)
Description: Display a list of scrollable and selectable options. The user can select one of the options.
Arguments:
***u8g2: *** A pointer to the u8g2 structure.
start_pos: The element, which is highlighted first (starts with 1).
sl: List of options, one per line (Lines have to be separated with \n).
***Returns: *** 1 to n for if one of the buttons had been selected. 0 if the user has pressed the home/cancel button.
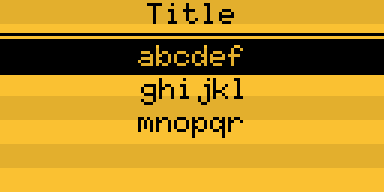
Example
u8g2.userInterfaceSelectionList("Title", 2, "abcdef\nghijkl\nmnopqr");

Example of the three fuctions:
#include <Arduino.h>
#include <U8g2lib.h>

#ifdef U8X8_HAVE_HW_SPI
#include <SPI.h>
#endif
#ifdef U8X8_HAVE_HW_I2C
#include <Wire.h>
#endif
U8G2_SH1106_128X64_NONAME_F_4W_HW_SPI u8g2(U8G2_R0, /* cs=*/ 10, /* dc=*/ 9, /* reset=*/ 8);

void setup(){
u8g2.begin(/*Select=*/ 7, /*Right/Next=*/ A1, /*Left/Prev=*/ A2, /*Up=*/ A0, /*Down=*/ A3, /*Home/Cancel=*/ 8); // Arduboy 10 (Production)

  u8g2.setFont(u8g2_font_6x12_tr);
}

const char *string_list =
  "Altocumulus\n"
  "Altostratus\n"
  "Cirrocumulus\n"
  "Cirrostratus\n"
  "Cirrus\n"
  "Cumulonimbus\n"
  "Cumulus\n"
  "Nimbostratus\n"
  "Stratocumulus\n"
  "Stratus";

uint8_t current_selection = 0;


void loop(void) {

  current_selection = u8g2.userInterfaceSelectionList(
    "Cloud Types",
    current_selection,
    string_list);

  if ( current_selection == 0 ) {
    u8g2.userInterfaceMessage(
	"Nothing selected.",
	"",
	"",
	" ok ");
  } else {
    u8g2.userInterfaceMessage(
	"Selection:",
	u8x8_GetStringLineStart(current_selection-1, string_list ),
	"",
	" ok \n cancel ");
  }